

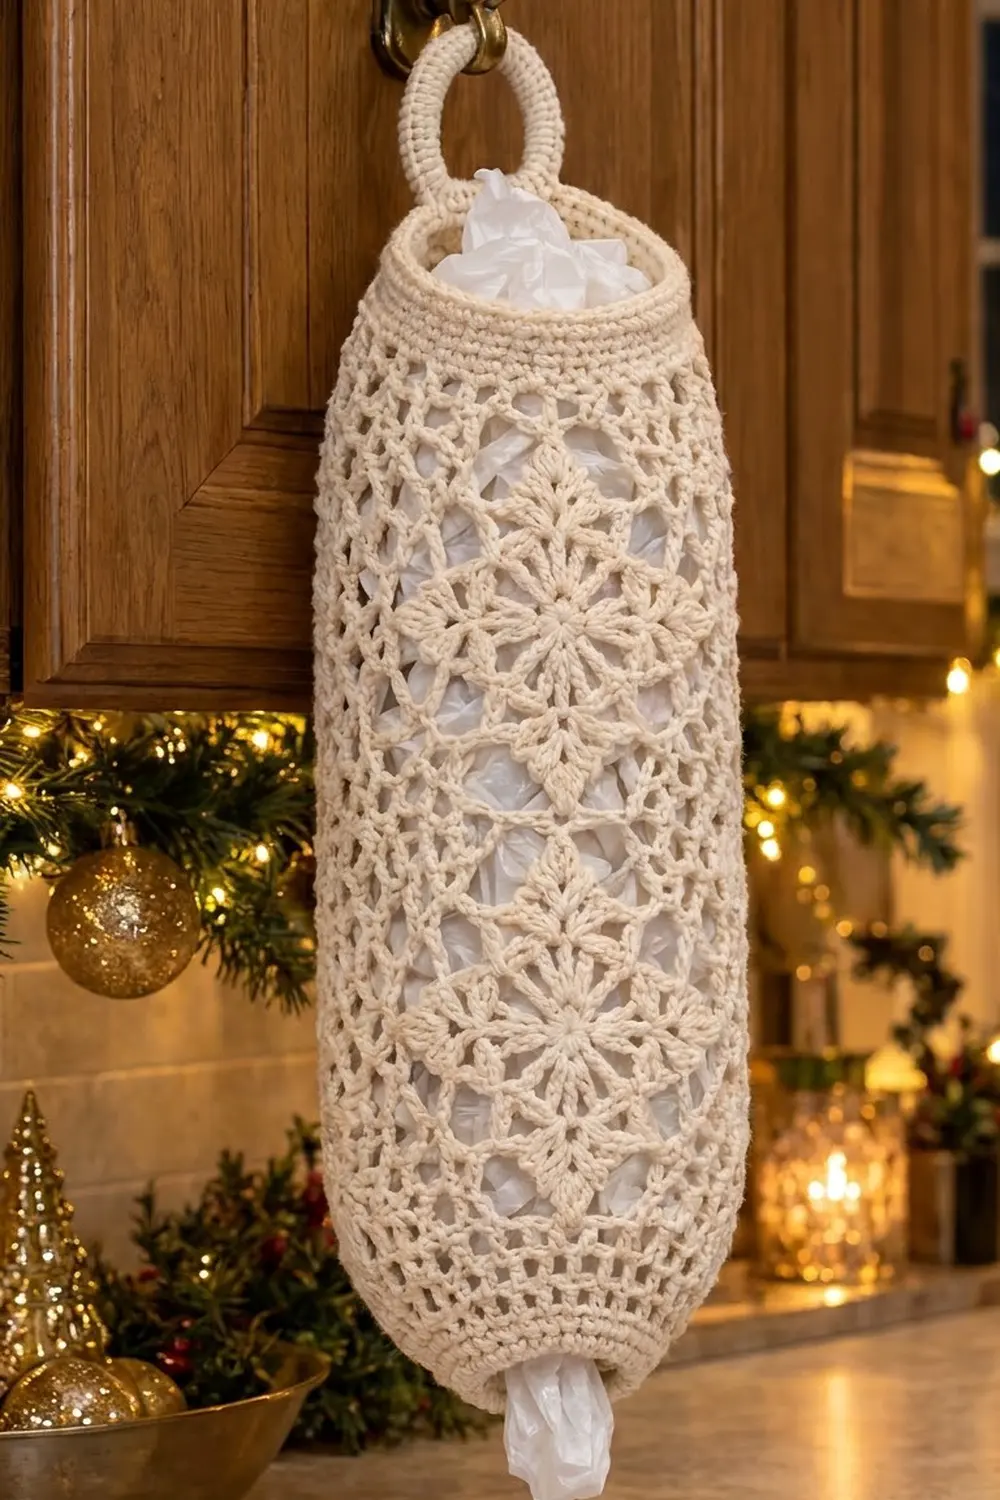
This bag holder turns a messy pile of grocery bags into something pretty enough to hang where people can see it. The body is a tube of lacy snowflake motifs. Each one has a star of petal clusters in the middle and an open mesh frame, so the white bags inside show through the lattice.
It’s worked in one soft cream cotton, which gives it a cozy, wintry look that suits a holiday kitchen and works all year. A slightly gathered solid band finishes the top and keeps bags from spilling out. The tapered bottom ends in a small, firm opening so you can pull out one bag at a time. A crocheted ring at the back slips over a cabinet hook or door knob.
All instructions use US crochet terms. The finished holder is 7.5 in (19.1 cm) wide when flat, with a 15 in (38.1 cm) body circumference. It is 20 in (50.8 cm) long from top band to bottom opening, or about 22 in (55.9 cm) including the hanging ring.
Construction is simple. You make 16 square snowflake motifs and join them into a 4 × 4 panel, then roll the panel into a tube and close it. Next you work the top band and the tapered bottom in rounds straight off the tube edges. Last, you cover a ring and stitch it to the back.
Finished Size and Construction
- Finished size: 7.5 in (19.1 cm) wide flat × 20 in (50.8 cm) long, plus a 2 in (5.1 cm) ring
- Body circumference: 15 in (38.1 cm)
- Skill level: Intermediate
- Terminology: US crochet terms
- Yarn weight: DK / light worsted (#3) cotton
- Hook: 4.0 mm (G-6)
- Number of pieces: 16 motifs, plus 1 covered ring
- Layout: 4 motifs around × 4 motifs tall, joined into a tube
- Motif size: 3.75 in (9.5 cm) square
- Size before borders: 15 in (38.1 cm) around × 15 in (38.1 cm) tall
- Border depth: top band 1.75 in (4.4 cm); tapered bottom 3.25 in (8.3 cm)
Materials
Use a smooth, mercerized or combed cotton. Cotton holds the motif shapes crisply, doesn’t stretch much under the weight of the bags, and washes well. Avoid fuzzy blends, because they blur the lace.
- Cream / ivory DK cotton: 150 g, about 330 m (360 yd)
That works out to about 6 g per motif (96 g in total), 20 g for the top and bottom, 5 g for the ring and tab, and 5 g for joining. These quantities include a margin of roughly 20%.
Tools:
- 4.0 mm (G-6) crochet hook
- One 2 in (5.1 cm) plastic or metal ring
- Stitch markers
- Tapestry needle
- Scissors
- Blocking mats and rustproof pins
- Spray bottle
- Tape measure
Abbreviations (US Terms)
- ch: chain
- sl st: slip stitch
- sc: single crochet
- hdc: half double crochet
- dc: double crochet
- sk: skip
- sp: space
- st(s): stitch(es)
- sc2tog: single crochet 2 together
- BLO: back loop only
- RS / WS: right side / wrong side
Special stitches:
- 3-dc cluster (cl): Yarn over, insert the hook in the stitch, pull up a loop, yarn over and pull through 2 loops. Repeat from * 2 more times in the same stitch, then yarn over and pull through all 4 loops on the hook.
- Beginning cluster (beg cl): Ch 2, then work a 2-dc cluster in the same stitch. Together these count as one 3-dc cluster.
Gauge and Checkpoints
Base gauge: 16 sc and 16 rows = 4 in (10.2 cm).
Make one motif first and block it lightly before you go any further. The motif is your real gauge swatch.
Checkpoints for one motif:
- After Round 1: about 1.25 in (3.2 cm) across
- After Round 3: about 2.75 in (7.0 cm) across
- After Round 5: 3.75 in (9.5 cm) square, with 15 sts along each side
If your motif is too big (4 in / 10.2 cm or more), go down to a 3.75 mm hook. If it’s too small (3.5 in / 8.9 cm or less), go up to a 4.5 mm hook.
Even a small error adds up. Being 0.25 in off per motif changes the circumference by a full inch, because four motifs go around the tube.
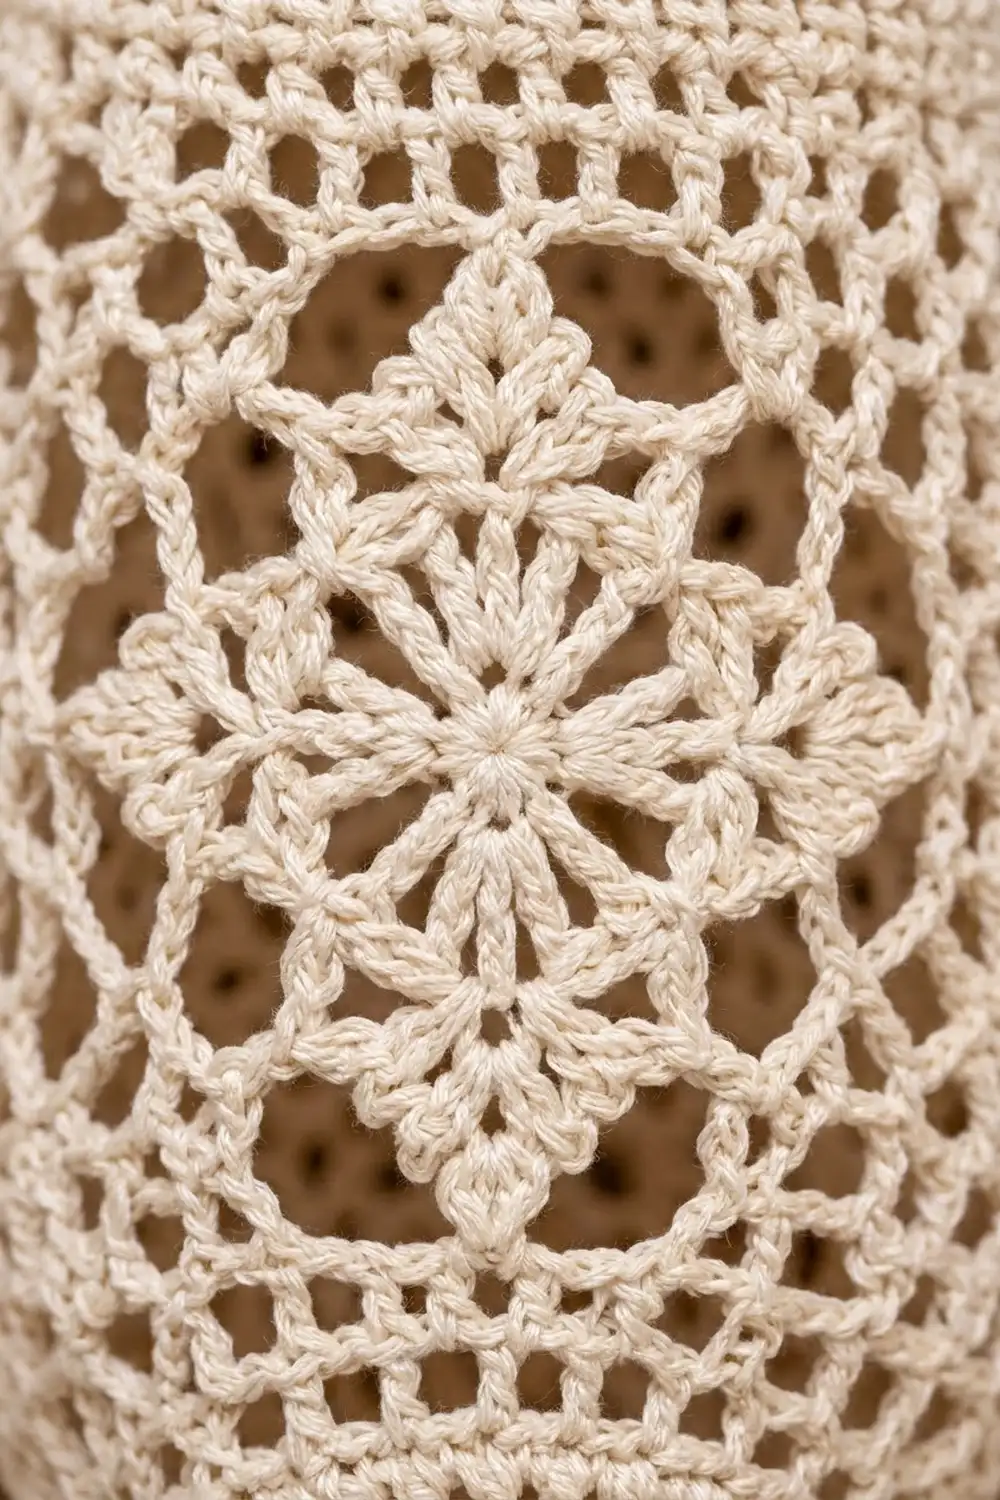
Snowflake Motif (Make 16)
Round 1: Make a magic ring. Ch 3 (counts as dc), work 15 dc in the ring, then join with a sl st to the top of the ch-3. Pull the ring closed. (16 dc)
Round 2: Work a beg cl in the same st as the join. Ch 3, sk next dc, cl in next dc, ch 3, sk next dc. Repeat from * 6 more times, then join to the top of the beg cl. (8 clusters, 8 ch-3 sps)
These 8 clusters are the petals of the star center.
Round 3: Ch 1. Sc in the top of the same cluster, ch 5, sc in the top of the next cluster, ch 5. Repeat from * 6 more times, then join to the first sc. (8 sc, 8 ch-5 loops)
The loops arch between the petal tips, which gives the snowflake its star outline.
Round 4 (squaring round):
- Sl st into each of the next 2 ch so you are at the center of the first loop.
- Ch 3 (counts as dc). In the same loop, work 2 dc, ch 3, and 3 dc. This is the first corner.
- Ch 2, sc in the next loop, ch 2.
- In the next loop work 3 dc, ch 3, 3 dc (corner). Ch 2, sc in the next loop, ch 2. Repeat from * 2 more times.
- Join to the top of the beginning ch-3.
Count: 24 dc, 4 sc, 4 corner ch-3 sps, and 8 ch-2 sps.
The ch-2 sps on either side of each side sc form the open mesh windows of the frame.
Round 5 (edge round):
- Ch 1. Sc in the same st as the join and in the next 2 dc.
- Work 3 sc in the corner ch-3 sp.
- Along the side: sc in the next 3 dc, 2 sc in the ch-2 sp, sc in the sc, 2 sc in the ch-2 sp.
- Sc in the next 3 dc, 3 sc in the corner sp, then repeat the side sequence from step 3. Repeat from * 2 more times.
- Join to the first sc and fasten off, leaving a 6 in (15.2 cm) tail.
Count: 56 sc. This comes from 24 (1 per dc) + 12 (3 per corner) + 16 (2 per ch-2 sp) + 4 (1 per sc) = 56.
Per side: The center sc of each 3-sc corner group is the corner stitch. Each side has 15 sts. That is 1 corner st, 13 sts between corners, and 1 corner st. The 13 sts between corners are 1 + 3 + 2 + 1 + 2 + 3 + 1, which matches the order you worked them in.
To check the total: 4 sides × 15 = 60, minus the 4 corners that are each shared by two sides, gives 56.
Weave in the center tail. Keep the edge tail for joining if you like.
Make All Pieces
- Cream: 16 snowflake motifs
- Cream: 1 covered ring with tab (see Hanging Ring below)
Block all 16 motifs to 3.75 in (9.5 cm) square before joining. Matching sizes make the seams much easier.
Layout grid (flat panel, columns A–D, rows 1–4 from top to bottom):
     A    B    C    D
1  [M]  [M]  [M]  [M]   <- top edge
2  [M]  [M]  [M]  [M]
3  [M]  [M]  [M]  [M]
4  [M]  [M]  [M]  [M]   <- bottom edge
After you roll the panel into a tube, column A’s left edge is seamed to column D’s right edge. That closing seam becomes the center back.
Joining
Method: Slip stitch join through the back loops only. Hold two motifs WS together and work from the RS. The front loops stay as a ridge on the outside, which reads as part of the lattice.
Stitch-to-stitch logic: Each motif side has 15 sts, corners included. Line up corner with corner and work 1 sl st through the matching back loops of each pair of sts. That is 15 sl sts per seam. Don’t add chains or extra sts at the corners.
Order:
- Join the motifs into 4 vertical strips (columns A–D), working 3 seams per strip.
- Join the strips side by side. Work each long seam continuously, 4 × 15 = 60 sl sts. Where four corners meet, simply step across from one corner pair to the next.
- Roll the 4 × 4 panel into a tube, RS facing out. Join column A’s free edge to column D’s free edge with another 60 sl sts.
Tension advice: Keep your slip stitches as loose as the motif stitches. If needed, go up to a 4.5 mm hook for joining only. Tight seams pucker the tube and make it lean.
Size checkpoint: The tube should measure 15 in (38.1 cm) around and 15 in (38.1 cm) tall. Each seam should lie flat without rippling.
Border: Top Band and Tapered Bottom
Border gauge: 4 sc = 1 in (2.5 cm). Rounds measure about 4 sc rounds = 1 in (2.5 cm), 3 hdc rounds = 1 in (2.5 cm), and 1 dc mesh round = 0.5 in (1.3 cm).
Starting count: Each open edge of the tube has 4 motifs × 15 sts = 60 sts. At each seam, the two corner sts from neighboring motifs sit side by side. Work 1 sc into each of them. Don’t add any stitches at the seams. Those corner sts are already part of the 15 per motif.
Top Band
Join the yarn at the center back seam on the top edge.
Rnd 1: Ch 1, sc in each st around, join. (60 sc)
Rnd 2 (decrease round): Ch 1, sc in next 3 sts, sc2tog. Repeat from * 11 more times and join. (48 sts = 36 sc + 12 sc2tog)
Rnds 3–5: Ch 2 (does not count as a st), hdc in each st around, join. (48 hdc in each round)
Rnd 6: Ch 1, sc in each st around, join and fasten off. (48 sc)
Why the math works: 60 sts at 4 sts per inch is 15 in, which matches the tube exactly. Dropping to 48 sts gives 12 in (30.5 cm) and gathers the top just enough to hold bags in. The band’s 3 sc rounds and 3 hdc rounds add up to about 1.75 in (4.4 cm).
Tapered Bottom
Join the yarn at the center back seam on the bottom edge.
Rnd 1: Ch 1, sc in each st around, join. (60 sc)
Rnd 2: Ch 1, sc 3, sc2tog. Repeat from * 11 more times and join. (48 sts = 36 sc + 12 sc2tog)
Rnd 3 (mesh): Ch 4 (counts as dc + ch 1), sk next st, dc in next st, ch 1, sk next st. Repeat from * around and join to the 3rd ch of the ch-4. (24 dc + 24 ch-1 sps = 48 sts)
Rnd 4: Ch 1, sc in each dc and in each ch-1 sp around, join. (48 sc)
Rnd 5: Ch 1, sc 2, sc2tog. Repeat from * 11 more times and join. (36 sts = 24 sc + 12 sc2tog)
Rnd 6 (mesh): Work as Rnd 3. (18 dc + 18 ch-1 sps = 36 sts)
Rnd 7: Ch 1, sc in each dc and in each ch-1 sp around, join. (36 sc)
Rnd 8: Ch 1, sc 1, sc2tog. Repeat from * 11 more times and join. (24 sts = 12 sc + 12 sc2tog)
Rnds 9–11: Ch 1, sc in each st around, join. (24 sc in each round) Fasten off after Rnd 11.
Why the math works: Each decrease round removes exactly 12 sts, which keeps the taper even: 60, 48, 36, 24. The final 24 sts measure 6 in (15.2 cm) around, so the opening is about 1.9 in (4.8 cm) across. That’s snug enough to hold bags in place and loose enough to pull one out.
There are 9 sc rounds (2.25 in) and 2 mesh rounds (1 in), for a bottom depth of 3.25 in (8.3 cm).
Hanging Ring
- Join the yarn to the 2 in (5.1 cm) ring. Work 40 sc tightly over the ring, pushing them together so no ring shows. Join and don’t fasten off.
- Tab, Row 1: Ch 1, sc in the same st and in the next 5 sts, turn. (6 sc)
- Tab, Rows 2–6: Ch 1, sc in each st, turn. (6 sc)
- Fasten off, leaving a 12 in (30.5 cm) tail.
The tab is about 1.5 in (3.8 cm) square. Center it over the back seam on the outside of the top band, with the ring rising above the band. Whipstitch all four edges of the tab to the band.
Final Blocking
- Weave in all ends along the seams, then trim.
- Spray the holder evenly until it is damp but not dripping.
- Stuff it loosely with a rolled towel or plastic bags to shape the tube.
- Lay it flat and pat it to 7.5 in (19.1 cm) wide, with a 15 in (38.1 cm) body length.
- Open each snowflake by gently easing the petals and mesh windows with your fingertips.
- Pin the top band straight and make sure the bottom opening is round.
- Let it dry completely, then turn it over and repeat for the back if needed.
Final Quality-Control Checklist
- 16 motifs, each 3.75 in (9.5 cm) square with 15 sts per side
- All seams worked 15 sl sts per motif side, lying flat
- Body is 15 in (38.1 cm) around and 15 in (38.1 cm) tall
- Top band is 48 sts and about 1.75 in (4.4 cm) deep
- Bottom tapers through 60, 48, 36, and 24 sts, and is about 3.25 in (8.3 cm) deep
- Bottom opening is about 1.9 in (4.8 cm) across
- Ring is fully covered, and the tab is centered over the back seam and sewn on all sides
- Total length is 20 in (50.8 cm), or about 22 in (55.9 cm) with the ring
Troubleshooting
Motifs curl or cup. Round 3’s chains are probably too tight. Loosen your ch-5 loops or go up a hook size for that round only.
Motif edges ruffle. Your ch-5 loops are too loose, or your Round 5 tension is loose. Tighten up or go down a hook size.
Seams pucker. Your slip stitches are too tight. Rejoin with a larger hook.
Wrong count on the top or bottom edge. Count each motif side separately. Every motif must give exactly 15 sts, including both corner sts.
Bottom opening is too tight. Work Rnds 9–11 in hdc instead of sc, or skip Rnd 8 (stop at 36 sts).
Holder leans or twists. The closing seam is tighter than the others. Redo it more loosely.
Care
Hand wash or machine wash on cool in a mesh bag. Reshape while damp and dry flat. Don’t hang it to dry while wet, or the cotton may stretch lengthwise.
Final Notes
The whole design hangs on one chain of measurements:
- A 3.75 in (9.5 cm) motif with 15 sts per side
- Four motifs around makes 60 sts and 15 in (38.1 cm) of circumference.
- Four motifs tall makes a 15 in (38.1 cm) body.
- The top band gathers 60 sts to 48 and adds 1.75 in (4.4 cm).
- The bottom tapers to 24 sts and adds 3.25 in (8.3 cm).
Check your first motif and every other step falls into place. You’ll end up with a 20 in (50.8 cm) snowflake holder ready to hang.
Happy crocheting!