

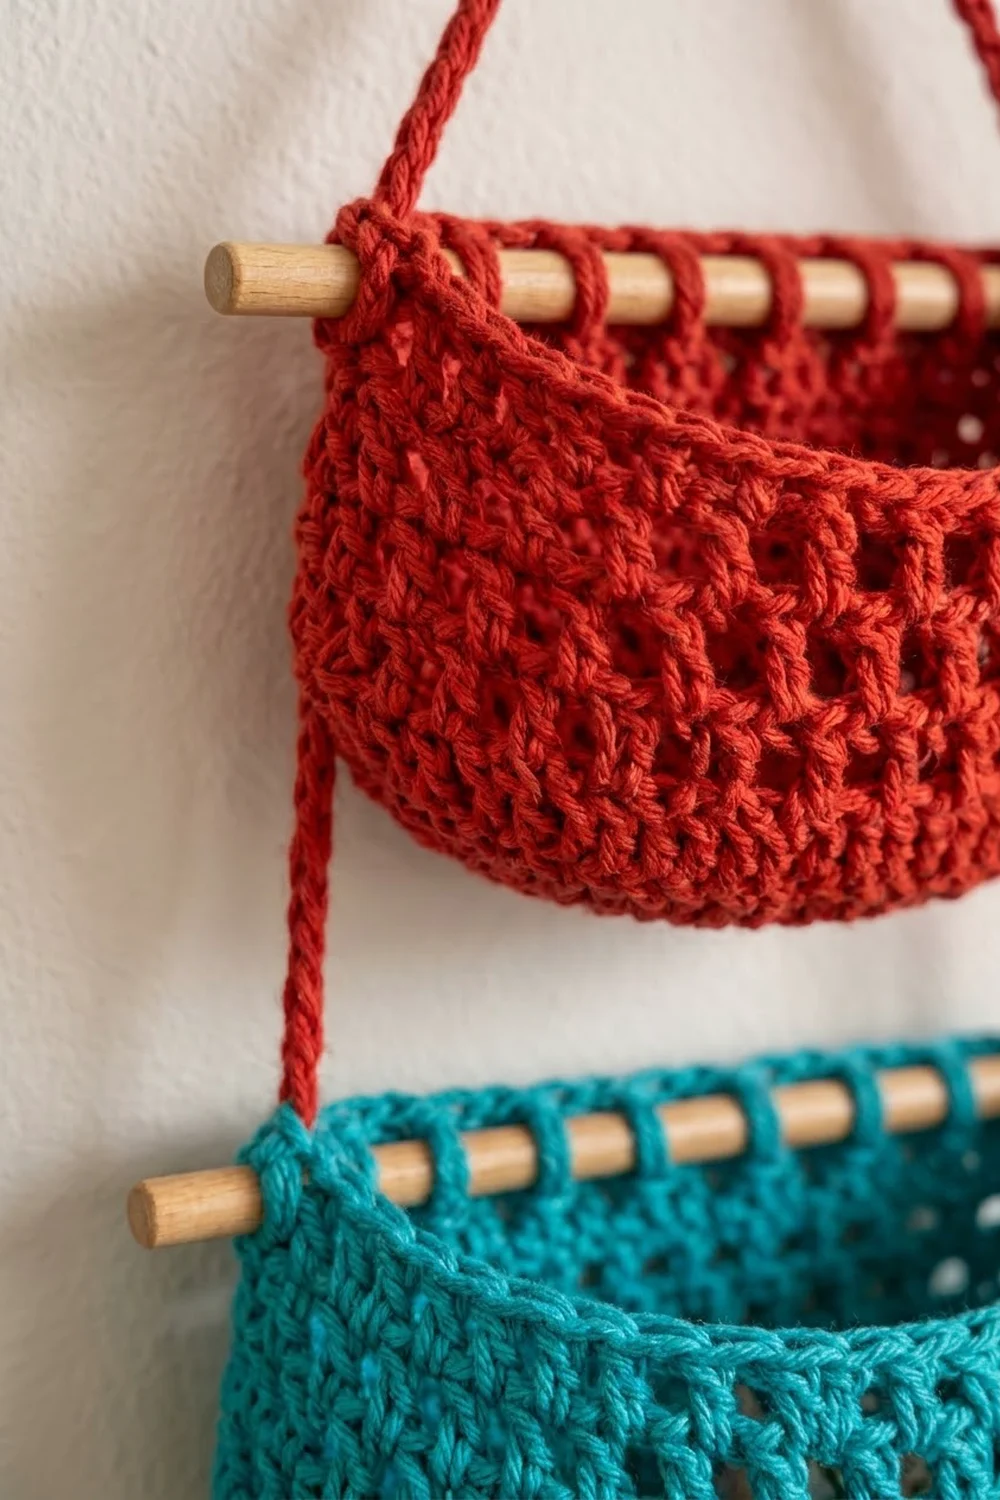
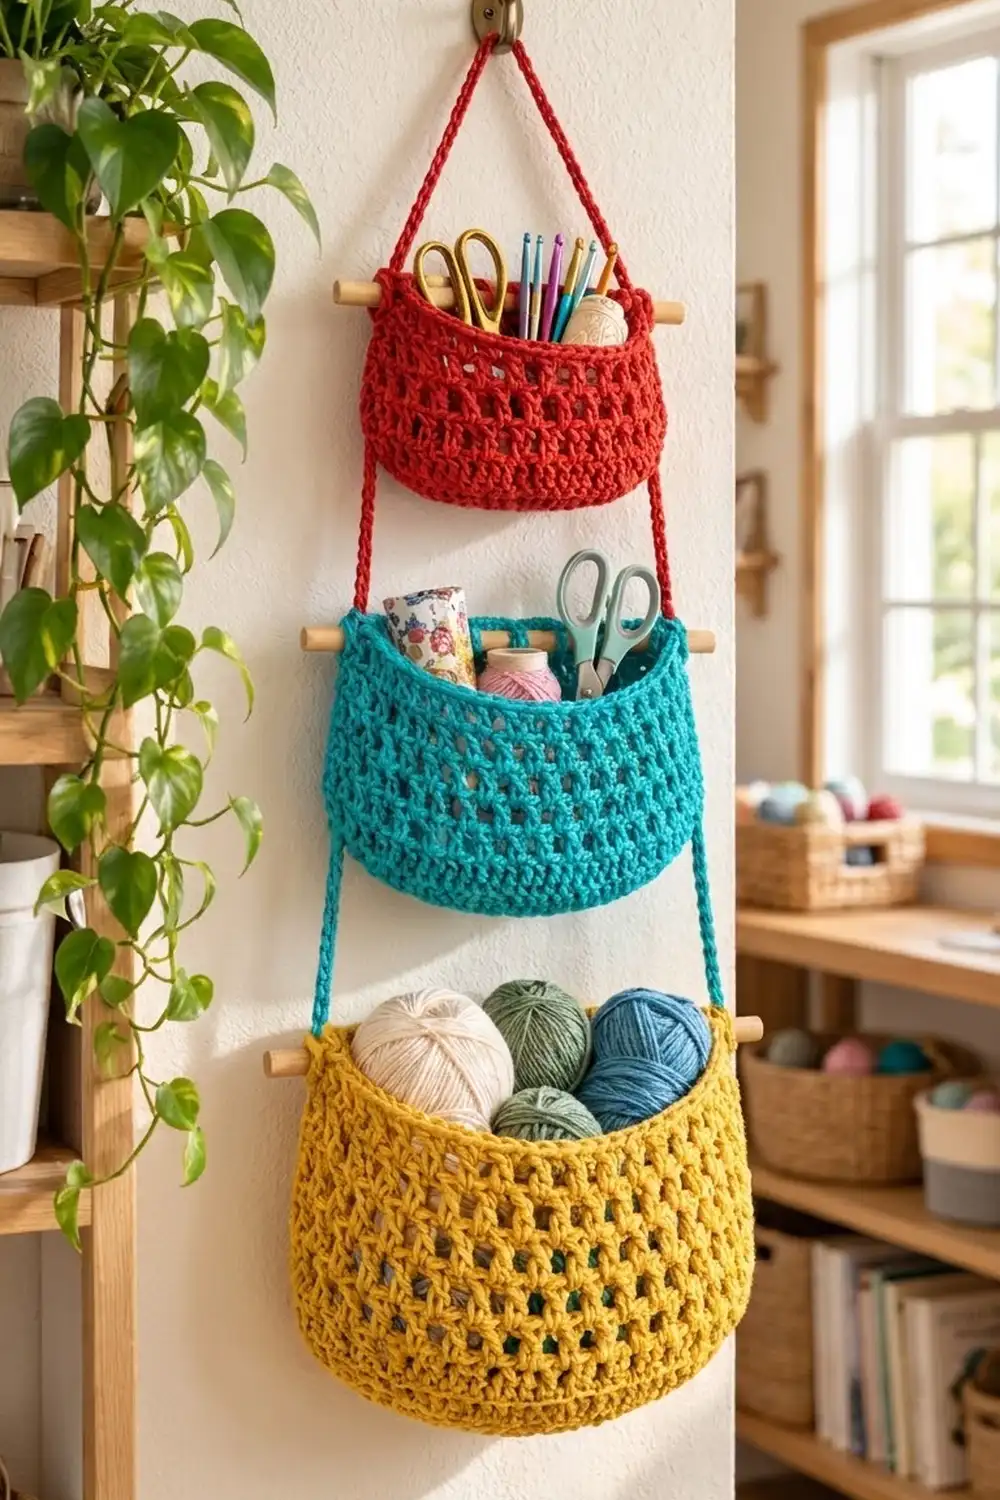
The Sunny Tiers organizer is a three-pocket wall hanging for the things that never seem to have a home: hooks, scissors, tape, stitch markers and half-used balls of yarn. Each pocket is a soft, rounded basket in an open mesh. A wooden dowel across the top front holds the mouth open so you can reach in with one hand.
The colors are bold and cheerful: bright red at the top, turquoise-teal in the middle and mustard yellow at the bottom. Cotton yarn gives clean stitch definition and a firm fabric that holds its shape when the pockets are full. The look is modern-cottage and works in a craft room, nursery, entryway or kitchen.
This pattern uses US crochet terms. The finished pockets measure about 8 x 6 in (20.3 x 15.2 cm), 10 x 7 in (25.4 x 17.8 cm) and 12 x 8 in (30.5 x 20.3 cm). The assembled organizer hangs about 30 in (76.2 cm) from the hook to the bottom of the mustard pocket.
Each pocket starts with an oval single-crochet base and is then worked in the round. You add a mesh body, a two-round single-crochet rim and a dowel woven through the front. Slip-stitch cords join the three tiers and form the hanging loop.
Finished Size and Construction
- Finished size: about 12 in (30.5 cm) at the widest dowel x 30 in (76.2 cm) long
- Skill level: Easy / Advanced Beginner
- Terminology: US crochet terms
- Yarn weight: Worsted (#4), cotton or cotton blend
- Hook: 5.0 mm (US H-8)
- Number of pieces: 3 pockets, plus 5 cords
- Layout: 1 column x 3 tiers, stacked vertically
- Piece sizes (flat width x height): Red 8 x 6 in (20.3 x 15.2 cm); Teal 10 x 7 in (25.4 x 17.8 cm); Mustard 12 x 8 in (30.5 x 20.3 cm)
- Size before rim: same widths, about 0.5 in (1.3 cm) shorter
- Rim depth: 0.5 in (1.3 cm), 2 rounds of sc
Materials
Yarn: Use a smooth worsted-weight cotton of about 170 m per 100 g. Cotton keeps the mesh crisp and doesn’t stretch much under weight. Acrylic works too, but the pockets will sag more when loaded.
- Red: 70 g (119 m), for the top pocket, the hanging loop and 2 cords
- Teal: 90 g (153 m), for the middle pocket and 2 cords
- Mustard: 110 g (187 m), for the bottom pocket
These quantities include a margin of about 10 percent for your swatch and tension differences.
Tools:
- 5.0 mm (US H-8) crochet hook
- 3 wooden dowels, 3/8 in (1.0 cm) diameter, cut to 10 in (25.4 cm), 12 in (30.5 cm) and 14 in (35.6 cm)
- Fine sandpaper for the cut dowel ends
- 4 locking stitch markers
- Tapestry needle
- Scissors and a tape measure
- Wall hook or sturdy nail
Abbreviations (US Terms)
- ch – chain
- sl st – slip stitch
- sc – single crochet
- dc – double crochet
- sp – space
- st(s) – stitch(es)
- rnd – round
- beg – beginning
Special stitch – Mesh unit: (dc, ch 1). One mesh unit counts as 2 sts, the dc plus the ch-1 sp.
Special technique – Slip-stitch cord: Chain the required number. Then sl st into the back bump of the 2nd ch from the hook and of each ch across. This makes a firm, round cord that won’t stretch.
Gauge and Checkpoints
Gauge:
- Single crochet: 16 sts and 16 rnds = 4 in (10.2 cm)
- Mesh: 8 mesh units (16 sts) and 8 rnds = 4 in (10.2 cm)
- Cord: 4 ch = 1 in (2.5 cm)
Test one piece first. Make the red pocket before anything else, because it is the smallest and quickest. Check it at these points:
- After Rnd 3 (base): The oval is about 6.5 in (16.5 cm) long and 1.5 in (3.8 cm) across.
- After the mesh: Flatten the pocket so the side markers sit at the folds. The width is 8 in (20.3 cm).
- After the rim: The height from the bottom fold to the top edge is about 6 in (15.2 cm).
If your pocket is too big, go down to a 4.5 mm hook. If it’s too small, go up to a 5.5 mm hook. Change hook size rather than stitch counts, because the dowel lengths and cord spacing depend on these widths.
Pocket Pattern
All three pockets follow the same steps. The counts for each pocket are given as Red / Teal / Mustard.
Base
Ch 26 / 34 / 42.
Rnd 1: 3 sc in the 2nd ch from the hook. Sc in each of the next 23 / 31 / 39 ch. Then 3 sc in the last ch. Rotate and work along the other side of the foundation ch: sc in each of the next 23 / 31 / 39 ch. Join with a sl st to the first sc.
Count: 3 + 23 + 3 + 23 = 52 / 3 + 31 + 3 + 31 = 68 / 3 + 39 + 3 + 39 = 84 sts.
Rnd 2: Ch 1. 2 sc in each of the next 3 sts, sc in each of the next 23 / 31 / 39 sts, 2 sc in each of the next 3 sts, sc in each of the next 23 / 31 / 39 sts. Join.
Count: 58 / 74 / 90 sts.
Rnd 3: Ch 1. (Sc in the next st, 2 sc in the next st) 3 times. Sc in each of the next 23 / 31 / 39 sts. (Sc in the next st, 2 sc in the next st) 3 times. Sc in each of the next 23 / 31 / 39 sts. Join.
Count: 9 + 23 + 9 + 23 = 64 / 9 + 31 + 9 + 31 = 80 / 9 + 39 + 9 + 39 = 96 sts.
Mark the side folds: Put a marker in the 5th st of each 9-st end group. Counting the marked sts as fold points, the front and back each have 4 + 23 + 5 = 32 / 4 + 31 + 5 = 40 / 4 + 39 + 5 = 48 sts. Move these markers up as you work so the folds stay lined up.
Mesh Body
Rnd 4 (set-up): Ch 4 (counts as dc + ch 1). Skip the next st. Dc in the next st, ch 1, skip the next st. Repeat from * around. Join with a sl st to the 3rd ch of the beg ch-4.
Count: 32 / 40 / 48 mesh units = 64 / 80 / 96 sts.
Rnd 5: Sl st into the first ch-1 sp. Ch 4 (counts as dc + ch 1). Dc in the next ch-1 sp, ch 1. Repeat from * around. Join to the 3rd ch of the beg ch-4.
Count: 32 / 40 / 48 mesh units.
Working each dc into a ch-1 sp offsets the holes on every round. This gives the slightly diagonal mesh texture.
Rnds 6 and up: Repeat Rnd 5 until you have 9 / 11 / 13 mesh rnds in total (Rnds 4–12 / 14 / 16). The count stays at 32 / 40 / 48 units on every round.
Checkpoint: The mesh section measures 4.5 / 5.5 / 6.5 in (11.4 / 14.0 / 16.5 cm) tall.
Do not fasten off. Go straight on to the rim.
Rim (Border)
Rim gauge: 16 sc = 4 in (10.2 cm). Each side, front or back, has exactly half the round’s sts, so its width is (sts per side) ÷ 4 in.
Rim Rnd 1 (conversion): Ch 1. Sc in the next dc, sc in the next ch-1 sp. Repeat from * around. Join.
Count: 32 sts in dc + 32 sts in sps = 64 / 40 + 40 = 80 / 48 + 48 = 96 sts.
Per side: 32 / 40 / 48 sts front and 32 / 40 / 48 sts back.
Rim Rnd 2: Ch 1. Sc in each st around. Join. Fasten off, leaving a 12 in (30.5 cm) tail.
Count: 64 / 80 / 96 sts; per side 32 / 40 / 48.
Why the math works: Each mesh unit holds 2 sts, so the conversion round turns 32 / 40 / 48 units into exactly 64 / 80 / 96 sc without adding or losing anything. The side-fold markers split each round in half. At 4 sts per inch, 32 sts give 8 in (20.3 cm), 40 sts give 10 in (25.4 cm) and 48 sts give 12 in (30.5 cm). Each dowel is 2 in (5.1 cm) longer than its pocket, which leaves 1 in (2.5 cm) sticking out on each side for the cords.
Insert the Dowel
- Sand the cut ends of each dowel smooth.
- Push the dowel in from the outside at one side fold, just below the rim, in the last mesh round.
- Weave it across the front wall only, going over 2 dc and under 2 dc, through the ch-1 spaces of that round.
- Bring it out at the opposite side fold.
- Center the dowel so 1 in (2.5 cm) sticks out on each side.
The dowel rests against the inside of the front rim, so the pocket opens forward while the back stays flat against the wall.
Make All Pieces
- Red: 1 pocket (8 in / 20.3 cm), 1 hanging loop, 2 upper cords
- Teal: 1 pocket (10 in / 25.4 cm), 2 lower cords
- Mustard: 1 pocket (12 in / 30.5 cm)
Cords (slip-stitch cord, at 4 ch per inch):
- Hanging loop, Red: ch 81, then sl st back across = 80 sts = 20 in (50.8 cm)
- Upper cords, Red, make 2: ch 37 each = 36 sts = 9 in (22.9 cm)
- Lower cords, Teal, make 2: ch 41 each = 40 sts = 10 in (25.4 cm)
Leave a 10 in (25.4 cm) tail at both ends of every cord for sewing.
Layout grid:
            [ HOOK ]
            /      \
   Red loop 9 in   9 in
          /          \
   o==== RED 8 in ====o      dowel 10 in
   |                  |      red cords 7 in exposed
   o===== TEAL 10 in =====o  dowel 12 in
   |                      |  teal cords 8 in exposed
 o====== MUSTARD 12 in ======o  dowel 14 in
Joining
Method: Wrap each cord end around a dowel end, then sew it to itself and to the rim.
- Hanging loop: Wrap 1 in (2.5 cm) of one loop end around the left red dowel end, just outside the side fold. Sew the tail through the cord 3 times to lock it. Then stitch it through the top two side-fold sts of the rim, the marked st on Rim Rnds 1 and 2. Repeat on the right. This leaves 18 in (45.7 cm) of loop, about 9 in (22.9 cm) per side.
- Upper cords (red): Wrap and sew the top of each cord around a red dowel end, right next to the loop. Run the cord down the red pocket’s side fold. Wrap the bottom 1 in (2.5 cm) around the matching teal dowel end and sew it to the teal rim’s side-fold sts.
- Lower cords (teal): Attach them the same way, from the teal dowel ends to the mustard dowel ends.
Stitch-to-stitch logic: Every cord meets the pockets only at the marked side-fold sts. That way the front and back counts of 32 / 40 / 48 stay untouched, and each pocket hangs level.
Tension advice: Sew firmly but don’t pucker the rim. Before you sew down the second side of each tier, check that the two cords on that tier are the same length.
Size checkpoint: The distance from dowel to dowel is 7 in (17.8 cm) from red to teal and 8 in (20.3 cm) from teal to mustard. The total from the hook to the bottom of the mustard pocket is about 30 in (76.2 cm).
Final Blocking
- Before inserting the dowels, wet each pocket and gently squeeze out the water. Don’t wring it.
- Stuff each pocket with a rolled towel or plastic bag to give it its rounded U shape.
- Pin the rim straight and flatten the pocket so the side folds sit exactly at the markers.
- Check the widths against the target: 8 / 10 / 12 in (20.3 / 25.4 / 30.5 cm).
- Let the pockets dry completely, which takes 24 hours.
- Insert the dowels, sew on the cords and hang the organizer. Let it hang empty overnight so the cords settle.
Final Quality-Control Checklist
- Base counts after Rnd 3: 64 / 80 / 96 sts
- Mesh rounds keep 32 / 40 / 48 units all the way up
- Rim rounds have 64 / 80 / 96 sc, split evenly into front and back
- Flat widths are 8 / 10 / 12 in (20.3 / 25.4 / 30.5 cm)
- Each dowel sticks out 1 in (2.5 cm) on both sides
- Cords on the same tier match in length
- All tails are woven in at least 2 in (5.1 cm) and trimmed
- The organizer hangs straight with no tilting tier
Troubleshooting
- Base curls into a bowl: Your tension is too tight on the end increases. Loosen up or use a hook 0.5 mm larger for Rnds 1–3.
- Base ruffles: You have extra increases. Recount the 9-st end groups.
- Mesh leans in a spiral: This is normal when you join in rounds. Block it straight and keep the side markers lined up.
- Pocket is too short: Add one mesh round. Each round adds about 0.5 in (1.3 cm).
- Tier hangs crooked: Re-sew the shorter cord until both measure the same.
- Pocket sags when full: Switch to 100 percent cotton, or work Rim Rnd 2 with a 4.5 mm hook.
Care
Remove the dowels, then hand-wash in cool water and lay flat to dry, re-shaping the pockets over a rolled towel. Dust the dowels with a dry cloth.
Final Notes
The measurement chain is short. At 16 sts per 4 in (10.2 cm), the bases build to 64 / 80 / 96 sts. The mesh holds 32 / 40 / 48 units, and the rim converts them back to 64 / 80 / 96 sc, giving flat widths of 8 / 10 / 12 in (20.3 / 25.4 / 30.5 cm). Dowels 2 in (5.1 cm) longer than each pocket carry the cords. At 4 ch per inch, the cords space the tiers 7 in (17.8 cm) and 8 in (20.3 cm) apart, for an organizer about 30 in (76.2 cm) long. Check your red pocket against these numbers first, and the other two tiers will fall into place.
Happy crocheting!