

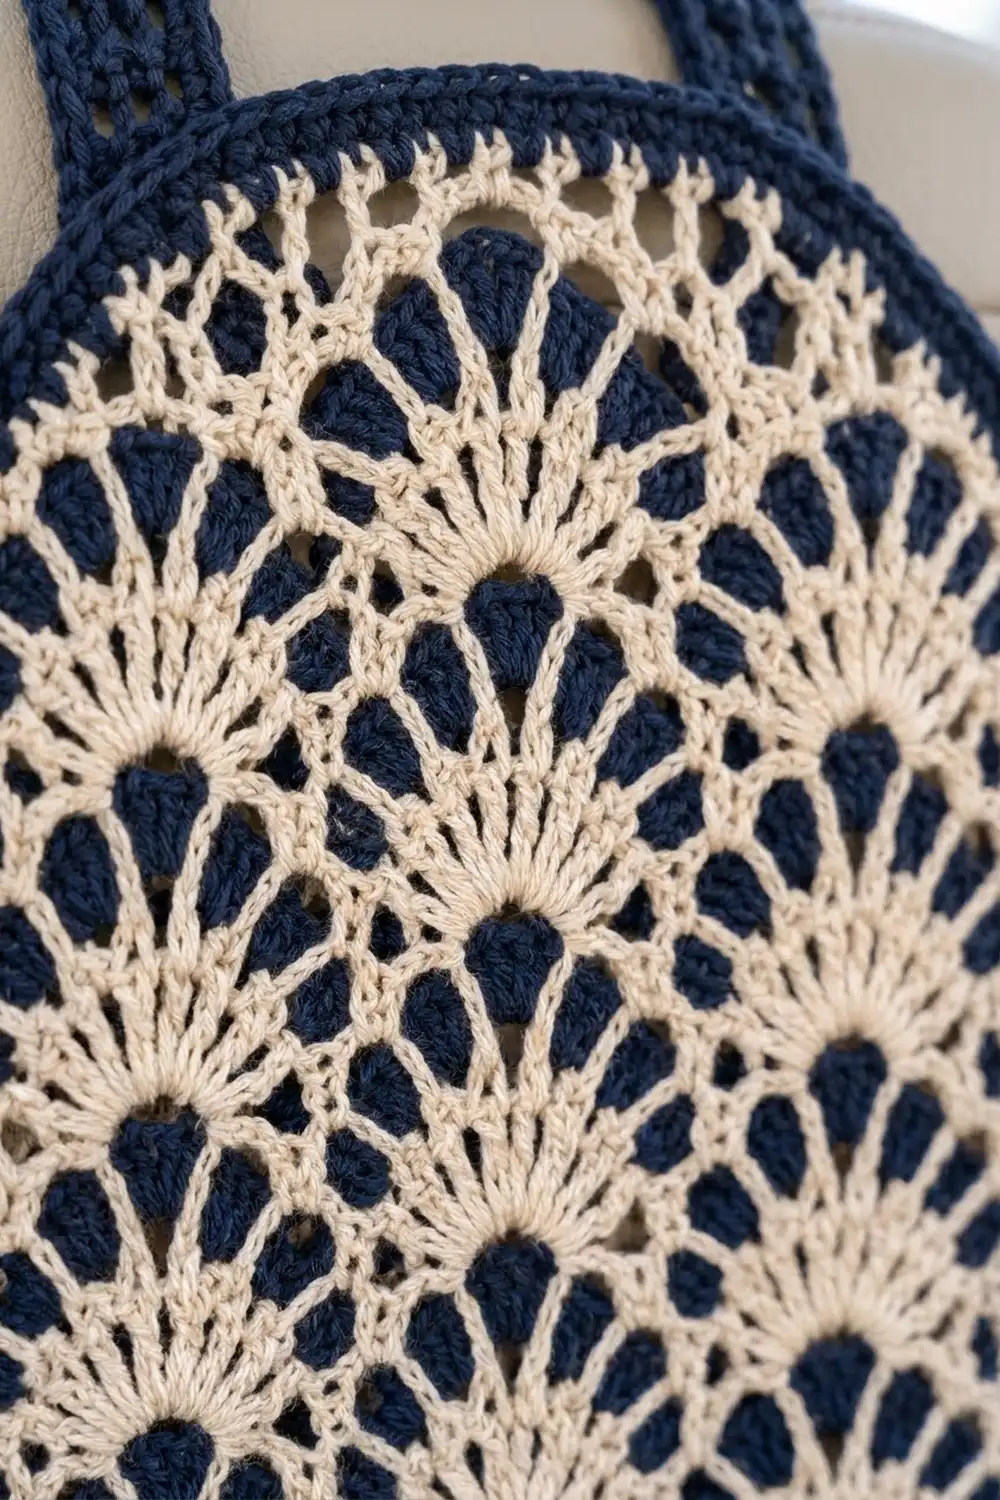
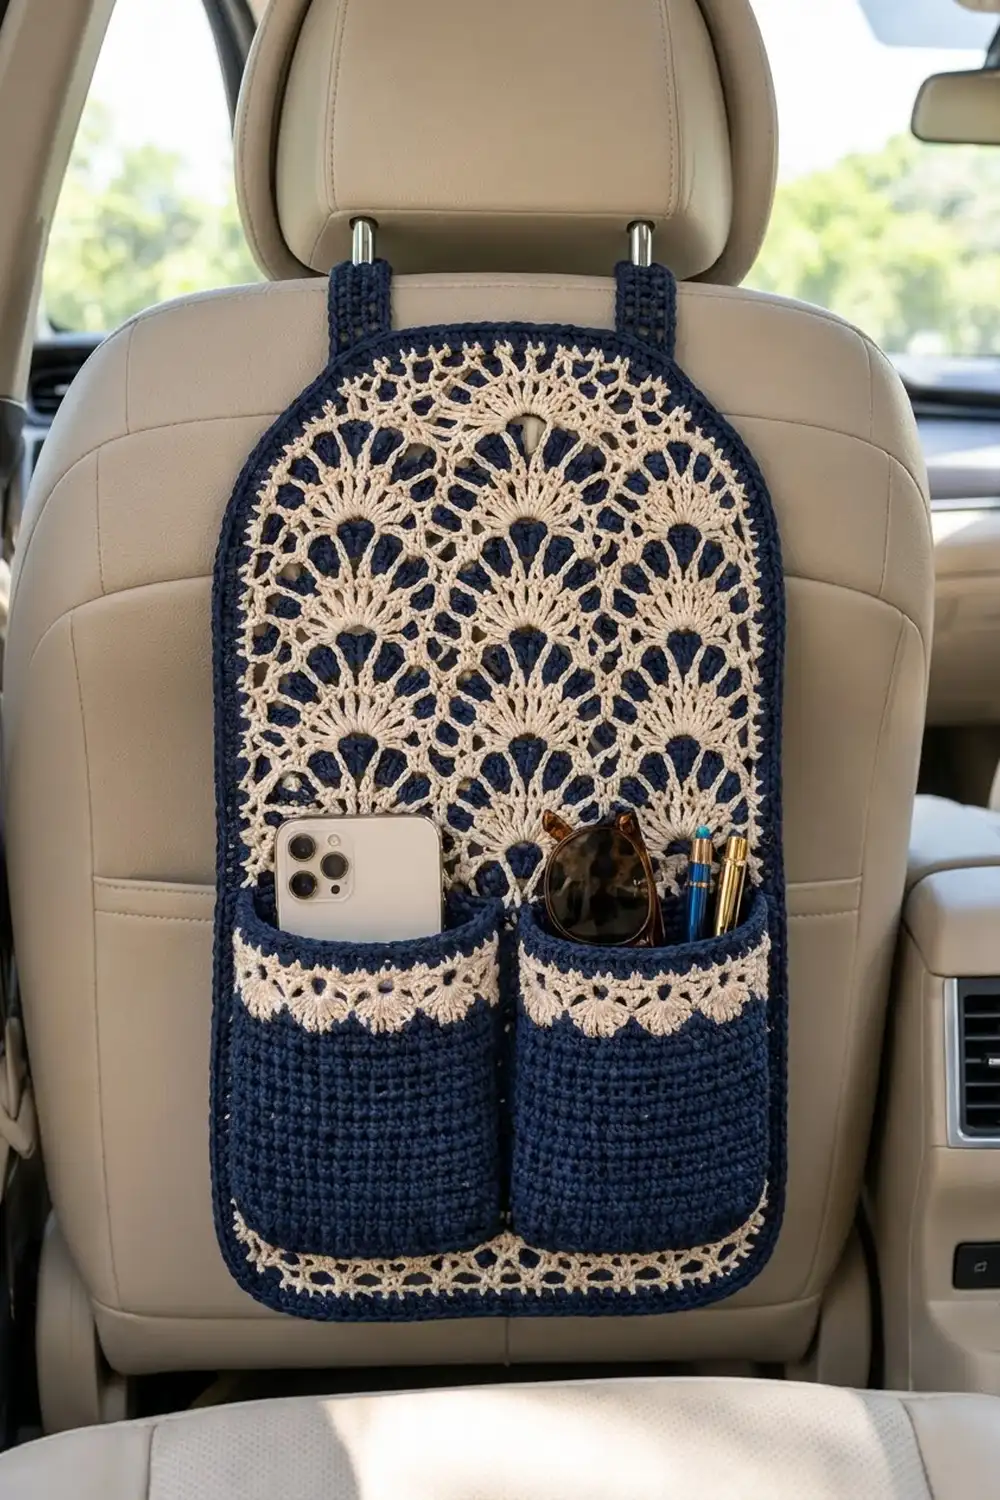
This car seat organizer has a tall backing panel in cream fan lace with small navy wedges between the fans. A neat navy border runs around the outside. Two sturdy navy pockets sit across the lower half, each with a band of cream shells near the top. Two navy loops hold it on the headrest posts.
The design uses just two colors, cream and deep navy. The lace makes it look light, and the solid pockets and border make it strong enough to hold a phone, sunglasses, pens and tissues.
This pattern uses US crochet terms throughout. The finished organizer measures 13.25 in wide x 21 in tall (33.7 x 53.3 cm). The strap loops add about 3.5 in (8.9 cm) above the top.
You work the backing panel flat from the bottom up and shape the arch with stepped rows. Then you make two pockets and two straps, sew them onto the panel, and crochet a navy border around everything to tie it all together.
Finished Size and Construction
- Finished size: 13.25 x 21 in (33.7 x 53.3 cm), not counting the straps
- Skill level: Intermediate
- Terminology: US crochet terms
- Yarn weight: DK (#3) cotton
- Hook: 4.0 mm (G-6)
- Number of pieces: 5 (1 panel, 2 pockets, 2 straps)
- Layout: two pockets side by side on the lower panel; straps on the back at the top
- Lace panel before border: 12.25 x 20 in (31.1 x 50.8 cm)
- Pocket size: 6.25 x 6.25 in (15.9 x 15.9 cm) each
- Border depth: 2 rounds, 0.5 in (1.3 cm)
Materials
Choose a smooth mercerized or combed cotton in DK weight, about 2.2 m per gram (roughly 110 m per 50 g). Cotton holds its shape when weighted and does not fuzz with car-seat rubbing.
- Cream (Color A): 175 g, about 385 m
- Navy (Color B): 200 g, about 440 m
These quantities include a margin of about 15 percent for swatching and tails.
Tools:
- 4.0 mm (G-6) crochet hook
- Tapestry needle
- Locking stitch markers (at least 8)
- Rust-proof pins
- Blocking mat
- Measuring tape
- Scissors
- Spray bottle
Abbreviations (US Terms)
- ch – chain
- sl st – slip stitch
- sc – single crochet
- dc – double crochet
- sk – skip
- st(s) – stitch(es)
- sp – space
- rep – repeat
- RS / WS – right side / wrong side
Special stitches:
- Fan: 7 dc in the same stitch.
- Shell: 5 dc in the same stitch.
- cl (3-dc cluster): *Yarn over, insert hook in stitch, yarn over and pull up a loop, yarn over and draw through 2 loops; rep from * 2 more times in the same stitch, then yarn over and draw through all 4 loops on hook. A cluster counts as 1 stitch.
Gauge and Checkpoints
Single crochet gauge: 16 sts and 16 rows = 4 in (10.2 cm).
Lace gauge: the 49-stitch panel measures 12.25 in (31.1 cm) wide, and one repeat of Rows 2–5 measures 2.5 in (6.4 cm) tall.
Make one pocket first and use it as your gauge test. After Row 18 it should measure 6.25 in (15.9 cm) wide and 4.5 in (11.4 cm) tall.
Panel checkpoints:
- After Row 1: 12.25 in (31.1 cm) wide, 1 in (2.5 cm) tall
- After Row 25: 16 in (40.6 cm) tall
- After Row 32: 20 in (50.8 cm) tall
If your pieces come out too big, go down 0.5 mm in hook size. If they are too small, go up 0.5 mm. Lace relaxes when you block it, so pin and mist the fabric before measuring the panel.
Backing Panel
Every row changes color, so you fasten off at the end of each row and leave 4 in (10.2 cm) tails. Turn your work at the start of every row. The navy border is crocheted over these tails later, which hides most of the weaving.
Foundation Row (navy): Ch 50. Sc in the 2nd ch from hook and in each ch across. Fasten off. (49 sc)
Row 1 (cream, RS): Join cream with a sc in the first st. Sk 3 sts, fan in the next st, sk 3 sts, sc in the next st; rep from * 5 more times. Fasten off. (6 fans, 7 sc = 49 sts)*
Row 2 (navy, WS): Join navy in the first sc. Ch 3 (counts as dc) and dc in the same sc. Ch 2, sk 3 dc, sc in the center (4th) dc of the fan, ch 2, sk 3 dc, cl in the next sc; rep from * across, but end the last repeat with 2 dc in the last sc instead of a cl. Fasten off. (4 edge dc, 6 sc, 5 cl, 12 ch-2 sps)*
Row 3 (cream, RS): Join cream in the top of the last dc. Ch 3 (counts as dc) and work 3 dc in the same st to make a half fan. Sk the next dc and ch-2 sp, then sc in the next sc. Fan in the top of the next cl, sc in the next sc; rep from * 4 more times. Work 4 dc in the top of the turning ch for the second half fan. Fasten off. (4 + 6 sc + 35 dc + 4 = 49 sts)*
Row 4 (navy, WS): Join navy with a sc in the first st. Ch 2, sk 3 dc, cl in the next sc, ch 2, sk 3 dc, sc in the center dc of the fan; rep from * across. For the last repeat, after the final cl, ch 2, sk 3 dc, and sc in the top of the turning ch. Fasten off. (7 sc, 6 cl, 12 ch-2 sps)*
Row 5 (cream, RS): Join cream with a sc in the first sc. Fan in the top of the next cl, sc in the next sc; rep from * across. Fasten off. (6 fans, 7 sc = 49 sts)*
Rows 6–25: Rep Rows 2–5 five more times. That makes 6 full repeats in total.
Checkpoint: the panel should be 12.25 x 16 in (31.1 x 40.6 cm).
Arch Shaping
Each shaping row starts and ends one half-fan further in, so each edge steps in about 0.5 fan, or 1 in (2.5 cm), every time.
Row 26 (navy): Work as Row 2. (6 sc, 5 cl)
Row 27 (cream): Join cream with a sc in the first sc of Row 26, not the edge dc. Fan in the next cl, sc in the next sc; rep from * across, ending in the last sc. Leave the edge dc and the ch-2 spaces unworked. (5 fans, 6 sc = 41 sts)*
Row 28 (navy): Work as Row 2 over 41 sts. (4 edge dc, 5 sc, 4 cl)
Row 29 (cream): Work as Row 27. (4 fans, 5 sc = 33 sts)
Row 30 (navy): Work as Row 2 over 33 sts. (4 edge dc, 4 sc, 3 cl)
Row 31 (cream): Work as Row 27. (3 fans, 4 sc = 25 sts)
Row 32 (navy): Join navy with a sc in the first st, then sc in each st across. (25 sc) Fasten off.
Checkpoint: the panel is 20 in (50.8 cm) tall, and the flat top is 6.25 in (15.9 cm) wide.
Pockets (Make 2)
Row 1 (navy): Ch 26. Sc in the 2nd ch from hook and in each ch across. (25 sc)
Rows 2–18: Ch 1 and turn, then sc in each st across. (25 sc) At the end of Row 18, change to cream. Leave navy attached.
Checkpoint: 6.25 x 4.5 in (15.9 x 11.4 cm).
Row 19 (cream): Ch 1 and turn, sc in each st across. (25 sc)
Row 20 (cream): Ch 1 and turn, sc in the first st. Sk 2 sts, shell in the next st, sk 2 sts, sc in the next st; rep from * 3 more times. (4 shells, 5 sc = 25 sts)*
Row 21 (cream): Ch 3 and turn (counts as dc), 2 dc in the first sc. Sk 2 dc, sc in the center dc, sk 2 dc, shell in the next sc; rep from * 2 more times. Sk 2 dc, sc in the center dc, sk 2 dc, 3 dc in the last sc. (3 + 4 sc + 15 + 3 = 25 sts)* Change to navy by carrying it up the side, since that edge will be sewn into the seam.
Rows 22–23 (navy): Ch 1 and turn, sc in each st across. (25 sc) Fasten off.
Checkpoint: each pocket is 6.25 x 6.25 in (15.9 x 15.9 cm).
Straps (Make 2)
Row 1 (navy): Ch 6. Sc in the 2nd ch from hook and in each ch across. (5 sc)
Rows 2–40: Ch 1 and turn, sc in each st across. (5 sc)
Each strap is 1.25 x 10 in (3.2 x 25.4 cm).
Make All Pieces
| Piece | Qty | Cream | Navy |
|---|---|---|---|
| Backing panel | 1 | about 140 g | about 85 g |
| 2 | about 8 g each | about 30 g each | |
| Strap | 2 | – | about 8 g each |
| Border | – | – | about 15 g |
Layout (front view):
        [strap]   [strap]        <- sewn to back
      .----- arch top -----.
     /    cream fan lace    \
    |     cream fan lace     |
    |     cream fan lace     |
    |  [POCKET 1][POCKET 2]  |   <- tops 8.25 in from bottom
    |  [ navy   ][  navy  ]  |
    |   cream lace strip     |
    '------ navy border -----'
Before you assemble, block the panel to 12.25 x 20 in (31.1 x 50.8 cm) and each pocket to 6.25 in (15.9 cm) square, and let them dry.
Joining
Method: whipstitch with navy yarn and a tapestry needle.
- Place the pockets. Lay the panel RS up. Line up the pocket bottoms along the top of Row 2, about 1.5 in (3.8 cm) above the foundation edge, so a strip of cream fans shows underneath. Put the outer side edge of each pocket flush with the panel’s side edge, and butt the two inner edges together on the center line.
- Ease in the extra width. Side by side, the pockets are 12.5 in (31.8 cm) wide and the panel is 12.25 in (31.1 cm). Spread the extra 0.25 in (0.6 cm) evenly along the pocket bottoms. This little bit of fullness gives a phone room to slide in.
- Sew the bottoms. Sew one pocket row-end or stitch to one panel stitch. Anchor into the navy foundation row and the Row 2 sc and clusters, not into the open chain spaces.
- Sew the sides. Sew the 23 row ends of each outer side edge to the panel’s side edge, from the pocket bottom up to Row 23. Then sew both inner edges down the center line together, going through all three layers. Leave the top edges open.
- Attach the straps. Turn the panel over. Pin each strap end 1.5 in (3.8 cm) down from the top edge on the WS. Center the straps 5 in (12.7 cm) apart, measured strap center to strap center, so their outer edges line up with the 6.25 in (15.9 cm) flat top. Fold each strap into a loop, pin the second end over the first, and sew a box around both layers.
Tension: keep the whipstitches snug but flat. Lace pulled tight puckers.
Checkpoint: the panel should still measure 12.25 in (31.1 cm) across at the pocket line.
Border
Border gauge: 4 sc per inch (2.5 cm), and 2 rounds = 0.5 in (1.3 cm).
Rnd 1 (navy, RS): Join navy in the first foundation st at the bottom right. Work all the way around as follows, crocheting over the row tails as you go. Along the pocket side edges, work through both the pocket and the panel.
- Bottom: 3 sc in the first st, sc in the next 47 sts, 3 sc in the last st. (53 sc)
- Each straight side (Rows 1–25): 64 sc spaced evenly along the row ends, about 2 per dc row and 1 per navy row.
- Each shoulder (Rows 26–31, including the steps): 20 sc, following the stepped edge so it becomes a curve.
- Top (Row 32): 1 sc in each st. (25 sc)
Join with a sl st. Total: 53 + 64 + 64 + 20 + 20 + 25 = 246 sc.
Rnd 2: Ch 1, then sc in each st. Work 3 sc in the center st of each bottom corner (+4). On each shoulder, work 2 sc in every 5th st, 4 times (+8). Join.
- Bottom: 57 sc
- Each side: 64 sc
- Each shoulder: 24 sc
- Top: 25 sc
- Total: 258 sc. Fasten off and weave in the ends.
Why the math works: at 4 sc per inch, 64 sc covers the 16 in (40.6 cm) body sides exactly, and 25 sc matches the 6.25 in (15.9 cm) top. The 49 base stitches at the bottom match the 12.25 in (31.1 cm) panel width. That leaves only the corner groups as extra stitches. The shoulder increases on Rnd 2 let the outer curve lie flat. Two rounds add 0.5 in (1.3 cm) on every side, so the finished size is 13.25 x 21 in (33.7 x 53.3 cm).
Final Blocking
- Mist the whole organizer until it is damp. Don’t soak it, because the sewn seams can stretch.
- Lay it flat RS up on the blocking mat.
- Pin the bottom edge straight at 13.25 in (33.7 cm).
- Pin both sides straight to 21 in (53.3 cm) total height.
- Pin the arch into an even curve, using the Rnd 2 shoulder stitches as a guide.
- Open each fan with a fingertip so its seven dc spread evenly.
- Smooth the pockets flat, but don’t stretch the eased fullness out of them.
- Let it dry completely, at least 12 hours, before you hang it.
Final Quality-Control Checklist
- The panel measures 13.25 x 21 in (33.7 x 53.3 cm).
- The fans line up in straight columns, and each one is centered over a navy cluster.
- The arch is symmetrical, with three steps on each side and both shoulders the same.
- The pocket tops are 8.25 in (21.0 cm) above the finished bottom edge.
- The center pocket seam is straight and sewn through all three layers.
- The cream strip below the pockets is visible and even.
- The border is the same depth all the way around, with no ruffling or cupping.
- The straps are 5 in (12.7 cm) apart, and the box stitching is secure.
- All tails are woven in on the WS.
Troubleshooting
- The fans lean to one side: you have skipped 2 or 4 sts instead of 3. Count the skips, and check the stitch total after every row.
- The panel narrows as you go: the half fans at the edges are too tight. Work the edge dc a little looser.
- The border ruffles: you have too many sc on the sides. Go back to 64.
- The border cups: you have too few sc. Work 1 or 2 extra sc per side.
- The shoulders look boxy: spread the 20 sc of Rnd 1 more evenly over the steps, then block the curve again.
- The pockets gape at the top: add a navy sc row at the top edge and block flat.
- The pockets are too tight for a phone: sew the inner seam 0.25 in (0.6 cm) closer to each pocket’s edge to give more ease.
- The organizer sags on the seat: shorten the strap loops by sewing the ends further down the back.
Care
Hand wash in cool water with mild soap, press out the water in a towel, and dry flat to the blocked size. Don’t tumble dry, because it will distort the lace.
Final Notes
Each stage of this organizer builds on the one before. The 49-stitch panel measures 12.25 in (31.1 cm) wide. Six repeats take the body to 16 in (40.6 cm), and the stepped arch finishes the lace at 20 in (50.8 cm). Two 6.25 in (15.9 cm) pockets are eased onto the lower panel. Then a 258-stitch border adds 0.5 in (1.3 cm) all around, for a finished size of 13.25 x 21 in (33.7 x 53.3 cm). Check each measurement before moving on, and the finished piece will come out at the right size.
Happy crocheting!