

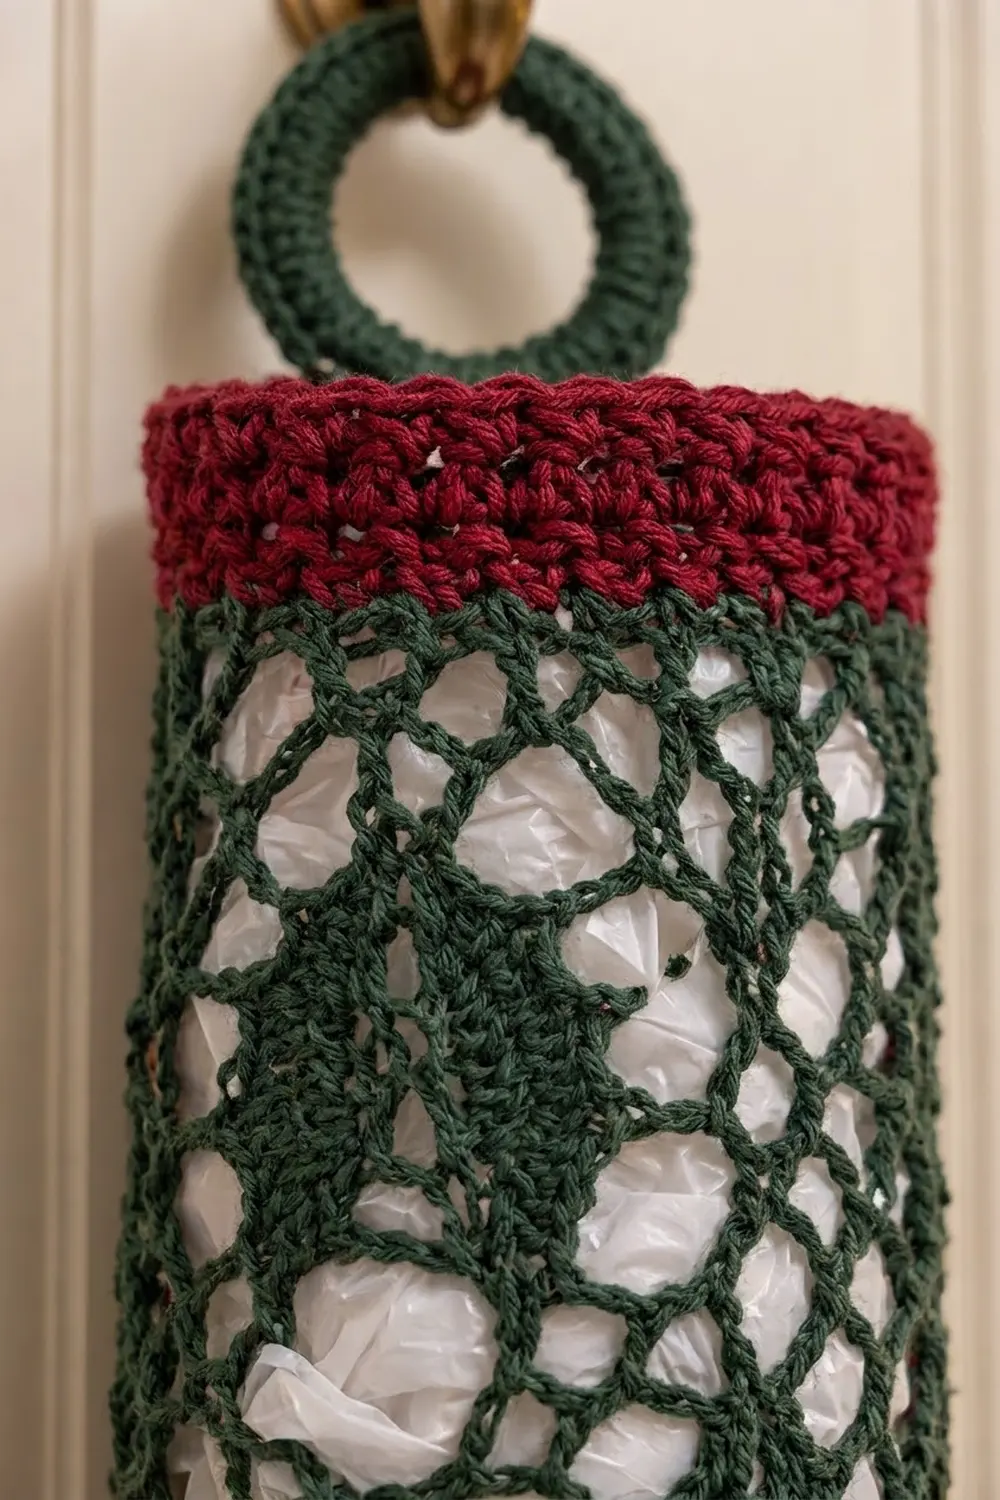
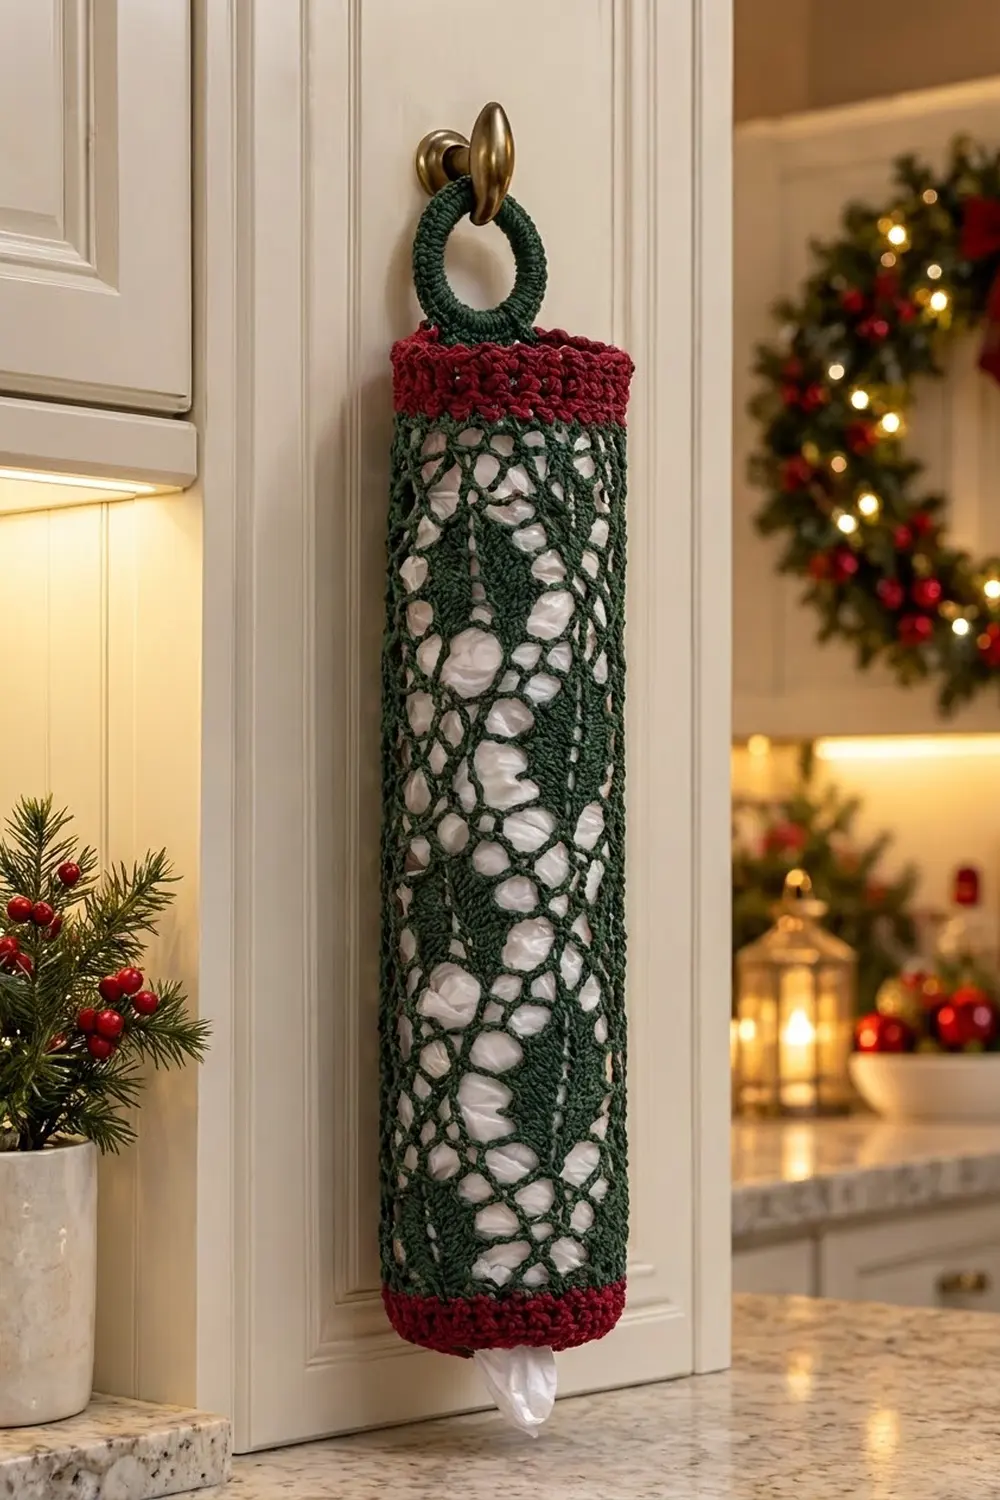
Every kitchen has a drawer full of plastic bags, and this holder turns that clutter into a holiday decoration. The Hollyberry Lattice holder is a long tube of open green mesh with solid holly leaves climbing up it in three columns. Cranberry-red bands at the top and bottom finish it off.
The palette is just two colors: deep forest green for the lattice and leaves, and cranberry red for the bands. White bags inside show through the mesh like snow, so the holly stands out even when the holder is full. The style is classic filet crochet: a grid of open and filled squares, worked in the round so there are no side seams.
This pattern uses US crochet terms. The finished tube is 19 in (48.3 cm) long, 14.4 in (36.6 cm) around and about 4.6 in (11.7 cm) across. It lies 7.2 in (18.3 cm) wide when flattened. The covered ring rises about 3.5 in (8.9 cm) above the top rim.
Construction is simple. You chain a ring of green, then work 25 joined filet rounds to form the holly lattice tube. Next you add a red band to each end and cover a ring with single crochet. Finally, a short green tab attaches the ring to the top back of the holder.
Finished Size and Construction
- Finished size: 19 in (48.3 cm) long × 14.4 in (36.6 cm) around; 7.2 in (18.3 cm) wide lying flat
- Diameter: about 4.6 in (11.7 cm)
- Skill level: Intermediate (basic filet crochet in the round)
- Terminology: US crochet terms
- Yarn weight: Worsted (#4), cotton or cotton blend
- Hook: 5.0 mm (H-8)
- Number of pieces: 1 tube body, plus a crochet-covered ring attached with a worked-on tab
- Layout: 18 filet squares around × 25 rounds tall; 3 columns of holly leaves, 3 leaves per column
- Lattice section (before bands): 14.4 in (36.6 cm) around × 15 in (38.1 cm) tall
- Band depth: 2 in (5.1 cm) at each end, 6 rounds of hdc
Materials
Yarn advice: Choose a smooth worsted-weight cotton or cotton blend. Cotton keeps the filet squares crisp, holds its shape when the holder is packed with bags, and wipes clean easily. Avoid fuzzy or very stretchy acrylic, because the tube will sag when it is full.
- Forest green (main color): 60 g / about 108 m. This covers the lattice body, ring cover and tab.
- Cranberry red (band color): 30 g / about 54 m. This covers both end bands.
The quantities above include a margin of about 20 percent. You will not run short if your gauge is slightly loose or if you need to rip back a round.
Tools:
– 5.0 mm (H-8) crochet hook
– One plastic or metal ring, 2.5 in (6.4 cm) outer diameter
– Tapestry needle
– 4 stitch markers
– Measuring tape
– Spray bottle and a rolled towel or a cardboard tube about 4.5 in (11.4 cm) across, for blocking
Abbreviations (US Terms)
- ch – chain
- sl st – slip stitch
- sc – single crochet
- hdc – half double crochet
- dc – double crochet
- sp – space
- st(s) – stitch(es)
- rep – repeat
- Rnd – round
- RS – right side
Special stitches (filet squares):
Each filet square is 3 stitches wide: a post dc plus 2 filling stitches. Every square sits directly above the square below it.
- Mesh (M): dc in the next post dc, ch 2, skip the next 2 sts or ch-2 sp. This makes an open square.
- Block (B): dc in the next post dc, then 2 dc in the next ch-2 sp, or 1 dc in each of the next 2 dc. This makes a solid square.
- Starting a round with M: ch 5 (counts as the first post dc + ch 2).
- Starting a round with B: ch 3 (counts as the first post dc), then work 2 dc into the filling below.
The squares always total 18 per round, which is 54 sts (18 post dc + 36 filling sts).
Gauge and Checkpoints
Filet gauge: 15 sts (5 squares) = 4 in (10.2 cm) wide, and 5 rounds = 3 in (7.6 cm) tall. Each square is 0.8 in (2.0 cm) wide and 0.6 in (1.5 cm) tall.
Band gauge: 15 hdc = 4 in (10.2 cm), and 3 rounds of hdc = 1 in (2.5 cm).
Test first: Your first few rounds are the gauge swatch. Work the foundation and Rnds 1–5 of the body, then lay the tube flat without stretching it.
Checkpoints:
– After Rnd 1: the tube is 7.2 in (18.3 cm) wide flat, or 14.4 in (36.6 cm) around.
– After Rnd 5: 3 in (7.6 cm) tall.
– After Rnd 8 (first leaf tier done): 4.8 in (12.2 cm) tall.
– After Rnd 17: 10.2 in (25.9 cm) tall.
– After Rnd 25: 15 in (38.1 cm) tall.
– After the bottom band: 17 in (43.2 cm) tall.
– After the top band: 19 in (48.3 cm) tall.
If your tube is too big (more than 7.5 in / 19.1 cm wide flat), go down to a 4.5 mm hook. If it is too small (less than 6.9 in / 17.5 cm wide flat), go up to a 5.5 mm hook. Don’t change the stitch count: the 6-square holly repeat needs exactly 18 squares around.
Body: Holly Lattice Tube
Work with forest green and RS facing throughout. Join each round with a sl st and do not turn. Place a marker in the joining stitch and move it up every round. The joins stack at the center back, which is where the hanging tab will go later.
Foundation: Ch 54. Sl st in the first ch to form a ring, taking care not to twist the chain. (54 ch)
Rnd 1 (all mesh): Ch 5 (counts as dc + ch 2). Skip the next 2 ch. Dc in the next ch, ch 2, skip 2 ch. Rep from * 16 more times. Join with a sl st to the 3rd ch of the beginning ch-5.
(18 mesh squares = 18 dc + 36 ch = 54 sts)
From here on, each round is written as one 6-square repeat (squares 1–6), worked 3 times around. Square 6 is always a mesh, so it forms the open channel between the leaf columns. Squares 1–5 make the leaf, centered on square 3.
Leaf chart, 7 rounds (L1–L7):
– L1: M, M, B, M, M, M (1 block per repeat)
– L2: M, B, B, B, M, M (3 blocks per repeat)
– L3: B, B, B, B, B, M (5 blocks per repeat: the first pair of points)
– L4: M, B, B, B, M, M (3 blocks per repeat)
– L5: B, B, B, B, B, M (5 blocks per repeat: the second pair of points)
– L6: M, B, B, B, M, M (3 blocks per repeat)
– L7: M, M, B, M, M, M (1 block per repeat)
The leaf widens to 5 squares and narrows back to 3 squares twice, which creates the spiky holly outline. A single block at each end forms the pointed tip and the stem.
Every leaf round contains 18 squares = 54 sts. The rounds differ only in which fillings are chain and which are dc:
– L1 and L7: 3 blocks + 15 mesh around
– L2, L4 and L6: 9 blocks + 9 mesh
– L3 and L5: 15 blocks + 3 mesh
Rnds 2–8 (leaf tier 1): Work L1 through L7 in order, once each. For L1, L2, L4, L6 and L7, start with ch 5. For L3 and L5, start with ch 3 and 2 dc into the filling below. (54 sts every round)
Rnd 9: Work as Rnd 1, but work each dc into the post dc below and each ch-2 over the filling below. All 18 squares are mesh. (54 sts)
Rnds 10–16 (leaf tier 2): Work L1 through L7 again. (54 sts every round)
Rnd 17: All mesh. (54 sts)
Rnds 18–24 (leaf tier 3): Work L1 through L7 again. (54 sts every round)
Rnd 25: All mesh. (54 sts) Fasten off.
You now have 3 columns of 3 holly leaves, separated by open mesh rounds, and a 15 in (38.1 cm) tube.
Tip: When you work a mesh over a block, skip the 2 filling dc and chain over them. When you work a block over a mesh, put both filling dc into the ch-2 space, not into the chains themselves. This keeps the squares square.
Border: Red End Bands
The two red bands are the border. They make the ends firm, hide the foundation chain, and keep the bottom opening from stretching out.
Border gauge: 15 hdc = 4 in (10.2 cm), and 3 rounds = 1 in (2.5 cm).
Because the tube has no corners, the border count is given per round around. Flattened, each side is half the round: 27 sts = 7.2 in (18.3 cm).
Bottom Band
Hold the tube upside down with the foundation chain at the top and RS facing.
Rnd 1 (conversion round): Join cranberry red with a sl st in the foundation ch at the center-back join. Ch 2 (does not count as a st). Hdc in the same ch and in each remaining foundation ch around. Join to the first hdc.
Count: 54 hdc worked 1 per foundation ch + 0 extra sts = 54 hdc (27 per flattened side).
Rnds 2–6: Ch 2. Hdc in each st around. Join. (54 hdc each round)
Fasten off. The band measures 2 in (5.1 cm) deep.
Top Band
Turn the tube right side up with RS facing.
Rnd 1 (conversion round): Join cranberry red with a sl st in the post dc at the center-back join of Rnd 25. Ch 2. Hdc in the same dc. Work 2 hdc in the next ch-2 sp. Hdc in the next dc, 2 hdc in the next ch-2 sp. Rep from * around. Join.
Count: 18 hdc worked into the 18 post dc + 36 hdc worked into the 18 ch-2 spaces (2 each) + 0 extra sts = 54 hdc (27 per flattened side).
Rnds 2–6: Ch 2. Hdc in each st around. Join. (54 hdc each round)
Fasten off.
Why the math works: The lattice is 54 sts at 15 sts per 4 in, and so is each band. That gives 54 ÷ 15 × 4 = 14.4 in (36.6 cm) all the way along the tube. Since no stitches are added or removed, the bands stay the same width as the body without flaring or pulling in. Six rounds at 3 rounds per inch give exactly 2 in (5.1 cm) per band. The total length is 2 + 15 + 2 = 19 in (48.3 cm).
Covered Ring and Hanging Tab
Covering the ring: Using green, make a slipknot on the hook. Work 44 sc around the ring, pushing the stitches together as you go so no plastic shows. Join with a sl st to the first sc and fasten off. Turn the sc edges toward the outside of the ring so they lie neatly. The covered ring measures about 3 in (7.6 cm) across.
Tab: Flatten the tube so the center-back join faces you. Find the 6 center-back sts of the top band’s Rnd 6 and mark the first and last of them.
- Row 1: With green and RS facing, join with a sl st in the first marked st. Ch 1. Sc in the same st and in the next 5 sts. (6 sc)
- Rows 2–6: Ch 1, turn. Sc in each st across. (6 sc)
Fasten off, leaving a 12 in (30.5 cm) tail. The tab is 1.5 in (3.8 cm) wide and 1.5 in (3.8 cm) tall.
Attach the ring: Pass the tab through the covered ring from front to back. Fold it down over the inside of the top band. Whipstitch Row 6 to the inside of the band at the base of the tab, through the back loops only, so nothing shows on the front. The ring now sits snugly on the rim.
Final Blocking
- Weave in all ends along the dc posts or inside the bands. Leave the tails uncut for now.
- Slide a rolled towel or a 4.5 in (11.4 cm) cardboard tube wrapped in plastic into the holder.
- Spritz it evenly with water until it is damp, not soaking.
- Smooth each column of squares so the post dc line up vertically and the leaf points sit straight.
- Check that the tube is 14.4 in (36.6 cm) around and 19 in (48.3 cm) long, and ease it gently to size.
- Let it dry completely on the form. This takes about 24 hours for cotton.
- Trim the woven-in tails once dry.
Final Quality-Control Checklist
- [ ] Every round has 18 squares = 54 sts.
- [ ] 3 holly columns, 3 leaves each, all separated by mesh rounds (Rnds 9 and 17).
- [ ] Leaf outlines alternate between 5-block and 3-block rounds, so the edges look spiky.
- [ ] Both bands are 54 hdc, 6 rounds, 2 in (5.1 cm) deep.
- [ ] The tube is 14.4 in (36.6 cm) around and 19 in (48.3 cm) long.
- [ ] The round joins and the tab are both at the center back.
- [ ] The ring is fully covered and the tab is stitched securely inside.
- [ ] The bottom opening lets you pull out a bag without the band stretching out.
Troubleshooting
The squares slant to one side over the rounds. Joined rounds can drift a little. Always join into the top of the beginning chain, and start each round in the same join stitch.
The leaves look lopsided. Count the squares from the join: square 3 of each repeat must be the leaf center. Mark the start of each repeat with a stitch marker.
The mesh holes are tall and narrow. Your dc are too loose or your chains too tight. Try chaining a little more loosely.
The bands ruffle. You probably have more than 54 hdc. Count again, especially in the top band’s Rnd 1, where it is easy to put 3 hdc in a space.
Bags slide out on their own. Work Rnd 6 of the bottom band as sc instead of hdc for a tighter edge.
The ring tab stretches. Use a firmer tension, or add a second line of whipstitches to reinforce it.
Care
Hand wash in cool water with mild soap, press out the water in a towel, and reshape it on a rolled towel to dry. Don’t wring or tumble dry it, because that distorts the filet squares.
Final Notes
Each measurement builds on the last. Your gauge of 15 sts = 4 in (10.2 cm) sets the 54-stitch round at 14.4 in (36.6 cm) around. Twenty-five filet rounds at 0.6 in (1.5 cm) each make 15 in (38.1 cm) of holly lattice. Two 54-stitch red bands, each 2 in (5.1 cm) deep, bring the tube to 19 in (48.3 cm) without changing its width. Check your gauge first, count every round, and the holly columns will line up from bottom to top.
Happy crocheting!