

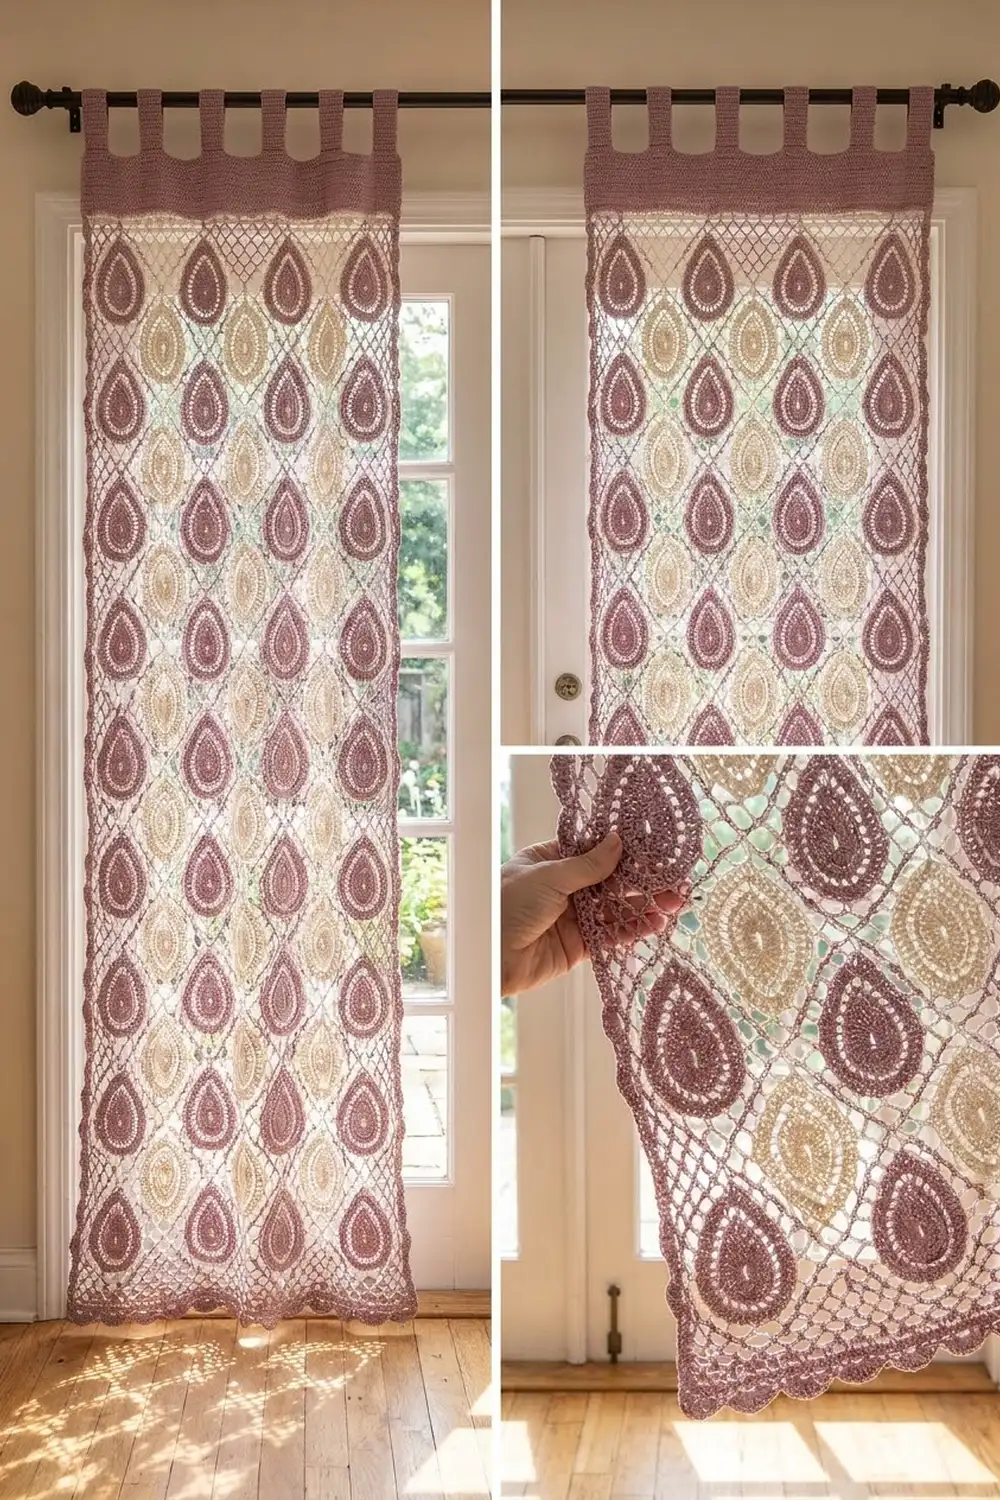
These curtain panels mix soft mauve and creamy ivory in a teardrop lace. Each panel is a grid of paisley-style teardrop motifs set in an open chain-diamond mesh. Light comes through the mesh, and the motifs stay crisp.
The colors alternate in a checkerboard: a mauve teardrop next to a cream one. The style is relaxed boho cottage, and the panels work well on French doors, patio windows, or a sunny bedroom window. A solid mauve band with tabs at the top slides onto a standard rod, and a row of small shell scallops finishes the hem.
The pattern uses US crochet terms. One finished panel measures 30.5 in (77.5 cm) wide and 81.25 in (206.4 cm) long, not counting the tabs. Hung on a rod, it’s about 84 in (213.4 cm) from the top of the rod to the scallop tips. The instructions are for one panel. Make two for the pair shown.
You build each panel from blocks. A block is a three-round teardrop followed by three rounds of chain mesh that square it off. From the second block on, you join each block to its neighbors on its last round (join-as-you-go). After that, one edging round goes around the joined grid, a hdc band with tabs goes across the top, and a scallop row goes along the bottom.
Finished Size and Construction
- Finished panel size: 30.5 in x 81.25 in (77.5 cm x 206.4 cm), plus 3 in (7.6 cm) tab loops
- Skill level: Intermediate
- Terminology: US
- Yarn weight: DK / light worsted (#3), cotton or cotton blend
- Hook: 4.0 mm (US G-6)
- Number of pieces: 78 blocks per panel, 156 for the pair
- Layout: 6 blocks across x 13 blocks down, colors in a checkerboard
- Block size (blocked): 5 in x 6 in (12.7 cm x 15.2 cm)
- Size before border: 30 in x 78 in (76.2 cm x 198.1 cm)
- Border depth: 0.25 in (0.6 cm) at the sides, 2.25 in (5.7 cm) at the top, 1 in (2.5 cm) at the bottom
Materials
Use a smooth, mercerized or combed cotton DK. Cotton keeps the mesh open after blocking and doesn’t stretch much while the panel hangs. The amounts below assume 50 g balls of about 115 m.
- Color A, mauve / dusty lavender: 500 g, about 1,150 m (10 balls). This covers 39 blocks per panel plus all the border work.
- Color B, cream / ivory: 400 g, about 920 m (8 balls). This covers 39 blocks per panel.
Both amounts are for the pair and include a margin of about 18%. One block uses about 10 m (4.4 g).
Tools:
– 4.0 mm (US G-6) crochet hook
– Tapestry needle
– Stitch markers
– Tape measure
– Rust-proof pins and blocking mats
– Spray bottle
– Curtain rod up to 1.5 in (3.8 cm) across
Abbreviations (US Terms)
- ch: chain
- sl st: slip stitch
- sc: single crochet
- hdc: half double crochet
- dc: double crochet
- tr: treble crochet
- sk: skip
- BLO: back loop only
- sp: space
- RS: right side
Special technique, join-as-you-go loop (JL): In place of ch 5, work ch 2, sl st in the matching ch-5 loop of the finished neighbor block, ch 2. At a corner, in place of ch 7, work ch 3, sl st in the neighbor’s ch-7 corner loop (or in the sl st already there), ch 3.
Gauge and Checkpoints
Make and block one complete block before you start the panel. With 156 blocks, small gauge differences add up in the width, the length, and the yarn you use.
Base gauge: 22 sc = 5 in (12.7 cm), which is 4.4 sc per inch. Band gauge: 22 hdc and 15 rows = 5 in (12.7 cm).
Block checkpoints (measure lightly stretched):
– After Rnd 1: 1.25 in x 2.75 in (3.2 cm x 7.0 cm)
– After Rnd 3: 2.5 in x 3.5 in (6.4 cm x 8.9 cm)
– After Rnd 4: 3.5 in x 4.25 in (8.9 cm x 10.8 cm)
– After Rnd 6, blocked: 5 in x 6 in (12.7 cm x 15.2 cm)
If the teardrop is bigger than the Rnd 3 checkpoint, switch to a 3.75 mm hook. If it’s smaller, switch to 4.5 mm. If only the mesh is off, change your chain tension and keep the chain counts the same. Chains that are too tight are the usual reason a block comes out small.
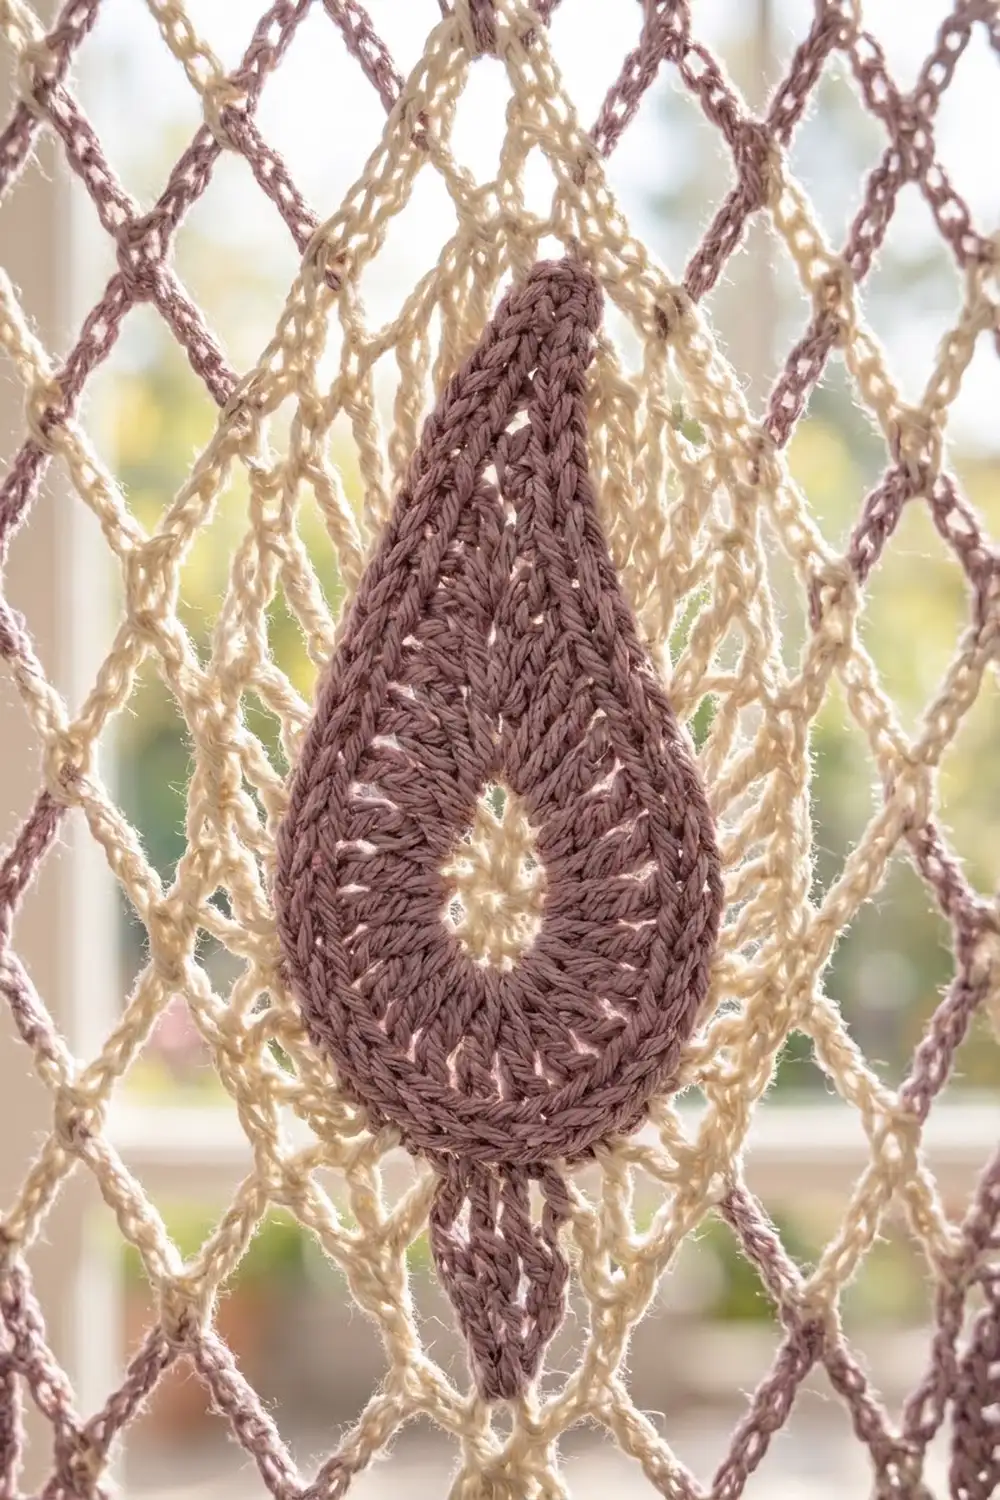
Lace Block
Make each block in one color. Mauve and cream blocks use the same instructions.
Teardrop
Foundation: Ch 12.
Rnd 1 (RS): Sc in 2nd ch from hook, hdc in next 2 ch, dc in next 3 ch, tr in next 4 ch, 7 tr in last ch. Rotate the work so you’re working along the other side of the foundation chain. Tr in next 4 ch, dc in next 3 ch, hdc in next 2 ch, sc in last ch, ch 2, sl st in first sc. (27 sts + ch-2 point sp)
The short stitches at the start and end form the point at the top. The 7-tr fan rounds out the bottom.
Rnd 2: Ch 1. Working in BLO, sc in first 10 sts, 2 sc in each of next 7 tr, sc in next 10 sts. Work (sc, ch 3, sc) in ch-2 point sp, then sl st in first sc. (36 sc + ch-3 point sp)
The front loops you leave unworked make the raised outline ridge around the center.
Rnd 3: Ch 3 (counts as dc), dc in next 9 sc, [2 dc in next sc, dc in next sc] 7 times, dc in next 10 sc, dc in next sc. Work (2 dc, ch 3, 2 dc) in point sp, dc in last sc, sl st to top of ch-3. (47 dc + ch-3 point sp)
Check: 10 side + 21 bottom + 10 side + 1 + 4 + 1 = 47.
Mesh Frame
Rnd 4: Ch 1, sc in same st. Ch 5, sk 3 dc, sc in next dc. Repeat from * 10 times. Ch 5, sk 3 dc, sc in ch-3 point sp. Ch 5, sk 3 dc, sl st in first sc. (12 ch-5 loops)
Count the point sp as position 0. The sc anchors then sit on dc 4, 8, 12, and so on up to 44, plus one in the point sp. One anchor is at the tip and one is on dc 24, the exact center of the bottom, so the frame stays symmetric. Number the loops L1 to L12 in the order you made them. The point sits between L11 and L12.
Rnd 5: Sl st in next 3 ch, ch 1.
– (Sc, ch 5, sc) in L1, ch 5, sc in L2, ch 5, sc in L3, ch 5.
– (Sc, ch 5, sc) in L4, ch 5, sc in L5, ch 5, sc in L6, ch 5.
– (Sc, ch 5, sc) in L7, ch 5, sc in L8, ch 5, sc in L9, ch 5.
– (Sc, ch 5, sc) in L10, ch 5, sc in L11, ch 5, sc in L12, ch 5, sl st in first sc.
(16 ch-5 loops)
This round turns the oval into a rectangle: 12 loops (one per Rnd 4 loop) + 4 new corner loops = 16. That gives 4 corner loops and 3 side loops on each side. The center loop on the top side sits right above the teardrop tip.
Rnd 6: Sl st in next 3 ch to reach a top corner loop. Ch 1, (sc, ch 7, sc) in same loop.
– Long side and corner: Ch 5, sc in next loop, ch 5, (sc, ch 5, sc) in next loop, ch 5, sc in next loop, ch 5, (sc, ch 7, sc) in corner loop.
– Short side: [Ch 5, sc in next loop] 3 times, ch 5.
– (Sc, ch 7, sc) in corner loop.
– Work the long side and corner again, then the short side again.
– Sl st in first sc. Fasten off.
Count: 4 ch-7 corner loops + 18 ch-5 loops. The top and bottom each have 4 ch-5 loops. The left and right sides each have 5, because the middle side loop gets an extra loop. That makes the block taller than it is wide, 5 in x 6 in (12.7 cm x 15.2 cm), with the teardrop pointing up the long side.
Make All Pieces
Per panel: 39 Color A blocks + 39 Color B blocks = 78. For the pair: 78 A + 78 B = 156 blocks.
Work Rnds 1 to 5 of every block first. Then work Rnd 6 while joining, following this layout. All teardrops point up, and Row 1 is the top of the panel:
Row  1: A B A B A B
Row  2: B A B A B A
Row  3: A B A B A B
Row  4: B A B A B A
Row  5: A B A B A B
Row  6: B A B A B A
Row  7: A B A B A B
Row  8: B A B A B A
Row  9: A B A B A B
Row 10: B A B A B A
Row 11: A B A B A B
Row 12: B A B A B A
Row 13: A B A B A B
Each row has 3 A + 3 B blocks, so 13 rows give 39 of each.
Joining
Join on Rnd 6 as you go. Finish the first block of Row 1 completely. On every block after that, work Rnd 6 as written until you reach a side that touches a finished block. On that side, work a JL in place of each loop.
Stitch-to-stitch logic:
– Blocks next to each other share a long side. Join its 5 ch-5 loops to the neighbor’s 5, in order.
– Blocks above and below each other share a short side. Join its 4 loops to the neighbor’s 4.
– Join each ch-7 corner loop to the neighbor’s ch-7. Where four blocks meet, sl st into the sl st that’s already there, so all four corners meet at one point.
You don’t add or remove any loops at the seams. Each joined loop looks like an ordinary mesh diamond, so the seams blend into the lace.
Tension: Keep the ch 2 on each side of every joining sl st as relaxed as your other chains. Tight joins pull the grid into a waffle shape, and loose joins sag when the panel hangs.
Size checkpoint: After Row 3, lay the grid flat and pat it into shape. It should measure 30 in (76.2 cm) wide and 18 in (45.7 cm) tall. The finished grid should measure 30 in x 78 in (76.2 cm x 198.1 cm).
Border
Work the whole border in Color A. The border gauge is 4.4 sc per inch, the same as the base gauge.
Edge counts for one block: 3 sc in each ch-7 corner loop and 4 sc in each ch-5 loop.
– Top or bottom of one block: 3 + (4 x 4) + 3 = 22 sc. This includes the block’s own two corner loops.
– Side of one block: 3 + (5 x 4) + 3 = 26 sc. This also includes both corner loops.
Edging Round
Rnd 1 (RS): Join A in the top-right corner loop of the panel, ch 1, (3 sc, ch 2, 3 sc) in same loop. Work along every edge with 3 sc in each corner loop and 4 sc in each ch-5 loop. At seams, both neighbors’ corner loops get their own 3 sc. In the other three outer corner loops, work (3 sc, ch 2, 3 sc). The first 3 sc count toward one side and the last 3 sc toward the next. Sl st in first sc and fasten off.
- Top: 6 blocks x 22 = 132 sc
- Each side: 13 blocks x 26 = 338 sc
- Bottom: 6 x 22 = 132 sc
- Total: 940 sc + 4 corner ch-2 sps
Why the math works: 132 sc ÷ 4.4 = 30 in (76.2 cm), the exact width of the grid. On the sides, 338 ÷ 4.4 = 76.8 in (195.1 cm). That draws in the 78 in (198.1 cm) mesh very slightly, so the long edges hang straight instead of rippling. You add no stitches at the seams, so each count is simply the per-block count times the number of blocks.
Top Band
Row 1: With RS facing, join A in the first sc of the top edge (not the corner sp). Ch 2 (does not count), hdc in each sc across, turn. (132 hdc)
Rows 2 to 6: Ch 2, hdc in each st across, turn. (132 hdc)
The band is 2 in (5.1 cm) deep, or 2.25 in (5.7 cm) counting the edging round.
Tabs
Make 6 tabs, each 12 sts wide, with 12 sts between tabs: (6 x 12) + (5 x 12) = 132.
Tab 1:
– Row 1: Ch 2, hdc in first 12 sts, turn.
– Rows 2 to 18: Ch 2, hdc in 12 sts, turn.
– Fasten off, leaving a 12 in (30.5 cm) tail.
Tabs 2 to 6: Skip 12 band sts, join A in the next st, and repeat Tab 1. The tabs sit on sts 1–12, 25–36, 49–60, 73–84, 97–108, and 121–132.
Each tab is 2.75 in (7.0 cm) wide and 6 in (15.2 cm) long. Fold each tab to the back and whipstitch its last row along the top of band Row 6. That makes a 3 in (7.6 cm) loop for the rod.
Scallop Hem
With RS facing, join A with sc in a bottom corner ch-2 sp.
– Sk 2 sc, 7 dc in next sc, sk 2 sc, sc in next sc. Repeat from * 22 times. The last sc goes in the 132nd sc.
– Sl st in the next corner ch-2 sp and fasten off. (22 scallops)
Each repeat uses 6 sts, and 132 ÷ 6 = 22, so the scallops fit exactly. Each scallop is about 1.36 in (3.5 cm) wide and 0.75 in (1.9 cm) deep.
Final Blocking
- Weave in the remaining ends along chain loops for at least 2 in (5.1 cm), splitting the plies as you go.
- Soak the panel in cool water for 15 minutes. Press the water out gently; don’t wring.
- Roll the panel in towels to take out most of the moisture.
- Lay it flat and pin the joined grid to 30 in x 78 in (76.2 cm x 198.1 cm).
- Pin the four-way corner joins into straight lines across and down. Then open each mesh diamond with your fingers.
- Pin each teardrop tip straight up and shape each scallop into a curve.
- Pin the band and tabs flat and square.
- Let it dry completely, then unpin. Block the second panel to the same measurements.
Final Quality-Control Checklist
- Every block has 47 dc on Rnd 3 and 16 loops on Rnd 5
- All teardrops point up, and the checkerboard is correct
- Every seam loop and every four-way corner is joined
- 132 sc across the top and bottom, 338 sc down each side
- 6 evenly spaced tabs, each 12 sts wide
- 22 complete scallops
- The panel measures 30.5 in x 81.25 in (77.5 cm x 206.4 cm), not counting tabs
- The two panels match within 0.5 in (1.3 cm)
Troubleshooting
- The teardrop cups: Rnd 3 is too tight. Go up one hook size for that round.
- The teardrop ruffles at the bottom: Make sure Rnd 2 has exactly 14 sc across the bottom.
- The block is square, not tall: You missed the (sc, ch 5, sc) in the middle side loops of Rnd 6.
- The grid is crooked: A JL went into the wrong loop. Count 4 or 5 loops per side before joining.
- The edge ripples: There are too many sc per loop. Use 4 sc in each ch-5 loop.
- The edge pulls in: Your sc gauge is tight. Work the edging round with a 4.5 mm hook.
- The scallops don’t fit: Recount the bottom edge. It must be exactly 132 sc.
Care
Hand wash in cool water, or machine wash on a gentle cycle in a mesh bag, then reshape and dry flat. Don’t tumble dry, because heat can shrink cotton lace and pull the mesh out of shape.
Final Notes
Each measurement sets up the next one:
– The 47-dc teardrop sets the size of the frame.
– The 5 in x 6 in (12.7 cm x 15.2 cm) block sets the grid.
– 6 x 13 blocks give a 30 in x 78 in (76.2 cm x 198.1 cm) grid.
– 22 sc per block on the top and bottom gives 132 sc, and 26 sc per block on the sides gives 338 sc.
– The 132 top and bottom stitches set the band, the tabs, and the 22 scallops.
Get one block right and the rest of the panel follows from it.
Happy crocheting!