

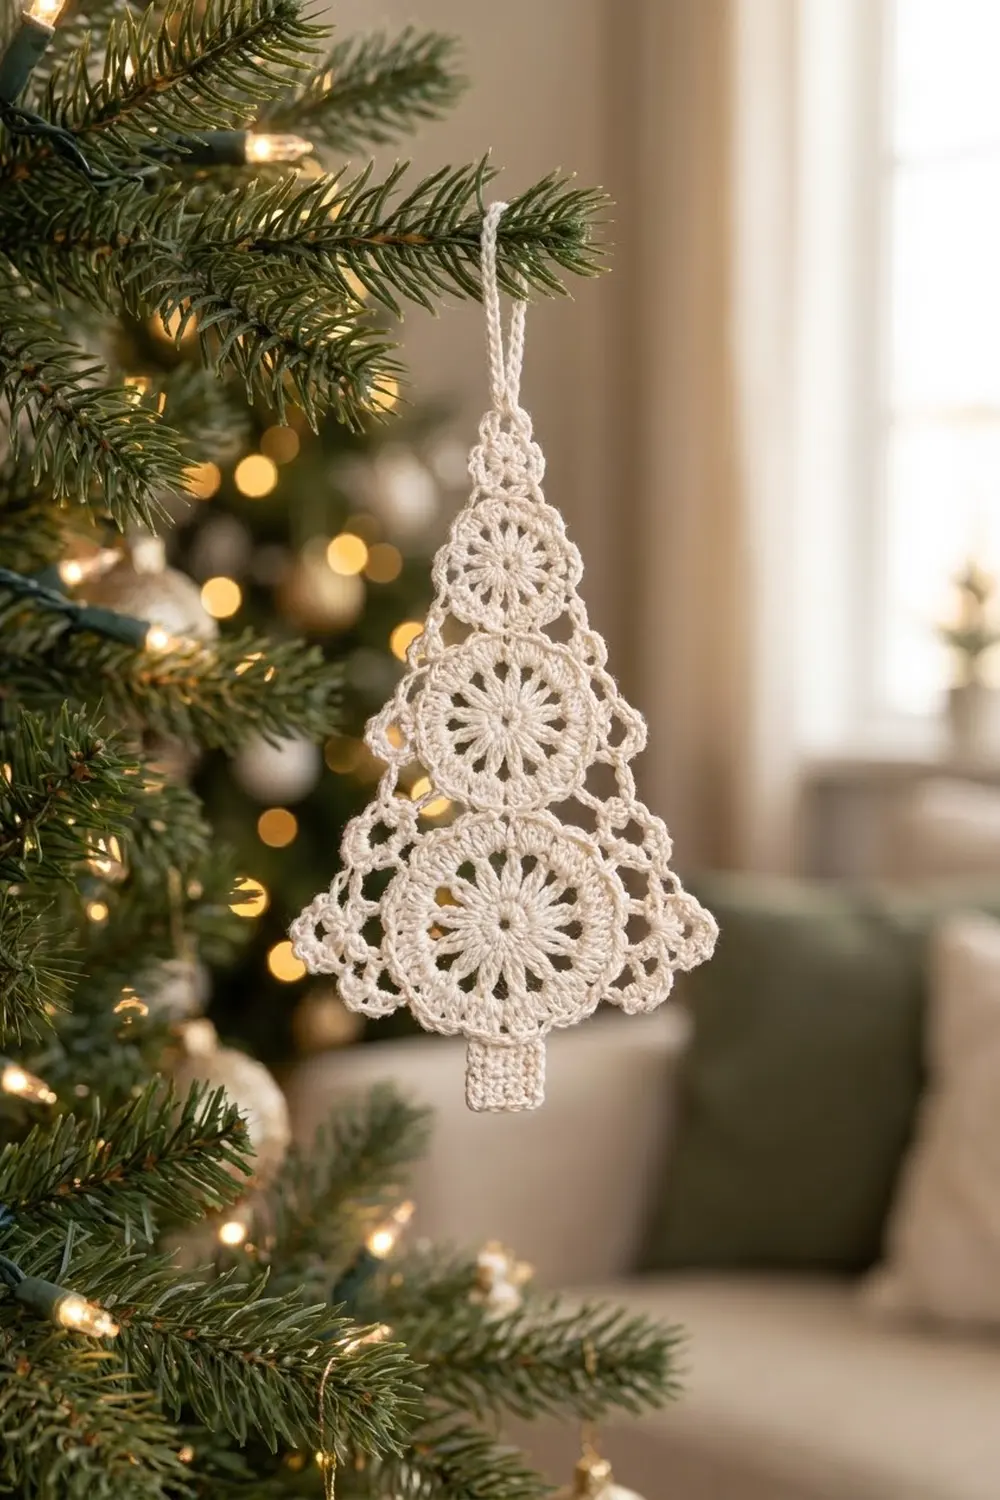
This little lace Christmas tree is made from three round medallions stacked from small to large, then framed with a lacy edge that turns the circles into a tiered tree. Each tier ends in a small pointed tip on both sides, and a short solid trunk finishes the bottom.
The sample is worked in a single color, a soft cream (ivory) cotton thread. One color keeps the spoke texture of the medallions easy to see and gives the ornament a frosted, heirloom look. It suits a tree, a window, a gift tag, or a car mirror.
The pattern uses US crochet terms. The finished tree body measures 2.5 in (6.4 cm) wide at the lowest points and 4.6 in (11.7 cm) tall from the top ring to the bottom edge. With the trunk it is 5.2 in (13.2 cm) tall, and the hanging loop adds another 1.5 in (3.8 cm), so the ornament hangs 6.7 in (17.0 cm) in total.
Here is how it goes together. You make the small top medallion first. The medium medallion is joined to it on its last round, and the large medallion is joined to the medium one the same way. Two edging rounds then go all the way around the whole shape to build the tree outline, the top ring, and the hanging loop. Last, you work the trunk in rows off the bottom edge.
Finished Size and Construction
- Finished size: 2.5 in (6.4 cm) wide x 4.6 in (11.7 cm) tall (body); 5.2 in (13.2 cm) with trunk; 6.7 in (17.0 cm) with hanging loop
- Skill level: Intermediate
- Terminology: US crochet terms
- Yarn weight: Size 5 cotton crochet thread (Lace, category 0)
- Hook: 1.75 mm steel hook (US steel 4)
- Number of pieces: 1 finished ornament (3 medallions joined as you go, so there’s no sewing)
- Layout: 3 medallions stacked in a vertical column, smallest at the top
- Medallion sizes: 0.8 in (2.0 cm), 1.2 in (3.0 cm), and 1.6 in (4.1 cm) across
- Size before border: 3.6 in (9.1 cm) tall x 1.6 in (4.1 cm) wide
- Border depth: 0.35 in (0.9 cm) along the curves, 0.45 in (1.1 cm) at each tier point
Materials
Use a mercerized cotton crochet thread in size 5. Mercerized thread holds its shape after starching and shows the stitch definition clearly. A slightly thicker thread such as size 3 will also work, but the ornament will come out bigger (see Gauge).
- Cream (ivory): 8 g, about 35 yd (32 m)
That amount includes a margin of roughly 50% for your gauge swatch, joining tails, and weaving in ends. One ornament uses about 5 g.
Tools:
– 1.75 mm steel crochet hook
– Fine tapestry needle
– Small sharp scissors
– 4 locking stitch markers
– Blocking board or foam mat, plus rustproof pins
– Fabric stiffener or spray starch
– Ruler or measuring tape
Abbreviations (US Terms)
- ch – chain
- sl st – slip stitch
- sc – single crochet
- hdc – half double crochet
- dc – double crochet
- tr – treble crochet
- sp – space
- st(s) – stitch(es)
- rep – repeat
Special stitch:
– Picot: ch 3, sl st in the 3rd ch from hook.
Joining loop: ch 1, sl st in the named loop or space of the earlier medallion, ch 1. This takes the place of one ch-3 loop.
Gauge and Checkpoints
Make Medallion A as your gauge piece before starting anything else. When it’s done and lightly pressed, it should measure 0.8 in (2.0 cm) across.
Checkpoints for each stage:
– Round 1 of any medallion (12 dc): 0.5 in (1.3 cm)
– Medallion B after Round 2: 1.0 in (2.5 cm). After Round 3: 1.2 in (3.0 cm)
– Medallion C after Round 3: 1.35 in (3.4 cm). After Round 4: 1.6 in (4.1 cm)
– Three joined medallions: 3.6 in (9.1 cm) tall
– After the edging: 2.5 in (6.4 cm) wide at the lowest points
– Trunk: 10 sc and 12 rows = 1 in (2.5 cm)
If your piece is too big: go down to a 1.5 mm hook, or tighten the ch-loops by pulling each chain snug.
If your piece is too small: go up to a 2.0 mm hook.
Each medallion only has to be within 0.05 in (0.1 cm) of its target. Small differences add up over three medallions, so check each one before you move on to the next.
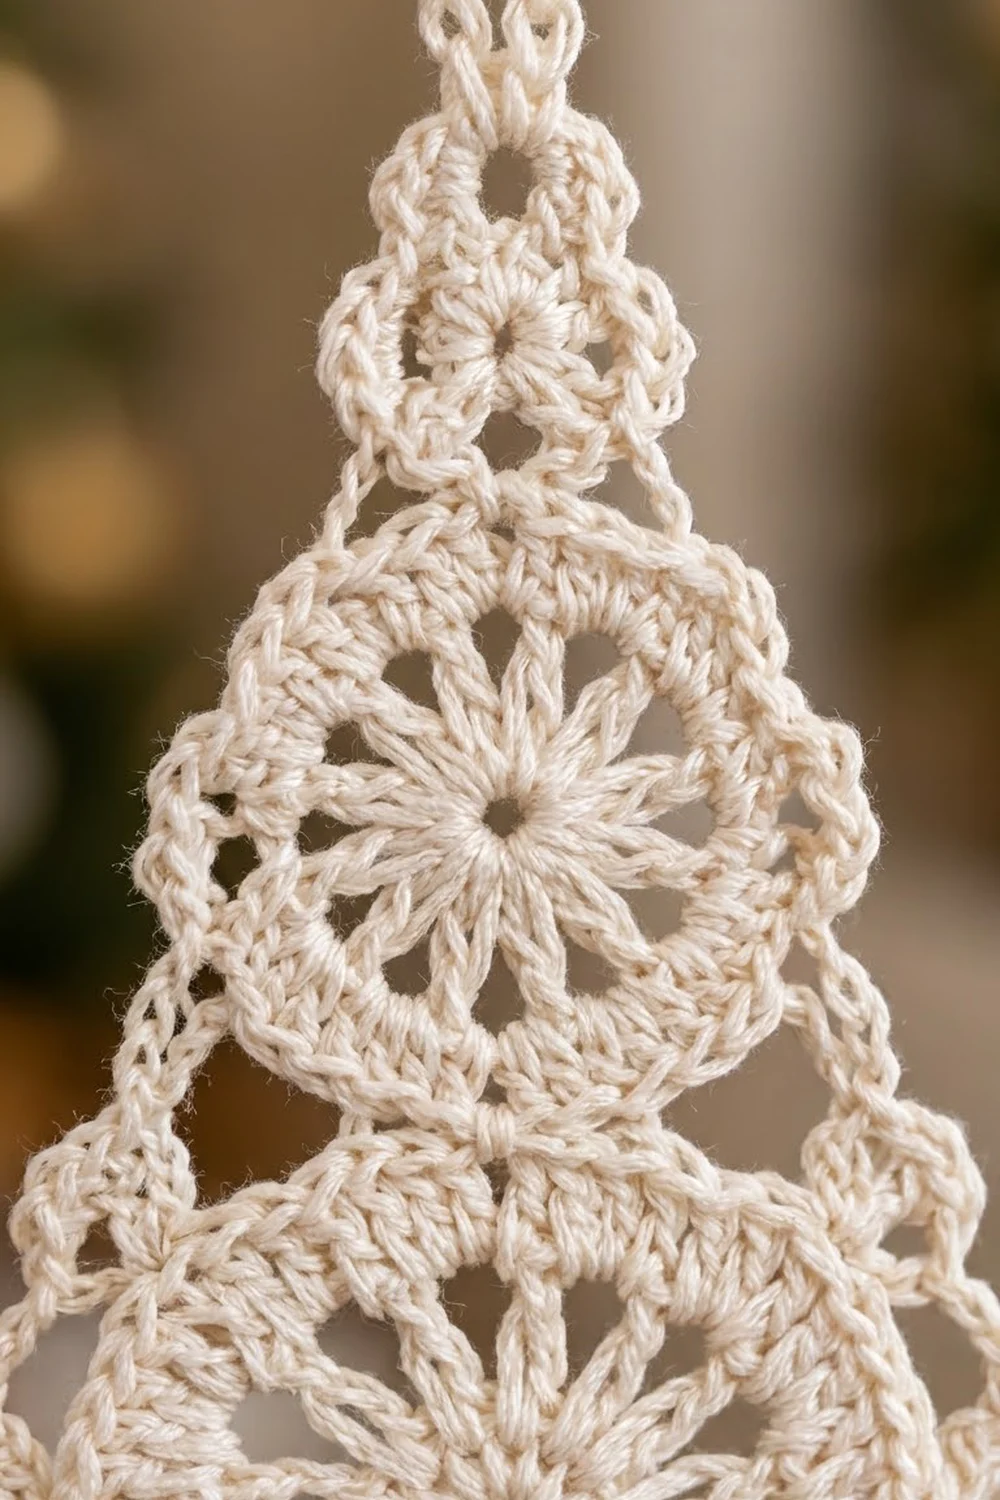
Medallion A (Small, Top)
Ch 4 and sl st to the first ch to form a ring.
Round 1: Ch 3 (counts as dc), 11 dc in ring, sl st to top of beg ch-3. (12 dc)
Round 2: Ch 1, sc in the same st, ch 2, sc in next dc, ch 2; rep from * 10 more times, sl st to first sc. (12 sc, 12 ch-2 sps)
Fasten off and weave in the ends. Medallion A measures 0.8 in (2.0 cm).
Medallion B (Medium, Middle)
Ch 4 and sl st to the first ch to form a ring.
Round 1: Ch 3 (counts as dc), 11 dc in ring, sl st to top of beg ch-3. (12 dc)
Round 2: Ch 3 (counts as dc), dc in the same st, ch 1, 2 dc in next dc, ch 1; rep from * 10 more times, sl st to top of beg ch-3. (24 dc = 12 worked 1 per st + 12 added; 12 ch-1 sps)
This round makes the paired spokes you can see radiating from the center.
Round 3 (joining round): Ch 1, sc in each of next 2 dc, ch 3, skip ch-1 sp; rep from * 10 more times, sc in each of the last 2 dc, then work the joining loop: ch 1, sl st in any ch-2 sp of Medallion A, ch 1. Sl st to the first sc. (24 sc = 24 worked 1 per dc + 0 added; 11 ch-3 loops + 1 joining loop)
Fasten off and weave in the ends. Medallion B measures 1.2 in (3.0 cm).
Loop numbering (for reference): Hold the joined pair with the front facing you and Medallion A on top. On each medallion, the loop at the top is loop 1, and you count clockwise from there through loop 12. That means the joining loop is B1, the joined space on A is A7, and B7 sits straight down at the bottom of B. Put a marker in B7.
Medallion C (Large, Bottom)
Ch 4 and sl st to the first ch to form a ring.
Round 1: Ch 3 (counts as dc), 11 dc in ring, sl st to top of beg ch-3. (12 dc)
Round 2: Ch 3, dc in same st, ch 1, 2 dc in next dc, ch 1; rep from * 10 more times, sl st to top of beg ch-3. (24 dc = 12 worked 1 per st + 12 added; 12 ch-1 sps)
Round 3: Sl st in next dc and into the ch-1 sp. Ch 3 (counts as dc), 2 dc in the same sp, ch 2, 3 dc in next ch-1 sp, ch 2; rep from * 10 more times, sl st to top of beg ch-3. (36 dc in 12 groups of 3; 12 ch-2 sps)
Round 4 (joining round): Ch 1, sc in each of next 3 dc, ch 3, skip ch-2 sp; rep from * 10 more times, sc in each of the last 3 dc, then work the joining loop into marked loop B7: ch 1, sl st in B7, ch 1. Sl st to the first sc. (36 sc = 36 worked 1 per dc + 0 added; 11 ch-3 loops + 1 joining loop)
Fasten off and weave in the ends. The joining loop is C1, and C7 sits at the bottom center. The column should now measure 3.6 in (9.1 cm) from the top of A to the bottom of C.
Edging
The edging is the border of this ornament. It goes once around the whole column and forms the tree outline. Round 1 lays a chain frame, and Round 2 fills it in with scallops and points.
Border gauge: Each ch-5 loop gets 6 sc, and each ch-9 loop gets 12 sts. That’s about 1.2 sts per chain, which keeps the curves flat. Round 2 adds 0.35 in (0.9 cm) along the curves and 0.45 in (1.1 cm) at each point.
Round 1 (Chain Frame)
With the front facing, join the thread with sc in loop C7 (bottom center).
Right side, working upward:
– Ch 5, sc in C6.
– Ch 9, sc in C5 (lower corner loop).
– [Ch 5, sc in next loop] 3 times, ending in C2.
– Ch 9, sc in B6 (this bridge crosses the C/B junction).
– [Ch 5, sc in next loop] 4 times, ending in B2.
– Ch 9, sc in A6 (this bridge crosses the B/A junction).
– [Ch 5, sc in next ch-2 sp] 5 times, ending in A1 (top center).
Left side, working downward:
– [Ch 5, sc in next ch-2 sp] 4 times, ending in A9.
– Ch 5, sc in A8.
– Ch 9, sc in B12 (bridge).
– [Ch 5, sc in next loop] 4 times, ending in B8.
– Ch 9, sc in C12 (bridge).
– [Ch 5, sc in next loop] 3 times, ending in C9.
– Ch 9, sc in C8 (lower corner loop).
– Ch 5, sl st to the first sc.
Count: 32 sc (11 on A, 10 on B, 11 on C) and 32 loops: 26 ch-5 loops and 6 ch-9 loops. Each side has 16 loops (13 ch-5 + 3 ch-9) and 92 chains. The ch-9 loops bow outward over the waists and lower corners, and that’s where the tier points will come from.
Round 2 (Scallops, Points, Top Ring)
Ch 1, sc in the same sc (bottom-center sc).
Plain loop: 6 sc in the loop.
Scallop: 3 sc, picot, 3 sc in the loop.
Point: 2 sc, hdc, 2 dc, tr, ch 3, tr, 2 dc, hdc, 2 sc in the ch-9 loop. (12 sts + ch-3 tip)
Right side: Plain loop in C7–C6. Point in C6–C5. Scallop in each of the next 3 loops. Point in the bridge. Scallop in each of the next 4 loops. Point in the bridge. Scallop in each of the next 4 loops. Plain loop in A2–A1.
Top ring and hanging loop: Sc in the top-center sc of Round 1 (in A1). Ch 8, sl st in that same sc to form the ring. Work 7 sc in the ring. Ch 30 and sl st in the last sc made. Work 36 sc over the ch-30 loop and sl st in the same sc. Work 7 sc in the rest of the ring, then sl st in the base sc. (Ring: 14 sc. Hanging loop: 36 sc.)
Left side: Plain loop in A1–A12. Scallop in each of the next 4 loops. Point in the bridge. Scallop in each of the next 4 loops. Point in the bridge. Scallop in each of the next 3 loops. Point in C9–C8. Plain loop in C8–C7. Sl st to the first sc.
Count: 230 sts (not counting picots, tips, the ring, or the hanging loop). That’s 22 scallops (132 sc), 4 plain loops (24 sc), 6 points (72 sts), and 2 center sc. Each side has 114 sts: 11 scallops (66) + 2 plain loops (12) + 3 points (36). Add the 2 shared center sc and you get 114 x 2 + 2 = 230.
Why the math works: Every ch-5 loop gets the same 6 sc, so the curved edges lie flat. The ch-9 loops are almost twice as long, and they get the tall stitches (hdc, dc, tr), which push each tip outward. The bridge points sit at the A/B and B/C waists, and the corner points sit at the bottom of C, so you get three tiers. The two sides mirror each other exactly, which keeps the tree straight.
Fasten off and weave in the ends.
Trunk
Find the bottom-center sc of Round 2. Count 3 sc to the left of it (the last 3 sc of plain loop C8–C7) and join there.
Row 1: Ch 1, sc in the same st and the next 2 sc, sc in the center sc, sc in the next 3 sc. Turn. (7 sc = 7 worked 1 per st + 0 added)
Rows 2–7: Ch 1, sc in each sc across. Turn. (7 sc)
Fasten off. The trunk measures 0.7 in (1.8 cm) wide x 0.6 in (1.5 cm) tall.
Final Blocking
- Weave in all the ends along the back of the sc rounds. Don’t use the chain loops for this.
- Soak the ornament in fabric stiffener (or spray it well with starch) and squeeze out the excess.
- Lay it face up on the blocking board.
- Pin the top ring and stretch the hanging loop upward.
- Pin the bottom of the trunk so the tree is 5.2 in (13.2 cm) from ring top to trunk bottom.
- Pin the centers of the three medallions in a straight vertical line.
- Pin the six ch-3 tips. Set the two lowest tips 2.5 in (6.4 cm) apart, and pin each pair level with the other.
- Pin out every picot so the scallops are even.
- Square up the trunk edges.
- Let it dry completely (8–12 hours) before you unpin.
Final Quality-Control Checklist
- The medallions measure 0.8 in (2.0 cm), 1.2 in (3.0 cm), and 1.6 in (4.1 cm).
- Each junction is a single joining loop, centered top and bottom.
- Round 1 has 32 sc and 32 loops, with 6 ch-9 loops placed symmetrically.
- There are 6 points and 22 picots, and the left side mirrors the right.
- The top ring has 14 sc and the hanging loop is fully covered with 36 sc.
- The trunk is 7 sc wide and centered under C7.
- The body is 2.5 in (6.4 cm) x 4.6 in (11.7 cm).
- All ends are hidden and the ornament is stiff and flat.
Troubleshooting
The medallion cups: Your chains are too tight. Loosen the ch-1 and ch-3 loops, or go up a hook size.
The medallion ruffles: Your dc are too tall. Pull up shorter loops, or go down a hook size.
The tree leans: A joining loop is off-center. Recount 6 loops on each side of B1 before you join C.
The points are flat: Make sure the tr pair goes in the middle of the ch-9 loop. Then pin the tips firmly while blocking.
Scallops pucker between medallions: You probably used ch 5 where a bridge needs ch 9. Check the Round 1 count.
The hanging loop twists: Work the 36 sc evenly, and block the loop flat.
The trunk is off-center: Pull it out and rejoin 3 sc to the left of the bottom-center sc.
Care
Hand wash in cool water with mild soap, then reshape and re-stiffen while damp. Store it flat or hanging, away from crushing weight.
Final Notes
Here is the full measurement chain. Medallion A reaches 0.8 in (2.0 cm), B reaches 1.2 in (3.0 cm), and C reaches 1.6 in (4.1 cm). Stacked, they make a 3.6 in (9.1 cm) column. The edging (32 sc and 32 loops in Round 1, then 230 sts in Round 2) brings the body to 2.5 in (6.4 cm) x 4.6 in (11.7 cm). The trunk takes it to 5.2 in (13.2 cm), and the hanging loop brings the ornament to 6.7 in (17.0 cm). If each checkpoint matches, the finished tree will too.
Happy crocheting!