

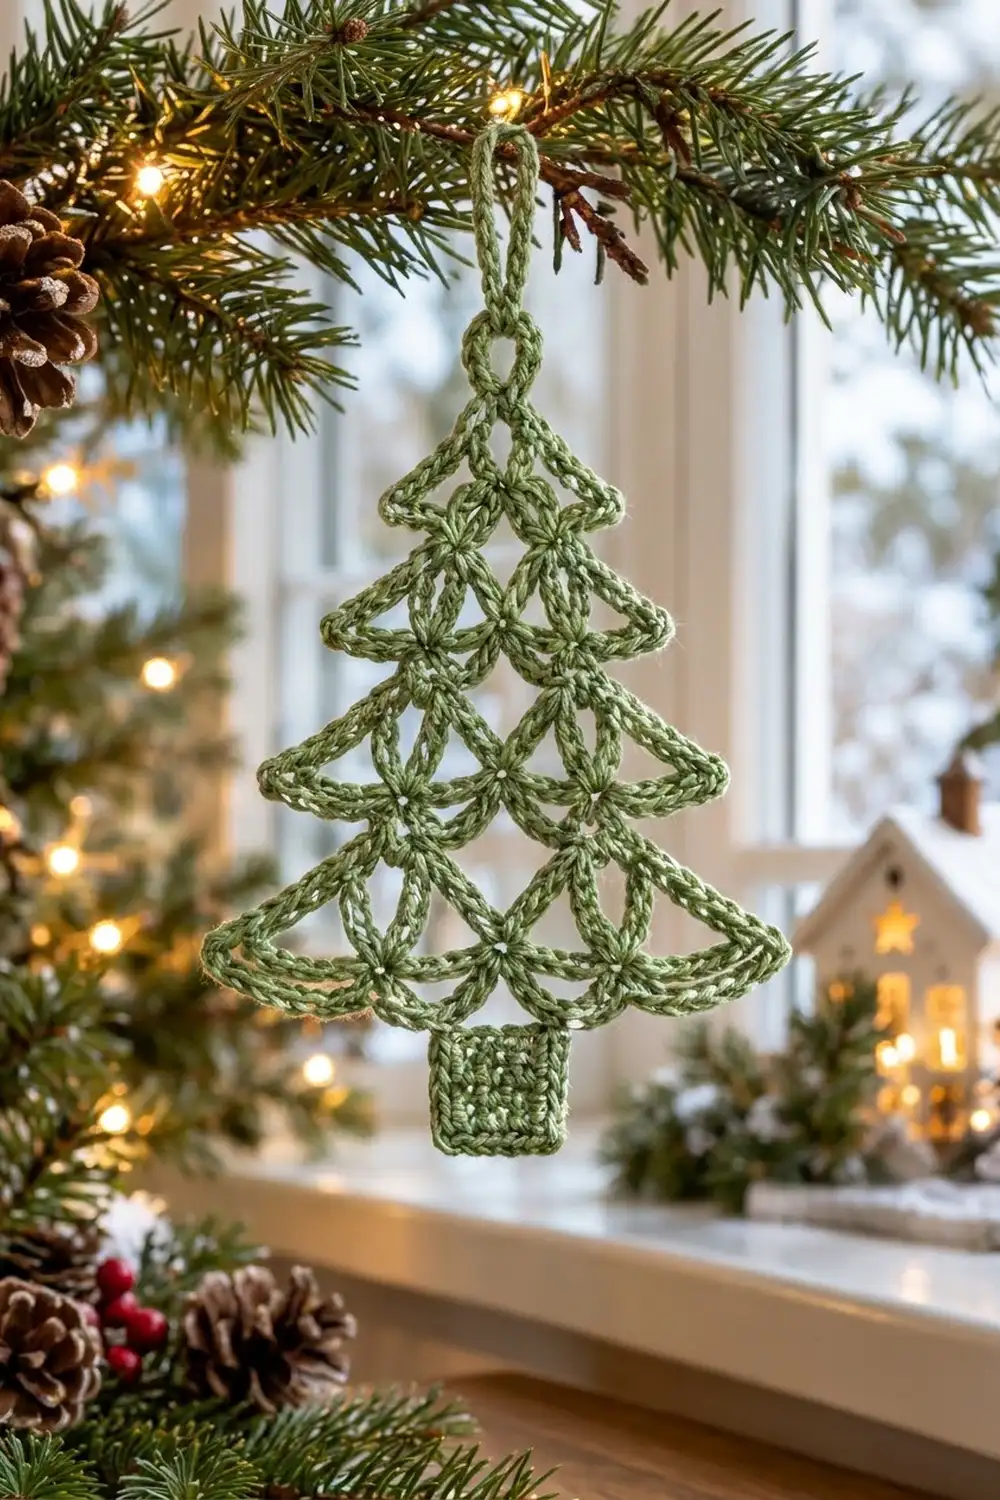
This lacy tree ornament is built from chain loops that cross and meet at small star points. Four tiers step outward as they go down, and each one ends in a row of soft scallops that sits over the tier below. A small solid trunk anchors the bottom, and a simple chain loop at the top lets you hang it from a branch, a window latch or a gift tag.
The sample is made in one color, a muted sage green cotton. Because it’s a single color, the lace pattern stands out clearly. It looks good on a natural-style tree, against a frosted window or tied to kraft-paper wrapping.
The pattern uses US crochet terms. After blocking, the finished ornament is 4.5 in (11.4 cm) wide at the bottom tier. It is 6.25 in (15.9 cm) tall from the tip to the bottom of the trunk, or 7.5 in (19.1 cm) tall with the hanging loop.
You work the whole ornament as one piece, from the top down, in turned rows. Each tier has three rows: a narrow “pinch” row, a widening row and a scallop row. After that you add the trunk below the center of the last tier and the hanging loop at the tip. Stiffening it lightly keeps the arches crisp.
Finished Size and Construction
- Finished size: 4.5 in (11.4 cm) wide × 6.25 in (15.9 cm) tall; 7.5 in (19.1 cm) with loop
- Skill level: Easy-intermediate (you need to be able to count chains carefully)
- Terminology: US crochet terms
- Yarn weight: Sport weight (#2) cotton
- Hook: 3.25 mm (US D/3)
- Number of pieces: 1
- Layout: Four stacked tiers, a trunk below and a loop above
- Piece size: Tier widths of 2.25 in (5.7 cm), 3 in (7.6 cm), 3.75 in (9.5 cm) and 4.5 in (11.4 cm)
- Size before border: The same as the finished size, because the scallop edge is built into the rows
- Border depth: No added border; each scallop arch dips about 0.25 in (0.6 cm)
Materials
Yarn: Use a smooth, tightly plied sport weight cotton or cotton blend. Mercerized cotton shows the chain lines best and holds starch well. Avoid fuzzy or very soft acrylic, because the lace will look blurry and won’t hold its shape.
- Sage green: 8 g, about 16 m (17.5 yd)
The amount includes a generous margin. One ornament usually needs a little less, so one 50 g ball makes several ornaments.
Tools:
- 3.25 mm (US D/3) crochet hook
- Tapestry needle
- Scissors
- Stitch marker
- Fabric stiffener, or starch and water
- Blocking mat or foam board, plus rustproof pins
- Ruler or tape measure
Abbreviations (US Terms)
- ch – chain
- sc – single crochet
- sl st – slip stitch
- sp – space
- st(s) – stitch(es)
- ch-5 loop – a loop of 5 chains that links two anchor sc
- ch-7 arch – a longer loop of 7 chains, used in scallop rows
Special stitch – Anchor sc: a sc worked around the whole chain loop (into the space, not into a single chain). This is where the loops gather and form the small star points you see in the lace.
Gauge and Checkpoints
Lace gauge depends on tension, so make one tier first and measure it before you go on.
Gauge swatch: Work Rows 1–3 (Tier 1) and lay it flat without stretching it. It should be 2.25 in (5.7 cm) across the arch tips and 1.5 in (3.8 cm) tall from the tip. Each ch-7 arch spans about 0.75 in (1.9 cm).
Trunk gauge: 6 sc = 1.25 in (3.2 cm) wide; 8 rows = 1 in (2.5 cm).
Checkpoints (measured flat, before blocking):
- After Row 3 (Tier 1): 2.25 in (5.7 cm) wide, 1.5 in (3.8 cm) tall
- After Row 6 (Tier 2): 3 in (7.6 cm) wide, 2.75 in (7.0 cm) tall
- After Row 9 (Tier 3): 3.75 in (9.5 cm) wide, 4 in (10.2 cm) tall
- After Row 12 (Tier 4): 4.5 in (11.4 cm) wide, 5.25 in (13.3 cm) tall
- After the trunk: 6.25 in (15.9 cm) tall overall
If the tree is too big: go down to a 2.75 mm hook, or pull each chain snug. Loose chains are the most common reason lace ends up oversized.
If the tree is too small: go up to a 3.5 mm hook. Don’t add chains to the loops, because that changes the shape of the arches and the scallops will sag.
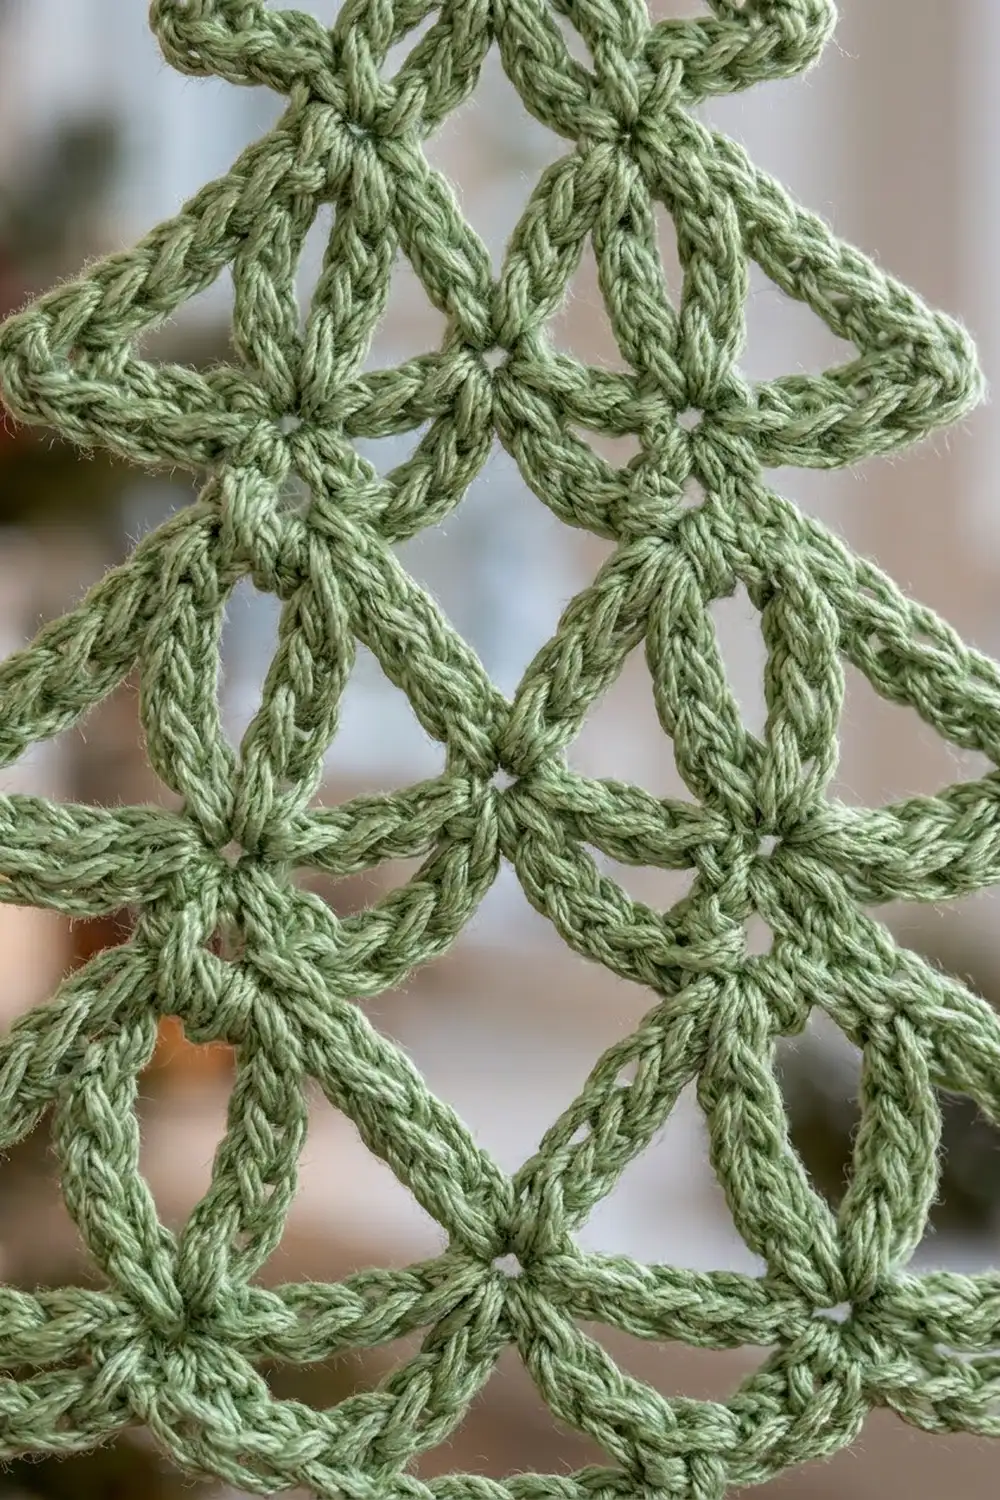
Pattern: Tree Body
Work in turned rows from the tip down. At the start of each row, ch 1, which doesn’t count as a stitch. The piece looks the same on both sides, so either side can be the front.
Tier 1 (Top)
Row 1: Ch 2, work 3 sc in the 2nd ch from the hook. Turn. (3 sc)
Row 2: Ch 1, sc in the first sc, ch 5, sc in the next sc; repeat from * to * once more. Turn. (3 sc, 2 ch-5 loops)
These two short loops form the small star at the tip.
Row 3 (scallop row): Ch 1, sc in the first sc, ch 7, anchor sc in the first ch-5 loop, ch 7, anchor sc in the next ch-5 loop, ch 7, sc in the last sc. Turn. (4 sc, 3 ch-7 arches)
Checkpoint: 2.25 in (5.7 cm) wide, 1.5 in (3.8 cm) tall.
How the Rows Work
Every tier after Tier 1 uses the same three kinds of row:
- Pinch row: Skip the end sc. Sl st across to the center of the first arch, then work an anchor sc into each arch with ch 5 between them. The end sc of the row below are left unworked, so the outer half-arches stick out as the tier’s skirt tips. This row has one fewer loop than the number of arches below it.
- Widening row: Sc in the first sc, ch 5, anchor sc in each loop with ch 5 between, ch 5, sc in the last sc. This row adds 1 loop.
- Scallop row: Work like the widening row, but use ch 7 instead of ch 5. This also adds 1 loop, and the longer chains drop into rounded scallops.
Tier 2
Row 4 (pinch): Ch 1, skip the end sc, sl st in each of the first 4 ch of the first arch, ch 1, anchor sc in the same arch, ch 5, anchor sc in the next arch; repeat from * to * once more. Leave the last sc unworked. Turn. (3 sc, 2 ch-5 loops)
Row 5 (widening): Ch 1, sc in the first sc, ch 5, anchor sc in the first loop, ch 5, anchor sc in the next loop, ch 5, sc in the last sc. Turn. (4 sc, 3 ch-5 loops)
Row 6 (scallop): Ch 1, sc in the first sc, ch 7, anchor sc in the next loop; repeat from * to * 2 more times, ch 7, sc in the last sc. Turn. (5 sc, 4 ch-7 arches)
Checkpoint: 3 in (7.6 cm) wide, 2.75 in (7.0 cm) tall. The Tier 1 scallop tips should stick out slightly over the top of Tier 2.
Tier 3
Row 7 (pinch): Ch 1, skip the end sc, sl st in each of the first 4 ch of the first arch, ch 1, anchor sc in the same arch, ch 5, anchor sc in the next arch; repeat from * to * 2 more times. Leave the last sc unworked. Turn. (4 sc, 3 ch-5 loops)
Row 8 (widening): Ch 1, sc in the first sc, ch 5, anchor sc in the next loop; repeat from * to * 2 more times, ch 5, sc in the last sc. Turn. (5 sc, 4 ch-5 loops)
Row 9 (scallop): Ch 1, sc in the first sc, ch 7, anchor sc in the next loop; repeat from * to * 3 more times, ch 7, sc in the last sc. Turn. (6 sc, 5 ch-7 arches)
Checkpoint: 3.75 in (9.5 cm) wide, 4 in (10.2 cm) tall.
Tier 4 (Bottom)
Row 10 (pinch): Ch 1, skip the end sc, sl st in each of the first 4 ch of the first arch, ch 1, anchor sc in the same arch, ch 5, anchor sc in the next arch; repeat from * to * 3 more times. Leave the last sc unworked. Turn. (5 sc, 4 ch-5 loops)
Row 11 (widening): Ch 1, sc in the first sc, ch 5, anchor sc in the next loop; repeat from * to * 3 more times, ch 5, sc in the last sc. Turn. (6 sc, 5 ch-5 loops)
Row 12 (scallop): Ch 1, sc in the first sc, ch 7, anchor sc in the next loop; repeat from * to * 4 more times, ch 7, sc in the last sc. (7 sc, 6 ch-7 arches)
Fasten off and leave a short tail.
Checkpoint: 4.5 in (11.4 cm) wide, 5.25 in (13.3 cm) tall.
Pattern: Trunk
Row 12 has 6 arches. The 4th sc sits at the exact center, between arch 3 and arch 4. The trunk hangs from these two center arches.
Row 1: Join the yarn in arch 3, close to the center sc. Work 3 sc in arch 3 on the half nearest the center, skip the center sc, then work 3 sc in arch 4 on the half nearest the center. Turn. (6 sc)
Rows 2–8: Ch 1, sc in each sc across. Turn. (6 sc)
Fasten off.
Checkpoint: The trunk is 1.25 in (3.2 cm) wide and 1 in (2.5 cm) deep, and the tree is now 6.25 in (15.9 cm) tall overall.
Pattern: Hanging Loop
Join the yarn with a sl st in the center sc of Row 1 at the tip. Ch 16, then sl st in the same sc. Fasten off.
The loop is about 1.25 in (3.2 cm) long, which brings the hanging length to 7.5 in (19.1 cm). Weave in all ends along chain lines so they don’t show.
Border: Built-In Scallop Edges
This ornament has no separate border round. The scallop row at the bottom of each tier is the edging, and adding sc around the outline would fill in the open look.
Border gauge: each ch-7 arch spans 0.75 in (1.9 cm) and dips about 0.25 in (0.6 cm).
Exact counts per tier edge:
- Tier 1 (Row 3): 3 arches × 0.75 in = 2.25 in (5.7 cm)
- Tier 2 (Row 6): 4 arches × 0.75 in = 3 in (7.6 cm)
- Tier 3 (Row 9): 5 arches × 0.75 in = 3.75 in (9.5 cm)
- Tier 4 (Row 12): 6 arches × 0.75 in = 4.5 in (11.4 cm)
Why the math works: each widening row and each scallop row adds exactly 1 loop. Each pinch row removes 1 loop, because it works only into the arches and skips both end sc. So every tier finishes exactly one arch wider than the one above (3, 4, 5, 6 arches). Each tier also starts 2 loops narrower than the scallop edge above it, and those skipped outer half-arches become the skirt tips. Total width therefore grows by a steady 0.75 in (1.9 cm) per tier, which gives the tree its even stepped outline.
Final Blocking
- Mix fabric stiffener as the label directs, or use about 1 part white glue to 1 part water.
- Soak the ornament fully, then gently press out the extra liquid in a towel.
- Lay it flat on a blocking mat. Pin the tip, then the center of the trunk, so the tree is 6.25 in (15.9 cm) tall.
- Pin the outer tip of each tier so the tiers are 2.25 in (5.7 cm), 3 in (7.6 cm), 3.75 in (9.5 cm) and 4.5 in (11.4 cm) wide, centered on the tip-to-trunk line.
- Pin the low point of each scallop arch so it curves evenly.
- Open each star point by nudging the loops apart with a pin.
- Pin the trunk square at 1.25 in (3.2 cm) wide.
- Let it dry completely, usually overnight, before removing the pins.
Final Quality-Control Checklist
- Four tiers with 3, 4, 5 and 6 bottom arches
- Final row counts: Row 3 has 4 sc, Row 6 has 5 sc, Row 9 has 6 sc, Row 12 has 7 sc
- Skirt tips stick out evenly on both sides of every tier
- Trunk is 6 sc wide, 8 rows deep and centered below the 4th sc of Row 12
- Hanging loop is centered at the tip
- Overall size is 4.5 in (11.4 cm) × 6.25 in (15.9 cm), or 7.5 in (19.1 cm) with the loop
- Ends are hidden and the ornament hangs straight
Troubleshooting
Tree leans to one side: you probably skipped or added an anchor sc. Count the sc in the last row of each tier against the counts above.
Scallops look flat: the ch-7 arches are too tight. Loosen your chain tension or go up a hook size for the scallop rows only.
Tiers don’t step out: you likely worked into the end sc in a pinch row. Always skip both end sc in Rows 4, 7 and 10.
Trunk is off-center: count the sc in Row 12 again. The trunk must sit on either side of the 4th sc.
Ornament curls: block it again with a stronger stiffener mix and pin every arch.
Care
Spot clean gently with cool water and reshape while damp. Store flat or hanging, away from humidity, so the starch stays firm.
Final Notes
The measurements build in a simple chain. A 2.25 in (5.7 cm) Tier 1 swatch confirms your 0.75 in (1.9 cm) arch. Each tier then adds one arch, giving 3 in (7.6 cm), 3.75 in (9.5 cm) and finally 4.5 in (11.4 cm). The four tiers reach 5.25 in (13.3 cm), the 1 in (2.5 cm) trunk brings the tree to 6.25 in (15.9 cm), and the 1.25 in (3.2 cm) loop finishes it at 7.5 in (19.1 cm). If you check the measurements at each tier, the finished tree will match.
Happy crocheting!