

This holder is a teardrop-shaped tube covered in deep fan shells. It hangs from a cabinet knob or hook by a padded ring. You push plastic bags in at the top and pull them out one at a time through the small cuff at the bottom.
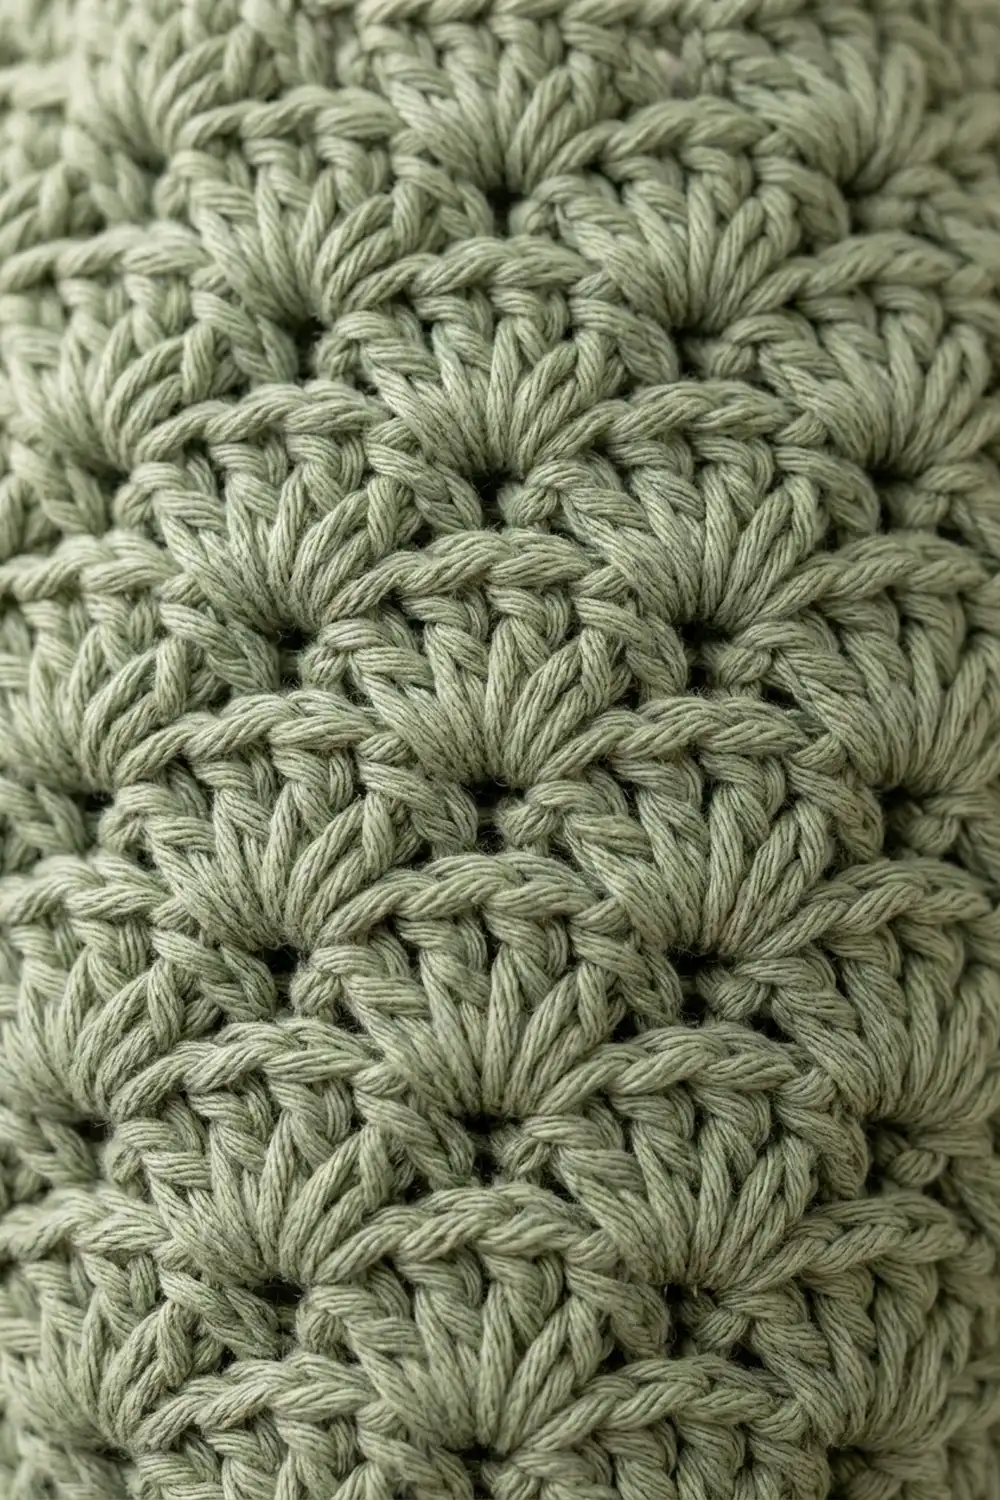
The sample uses one soft sage green yarn. That color sits quietly against painted cabinets, natural wood, and kitchen greenery. The shell texture looks rich, but the stitches are simple: single crochet, double crochet, and slip stitches.
The pattern uses US crochet terms. The finished body is 14.75 in (37.5 cm) long and 7.5 in (19.1 cm) wide flat at its widest point. With the hanging ring, the total length is about 19 in (48.3 cm).
You work from the bottom up in joined rounds. First you make a small single crochet cuff. Next come shell rounds that add shells in steps to shape the teardrop. A single crochet rim gently closes in the top. Finally, a short tab and a padded ring are worked straight off the back of the rim, so there is nothing to sew on.
Finished Size and Construction
- Finished size: 7.5 in (19.1 cm) wide flat at the widest point × 14.75 in (37.5 cm) long body; about 19 in (48.3 cm) overall with the ring
- Skill level: Easy-intermediate
- Terminology: US
- Yarn weight: Aran / heavy worsted (#4), cotton or cotton blend
- Hook: 5.5 mm (I-9)
- Number of pieces: 1 (the body, tab, and ring are worked continuously)
- Layout: A single vertical tube that hangs from the top ring
- Piece size: Bottom opening 3 in (7.6 cm) flat; widest point 7.5 in (19.1 cm) flat; top opening 6 in (15.2 cm) flat
- Size before rim: 7.5 in (19.1 cm) wide flat × 14 in (35.6 cm) long
- Rim depth: 0.75 in (1.9 cm), which is 3 rounds of sc
Materials
Yarn: Use a smooth Aran-weight cotton or cotton-acrylic blend. Cotton holds the shell shape well and doesn’t stretch out of shape when the holder is full. Avoid fuzzy or very soft acrylic yarns, because the shells will blur and the tube may sag.
- Sage green: 170 g, about 290 m (317 yd)
These quantities include a margin of roughly 15% for your gauge swatch and small tension differences.
Tools:
- 5.5 mm (I-9) crochet hook
- Locking stitch markers (at least 3)
- Tapestry needle
- Scissors
- Measuring tape
- Spray bottle and a rolled towel for blocking
Abbreviations (US Terms)
- ch – chain
- sl st – slip stitch
- sc – single crochet
- dc – double crochet
- st(s) – stitch(es)
- sk – skip
- rnd – round
- rep – repeat
Special stitches:
- Shell: Work 5 dc into the same stitch. The 3rd dc of a shell is its center dc.
- Normal repeat: Work 1 sc in the center dc of the next shell, then 1 shell in the next sc. This uses 1 old shell and 1 old sc, and makes 1 new sc and 1 new shell (6 sts).
- Increase repeat: Work 1 sc in the 1st dc of the next shell, 1 shell in its 3rd (center) dc, and 1 sc in its 5th dc, then 1 shell in the next sc. This uses 1 old shell and 1 old sc, and makes 2 sc and 2 shells (12 sts). It adds exactly 1 shell repeat.
Every shell round alternates sc and shell all the way around. The stitch count is always 6 × the number of shells.
Gauge and Checkpoints
- Single crochet: 16 sts × 16 rnds = 4 in (10.2 cm)
- Shell pattern: 4 shell repeats = 5 in (12.7 cm) around; 4 shell rnds = 3 in (7.6 cm) tall
Each shell repeat (1 shell + 1 sc) is 1.25 in (3.2 cm) wide, and each shell round is 0.75 in (1.9 cm) tall.
Test first: Work Rnds 1–4 below, then lay the tube flat and measure it. Treat this as your gauge swatch.
Checkpoints:
- After Rnd 2: the cuff is 3 in (7.6 cm) wide flat and 0.5 in (1.3 cm) tall.
- After Rnd 4: 3.75 in (9.5 cm) wide flat and 2 in (5.1 cm) tall.
- After Rnd 9: 7.5 in (19.1 cm) wide flat and 5.75 in (14.6 cm) tall.
- After Rnd 20: 7.5 in (19.1 cm) wide flat and 14 in (35.6 cm) tall.
- After Rnd 23: 14.75 in (37.5 cm) tall, with a rim 6 in (15.2 cm) wide flat.
Too big? Go down half a hook size (5 mm). Too small? Go up to 6 mm. If only the shells are off but your sc gauge is right, keep the hook and simply relax or firm up your dc tension.
Pattern
Work in joined rounds with the right side facing. Do not turn unless the pattern tells you to. The ch 1 at the start of a round never counts as a stitch.
Bottom Cuff
Foundation: Ch 24 and sl st to the first ch to form a ring. Be careful not to twist the chain.
Rnd 1: Ch 1, sc in each ch around, sl st to the first sc. (24 sts)
Rnd 2: Ch 1, sc in each st around, sl st to the first sc. (24 sts)
The cuff measures 6 in (15.2 cm) around, or 3 in (7.6 cm) flat.
Shell Body
Rnd 3 (conversion round): Ch 1, sc in the first st, sk 1, shell in the next st, sk 1, sc in the next st. Rep from * around. On the last repeat, end with “sk 1” and leave out the final sc. Sl st to the first sc.
Count: 6 repeats × (1 sc + 5 dc) = 6 sc + 30 dc = 36 sts, with 6 shells. That is 24 old stitches consumed in steps of 4, and 6 shells made.
Rnd 4: Sl st in each of the next 3 dc to reach the center dc of the first shell. Ch 1, then work a normal repeat 6 times, starting the first sc in the same st as the last sl st. Sl st to the first sc. (36 sts, 6 shells)
Each new shell now sits in the gap between two shells of the round below. This creates the offset fan texture.
Rnd 5 (increase): Sl st to the center dc of the first shell as in Rnd 4, then ch 1. Work [normal repeat 2 times, increase repeat 1 time] twice. Sl st to the first sc. (48 sts, 8 shells)
From now on, every round begins with “sl st to the center dc of the first shell, ch 1” and ends with “sl st to the first sc.”
Rnd 6: Normal repeat 8 times. (48 sts, 8 shells)
Rnd 7 (increase): [Normal repeat 3 times, increase repeat 1 time] twice. (60 sts, 10 shells)
Rnd 8: Normal repeat 10 times. (60 sts, 10 shells)
Rnd 9 (increase): [Normal repeat 4 times, increase repeat 1 time] twice. (72 sts, 12 shells)
Checkpoint: the piece is 7.5 in (19.1 cm) wide flat. The two increase points in each increase round sit opposite each other, so the teardrop stays symmetrical.
Rnds 10–20: Normal repeat 12 times in each round. (72 sts, 12 shells each round)
That gives 18 shell rounds in total (Rnds 3–20). The body now measures 14 in (35.6 cm) from the bottom edge.
Rim (Border)
Rim gauge: 4 sc = 1 in (2.5 cm), the same as the cuff.
Rnd 21 (trim round): Ch 1. Working into the round below, sc in the 1st dc of the shell, sc in the 3rd dc, sc in the 5th dc, sc in the next sc. Rep from * around and sl st to the first sc.
Count: 12 repeats × 4 sc = 48 sts. That breaks down as 3 sc worked over each shell (12 × 3 = 36) plus 1 sc worked into each existing sc (12 × 1 = 12), and 36 + 12 = 48.
Rnds 22–23: Ch 1, sc in each st around, sl st to the first sc. (48 sts)
Do not fasten off yet if you plan to go straight to the tab. Otherwise, fasten off and weave in the end.
Per side: Lay the tube flat with the round joins along one fold. Each flat side then holds 24 rim sts, which is 6 in (15.2 cm) at 4 sts per in. The fold stitches are shared, so nothing is counted twice.
Why the math works: The body is 12 repeats × 1.25 in = 15 in (38.1 cm) around. The rim is 48 sc ÷ 4 = 12 in (30.5 cm) around. That gathers the top in by 3 in (7.6 cm) and gives the rounded shoulder of the teardrop. The rim is still wide enough for a hand to push bags in.
The bottom cuff has the same logic. Its 24 sc measure 6 in (15.2 cm) around, which is snug enough to hold bags in but loose enough to pull one out.
Hanging Tab
Flatten the rim so the joins sit at one side fold. Count 48 sts around, starting at the join. Sts 25–48 form the back. Place markers in sts 33 and 40, which are the center 8 sts of the back.
Row 1: Join yarn in st 33 (or sl st over to it). Ch 1, sc in sts 33–40. Turn. (8 sts)
Row 2: Ch 1, sc in each st across. Do not turn. (8 sts)
The tab is 2 in (5.1 cm) wide and 0.5 in (1.3 cm) tall.
Hanging Ring
Arch: Ch 30. Without twisting, sl st into the first sc of Row 2 at the opposite corner of the tab. The chain arch and the top of the tab now form a closed loop.
Ring Row 1: Turn. Ch 1, then work 40 sc into the arch (into the loop space, enclosing the chain, not into the individual chains). Sl st into the last sc of tab Row 2. Turn. (40 sts)
Pack the stitches closely so the chain is fully hidden. This gives the ring its padded look.
Ring Row 2: Sk the sl st. Work sc in the next 4 sts, 2 sc in the next st 8 times. Sl st into the first sc of tab Row 2. (48 sts: 40 worked one-per-stitch + 8 added)
Fasten off. The ring’s inner opening is about 2.75 in (7.0 cm) and its outer width is about 4 in (10.2 cm). The ring and tab together add about 4.25 in (10.8 cm), so the total length is about 19 in (48.3 cm).
Final Blocking
- Weave in all ends on the wrong side, following the dc posts so the tails disappear into the shells.
- Roll a towel into a tapered cylinder and slide it into the holder so it fills out the teardrop shape.
- Mist the holder evenly with water until it is damp but not dripping.
- Ease the shells into straight vertical columns, and shape the bottom into a smooth point.
- Check the measurements: 7.5 in (19.1 cm) at the widest point, 6 in (15.2 cm) at the rim, and 3 in (7.6 cm) at the cuff.
- Flatten the ring between your palms and pat it into a round shape.
- Let it dry completely with the towel still inside, standing upright or lying on its back.
Final Quality-Control Checklist
- 18 shell rounds, with 12 shells in each round from Rnd 9 to Rnd 20
- The shells are offset neatly and there are no gaps at the increase points
- Rim: 48 sts, 3 rnds, 6 in (15.2 cm) flat
- Cuff: 24 sts, 3 in (7.6 cm) flat, and a bag can pull through smoothly
- The tab is centered on the back, opposite the joins
- The ring is evenly covered with no chain showing
- The body is 14.75 in (37.5 cm) long and the total is about 19 in (48.3 cm)
- All ends are secured
Troubleshooting
Holes at the increase points: Work the increase sc’s into the front and back loops of the 1st and 5th dc, not just one loop.
The shells slant in a spiral: Make sure every round starts by slip stitching to the center dc of the first shell. Don’t add extra slip stitches.
The tube is wider than 7.5 in (19.1 cm): Your dc’s are too tall. Go down a hook size, or pull up shorter loops.
The rim flares: Your sc’s are too loose. Rework Rnd 21 with a hook 0.5 mm smaller.
The ring is stiff or curls: Ring Row 1 is packed too tightly. Rework it with 36–38 sc, then adjust Row 2 so it ends at 48.
Bags fall out of the bottom: Add a 3rd cuff round of sc2tog every 6 sts, which gives 20 sts.
Care
Hand wash or machine wash in cold water on a gentle cycle, then reshape the holder over a rolled towel and lay it flat to dry. Don’t tumble dry.

Final Notes
The measurement chain is:
- 24-st cuff = 3 in (7.6 cm) flat
- 6 shells = 3.75 in (9.5 cm)
- After three increase rounds, 12 shells = 7.5 in (19.1 cm) at the widest point
- 18 shell rounds bring the body to 14 in (35.6 cm)
- The 48-st rim draws the top in to 6 in (15.2 cm) and finishes the body at 14.75 in (37.5 cm)
- The tab and padded ring bring the total length to about 19 in (48.3 cm)
Check your size at each stage, and the holder should come out at the size given here.
Happy crocheting!