

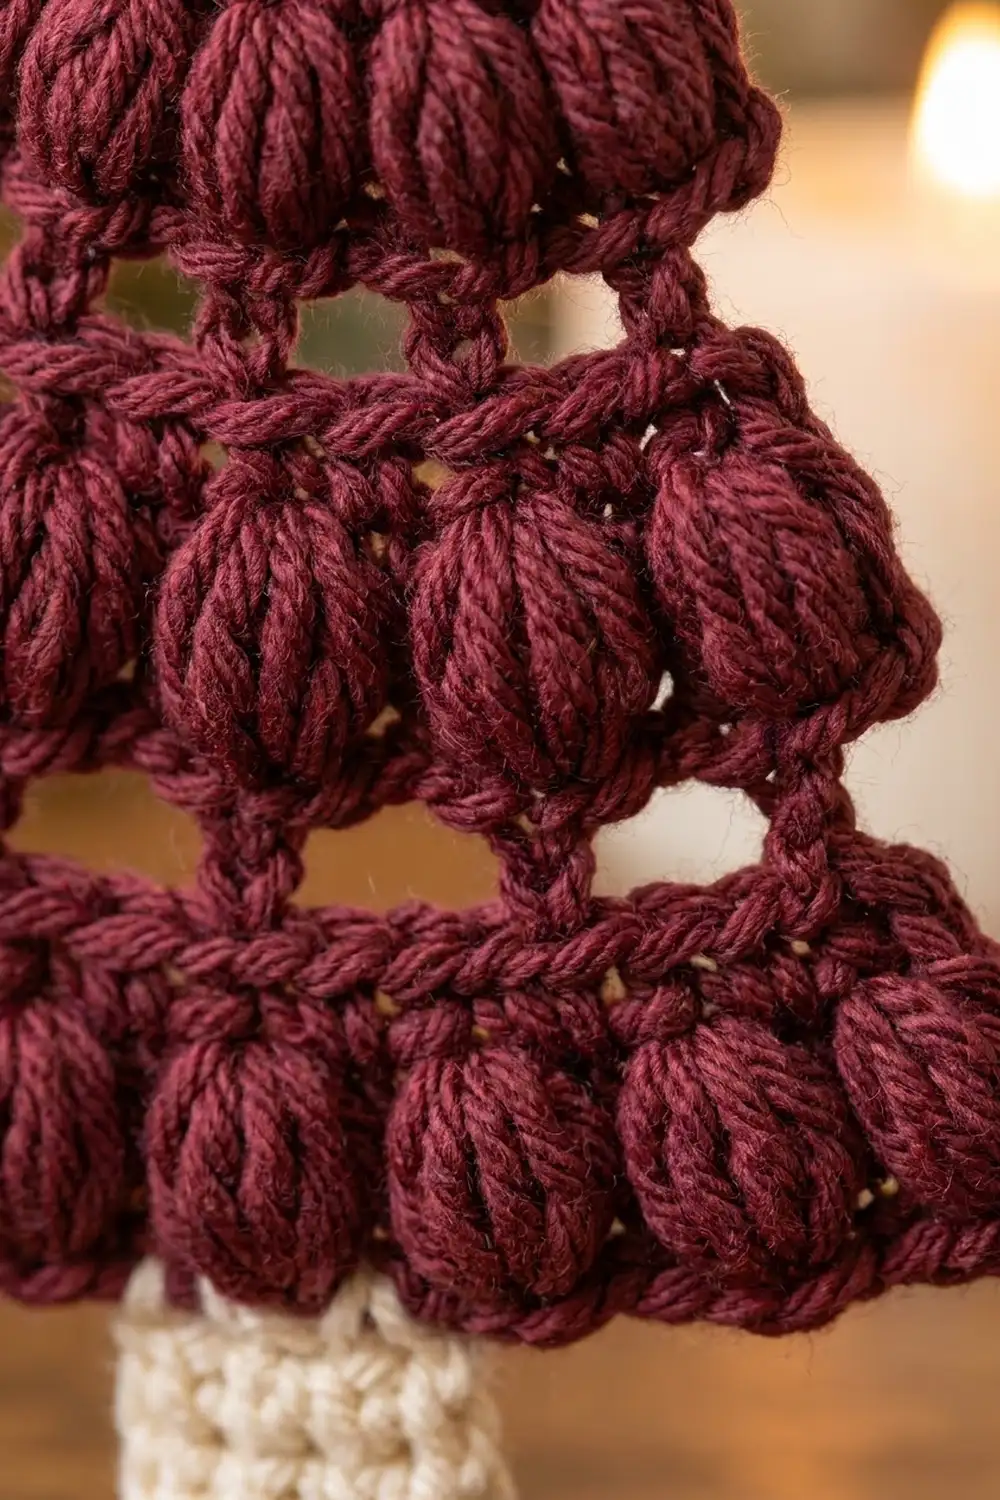
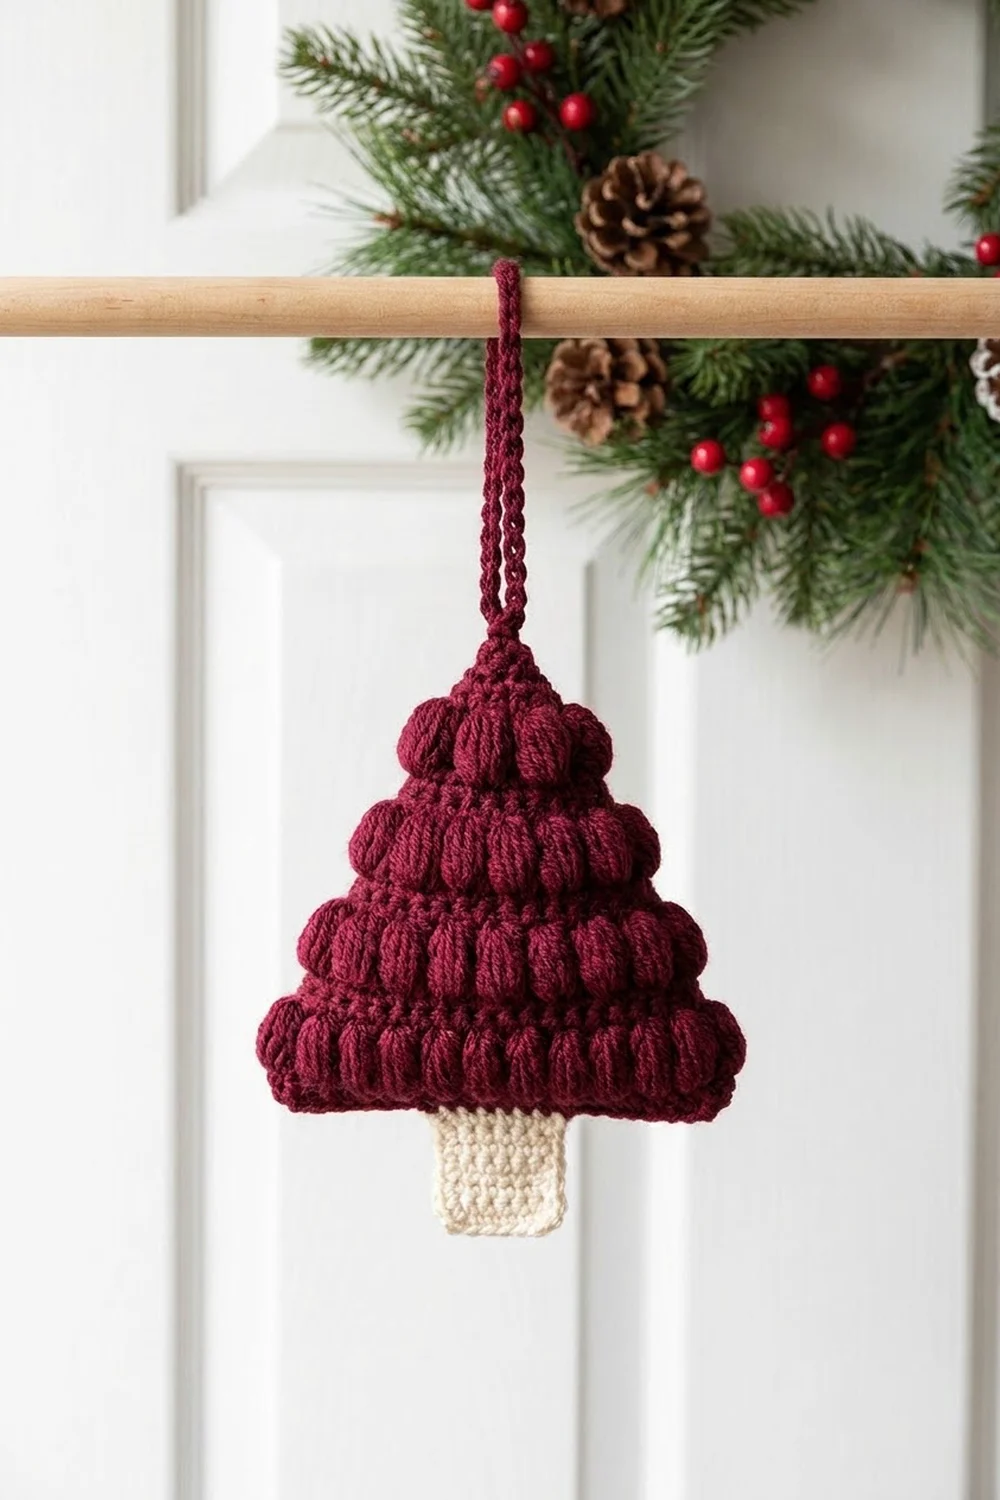
The Cranberry Puff Tree is a small, textured Christmas tree ornament made from rows of plump puff stitches. Each tier steps in from the one below to build the classic stacked tree shape. Between the tiers, a narrow open band of chain spaces keeps the piece light.
The tree body uses a deep cranberry burgundy. The trunk is a small cream square, and the hanging loop is a burgundy chain. The look is rustic and cozy, and it suits a door knob, a garland dowel, a gift package, or a tree branch.
This pattern uses US crochet terms. The finished ornament is 4.75 in (12.1 cm) wide at the base and 6.5 in (16.5 cm) tall from the bottom of the trunk to the tip, not counting the loop. With the loop it is about 8 in (20.3 cm) tall.
You work the tree flat in turned rows from the bottom up. At each new tier you decrease by slip stitching over the edge stitches. Then you make the hanging loop, work one border round of single crochet, and crochet the trunk directly onto the bottom edge. The ornament is one piece, and the only sewing is weaving in ends.
Finished Size and Construction
- Finished size: 4.75 in (12.1 cm) wide x 6.5 in (16.5 cm) tall, plus a 1.5 in (3.8 cm) hanging loop
- Skill level: Easy (confident beginner)
- Terminology: US crochet terms
- Yarn weight: Worsted (#4)
- Hook: 5.0 mm (US H-8)
- Number of pieces: 1 (single-piece ornament)
- Layout: One stacked triangle with four puff tiers of 7, 5, 3, and 1 puffs, from the bottom up
- Tree body before border: 4.25 in (10.8 cm) wide x 5.25 in (13.3 cm) tall
- Border depth: 0.25 in (0.6 cm), one round of sc
- Trunk: 1.25 in (3.2 cm) wide x 1 in (2.5 cm) tall
Materials
Use a smooth worsted-weight yarn. Cotton or a cotton blend gives crisp, well-defined puffs. Acrylic works too, but its puffs come out a little softer and rounder. Avoid fuzzy or splitty yarns: they hide the open bands and are hard to pull through when you close a puff.
- Color A, Burgundy / Cranberry: 18 g, about 36 m (39 yd)
- Color B, Cream: 3 g, about 6 m (7 yd)
These amounts include about 20% extra to cover a test tier, differences in tension, and weaving in ends. Puff stitches use a lot of yarn, so don’t cut it close.
Tools:
- 5.0 mm (US H-8) crochet hook
- Tapestry needle
- Scissors
- Stitch markers (2)
- Ruler or tape measure
- Blocking mat, rust-proof pins, and a spray bottle
Abbreviations (US Terms)
- ch – chain
- sl st – slip stitch
- sc – single crochet
- dc – double crochet
- sc2tog – single crochet 2 together
- sc3tog – single crochet 3 together
- sk – skip
- st(s) – stitch(es)
- sp – space
- yo – yarn over
- RS – right side
- rep – repeat
Special stitch – Puff stitch (puff): *Yo, insert the hook into the indicated stitch, yo, and pull up a loop about 0.5 in (1.3 cm) tall. Repeat from * 3 more times (9 loops on hook). Yo and pull through all 9 loops, then ch 1 to close. The closing ch-1 is part of the puff, not a separate stitch. On the next row, work into this closing chain.
Gauge and Checkpoints
Base gauge: 16 sc and 16 sc rows = 4 in (10.2 cm) with a 5.0 mm hook. That works out to 4 sc per inch, and each sc row is 0.25 in (0.6 cm) tall. Each puff row and each open dc row is 0.5 in (1.3 cm) tall.
The best gauge test is the ornament itself. Work Rows 1–3 (the bottom tier) and measure before you continue:
- After Row 3: 4.25 in (10.8 cm) wide, 1 in (2.5 cm) tall
- After Row 6: Row 6 is 3.25 in (8.3 cm) wide; total height 2.25 in (5.7 cm)
- After Row 9: Row 9 is 2.25 in (5.7 cm) wide; total height 3.5 in (8.9 cm)
- After Row 12: Row 12 is 1.25 in (3.2 cm) wide; total height 4.75 in (12.1 cm)
- After Row 14: total height 5.25 in (13.3 cm)
Too big? Switch to a 4.5 mm hook, and make sure you aren’t pulling your puff loops up too tall. Too small? Switch to a 5.5 mm hook, or pull the puff loops up a little higher. Change the hook first. Adjust puff height only if the rows are still too short.
Tree Body
Work in turned rows with Color A. Odd-numbered rows are RS rows.
Keep the foundation chain loose, or make it with a hook one size larger, because the border is worked into its underside later. Pull every puff loop to the same height so the tiers stay even. On open rows, the turning ch-4 counts as a stitch. On sc and puff rows, the ch 1 does not count.
Row 1 (RS): Ch 18. Sc in the 2nd ch from the hook and in each ch across. (17 sc)
Row 2 (puff row, Tier 1): Ch 1, turn. Sc in first st, ch 1, sk next st, puff in next st; rep from * 7 times total, ch 1, sk next st, sc in last st. (7 puffs, 8 ch-1 sps, 2 sc = 17 sts)*
Row 3: Ch 1, turn. Sc in each sc, each ch-1 sp, and the closing chain of each puff across. (17 sc)
Checkpoint: 4.25 in (10.8 cm) wide and 1 in (2.5 cm) tall.
Row 4 (open row, first step-in): Turn. Sl st in first 3 sts. Ch 4 (counts as dc and ch-1 sp), sk next st, dc in next st, ch 1, sk next st, dc in next st; rep from * 5 more times. Leave last 2 sts unworked. (7 dc, 6 ch-1 sps = 13 sts)*
The 2 stitches you skip with slip stitches at the start and the 2 you leave unworked at the end form the small ledges at the sides, so each tier sticks out past the one above it. The ch-1 spaces form the open band between tiers.
Row 5 (puff row, Tier 2): Ch 1, turn. Sc in first dc, ch 1, sk next ch-1 sp, puff in next dc; rep from * 5 times total, ch 1, sk next ch-1 sp, sc in 3rd ch of turning ch. (5 puffs, 6 ch-1 sps, 2 sc = 13 sts)*
Row 6: Ch 1, turn. Sc in each st across, as in Row 3. (13 sc)
Row 7 (open row): Turn. Sl st in first 3 sts. Ch 4, sk next st, dc in next st, ch 1, sk next st, dc in next st; rep from * 3 more times. Leave last 2 sts unworked. (5 dc, 4 ch-1 sps = 9 sts)*
Row 8 (puff row, Tier 3): Ch 1, turn. Sc in first dc, ch 1, sk next ch-1 sp, puff in next dc; rep from * 3 times total, ch 1, sk next ch-1 sp, sc in 3rd ch of turning ch. (3 puffs, 4 ch-1 sps, 2 sc = 9 sts)*
Row 9: Ch 1, turn. Sc in each st across. (9 sc)
Row 10 (open row): Turn. Sl st in first 3 sts. Ch 4, sk next st, dc in next st, ch 1, sk next st, dc in next st. Leave last 2 sts unworked. (3 dc, 2 ch-1 sps = 5 sts)
Row 11 (puff row, Tier 4): Ch 1, turn. Sc in first dc, ch 1, sk next ch-1 sp, puff in next dc, ch 1, sk next ch-1 sp, sc in 3rd ch of turning ch. (1 puff, 2 ch-1 sps, 2 sc = 5 sts)
Row 12: Ch 1, turn. Sc in each st across. (5 sc)
Row 13: Ch 1, turn. Sc2tog, sc in next st, sc2tog. (3 sts)
Row 14: Ch 1, turn. Sc3tog. (1 st)
Checkpoint: the body should be 4.25 in (10.8 cm) wide at Row 1 and 5.25 in (13.3 cm) tall.
Hanging Loop
Don’t fasten off. Ch 12, then sl st into the top of the sc3tog from Row 14. This makes a loop about 1.5 in (3.8 cm) long. Keep working with Color A for the border.
Border
The border is one round of sc in Color A. It tidies the stepped edges, covers the ledges, and gives the trunk a firm base to be worked into.
Border gauge: Use the same 4 sc per inch. On the sides, work 1 sc for every 0.25 in (0.6 cm) of row height, plus 1 sc in each exposed ledge stitch.
Border Rnd 1 (RS): Ch 1. Turn the piece so the RS faces you and you are working down the right-hand side. Work 27 sc down this side, spaced as listed below. At the bottom corner, turn the piece and work along the underside of the foundation chain: 2 sc in the first loop, sc in each of the next 15 loops, 2 sc in the last loop. (19 sc on the bottom edge) Work 27 sc up the second side. Work 1 sc into the base of the hanging loop at the tip, then sl st to the first sc. (74 sc total)
Side placement (same on each side, 27 sc):
- Row 1 end: 1 sc
- Row 2 end: 2 sc
- Row 3 end: 1 sc
- For each of the 3 upper tiers: 2 sc in the 2 exposed ledge sts, 2 sc in the open-row end, 2 sc in the puff-row end, 1 sc in the sc-row end (7 sc per tier, 21 total)
- Row 13 end: 1 sc
- Row 14 end: 1 sc
Why the math works: The body is 5.25 in (13.3 cm) tall. At 0.25 in (0.6 cm) per sc, that height takes 21 stitches: 1 for each of the 7 sc rows and 2 for each of the 7 tall rows. Adding the 6 ledge stitches (2 at each of the 3 step-ins) gives 27 per side. The bottom edge has 1 sc in each of the 17 foundation loops plus 1 extra sc at each corner, for 19 sc. Those 2 corner stitches are already part of the 19, so don’t count them again. Total: 19 + 27 + 27 + 1 tip = 74.
The border adds 0.25 in (0.6 cm) to each side and to the bottom. The body now measures 4.75 in (12.1 cm) wide and 5.5 in (14.0 cm) tall. Fasten off Color A, leaving a 6 in (15.2 cm) tail.
Trunk
Hold the piece with the RS facing and the bottom edge at the top. Count the 19 bottom border sc, starting with the first corner sc. The center 5 stitches are sts 8–12. Place markers in sts 8 and 12.
Trunk Row 1: Join Color B with a sc in st 8, then sc in each of the next 4 sts. (5 sc)
Trunk Rows 2–4: Ch 1, turn. Sc in each st across. (5 sc)
Fasten off, leaving a 6 in (15.2 cm) tail. The trunk measures 1.25 in (3.2 cm) wide and 1 in (2.5 cm) tall, so the whole ornament is 6.5 in (16.5 cm) tall without the loop.
Final Blocking
- Weave in each end through the backs of stitches in its own color. Hide the cream tails inside the trunk.
- Lay the ornament RS up on your blocking mat.
- Pin the two bottom corners 4.75 in (12.1 cm) apart.
- Pin the tip 5.5 in (14.0 cm) above the bottom edge, centered between the corners.
- Pin the trunk into a neat rectangle 1.25 in (3.2 cm) wide x 1 in (2.5 cm) tall.
- Mist lightly with water. Don’t flatten the puffs; gently pat them back into shape.
- Let it dry completely before removing the pins.
Final Quality-Control Checklist
- From the bottom up, the tiers have 7, 5, 3, and 1 puffs
- Each open row shows a clear band of ch-1 spaces
- Each tier has a small ledge at its edges, matching on both sides
- After the border, the body measures 4.75 in (12.1 cm) x 5.5 in (14.0 cm)
- The trunk is centered, 5 sc wide, and 4 rows tall
- The hanging loop is secure and about 1.5 in (3.8 cm) long
- All ends are woven in and can’t be seen from the RS
Troubleshooting
Puffs look flat or uneven: Pull every loop to the same height before the final yo, and always close with ch 1.
The tree leans to one side: Make sure every open row starts with exactly 3 sl sts and leaves exactly 2 sts unworked.
An open row has the wrong count: The ch-4 counts as the first dc and ch-1 sp. Skip only the stitches between dc, never the stitch where a dc should go.
The open band disappears: Your dc stitches are too tight. Let each dc reach its full height so the ch-1 spaces stay visible.
The border ripples: There are too many side stitches. Recount against the 27-per-side placement.
The border pulls the sides in: There are too few stitches, or your tension is tight. Use a hook one size larger for the border only.
The trunk is off-center: Recount the bottom edge starting with the first corner sc. The trunk starts in st 8.
There’s a hole at the tip: Work the tip border sc through both the base of the loop and the sc3tog.
Care
Hand wash in cool water with mild soap, gently squeeze out the water, and dry flat, reshaping the puffs while the piece is damp. Store it flat or hanging so the puffs don’t get crushed.
Final Notes
Every measurement in this ornament builds on the one before. At 4 sc per inch, the base is 4.25 in (10.8 cm) wide, and four tiers bring the body to 5.25 in (13.3 cm) tall. The 74-stitch border brings it to 4.75 in (12.1 cm) x 5.5 in (14.0 cm), and the 1 in (2.5 cm) trunk makes the finished height 6.5 in (16.5 cm). Check your gauge at Row 3 and the later checkpoints should line up. If one measurement drifts, fix it at that row instead of stretching it out during blocking.
Happy crocheting!