

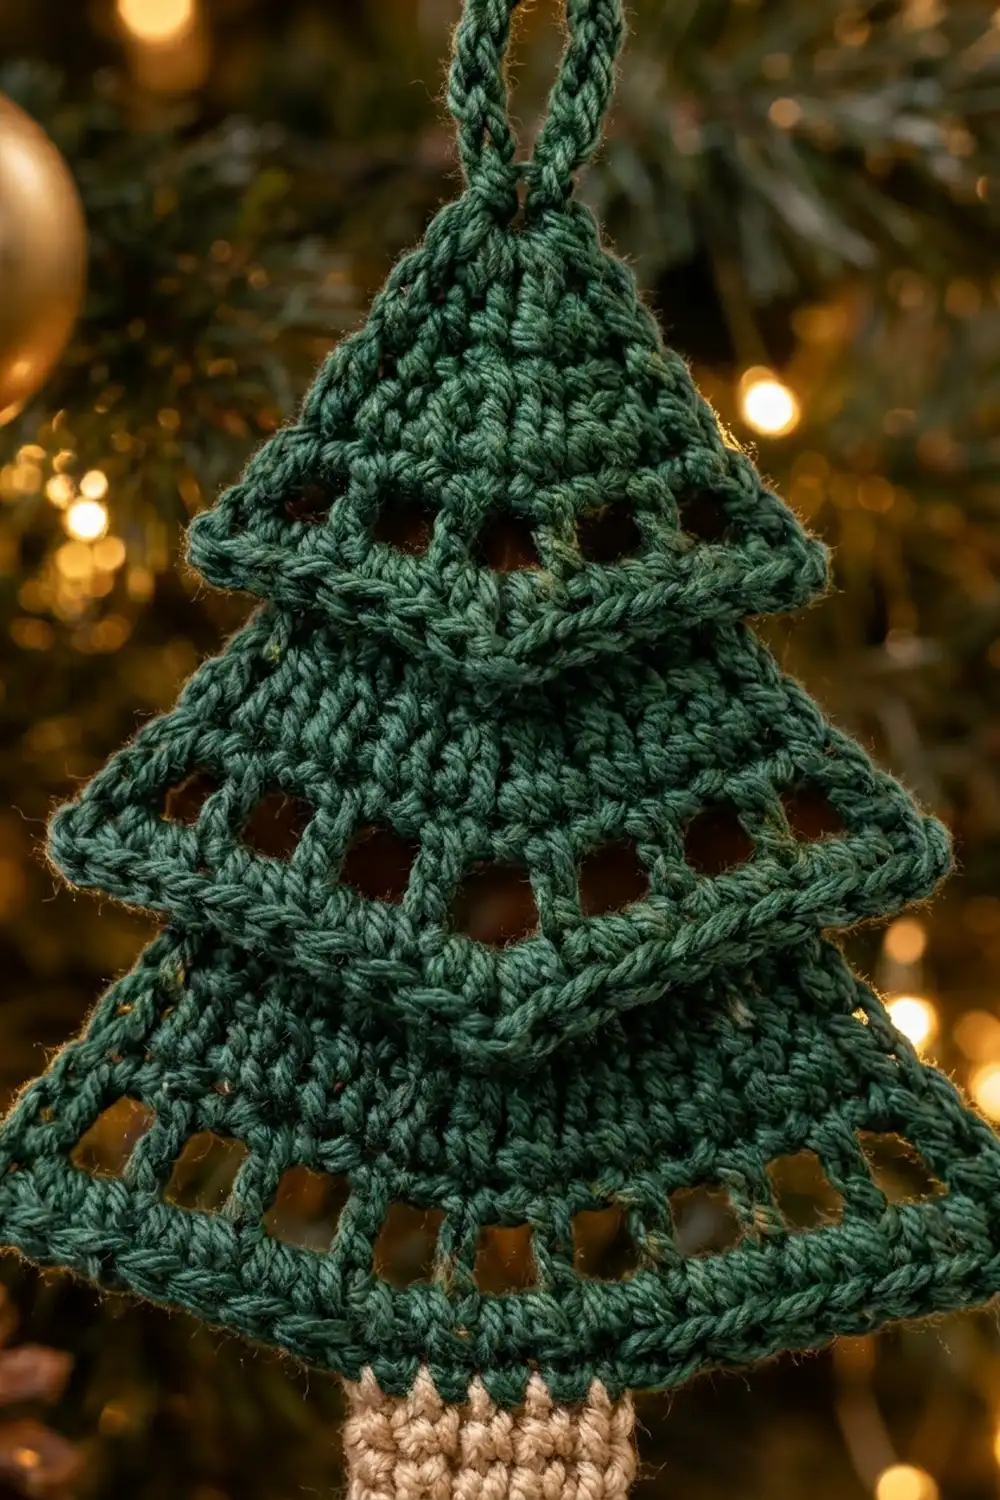
The Evergreen Tiers ornament is a small, layered Christmas tree with real dimension. It has three stacked triangular tiers in deep forest green, and each tier has one row of open eyelets near its lower edge. A short tan trunk sticks out underneath. A chained green loop at the tip lets the ornament hang straight from a branch.
The look is classic and a little rustic. Dense single crochet gives each tier a firm, smooth surface, and the eyelets add a lacy band of shadow. A single crochet edging gives every tier a crisp, slightly raised rim. The tiers are only sewn at the top, so each lower edge hangs free and casts a small shadow on the tier below.
This pattern uses US crochet terms. The finished ornament measures about 4.75 in (12.1 cm) wide at the bottom tier and 5.25 in (13.3 cm) tall from tip to trunk, not counting the hanging loop.
Construction is simple. You work three triangles from the point down in rows, increasing one stitch at each end of every row. Then you edge each triangle, crochet a small rectangular trunk, and sew everything into one finished ornament.
Finished Size and Construction
- Finished size: about 4.75 in (12.1 cm) wide x 5.25 in (13.3 cm) tall, plus a 1 in (2.5 cm) loop
- Skill level: Easy / advanced beginner
- Terminology: US crochet terms
- Yarn weight: Sport weight (#2), mercerized cotton
- Hook: 2.75 mm (C-2)
- Number of pieces: One finished ornament, built from 4 crocheted parts (3 tiers + 1 trunk)
- Layout: Tiers stacked vertically; each upper tier covers the top 0.75 in (1.9 cm) of the tier below
- Piece size (bottom tier, edged): 4.75 in (12.1 cm) wide x 2.5 in (6.4 cm) tall
- Size before border (bottom tier): 4.5 in (11.4 cm) wide x 2.3 in (5.8 cm) tall
- Border depth: about 0.125 in (0.3 cm), one round of single crochet
Materials
Choose a smooth mercerized cotton or cotton blend in sport weight. Cotton holds the sharp triangle points and shows the eyelets clearly. Acrylic also works, but the tiers will be softer and may need more blocking.
- Color A, Forest Green: 8 g / about 24 m (26 yd), for the tiers, edging, and hanging loop
- Color B, Tan / Light Beige: 2 g / about 6 m (7 yd), for the trunk
These amounts already include about 25 percent extra for your gauge test and longer sewing tails.
Tools:
- 2.75 mm (C-2) crochet hook
- Tapestry needle
- Scissors
- Rust-proof pins and a foam blocking mat
- Spray bottle with water
- Optional: 8 in (20.3 cm) of gold metallic thread or twine for hanging
Abbreviations (US Terms)
- ch – chain
- sl st – slip stitch
- sc – single crochet
- dc – double crochet
- sk – skip
- st(s) – stitch(es)
- sp – space
- RS – right side
Special stitch – Eyelet: ch 1, sk next st, dc in next st. Each eyelet makes 1 dc and 1 ch-1 sp, and leaves one small square hole.
Row-end: the side edge of a row. To work into it, insert the hook under the outer strands of the edge stitch.
Gauge and Checkpoints
Gauge: 24 sc and 24 sc rows = 4 in (10.2 cm). That is 6 sc and 6 rows per 1 in (2.5 cm). One dc row is about 0.33 in (0.8 cm) tall.
Make Tier 1 first and use it as your gauge test. Every row adds 2 sts, so the width checkpoints are easy to read:
- Tier 1, after Row 4 (9 sts): 1.5 in (3.8 cm) wide
- Tier 1, after Row 7 (15 sts): 2.5 in (6.4 cm) wide, about 1.3 in (3.3 cm) tall
- Tier 2, after Row 10 (21 sts): 3.5 in (8.9 cm) wide, about 1.8 in (4.6 cm) tall
- Tier 3, after Row 13 (27 sts): 4.5 in (11.4 cm) wide, about 2.3 in (5.8 cm) tall
- Trunk (6 sts x 7 rows): 1 in (2.5 cm) x 1.2 in (3.0 cm)
If Tier 1 measures more than 2.5 in (6.4 cm) across the last row, change to a 2.5 mm hook. If it measures less than 2.25 in (5.7 cm), change to a 3 mm hook. Width matters more than height, because the tiers overlap and you can adjust the overlap a little during assembly.
Tier 1 (Top Tier)
With Color A.
Row 1: Ch 2, 3 sc in 2nd ch from hook, turn. (3 sts)
Row 2: Ch 1 (does not count as a st throughout), 2 sc in first st, sc in next st, 2 sc in last st, turn. (5 sts)
Row 3: Ch 1, 2 sc in first st, sc in each st to last st, 2 sc in last st, turn. (7 sts)
Row 4: Repeat Row 3. (9 sts)
Row 5 (eyelet row): Ch 3 (counts as first dc), dc in same st, [ch 1, sk next st, dc in next st] 3 times, ch 1, sk next st, 2 dc in last st, turn. (11 sts: 7 dc + 4 ch-1 sps; 4 eyelets)
Row 6: Ch 1, 2 sc in first dc, sc in each dc and each ch-1 sp across to the turning ch, 2 sc in top of turning ch, turn. (13 sts)
Row 7: Repeat Row 3. (15 sts)
Do not fasten off. Continue with the edging in the Border section.
Tier 2 (Middle Tier)
With Color A.
Rows 1–4: Work as Tier 1, Rows 1–4. (9 sts)
Rows 5–7: Repeat Row 3 three times. (Row 5: 11 sts, Row 6: 13 sts, Row 7: 15 sts)
Row 8 (eyelet row): Ch 3 (counts as first dc), dc in same st, [ch 1, sk next st, dc in next st] 6 times, ch 1, sk next st, 2 dc in last st, turn. (17 sts: 10 dc + 7 ch-1 sps; 7 eyelets)
Row 9: Ch 1, 2 sc in first dc, sc in each dc and each ch-1 sp across to the turning ch, 2 sc in top of turning ch, turn. (19 sts)
Row 10: Repeat Row 3. (21 sts)
Do not fasten off. Continue with the edging.
Tier 3 (Bottom Tier)
With Color A.
Rows 1–4: Work as Tier 1, Rows 1–4. (9 sts)
Rows 5–10: Repeat Row 3 six times. (Row 5: 11 sts, Row 6: 13 sts, Row 7: 15 sts, Row 8: 17 sts, Row 9: 19 sts, Row 10: 21 sts)
Row 11 (eyelet row): Ch 3 (counts as first dc), dc in same st, [ch 1, sk next st, dc in next st] 9 times, ch 1, sk next st, 2 dc in last st, turn. (23 sts: 13 dc + 10 ch-1 sps; 10 eyelets)
Row 12: Ch 1, 2 sc in first dc, sc in each dc and each ch-1 sp across to the turning ch, 2 sc in top of turning ch, turn. (25 sts)
Row 13: Repeat Row 3. (27 sts)
Do not fasten off. Continue with the edging.
Eyelet math check: An eyelet row worked over an odd number of stitches always ends with 2 more stitches than it started with. Tier 1 goes from 9 to 11 sts, Tier 2 from 15 to 17, and Tier 3 from 21 to 23. The 2 extra stitches are the increases at each end, so the triangle’s slope continues without a break.
Trunk
With Color B.
Row 1: Ch 7, sc in 2nd ch from hook and in each ch across, turn. (6 sts)
Rows 2–7: Ch 1, sc in each st across, turn. (6 sts)
Fasten off, leaving a 12 in (30.5 cm) tail for sewing. The trunk measures 1 in (2.5 cm) wide x 1.2 in (3.0 cm) tall.
Border
The border is one round of sc around each tier. It straightens the edges at the eyelet row, creates the raised rim, and sharpens all three points. Work it in Color A straight from the last row of each tier.
Border gauge: 6 sc per 1 in (2.5 cm) along every edge, the same as the body. On the slanted sides, each sc row-end is about 0.24 in (0.6 cm) long, because the edge steps out by one stitch on every row. So work 3 sc over every 2 sc row-ends (1.5 per row-end), and 2 sc in each dc row-end.
Setup for all tiers: Ch 1. The side now facing you is the RS.
Tier 1 Border:
- Bottom: 3 sc in first st (corner), sc in next 13 sts, 3 sc in last st (corner).
- Side 1, going up: Work 3 sc over the row-ends of Rows 7–6: 2 sc in the first row-end and 1 sc in the next. Work 2 sc in the Row 5 dc row-end. Over Rows 4–1, work [2 sc in next row-end, 1 sc in next row-end] twice (6 sc). Side total: 11 sc.
- Tip: 3 sc in the underside of the foundation ch.
- Side 2, going down: Work this side as the mirror of Side 1. Over Rows 1–4, work [1 sc in next row-end, 2 sc in next row-end] twice (6 sc). Work 2 sc in the Row 5 row-end. Over Rows 6–7, work 1 sc, then 2 sc (3 sc). Side total: 11 sc.
- Sl st to first sc. Total: 44 sts. That is 13 + 11 + 11 between the corners, plus 3 corners x 3 sts.
Tier 2 Border:
- Bottom: 3 sc in first st, sc in next 19 sts, 3 sc in last st.
- Side 1: Work 3 sc over Rows 10–9 and 2 sc in the Row 8 row-end. Over the 6 row-ends of Rows 7–2, work [1 sc in next row-end, 2 sc in next row-end] 3 times (9 sc). Work 1 sc in the Row 1 row-end. Side total: 15 sc.
- Tip: 3 sc in the foundation ch.
- Side 2: Work as the mirror of Side 1. Side total: 15 sc.
- Sl st to first sc. Total: 58 sts. That is 19 + 15 + 15, plus 9 corner sts.
Tier 3 Border:
- Bottom: 3 sc in first st, sc in next 25 sts, 3 sc in last st.
- Side 1: Work 3 sc over Rows 13–12 and 2 sc in the Row 11 row-end. Over the 10 row-ends of Rows 10–1, work [2 sc in next row-end, 1 sc in next row-end] 5 times (15 sc). Side total: 20 sc.
- Tip: 3 sc in the foundation ch.
- Side 2: Work as the mirror of Side 1. Side total: 20 sc.
- Sl st to first sc. Total: 74 sts. That is 25 + 20 + 20, plus 9 corner sts.
Fasten off each tier. Leave a 12 in (30.5 cm) tail on Tiers 2 and 3 for sewing.
Why the math works: The first and last stitches of the last row become corners, so each bottom edge has 2 fewer stitches between corners than the last row has. The slanted sides are matched to their measured length at 6 sc per inch. For Tier 3, half the width is 2.25 in (5.7 cm) and the height is 2.3 in (5.8 cm), so each slanted side is about 3.2 in (8.1 cm) long. At 6 sc per inch, that side needs 19–20 sts, and the pattern gives 20. The border adds about 0.125 in (0.3 cm) on each side, so Tier 3 grows from 4.5 in (11.4 cm) to 4.75 in (12.1 cm) wide.
Hanging loop: Join Color A in the center sc of the tip corner on Tier 1. Ch 12, sl st in the same st, and fasten off. The loop stands about 1 in (2.5 cm) tall.
Assemble the Tree
- Lay Tier 3 RS up. Place Tier 2 on top with its tip pointing straight up and its bottom edge parallel to Tier 3’s bottom edge. It should cover the top 0.75 in (1.9 cm) of Tier 3, which hides Tier 3’s tip.
- Pin the tiers together. Turn the stack over and whipstitch the top of Tier 3 to the back of Tier 2. Sew through the back loops only so no stitches show on the front. Leave Tier 2’s bottom edge free.
- Repeat with Tier 1 over Tier 2, again with a 0.75 in (1.9 cm) overlap.
- Center the trunk behind Tier 3 so that 0.75 in (1.9 cm) shows below the bottom edge. Sew the top 2 rows of the trunk to the back of Tier 3. These 0.45 in (1.1 cm) sit behind the solid sc rows below the eyelets.
- Weave in all ends on the back.
Height check: Measured down from the top, Tier 1 runs from 0 to 1.5 in (3.8 cm) and Tier 2 from 0.75 in (1.9 cm) to 2.75 in (7.0 cm). Tier 3 runs from 2 in (5.1 cm) to 4.5 in (11.4 cm), and the bottom of the trunk sits at 5.25 in (13.3 cm).
Final Blocking
- Spray the assembled ornament evenly until it is damp, not dripping.
- Lay it RS up on the blocking mat.
- Pin the two bottom corners of Tier 3 first, 4.75 in (12.1 cm) apart.
- Pin the tip and bottom corners of each tier so every side is straight and every point stays sharp.
- Pin the trunk square at 1 in (2.5 cm) wide.
- Gently open each eyelet with a fingertip.
- Let it dry completely, about 4–6 hours, before you remove the pins.
Final Quality-Control Checklist
- Tier widths are 2.75 in (7.0 cm), 3.75 in (9.5 cm), and 4.75 in (12.1 cm)
- Each tier has its eyelets evenly spaced: 4, 7, and 10 eyelets
- Border totals are 44, 58, and 74 sts
- All three tips line up on one vertical center line
- Each overlap is 0.75 in (1.9 cm)
- The trunk is centered and 0.75 in (1.9 cm) of it shows below the tree
- The hanging loop is centered on the tip
- No sewing stitches show on the front
Troubleshooting
The tier curls or cups. Your increases may be too tight, or the slanted sides of the border may be missing stitches. Recount the side totals, then block the tier flat.
The border ruffles on the sides. You probably worked 2 sc into every row-end. Use the rule of 3 sc per 2 row-ends instead.
The eyelets look uneven. Pull every ch-1 to the same size, and make sure you skip exactly 1 st each time.
The tiers are lopsided. Count your stitches after every increase row. Each row must have exactly 2 more stitches than the row before.
Tan shows through the eyelets. The trunk is sewn too high. Its top edge must stay below Tier 3’s eyelet row.
The ornament tilts when it hangs. The loop is off-center. Remove it and rejoin the yarn in the exact center sc of the tip.
Care
Hand wash in cool water, roll the ornament in a towel to press out the water, and dry it flat. Re-pin the points if needed.

Final Notes
Every size in this ornament follows from one gauge. At 6 sc per inch, each triangle grows 1 in (2.5 cm) wider every 3 rows, so the tiers measure 2.5, 3.5, and 4.5 in (6.4, 8.9, and 11.4 cm) before the border. The border adds 0.125 in (0.3 cm) per side, which gives edged widths of 2.75, 3.75, and 4.75 in (7.0, 9.5, and 12.1 cm). The 0.75 in (1.9 cm) overlaps and the visible part of the trunk bring the total height to 5.25 in (13.3 cm). Check your gauge on Tier 1 first, and the other measurements will follow.
Happy crocheting!