

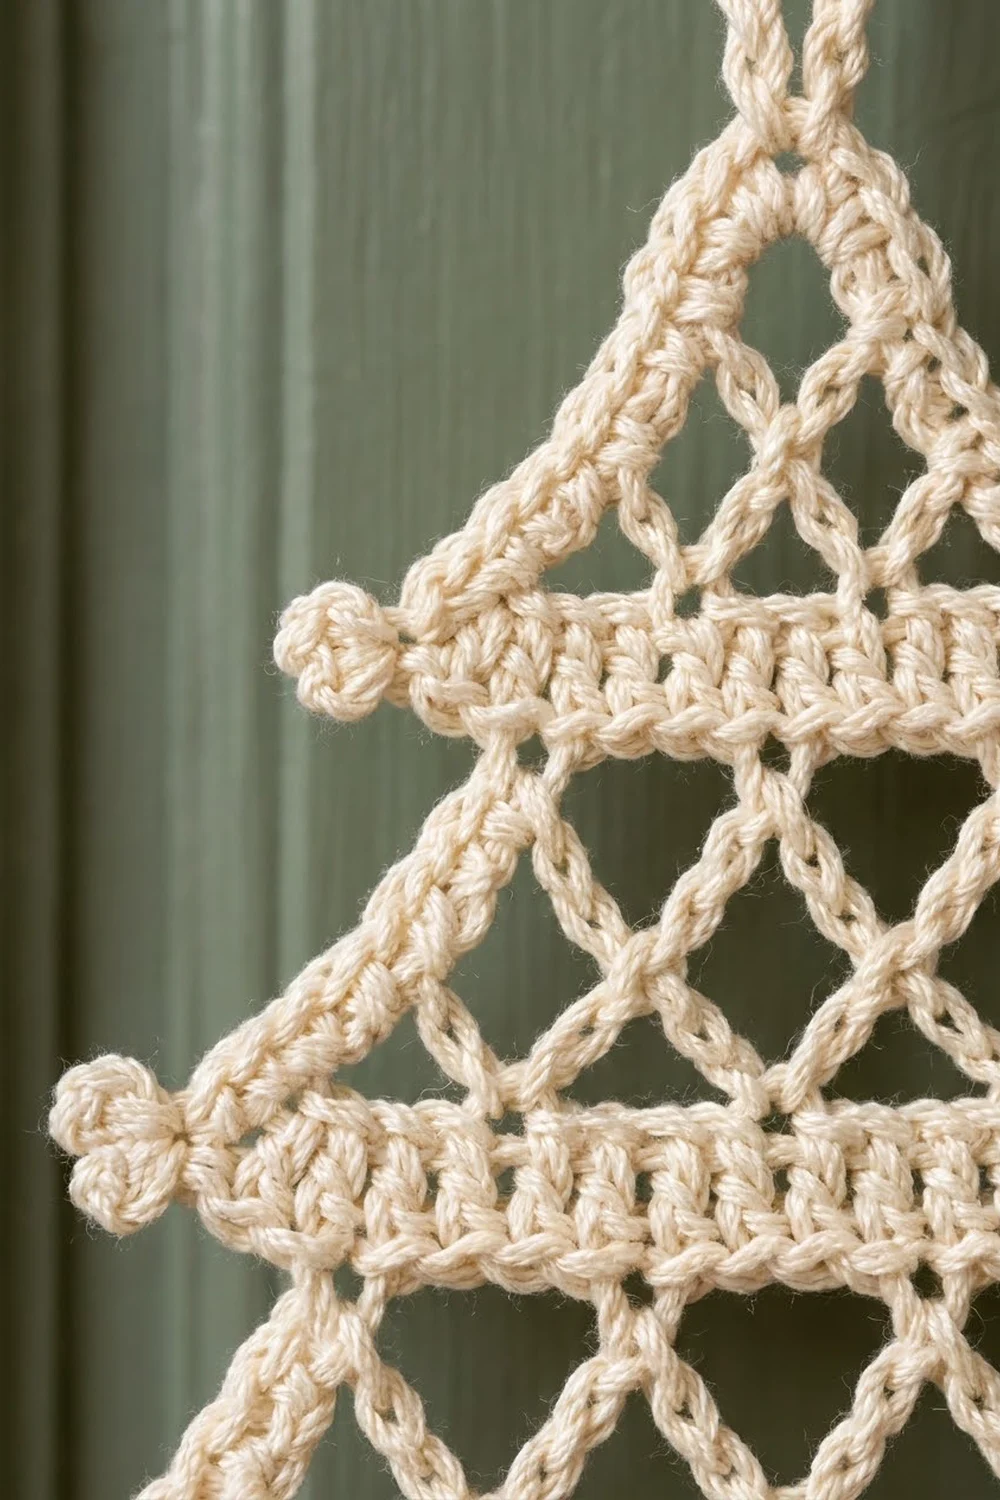
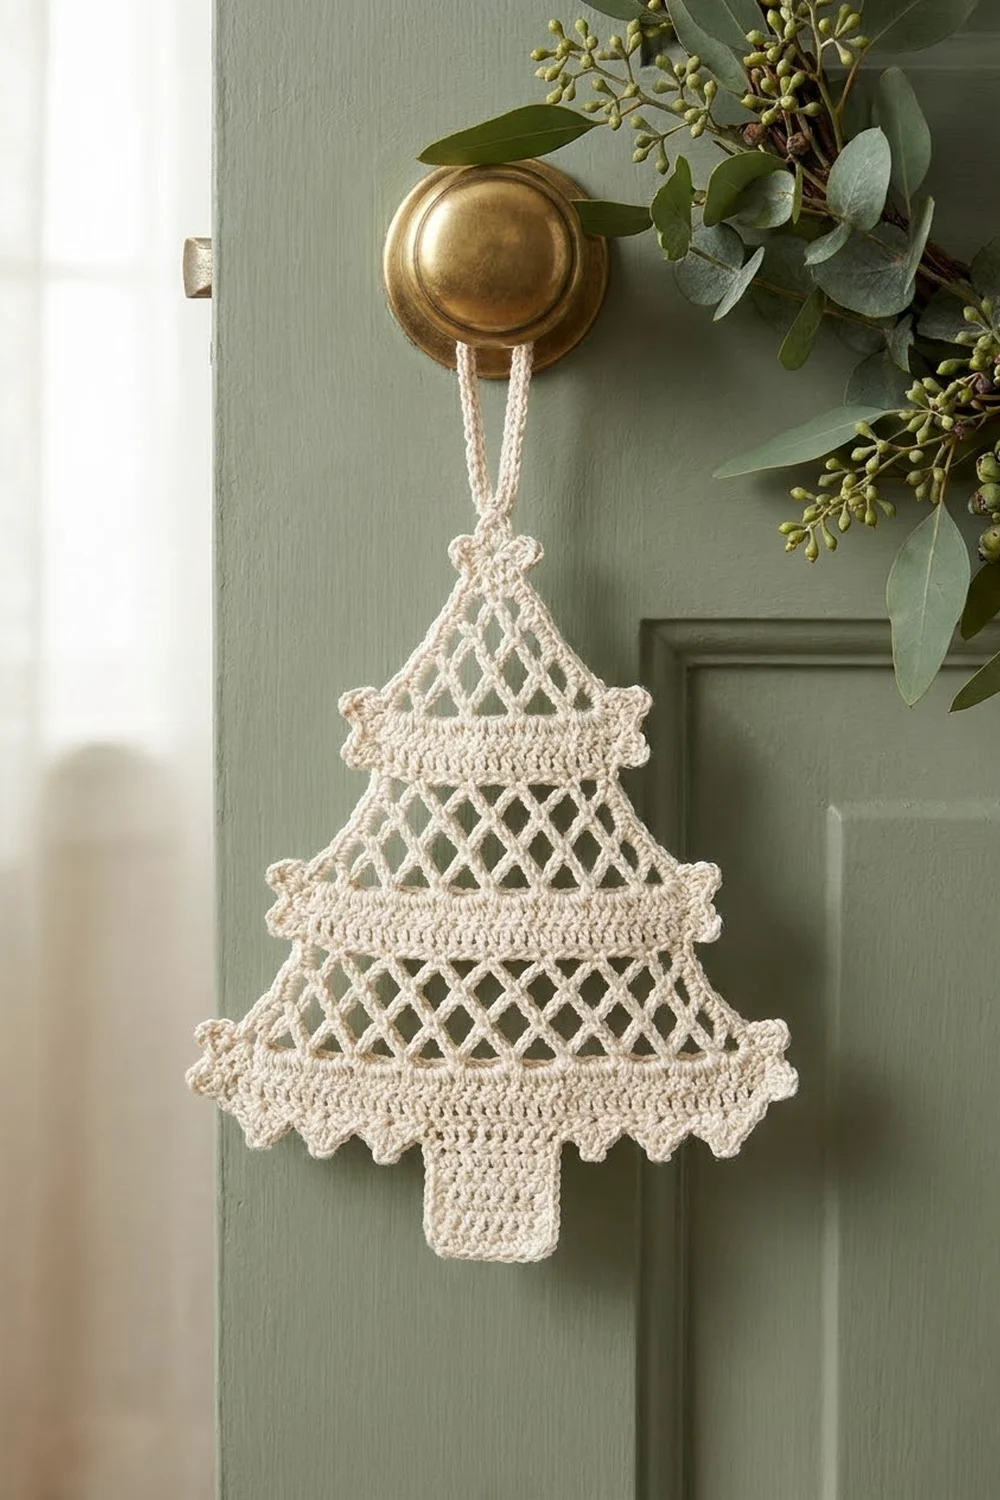
The Frosted Lattice Tree is a flat lace ornament. It has three tiers of open diamond mesh, solid bands between the tiers, a small solid trunk and tiny trefoil picots at the end of every band. Made in one cream cotton, it looks like a snowflake shaped into a tree.
The style is light, vintage and graphic. The solid bands frame the open diamonds, so the shape is easy to see from across a room. Hang it on a door knob, tuck it into a card or tie it onto a gift.
The pattern uses US crochet terms. After blocking, the ornament is about 5.5 in (14.0 cm) wide across the bottom band, 6 in (15.2 cm) from picot tip to picot tip and 7.2 in (18.3 cm) tall. The hanging loop adds about 1.75 in (4.4 cm).
You work the tree in one piece from the top down, in turned rows. Each tier is a chain-loop lattice that grows by one loop per row, and each band is a row of double crochet. The trunk is worked off the center of the last band. A single crochet border with trefoil picots finishes the outline.
Finished Size and Construction
- Finished size: 5.5 in (14.0 cm) wide x 7.2 in (18.3 cm) tall; 6 in (15.2 cm) wide including picots
- Skill level: Easy-intermediate
- Terminology: US
- Yarn weight: Fingering / 4-ply cotton (weight 1)
- Hook: 2.5 mm
- Number of pieces: 1
- Layout: Single ornament; three tiers stacked vertically, trunk centered below
- Piece size before border: 5.2 in (13.2 cm) wide x 6.9 in (17.5 cm) tall
- Border depth: about 0.15 in (0.4 cm) on each edge
Materials
Use a smooth, mercerized or combed cotton in fingering weight, about 400 m per 100 g. Cotton holds the lattice open after blocking and keeps the picots crisp. Avoid fuzzy yarns, which blur the diamonds.
- Cream / ivory: 15 g, about 60 m (66 yd)
These amounts include a margin for practice and the hanging loop.
Tools:
- 2.5 mm crochet hook
- 2 locking stitch markers
- Tapestry needle
- Scissors
- Rustproof pins and a blocking mat
- Spray bottle; spray starch (optional)
- Ruler or tape measure
Abbreviations (US Terms)
- ch – chain
- sl st – slip stitch
- sc – single crochet
- dc – double crochet
- sk – skip
- st(s) – stitch(es)
- sp – space
- RS / WS – right side / wrong side
Special stitch – Trefoil picot (tp): Ch 4, sl st in 4th ch from hook (first petal). [Ch 3, sl st in the same ch as the last sl st] twice. This gives you three small petals coming from one point at the edge.
Mesh loop: “Ch 4, sc in next loop” makes one lattice loop. Because each row’s sc go into the loops of the row below, the loops are offset and form diamonds.
Gauge and Checkpoints
Gauge: 6 dc and 3 dc rows = 1 in (2.5 cm), or 24 dc x 12 rows = 4 in (10.2 cm).
Mesh gauge: one ch-4 loop plus its sc = 0.5 in (1.3 cm) wide; one mesh row = 0.4 in (1.0 cm) tall, gently stretched.
For a piece this small, the ornament itself is your test. Work through Row 5 and measure before you go on.
Checkpoints (lightly stretched, before blocking):
- After Row 4: 2.2 in (5.6 cm) wide, 1.4 in (3.6 cm) tall
- After Row 5: 13 dc = 2.2 in (5.6 cm); height 1.7 in (4.3 cm)
- After Row 10: 22 dc = 3.7 in (9.4 cm); height 3.7 in (9.4 cm)
- After Row 16: 31 dc = 5.2 in (13.2 cm); height 5.9 in (15.0 cm)
- After Row 19: trunk 1.2 in (3.0 cm) wide; height 6.9 in (17.5 cm)
If too big: use a 2.25 mm hook, or tighten your chains. If too small: use a 2.75 mm hook. Never change the stitch counts, because the border counts depend on them.
Pattern
Mark Row 1 as the RS. The turning ch-1 does not count as a stitch. The turning ch-3 counts as the first dc.
Top Tier
Row 1 (RS): Ch 2, 3 sc in 2nd ch from hook. Turn. (3 sc)
The skipped ch at the top is the apex. You will use it later for the border and the hanging loop.
Row 2: Ch 1, sc in first sc, ch 4, sc in next sc, ch 4, sc in last sc. Turn. (2 loops, 3 sc)
Row 3: Ch 1, sc in first sc, ch 4, [sc in next ch-4 loop, ch 4] twice, sc in last sc. Turn. (3 loops, 4 sc)
Row 4: Ch 1, sc in first sc, ch 4, [sc in next ch-4 loop, ch 4] 3 times, sc in last sc. Turn. (4 loops, 5 sc)
Each increase row has one more loop than the row before it. You add a loop before the first loop and after the last loop, and you work into every loop below. Row 4 has 4 loops, so it is 1 + (3 x 4) = 13 stitch-widths wide.
Band 1
Row 5: Ch 3 (counts as dc), [2 dc in next ch-4 loop, dc in next sc] 4 times. Turn. (13 dc)
That is 5 dc worked one per existing sc + 8 dc in the 4 loops = 13 dc. The band comes out exactly as wide as the mesh above it.
Middle Tier
Row 6 (set-up): Ch 1, sc in first dc, [ch 4, sk 2 dc, sc in next dc] 4 times. Turn. (4 loops, 5 sc)
This row sits straight over the band. It makes the half-diamonds that point down into the band.
Row 7: Ch 1, sc in first sc, ch 4, [sc in next ch-4 loop, ch 4] 4 times, sc in last sc. Turn. (5 loops, 6 sc)
Row 8: Work as Row 7, repeating the bracket 5 times. (6 loops, 7 sc)
Row 9: Work as Row 7, repeating the bracket 6 times. (7 loops, 8 sc)
Band 2
Row 10: Ch 3 (counts as dc), [2 dc in next ch-4 loop, dc in next sc] 7 times. Turn. (22 dc)
That is 8 dc worked one per sc + 14 dc in the loops = 22 dc, which equals 1 + (3 x 7).
Bottom Tier
Row 11 (set-up): Ch 1, sc in first dc, [ch 4, sk 2 dc, sc in next dc] 7 times. Turn. (7 loops, 8 sc)
Row 12: Ch 1, sc in first sc, ch 4, [sc in next ch-4 loop, ch 4] 7 times, sc in last sc. Turn. (8 loops, 9 sc)
Row 13: Work as Row 12, repeating the bracket 8 times. (9 loops, 10 sc)
Row 14: Work as Row 12, repeating the bracket 9 times. (10 loops, 11 sc)
Band 3 (Double Band)
Row 15: Ch 3 (counts as dc), [2 dc in next ch-4 loop, dc in next sc] 10 times. Turn. (31 dc)
That is 11 dc worked one per sc + 20 dc in the loops = 31 dc, which equals 1 + (3 x 10).
Row 16: Ch 3 (counts as dc), dc in each dc across, working the last dc in the top of the turning ch. Fasten off. (31 dc)
Check your size: 5.2 in (13.2 cm) wide and 5.9 in (15.0 cm) tall.
Trunk
The trunk uses the center 7 stitches of Row 16 (sts 13 through 19). That leaves 12 stitches free on each side.
Row 17: Join yarn with a sl st in st 13, ch 3 (counts as dc), dc in next 6 sts. Turn. (7 dc)
Rows 18–19: Ch 3 (counts as dc), dc in each dc across. Turn. (7 dc each row)
Don’t fasten off. Go straight into the border. The trunk is 1.2 in (3.0 cm) wide and 1 in (2.5 cm) long.
Border
The border is one round of sc around the whole outline, with a trefoil picot at each end of each band. It firms up the sloped edges and gives the tree a clean outline.
Border gauge: 6 sc = 1 in (2.5 cm).
Where to put the stitches:
- Stitch tops: 1 sc in each st
- Row 1 row-end: 1 sc
- Mesh row-ends: 3 sc each
- Dc row-ends: 2 sc each
Round 1: Ch 1. Along the last trunk row: 3 sc in first st, sc in next 5 sts, 3 sc in last st (11 sc). Up the trunk side: 2 sc in each of 3 row-ends (6 sc).
Along the free stitches of Row 16: sc in each of the 12 sts (12 sc). At the corner, work (sc, tp, sc) in the Row 16 row-end, then 2 sc in the Row 15 row-end (4 sc + 1 tp).
Bottom tier side: 3 sc in each row-end of Rows 14–11 (12 sc). Band 2: (sc, tp, sc) in the Row 10 row-end (2 sc + 1 tp).
Middle tier side: 3 sc in each row-end of Rows 9–6 (12 sc). Band 1: (sc, tp, sc) in the Row 5 row-end (2 sc + 1 tp).
Top tier side: 3 sc in each row-end of Rows 4–2, then 1 sc in the Row 1 row-end (10 sc).
Apex: (sc, ch 2, sc) in the free ch at the tip (2 sc + ch-2 sp).
Work the second side as a mirror image: 10 sc, (sc, tp, sc), 12 sc, (sc, tp, sc), 12 sc, 2 sc in Row 15, (sc, tp, sc) in Row 16, 12 sc along Row 16, then 6 sc down the trunk side. Sl st to the first sc.
One side, apex to trunk: 10 + 2 + 12 + 2 + 12 + 2 + 2 + 12 + 6 = 60 sc and 3 tp.
Round total: 60 + 60 + 11 (trunk bottom) + 2 (apex) = 133 sc, plus 6 trefoil picots and 1 ch-2 sp.
Why the math works: Each mesh step moves 0.25 in (0.6 cm) out and 0.4 in (1.0 cm) down, so its edge is about 0.47 in (1.2 cm) long. Three sc cover 0.5 in (1.3 cm), which gives a little ease so the edge lies flat. Two sc cover each 0.33 in (0.8 cm) dc row-end exactly. One sc per stitch top matches the dc gauge.
Hanging Loop
Sl st along the edge to the apex ch-2 sp. Ch 30, then sl st in the apex sp. Turn, sl st in the back bump of each of the 30 ch, then sl st in the apex sp. Fasten off. The loop hangs about 1.75 in (4.4 cm) above the tip.
Weave in the ends inside the solid bands, where they won’t show.
Final Blocking
- Soak the ornament in cool water for 10 minutes, then press it in a towel. Don’t wring it.
- Lay it RS up on a blocking mat.
- Pin the apex and the trunk bottom 7.2 in (18.3 cm) apart.
- Pin the bottom band straight at 5.5 in (14.0 cm), then pin bands 1 and 2 straight and centered.
- Pin each diamond open to about 0.5 in (1.3 cm) across.
- Fan out the trefoil petals; the bottom tips sit 6 in (15.2 cm) apart.
- Mist with water, or spray with starch for a stiffer ornament.
- Leave it pinned until completely dry.
Final Quality-Control Checklist
- Tiers end with 4, 7 and 10 loops
- Bands count 13, 22 and 31 dc
- Trunk is 7 dc wide with 12 free sts on each side
- Border has 133 sc, 6 trefoil picots and 1 ch-2 sp
- Both halves mirror each other
- Blocked size is 5.5 in (14.0 cm) x 7.2 in (18.3 cm)
- Loop is secure and all ends are hidden
Troubleshooting
Diamonds look like slits: Your chains are tight. Loosen them, and pin each diamond open when blocking.
A tier leans to one side: You missed an edge ch-4 on an increase row. Count your loops.
A band is too wide: You put 3 dc in a loop. Each loop takes exactly 2 dc.
Sloped edges ruffle: Use 2 sc in one mesh row-end on each side, the same on both sides.
Trefoils flop: Keep the chains snug and starch the trefoils.
Care
Hand wash in cool water with mild soap, roll it in a towel and block it flat again. Store it flat or hanging.
Final Notes
Here is how the measurements build: at 6 dc per inch, the bands are 2.2 in (5.6 cm), 3.7 in (9.4 cm) and 5.2 in (13.2 cm) wide. Each tier adds one 0.5 in (1.3 cm) loop per row, so every band matches the mesh above it. With the trunk, the piece is 6.9 in (17.5 cm) tall, and the border finishes it at 5.5 in (14.0 cm) x 7.2 in (18.3 cm).
If you check your counts at each band, the tree will come out symmetrical.
Happy crocheting!