

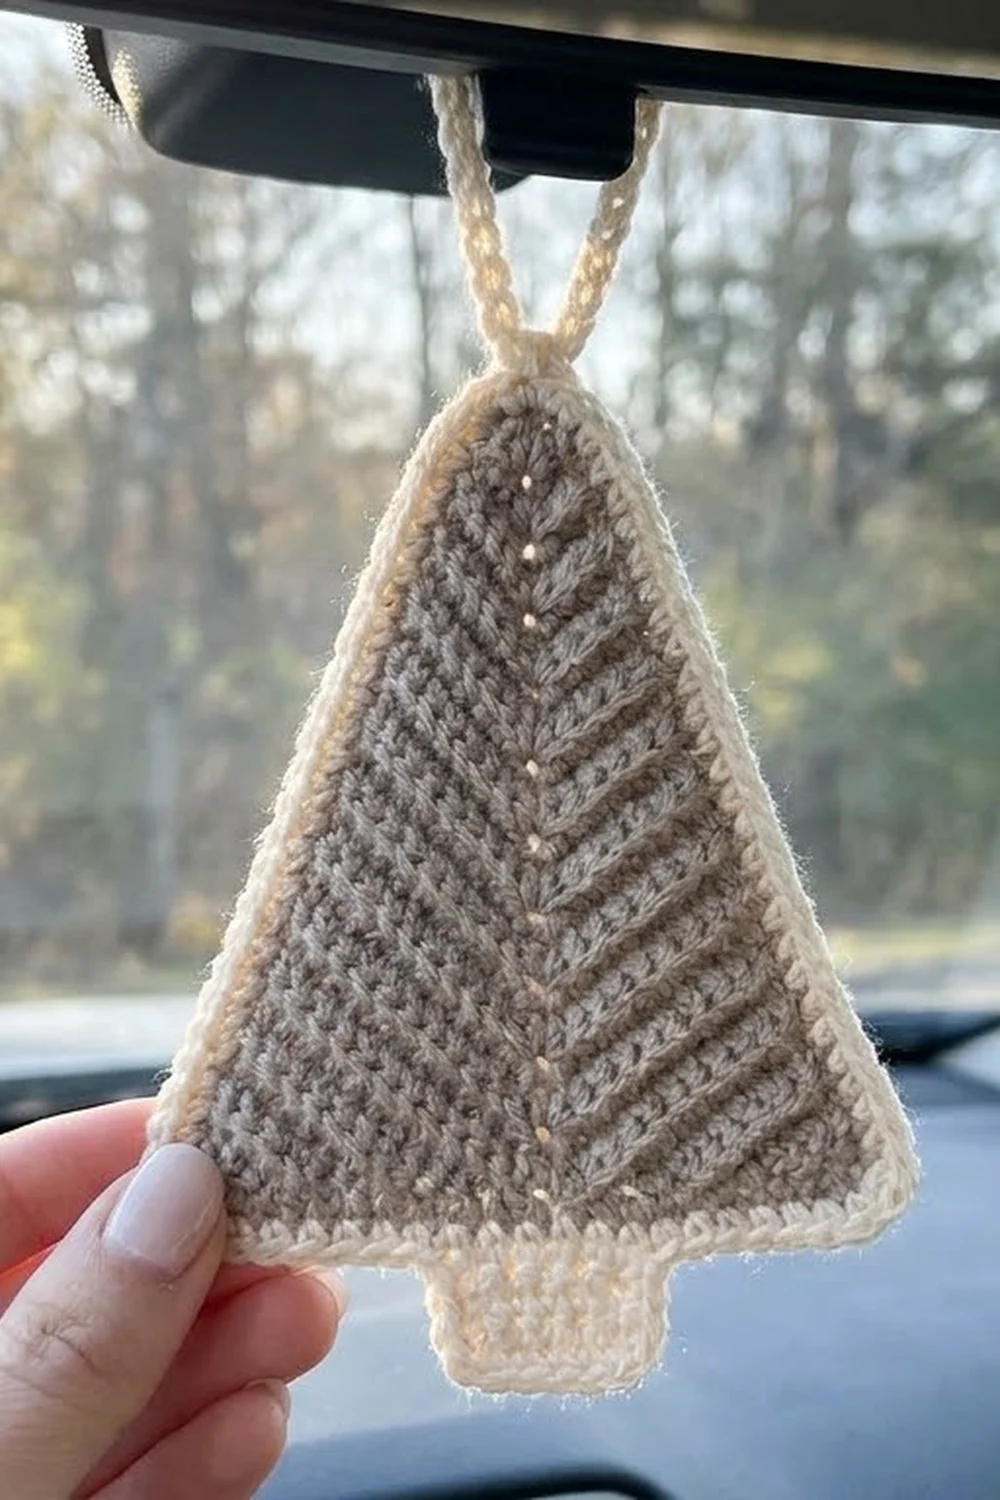
The Birchwood Spruce is a small, flat Christmas tree ornament made to hang from a rearview mirror, a tree branch, or a gift bag. It has a quiet, natural look: a taupe tree body with a raised center spine and sloping ribs, a crisp cream outline, a little cream trunk, and a cream hanging loop.
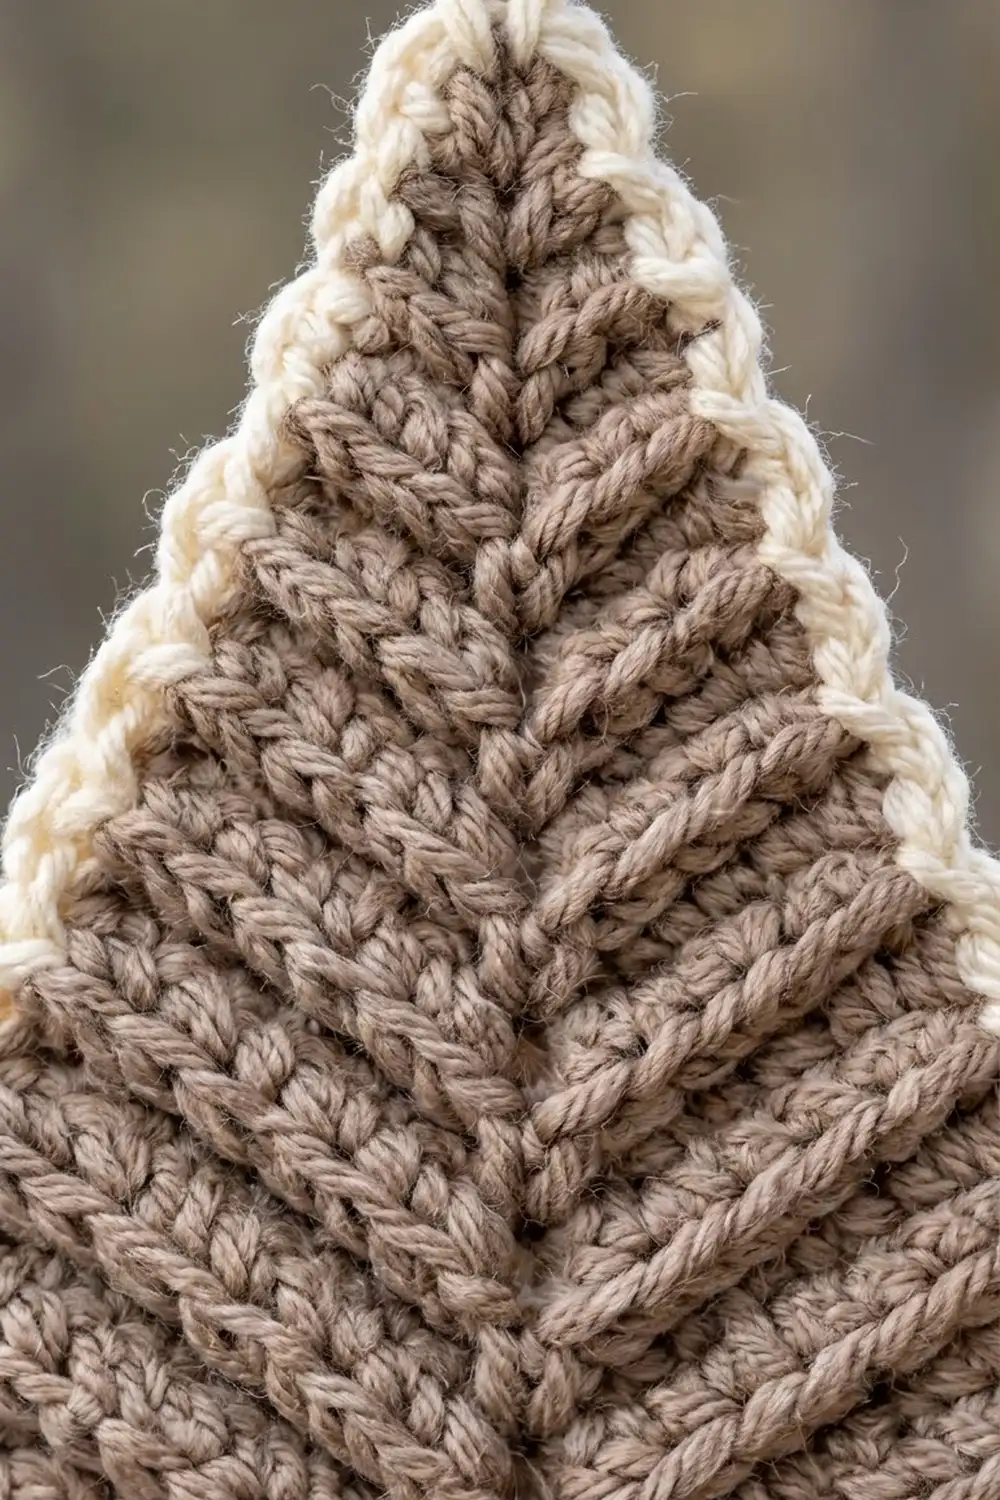
The ribs come from working single crochet through the back loops only. Each row has a 3-stitch increase at the center and decreases at both ends, so every ridge bends into an inverted V and the sides slope in toward the tip. The result looks like layered evergreen branches, but it’s only basic stitches.
This pattern uses US crochet terms. The finished ornament is about 3.8 in (9.7 cm) wide and 5.3 in (13.5 cm) tall from the tip to the bottom of the trunk. The loop adds about 2 in (5.1 cm) above the tip.
Construction is simple. You work the tree in rows from the bottom edge up to the tip. Next you work the trunk in rows from the center of the foundation edge. Last, you crochet one border round all the way around and finish with the hanging loop.
Finished Size and Construction
- Finished size: 3.8 in (9.7 cm) wide x 5.3 in (13.5 cm) tall, not counting the loop
- Skill level: Easy / advanced beginner
- Terminology: US crochet terms
- Yarn weight: DK (light worsted, #3)
- Hook: 3.5 mm (E-4)
- Number of pieces: 1 (the trunk and border are worked straight onto the tree)
- Layout: One single ornament; nothing is joined
- Tree body before border: 3.4 in (8.6 cm) wide at the base x 4.2 in (10.7 cm) tall along the center spine
- Trunk before border: 1.0 in (2.5 cm) wide x 0.7 in (1.8 cm) tall
- Size before border: 3.4 in (8.6 cm) wide x 4.9 in (12.4 cm) tall, including the trunk
- Border depth: 0.2 in (0.5 cm) on every edge
- Loop: a 20-chain loop that hangs about 2 in (5.1 cm) above the tip
Materials
Use a smooth, tightly plied DK yarn. Cotton, a cotton blend, or a firm acrylic shows the ridges well. Avoid fuzzy or brushed yarns, because they hide the chevron texture and the center spine.
- Color A, taupe (tree body): 5 g / 12 m (13 yd)
- Color B, cream (trunk, border, loop): 3 g / 7 m (8 yd)
These amounts make one ornament and already include a margin for your gauge swatch and weaving in ends. For a set of three, multiply by 3: 15 g / 36 m of taupe and 9 g / 21 m of cream.
Tools:
– 3.5 mm (E-4) crochet hook
– Tapestry needle
– Scissors
– Stitch marker (to mark the center stitch)
– Rust-proof pins and a blocking mat or folded towel
– Spray bottle with water
– Ruler or tape measure
Abbreviations (US Terms)
- ch – chain
- sc – single crochet
- sl st – slip stitch
- BLO – back loop only
- sc2tog – single crochet 2 together (decrease by 1)
- sc3tog – single crochet 3 together (decrease by 2)
- st(s) – stitch(es)
- rnd – round
- RS / WS – right side / wrong side
Special stitch – sc3tog: Insert your hook in the next stitch, yarn over, and pull up a loop. Repeat in each of the next 2 stitches, so you have 4 loops on the hook. Yarn over and pull through all 4 loops. That turns 3 stitches into 1.
Pattern notes:
– The ch 1 at the start of each row does not count as a stitch.
– From Row 2 on, every stitch goes into the back loop only, including increases and decreases.
– The center stitch is always the middle of the 3 sc you made in the row below. Move your marker up to it on every row.
Gauge and Checkpoints
Gauge: 5 sc and 5.5 rows = 1 in (2.5 cm) in sc BLO rows. That works out to 10 sts and 11 rows = 2 in (5.1 cm).
The ornament is small, so the best gauge test is to work Rows 1 through 10 of the tree and measure.
Checkpoints:
– After Row 1: the base is 3.4 in (8.6 cm) wide.
– After Row 10: the piece is 1.8 in (4.6 cm) tall along the center spine.
– After Row 13: the piece is 2.4 in (6.1 cm) tall along the spine.
– After Row 23: the tree is 4.2 in (10.7 cm) tall along the spine.
– After the trunk: the total height is 4.9 in (12.4 cm).
– After the border: the ornament is 3.8 in (9.7 cm) x 5.3 in (13.5 cm).
If your base is too wide (over 3.6 in / 9.1 cm), go down to a 3.25 mm hook. If it’s too narrow (under 3.2 in / 8.1 cm), go up to a 3.75 mm hook. Height usually follows width. If only the height is off, check whether you’re pulling your loops up too tall or working too tightly through the back loops.
Tree Body
Use Color A (taupe).
There are two repeating row types. Use these definitions for the rows below.
Row type A (count stays the same): Ch 1, turn. Sc2tog BLO, sc BLO in each st up to the center st, 3 sc BLO in the center st, sc BLO in each st up to the last 2 sts, sc2tog BLO. You lose 1 stitch at each end and add 2 at the center, so the count doesn’t change.
Row type B (count goes down by 2): Ch 1, turn. Sc3tog BLO, sc BLO in each st up to the center st, 3 sc BLO in the center st, sc BLO in each st up to the last 3 sts, sc3tog BLO. You lose 2 stitches at each end and add 2 at the center, so the count goes down by 2.
Row 1: Ch 18. Sc in the 2nd ch from the hook and in each ch across. (17 sts) Place a marker in the 9th st, which is the center.
Row 2: Row type A. (17 sts)
Row 3: Row type A. (17 sts)
Row 4: Row type B. (15 sts)
Rows 5–6: Row type A. (15 sts in each row)
Row 7: Row type B. (13 sts)
Rows 8–9: Row type A. (13 sts in each row)
Row 10: Row type B. (11 sts) Checkpoint: 1.8 in (4.6 cm) tall along the spine.
Rows 11–12: Row type A. (11 sts in each row)
Row 13: Row type B. (9 sts) Checkpoint: 2.4 in (6.1 cm) tall.
Rows 14–15: Row type A. (9 sts in each row)
Row 16: Row type B. (7 sts) The stitches here are: sc3tog, sc, 3 sc in the center, sc, sc3tog.
Rows 17–18: Row type A. (7 sts in each row)
Row 19: Row type B. (5 sts) The stitches here are: sc3tog, 3 sc in the center, sc3tog.
Rows 20–21: Row type A. (5 sts in each row) The stitches here are: sc2tog, 3 sc in the center, sc2tog.
Row 22: Ch 1, turn. Sc2tog BLO, sc BLO in the center st, sc2tog BLO. (3 sts) This row has no center increase, because there aren’t enough stitches for one.
Row 23: Ch 1, turn. Sc3tog BLO. (1 st) This is the tip.
Fasten off and weave in the end. The tree is now 3.4 in (8.6 cm) wide at the base and 4.2 in (10.7 cm) tall along the spine.
Why it works: Every row adds 2 stitches at the center, which pushes the middle of each row upward and turns the back-loop ridges into Λ shapes. The end decreases follow a repeating 0, 0, −2 rhythm. That takes the base from 17 sts down to 3 sts over 21 rows, which gives the tall, narrow spruce shape instead of a wide, flat triangle.
Look at both faces of the tree. The unworked front loops make ridges on both sides, so pick the face with the neater, straighter center spine as your RS.
Trunk
Use Color B (cream). With the RS facing, turn the tree upside down so you can work into the free loops of the foundation chain along the bottom edge.
Row 1: Skip the first 6 free loops. Join Color B in the 7th loop with a standing sc, or with a sl st and ch 1. Sc in the next 4 loops. (5 sts) These are foundation sts 7 through 11, the 5 center stitches, with 6 stitches left free on each side.
Rows 2–4: Ch 1, turn. Sc in each st across, working through both loops. (5 sts in each row)
Fasten off and weave in the ends. The trunk is 1.0 in (2.5 cm) wide and 0.7 in (1.8 cm) tall, and the whole piece is now 4.9 in (12.4 cm) tall.
The trunk is worked through both loops so it stays smooth and solid, like the cream trunk in the photo.
Border
Use Color B (cream).
Border gauge: Work 1 sc in each row end along the slanted sides and 1 sc in each stitch along the bottom and the trunk. One sc for each row end works because the sc BLO rows are almost exactly as tall as they are wide, so the edge lies flat without stretching.
Rnd 1: With the RS facing, join Color B with a sl st in the single st of Row 23 (the tip). Ch 1. Then work around the outline in this order:
- Tip: 3 sc in the tip st. (3 sts)
- Left side: 1 sc in the end of each row from Row 22 down to Row 2. (21 sts)
- Bottom-left corner: 3 sc in the end of Row 1, which is also the first foundation st. (3 sts)
- Bottom edge, left: 1 sc in each free foundation loop from st 2 through st 6. (5 sts)
- Trunk, left side: 1 sc in the end of each trunk row from Row 1 to Row 3. (3 sts)
- Trunk, bottom-left corner: 3 sc in the first st of trunk Row 4. (3 sts)
- Trunk bottom: 1 sc in each of the next 3 sts. (3 sts)
- Trunk, bottom-right corner: 3 sc in the last st of trunk Row 4. (3 sts)
- Trunk, right side: 1 sc in the end of each trunk row from Row 3 to Row 1. (3 sts)
- Bottom edge, right: 1 sc in each free foundation loop from st 12 through st 16. (5 sts)
- Bottom-right corner: 3 sc in the end of Row 1, which is also foundation st 17. (3 sts)
- Right side: 1 sc in the end of each row from Row 2 up to Row 22. (21 sts)
Join with a sl st to the first sc. (76 sts total)
Check the math: 3 + 21 + 3 + 5 + 3 + 3 + 3 + 3 + 3 + 5 + 3 + 21 = 76. On the bottom, you covered 1 corner stitch + 5 free loops + 5 trunk stitches + 5 free loops + 1 corner stitch = 17, which matches the 17 foundation stitches. On each side, you covered 21 row ends, plus Row 23 at the tip and Row 1 at the corner = 23 rows. No stitch was counted twice.
The two inside corners where the trunk meets the tree have no extra stitches. Pull the yarn snug as you go around them so the corners stay sharp.
Hanging loop: Sl st into the next sc, which is the center sc of the tip 3-sc group. Ch 20, then sl st in the same center sc to close the loop. To make the cord firmer, work 1 sl st into each ch around the loop (20 sl sts), then sl st into the center tip sc again. Fasten off and weave the end down into the border.
The 20-chain loop is about 4 in (10.2 cm) of chain and hangs about 2 in (5.1 cm) above the tip. For a rearview mirror with a thick stem, you can ch 40 instead, which makes a loop that hangs about 4 in (10.2 cm).
Final Blocking
- Weave in all the ends along matching colors: taupe ends into the tree body and cream ends into the border.
- Lay the ornament RS up on a blocking mat or folded towel.
- Pin the tip first, then the two bottom corners, so the base measures 3.8 in (9.7 cm) across.
- Pin the bottom of the trunk so the total height from the tip to the trunk is 5.3 in (13.5 cm).
- Pin each slanted side straight between the tip and its bottom corner, about every 0.5 in (1.3 cm).
- Gently straighten the center spine with your fingers so it runs straight from the tip to the trunk.
- Spray with water until damp, but not soaked.
- Let it dry completely before unpinning, which takes about 4 to 6 hours.
- Lay the loop flat while it dries so it doesn’t dry twisted.
Final Quality-Control Checklist
- The tree body has 23 rows and ends with a single tip stitch.
- The center spine runs straight from the tip to the base.
- The ribs form even inverted-V chevrons, and the two sides mirror each other.
- The base before the border is 3.4 in (8.6 cm) wide.
- The trunk is 5 sts wide, 4 rows tall, and exactly centered, with 6 free loops on each side.
- The border round has 76 sc, with 3 sc at each of the 5 outer corners.
- The finished size is 3.8 in (9.7 cm) x 5.3 in (13.5 cm).
- The loop is attached at the center tip stitch, so the ornament hangs straight.
- All ends are woven in, and no taupe shows through the cream.
Troubleshooting
The spine wanders to one side. You lost track of the center stitch. Move your marker up to the middle of the 3-sc group on every row.
The sides ruffle. Your end decreases are too loose, or you skipped a row type B. Check the 0, 0, −2 rhythm against the stitch counts.
The tree cups or bows upward. Your center increases are too tight. Relax your tension on the 3-sc groups, or block a little more firmly.
The ribs are faint. Make sure every stitch from Row 2 on goes through the back loop only, decreases included.
The border flares. You worked more than 1 sc into some row ends. Pull it out and recount: 21 sc per side.
The border pulls tight. Go up a hook size for the border round only.
The ornament hangs crooked. The loop isn’t on the center tip sc. Move it there.
Care
Hand wash in cool water with mild soap, press out the water gently in a towel, and dry flat. Pin it back to shape if needed. Keep the ornament out of direct sun on the dashboard so the taupe doesn’t fade.
Final Notes
Here’s the full measurement chain. Gauge is 5 sc and 5.5 rows per 1 in (2.5 cm). The 17-stitch base measures 3.4 in (8.6 cm), and 23 rows bring the tree to 4.2 in (10.7 cm). The trunk adds 0.7 in (1.8 cm) for a total of 4.9 in (12.4 cm). The 76-stitch border adds 0.2 in (0.5 cm) on every edge, which gives the finished size of 3.8 in (9.7 cm) x 5.3 in (13.5 cm).
If your checkpoints match at Row 10 and Row 23, the trunk and border will fit. One ornament takes about an hour, and a set of three separate trees makes a nice gift for anyone who loves a cozy car or a natural-style tree.
Happy crocheting!