

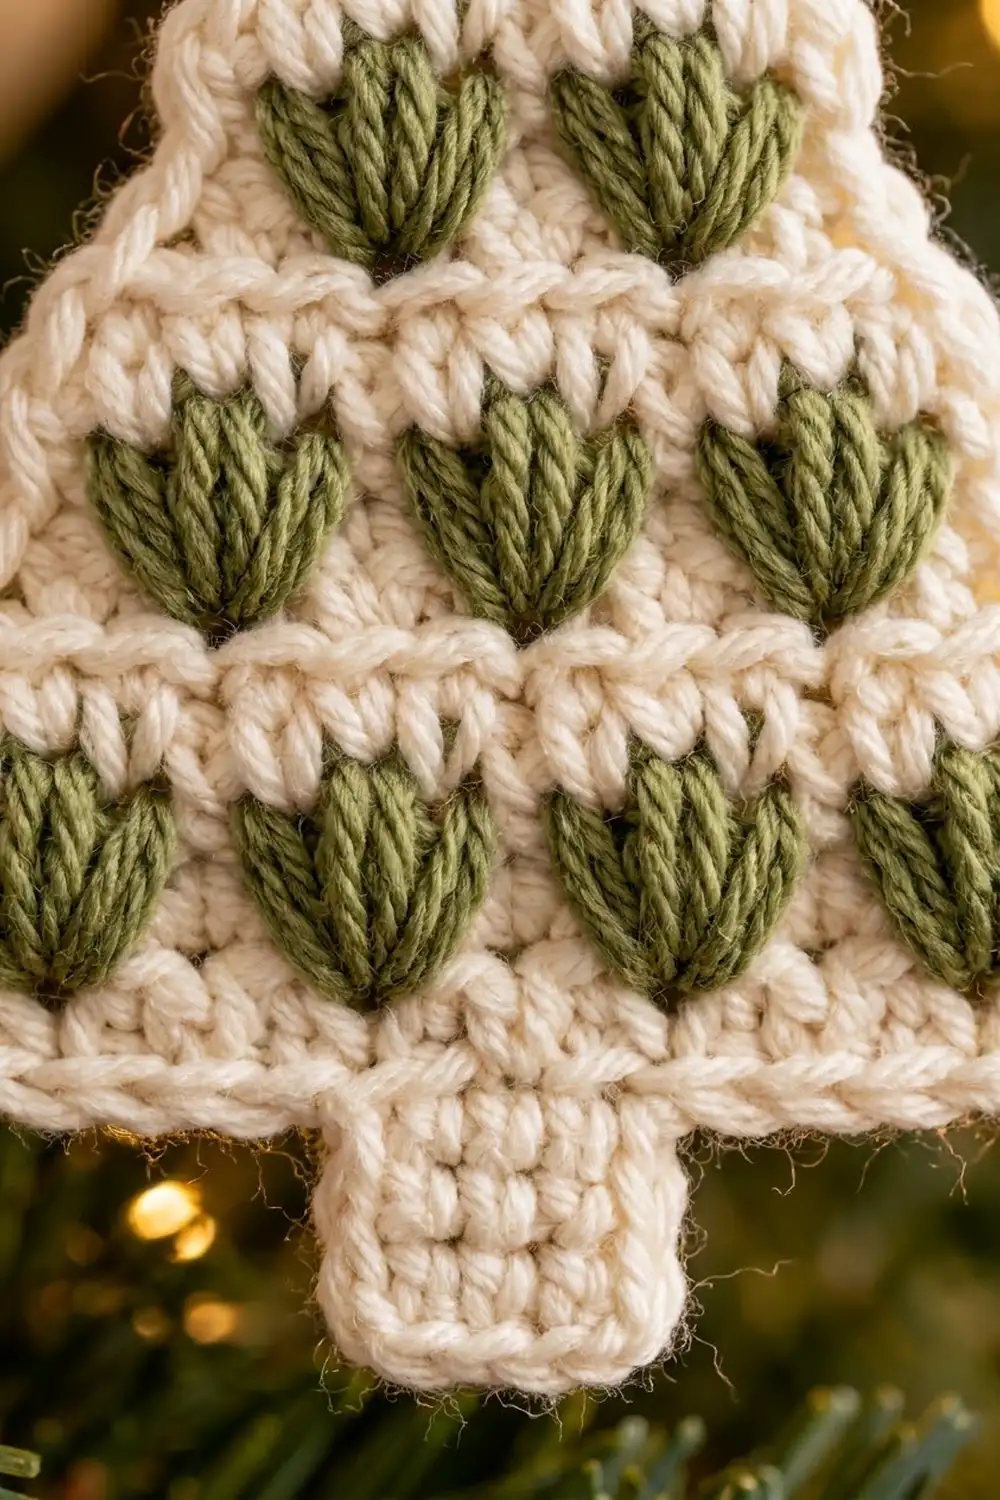
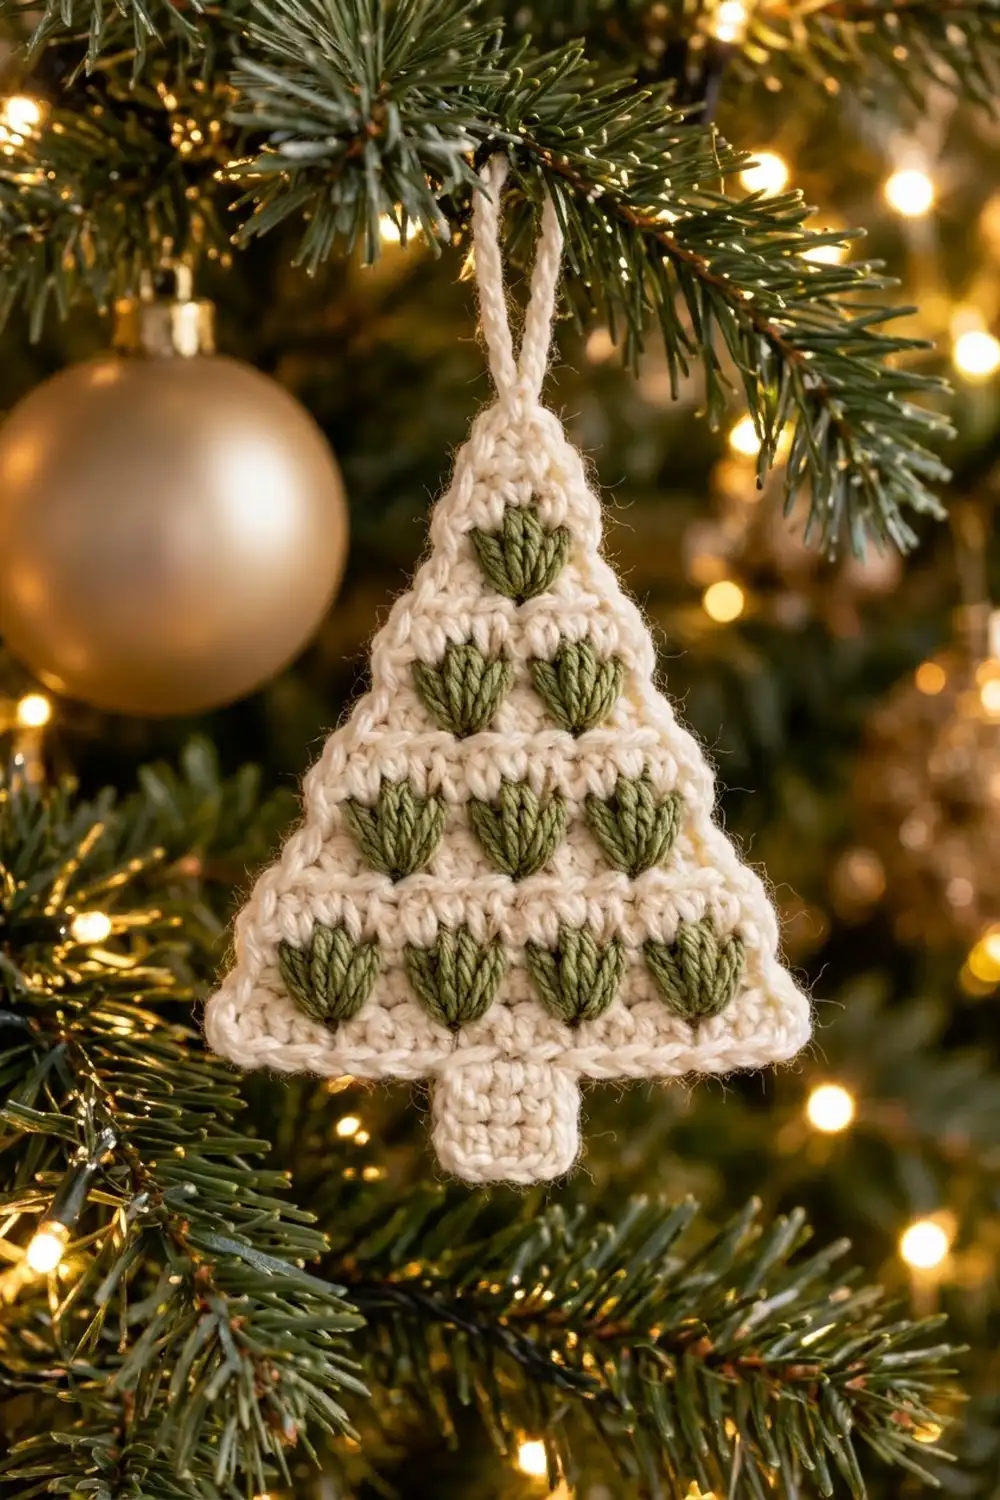
This little tree ornament is a flat cream triangle dotted with ten sage-green leaf clusters. Each cluster is pointed at the bottom and opens out at the top like a tulip bud. The clusters sit in staggered tiers of 1, 2, 3, and 4, with cream single crochet bands between them. There’s a short square trunk below and a chain loop at the tip for hanging.
The palette is quiet and Scandinavian: ivory for the body and sage green for the leaves. It suits a natural-themed tree, a gift tag, or a wreath. The texture comes from one special stitch, the Leaf Spike. It’s worked over two rows so it lies flat and doesn’t make the row bulge.
The pattern uses US crochet terms. The finished ornament measures about 5.0 in (12.7 cm) wide and 5.1 in (13.0 cm) tall, not counting the hanging loop.
Construction is simple. You crochet the tree body in rows from the bottom up, decreasing at the edges. Then you work the trunk down from the center of the foundation chain, add one round of single crochet border all the way around, and chain the hanging loop. It’s all one piece, so there’s nothing to sew on.
Finished Size and Construction
- Finished size: 5.0 in (12.7 cm) wide × 5.1 in (13.0 cm) tall, plus a loop about 1.5 in (3.8 cm) tall
- Skill level: Easy-intermediate (color changes, spike clusters, decreases)
- Terminology: US
- Yarn weight: DK (#3, light)
- Hook: 3.5 mm (E-4)
- Number of pieces: 1
- Layout: One flat tree motif; no joining needed
- Body size before border: 4.6 in (11.7 cm) wide at the base × 3.6 in (9.1 cm) tall
- Trunk before border: 1.0 in (2.5 cm) wide × 1.1 in (2.8 cm) tall
- Border depth: 1 round of sc, about 0.2 in (0.5 cm) on each edge
Materials
Yarn: Use a smooth DK yarn so the leaf strands show up clearly. Cotton or a cotton blend gives crisp stitches and blocks flat. Soft acrylic also works if you steam it gently. Avoid fuzzy or brushed yarn, because the halo hides the leaf texture.
- Color A, Cream/Ivory: 10 g (23 m), for the body, trunk, border, and loop
- Color B, Sage Green: 3 g (7 m), for the leaf clusters
These amounts assume a yarn of about 230 m per 100 g. They include a margin for tails and for checking gauge.
Tools:
– 3.5 mm (E-4) crochet hook
– Tapestry needle
– Scissors
– 2 stitch markers
– Rust-proof pins and a blocking mat or folded towel
– Spray bottle or steam iron
Abbreviations (US Terms)
- ch: chain
- sc: single crochet
- sc2tog: single crochet 2 together (1 decrease)
- sc3tog: single crochet 3 together (2 decreases)
- sl st: slip stitch
- st(s): stitch(es)
- yo: yarn over
- RS / WS: right side / wrong side
- rep: repeat
- LS: Leaf Spike (special stitch, below)
Leaf Spike (LS): Worked with Color B.
- Find the sc in the row below the next stitch, directly underneath it. That’s two rows below the row you’re working.
- Yo, insert the hook into that sc, yo, and pull up a long loop to the height of the current row.
- Repeat step 2 two more times, all in the same stitch (7 loops on hook).
- Pick up Color A, yo, and draw through all 7 loops.
- Skip the stitch of the previous row that’s now hidden behind the LS.
The LS counts as 1 stitch. All three loops come out of one stitch, so the cluster is narrow at the bottom and fans into six strands at the top. That’s what gives it the tulip-leaf shape.
Color change into LS: Work the sc before the LS until 2 loops are on the hook, then finish it with Color B. While you work the cream sc between leaves, carry the green along the top of the row and work over it so it stays hidden. Cut the green after the last LS of the row, leaving a 4 in (10.2 cm) tail.
Gauge and Checkpoints
Gauge: 20 sc and 22 rows = 4 in (10.2 cm) in sc. That’s 5 sc and 5.5 rows per 1 in (2.5 cm).
Since the ornament is small, the ornament itself is the best swatch. Work the first rows and measure at each checkpoint:
- After Row 2: The base is 4.6 in (11.7 cm) wide (23 sts).
- After Row 6: The piece is 1.1 in (2.8 cm) tall, and Row 6 is 3.8 in (9.7 cm) wide (19 sts).
- After Row 10: The piece is 1.8 in (4.6 cm) tall.
- After Row 20: The body is 3.6 in (9.1 cm) tall.
If your piece is too big, go down to a 3.25 mm (D-3) hook. If it’s too small, go up to a 3.75 mm (F-5) hook. If the width is right but the height is off, keep your hook. Instead, check that each LS is pulled up to full row height and that your sc stitches aren’t tight.
Tree Body
Use Color A unless told otherwise. Turn at the end of every row. The ch 1 at the start of each row does not count as a stitch. Odd-numbered rows are RS rows, and every leaf row is a RS row, so all leaves face the front.
Row 1 (RS): Ch 24. Sc in the 2nd ch from the hook and in each ch across. (23 sc) The free loops of the chain are used later for the trunk and border.
Row 2 (WS): Ch 1, sc in each st across. (23 sc)
Tier 1 (4 leaves)
Row 3 (RS, leaf row): Ch 1, sc2tog, sc 3, LS, sc 3; rep from * 2 more times, LS, sc 3, sc2tog. (21 sts: 17 sc + 4 LS)* Each LS goes into Row 1.
Row 4 (WS): Ch 1, sc2tog, sc 17, sc2tog. (19 sc)
Rows 5–6: Ch 1, sc in each st across. (19 sc)
Tier 2 (3 leaves)
Row 7 (RS, leaf row): Ch 1, sc2tog, sc 3, LS, sc 3; rep from * once more, LS, sc 3, sc2tog. (17 sts: 14 sc + 3 LS)* Each LS goes into Row 5.
Row 8 (WS): Ch 1, sc2tog, sc 13, sc2tog. (15 sc)
Rows 9–10: Ch 1, sc in each st across. (15 sc)
Tier 3 (2 leaves)
Row 11 (RS, leaf row): Ch 1, sc2tog, sc 3, LS, sc 3, LS, sc 3, sc2tog. (13 sts: 11 sc + 2 LS) Each LS goes into Row 9.
Row 12 (WS): Ch 1, sc2tog, sc 9, sc2tog. (11 sc)
Rows 13–14: Ch 1, sc in each st across. (11 sc)
Tier 4 (1 leaf) and Tip
Row 15 (RS, leaf row): Ch 1, sc2tog, sc 3, LS, sc 3, sc2tog. (9 sts: 8 sc + 1 LS) The LS goes into Row 13.
Row 16 (WS): Ch 1, sc2tog, sc 5, sc2tog. (7 sc)
Row 17 (RS): Ch 1, sc in each st across. (7 sc)
Row 18 (WS): Ch 1, sc2tog, sc 3, sc2tog. (5 sc)
Row 19 (RS): Ch 1, sc2tog, sc 1, sc2tog. (3 sc)
Row 20 (WS): Ch 1, sc3tog. (1 st) Don’t fasten off. Take the live loop off the hook and secure it with a stitch marker.
Why the leaves stagger: Every leaf row starts with sc2tog and sc 3, so the first leaf is always the 5th stitch. Each tier loses 2 stitches on each side, so each tier’s leaves shift 2 stitches inward. That puts each leaf halfway between the two leaves below it. The single top leaf lines up with stitch 12 of the original 23, which is the exact center.
Trunk
Hold the body upside down with the RS facing you, so the foundation chain is on top. Count the 23 free chain loops and skip the first 9.
Row T1 (RS): With a separate length of Color A, join with a sl st in the 10th free loop. Ch 1, sc in the same loop and in each of the next 4 loops. (5 sc) That leaves 9 free loops on each side of the trunk.
Rows T2–T6: Ch 1, turn, sc in each st across. (5 sc) Fasten off and weave in the end.
Checkpoint: the trunk is 1.0 in (2.5 cm) wide and 1.1 in (2.8 cm) long.
Border
Border gauge: Work at the same 5 sc per 1 in (2.5 cm) as the body. Put 1 sc in each row end and 1 sc in each free chain loop. Each outer corner gets 3 sc.
Put the live loop from Row 20 back on the hook. Ch 1 and turn so the RS faces you.
Rnd 1 (RS):
– Tip: 3 sc in the Row 20 stitch. (3 sc)
– First slanted side: Sc 1 in each row end from Row 19 down to Row 1. (19 sc)
– Bottom corner: 3 sc in the first free chain loop. (3 sc)
– Bottom edge: Sc in each of the next 7 free loops. (7 sc)
– Inner corner: Sc2tog over the next free loop and the row end of T1. (1 st)
– Trunk side: Sc 1 in each row end of T2–T6. (5 sc)
– Trunk bottom: 3 sc in the first st of T6, sc in the next 3 sts, 3 sc in the last st. (9 sc)
– Second trunk side: Sc 1 in each row end of T6–T2. (5 sc)
– Inner corner: Sc2tog over the row end of T1 and the next free loop. (1 st)
– Bottom edge: Sc in each of the next 7 free loops. (7 sc)
– Bottom corner: 3 sc in the last free loop. (3 sc)
– Second slanted side: Sc 1 in each row end from Row 1 up to Row 19. (19 sc)
– Join with a sl st to the first sc. (82 sts)
Count check: 3 + 19 + 3 + 7 + 1 + 5 + 9 + 5 + 1 + 7 + 3 + 19 = 82.
Why the math works:
– Bottom edge: Each side of the trunk has 9 free loops. One holds the corner, 7 get 1 sc each, and 1 goes into the inner sc2tog: 1 + 7 + 1 = 9.
– Slanted sides: Each one is about 4.2 in (10.7 cm) long on the diagonal. It gets its own 19 sc, plus 1 corner stitch at the tip and 1 at the bottom corner, for 21 sts. At 5 sts per 1 in (2.5 cm), 21 sts covers 4.2 in, so the edge lies flat.
– Inner corners: The sc2tog keeps each inner angle from gaping.
– Outer corners: The 3-sc corners let the points turn without cupping.
Hanging loop: Sl st into the next sc, which is the center sc of the tip. Ch 18, then sl st into the same center sc. Fasten off, leaving a 6 in (15.2 cm) tail. Pass the tail through the base of the loop twice to secure it, then weave it in.
Checkpoint: the ornament is now 5.0 in (12.7 cm) wide and 5.1 in (13.0 cm) tall.
Final Blocking
- Weave in all ends on the WS. Hide each green tail behind its own leaf so it can’t show through the cream.
- Mist the ornament until it’s lightly damp, or hold a steam iron about 1 in (2.5 cm) above the WS. Don’t press it.
- Lay it RS up on the mat. Pin the tip and both bottom corners into a symmetrical triangle 5.0 in (12.7 cm) across the base.
- Pin the trunk straight down from the center, with its sides square to the bottom edge.
- Straighten each slanted side with a finger, and pin the middle of the side if it bows.
- Gently pinch each leaf so its strands fan evenly.
- Let it dry completely before unpinning, about 2–4 hours.
Final Quality-Control Checklist
- [ ] One piece, with 10 leaves in tiers of 4, 3, 2, and 1 from bottom to top
- [ ] Every leaf is pointed at the bottom and fanned at the top
- [ ] Each leaf sits centered between the two leaves below it
- [ ] The top leaf lines up with the center of the trunk
- [ ] Border Rnd 1 has 82 sts, with 3 sc at the tip and at both bottom corners
- [ ] The trunk had 9 free loops on each side before the border
- [ ] The ornament is 5.0 in (12.7 cm) wide × 5.1 in (13.0 cm) tall, not counting the loop
- [ ] No green shows through the cream bands
- [ ] The loop is secure and about 1.5 in (3.8 cm) tall
Troubleshooting
Leaves look squashed or pull the row down: The loops are too short. Pull each one up to the full height of the current row.
The stitch count is off after a leaf row: You probably didn’t skip the stitch behind the LS. Recount against the totals given for that row.
Green peeks through between leaves: Carry the strand closer to the tops of the stitches. Or cut the green after each leaf and rejoin it for the next one.
The tree leans to one side: A decrease was missed. Every decrease row should start and end with sc2tog.
Bottom corners curl: Check that each corner loop has 3 sc, then block flat.
Inner trunk corners gap: Work the sc2tog firmly, and close any hole with the yarn tail.
Care
Hand wash in cool water with mild soap. Roll it in a towel to press out the water, then dry flat, re-pinning the shape if needed. Store it flat or hanging, away from direct sunlight, so the sage stays fresh.
Final Notes
Here’s the measurement chain. A gauge of 5 sc and 5.5 rows per 1 in (2.5 cm) makes the 23-stitch base 4.6 in (11.7 cm) wide. The 20 rows build a body 3.6 in (9.1 cm) tall, and the 5-stitch, 6-row trunk adds 1.1 in (2.8 cm). The 82-stitch border round adds 0.2 in (0.5 cm) on every edge. That gives a finished ornament of 5.0 in (12.7 cm) by 5.1 in (13.0 cm). If your size is right at Rows 2, 6, and 10, the rest will fall into place. Make one for your own tree and a few more to tie onto gifts.
Happy crocheting!