

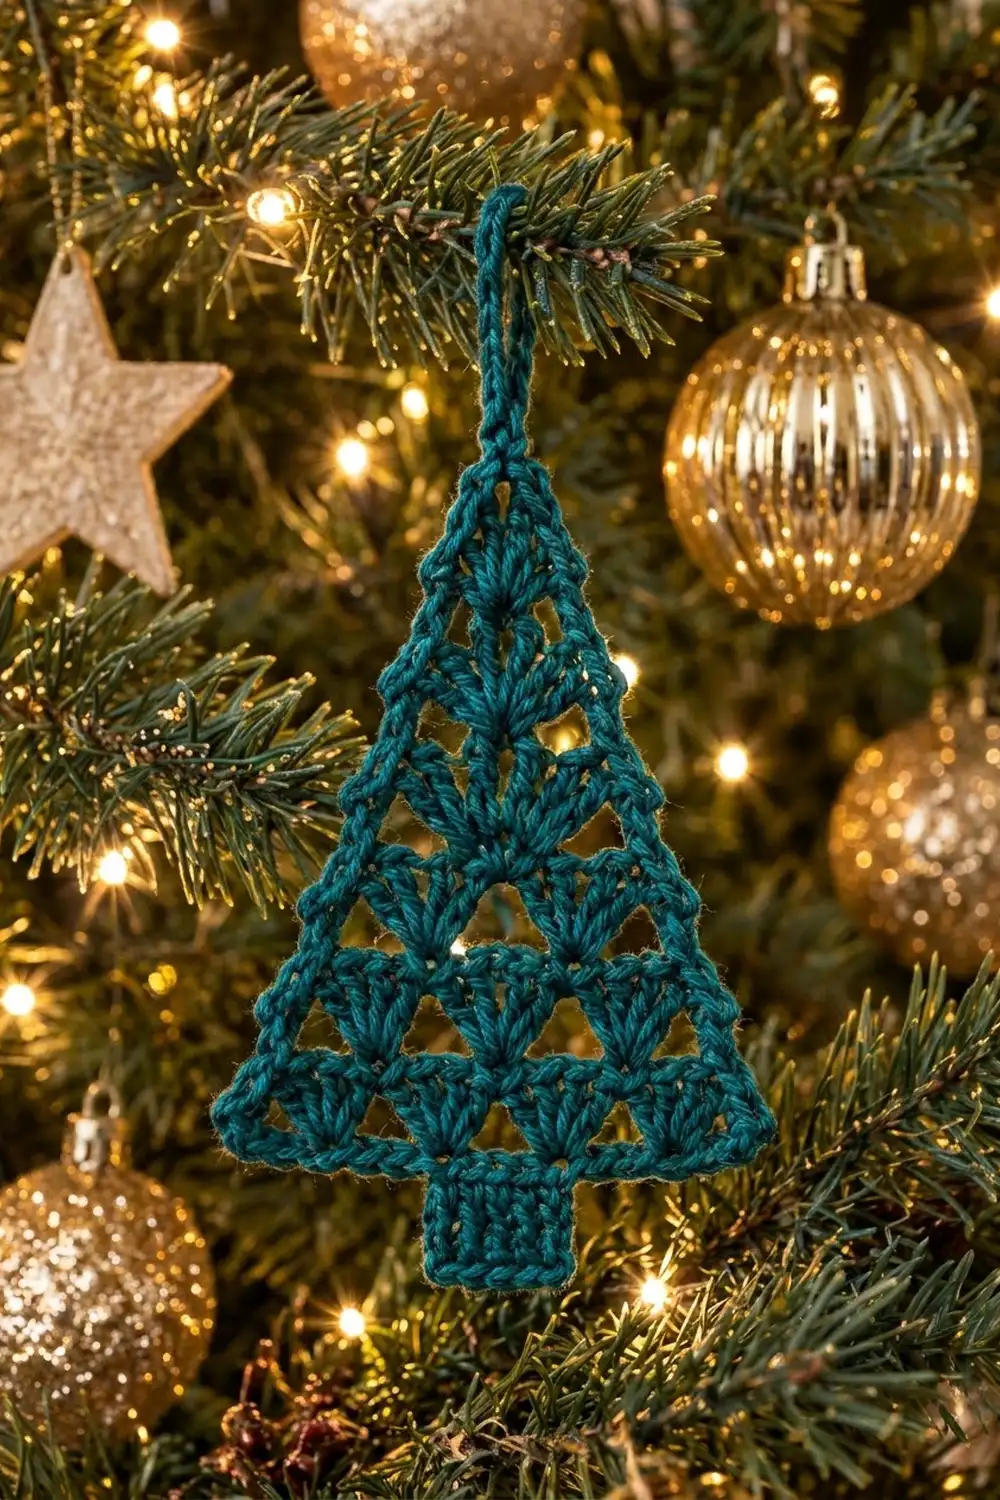
This little tree is made of rows of fans. Each row of plump five-double-crochet fans sits on the row below and gets one fan narrower until a single fan forms the tip. A smooth single crochet edging frames the shape, a solid trunk anchors the bottom, and a chain loop at the top lets it hang straight from a branch.
The sample uses one deep teal mercerized cotton. Cotton keeps the stitch definition crisp, so the fans read clearly even from across the room. The style is classic and lacy without being fragile. It works well as a gift tag, a package topper, or a full set of tree ornaments.
The pattern uses US crochet terms. The finished ornament measures 4.1 in (10.4 cm) wide and 4.3 in (10.9 cm) tall from trunk to tip, or about 5.6 in (14.2 cm) including the hanging loop.
Construction is simple. You work the triangle flat in turned rows from the base up, then add two rounds of single crochet edging. Next you work the trunk in rows directly off the bottom edge. Finally you chain the hanging loop at the apex. It is one piece with no sewing, apart from weaving in ends.
Finished Size and Construction
- Finished size: 4.1 in (10.4 cm) wide × 4.3 in (10.9 cm) tall, plus a 1.3 in (3.3 cm) hanging loop
- Skill level: Easy / advanced beginner
- Terminology: US crochet terms
- Yarn weight: Sport weight (#2) cotton
- Hook: 2.75 mm (C-2)
- Number of pieces: 1
- Layout: Single triangle with trunk and loop. No joining needed.
- Triangle size before border: 3.6 in (9.1 cm) wide × 3 in (7.6 cm) tall
- Border depth: 2 rounds of sc, about 0.25 in (0.6 cm)
- Trunk: 0.9 in (2.3 cm) wide × 0.8 in (2.0 cm) tall
Materials
Yarn: Choose a smooth sport-weight mercerized cotton or a cotton blend. Cotton holds the fan shapes and blocks flat. Acrylic works too, but the fans will look softer and the edges may curl more. Pick a dark, saturated color so the open gaps show well against the tree.
- Teal (main and only color): 10 g, about 35 m
Quantities include a margin of about 30% for your gauge swatch, tails, and the hanging loop.
Tools:
– 2.75 mm (C-2) crochet hook
– Tapestry needle
– Scissors
– Rust-proof pins and a blocking mat or folded towel
– Spray bottle with clean water
– Ruler or tape measure
Abbreviations (US Terms)
- ch – chain
- sl st – slip stitch
- sc – single crochet
- dc – double crochet
- st(s) – stitch(es)
- RS – right side
- sk – skip
Special stitch – Fan: Work 5 dc in the same stitch. The third dc of a fan is its center dc.
Gauge and Checkpoints
Exact gauge is not critical for an ornament. Still, your tree should match the size of the others if you make a set, so work Row 1 first and measure it.
Gauge: 6 fan repeats (Row 1) = 3.6 in (9.1 cm) wide. One fan row = 0.5 in (1.3 cm) tall. Each fan repeat is about 0.6 in (1.5 cm) wide.
Checkpoints:
– After Row 1: 3.6 in (9.1 cm) wide, lying flat without stretching.
– After Row 3: about 1.5 in (3.8 cm) tall.
– After Row 6: about 3 in (7.6 cm) tall at the center.
– After Border Round 2: 4.1 in (10.4 cm) wide × 3.5 in (8.9 cm) tall.
– After the trunk: 4.3 in (10.9 cm) total height.
If your Row 1 is too wide (over 3.8 in / 9.7 cm), go down one hook size to 2.5 mm. If it is too narrow (under 3.4 in / 8.6 cm), go up to 3 mm. A tight foundation chain is the most common cause of a too-narrow base. If that is the problem, make the chain with a hook one size larger and switch back for Row 1.

Triangle
Work in turned rows. Each row loses one fan, and the edges step inward by half a fan on each side. The stitch count for every row is (fans × 6) + 1.
Foundation: Ch 38.
Row 1: Sc in 2nd ch from hook. Sk 2 ch, fan in next ch, sk 2 ch, sc in next ch. Repeat from * 5 more times. (6 fans, 7 sc = 37 sts)
Each repeat uses 6 chains, so 1 + (6 × 6) = 37 chains are worked, which matches the 37 stitches.
Row 2: Turn. Sl st in first 3 sts (sc and 2 dc). Ch 1 (does not count as a st). Sc in next dc (center dc of first fan). Sk 2 dc, fan in next sc, sk 2 dc, sc in next center dc. Repeat from * 4 more times. (5 fans, 6 sc = 31 sts)
The last 2 dc and the last sc of Row 1 stay unworked. Each new fan sits in the sc between two fans of the row below.
Row 3: Turn. Sl st in first 3 sts. Ch 1. Sc in next dc (center dc). Sk 2 dc, fan in next sc, sk 2 dc, sc in next center dc. Repeat from * 3 more times. (4 fans, 5 sc = 25 sts)
Row 4: Turn. Sl st in first 3 sts. Ch 1. Sc in next center dc. Sk 2 dc, fan in next sc, sk 2 dc, sc in next center dc. Repeat from * 2 more times. (3 fans, 4 sc = 19 sts)
Row 5: Turn. Sl st in first 3 sts. Ch 1. Sc in next center dc. Sk 2 dc, fan in next sc, sk 2 dc, sc in next center dc. Repeat from * once more. (2 fans, 3 sc = 13 sts)
Row 6: Turn. Sl st in first 3 sts. Ch 1. Sc in next center dc. Sk 2 dc, fan in next sc, sk 2 dc, sc in next center dc. (1 fan, 2 sc = 7 sts)
Fasten off, leaving a 4 in (10.2 cm) tail.
Checkpoint: The triangle is 3.6 in (9.1 cm) wide at the base and 3 in (7.6 cm) tall at the center. It has a fan count of 6-5-4-3-2-1, and the sides look stepped. The border will smooth them.
Border
The two border rounds square up the stepped sides and give the ornament its firm, raised outline. Choose the neater face as the RS. The fabric is close to reversible.
Border gauge: About 5 sc per 1 in (2.5 cm) along the edges. Two rounds add about 0.25 in (0.6 cm) on every side.
Round 1: With RS facing, join yarn in the first foundation ch at the bottom right corner. Ch 1. Work along the underside of the foundation chain:
– Bottom corner: 3 sc in the first ch.
– Bottom edge: Sc in each of the next 35 ch.
– Bottom corner: 3 sc in the last ch.
– First slanted side: Work 15 sc evenly along the row ends of Rows 1–5 (3 sc per row). Place them in the sides of the sc and the outer dc, and over the sl sts. Then sc in the end sc of Row 6 and in each of the next 2 dc (3 sc). That makes 18 sc.
– Apex corner: 3 sc in the center dc of the top fan.
– Second slanted side: Sc in each of the next 2 dc and in the end sc of Row 6 (3 sc). Then work 15 sc evenly down the row ends of Rows 5–1. That makes 18 sc.
– Sl st to the first sc.
Count: 3 corner groups × 3 sc = 9. Bottom edge between groups = 35. Two slanted sides × 18 = 36. Total 80 sts.
Why the math works: The bottom edge uses all 37 foundation chains. The 2 end chains each hold a 3-sc corner, and the 35 between them get 1 sc each. The sides get 3 sc per 0.5 in (1.3 cm) row, which is about 6 sc per 1 in (2.5 cm) of slanted length. The slanted sides are longer than the vertical height, so this lies flat at the border gauge without ruffling.
Round 2: Ch 1. Sc in the same st as the join (the first sc of the bottom right corner group). 3 sc in the next sc (corner center). Sc in each st to the center sc of the next corner group, 3 sc in that center sc. Repeat from * twice more, but stop before working past the last corner. Sc in each remaining st to the end. Sl st to the first sc.
Count: Each corner gains 2 sts, so 80 + (3 × 2) = 86 sts. Each corner group is now 5 sts (sc, 3 sc in center, sc). The 3 groups total 15 sts. The bottom edge between groups is still 35, and each slanted side between groups is still 18. So 15 + 35 + 36 = 86.
Do not fasten off yet if you like a continuous finish. Otherwise fasten off and weave in.
Checkpoint: 4.1 in (10.4 cm) wide × 3.5 in (8.9 cm) tall. The edge lies flat with crisp points.
Trunk
The trunk is worked in rows straight off the bottom edge of Border Round 2, centered on the 35 bottom-edge sts.
Placement: Count 35 bottom-edge sts between the two bottom corner groups. Skip the first 14. The trunk uses the next 7 sts (sts 15–21), leaving 14 sts on the other side. Check: 14 + 7 + 14 = 35.
Row 1: With the bottom edge pointing up, join yarn in st 15. Ch 3 (counts as dc). Dc in each of the next 6 sts. (7 dc)
Row 2: Ch 3 (counts as dc), turn. Dc in each st across, working the last dc in the top of the turning ch. (7 dc)
Row 3: Ch 1 (does not count), turn. Sc in each st across. (7 sc)
Fasten off.
Checkpoint: The trunk is 0.9 in (2.3 cm) wide × 0.8 in (2.0 cm) tall, with straight parallel sides. The total ornament height is now 4.3 in (10.9 cm).
Hanging Loop
Join yarn in the center sc of the apex corner group (Border Round 2). Ch 16. Sl st in the same st. Then sl st in the next st to lock the loop. Fasten off and weave the tail down into the border.
The loop measures about 1.3 in (3.3 cm) when hanging.
Final Blocking
- Weave in all ends along the border stitches, not through the fans, so the open gaps stay clean.
- Spray the ornament with water until it is evenly damp, but not dripping.
- Lay it RS up on the blocking mat.
- Pin the 3 corners first, using the 4.1 in (10.4 cm) base width and 3.5 in (8.9 cm) triangle height.
- Pin the trunk square at 0.9 in (2.3 cm) wide.
- Use your fingertips to open each fan so the five dc spread evenly and the gaps between fans look alike.
- Straighten the slanted sides with a ruler and add pins every 0.5 in (1.3 cm) if they bow.
- Let it dry completely, usually 6–12 hours.
- For extra stiffness, spray lightly with fabric starch before drying.
Final Quality-Control Checklist
- Fan count per row is 6, 5, 4, 3, 2, 1.
- Row 1 has 37 sts and Row 6 has 7 sts.
- Border Round 1 has 80 sts and Round 2 has 86 sts.
- Corners are sharp, with 3 sc in the center of each corner.
- The trunk is exactly centered, with 14 border sts on each side.
- The trunk has 7 sts in every row.
- Size is 4.1 in (10.4 cm) × 4.3 in (10.9 cm) without the loop.
- The loop is secure and centered at the apex.
- All ends are woven in and invisible from the RS.
Troubleshooting
Fans lean to one side: You may be placing a fan in the wrong sc. Every fan must go in the sc centered between two fans of the row below.
Base curls upward: The foundation chain is too tight. Remake it with a larger hook.
Slanted sides ruffle: There are too many border sc. Use 2 per row instead of 3 on the worst rows, but keep the side total even on both sides.
Slanted sides pull in or pucker: There are too few border sc. Check that you worked 3 per row.
Trunk is off-center: Recount the 35 bottom-edge sts and make sure you skipped exactly 14.
Tip is rounded instead of pointed: Work all 3 apex sc into the single center dc, and pin the point firmly while blocking.
Loop twists: Chain more loosely, or work 1 sc in each ch back down the loop for a firmer cord.
Care
Hand wash in cool water with mild soap, press out the water in a towel, and reshape flat to dry. Store the ornament flat or hanging so the fans keep their shape.
Final Notes
The measurements build on each other. Row 1 sets the 3.6 in (9.1 cm) base. Six fan rows of 0.5 in (1.3 cm) each make a 3 in (7.6 cm) triangle. Two border rounds bring it to 4.1 in (10.4 cm) × 3.5 in (8.9 cm). The trunk adds 0.8 in (2.0 cm), for a finished height of 4.3 in (10.9 cm). The stitch counts hold the shape together: 37 sts on the bottom row, 80 and then 86 sts in the border, and 7 sts across the trunk. If you check them at each stage, every tree in your set will come out the same size.
Happy crocheting!