

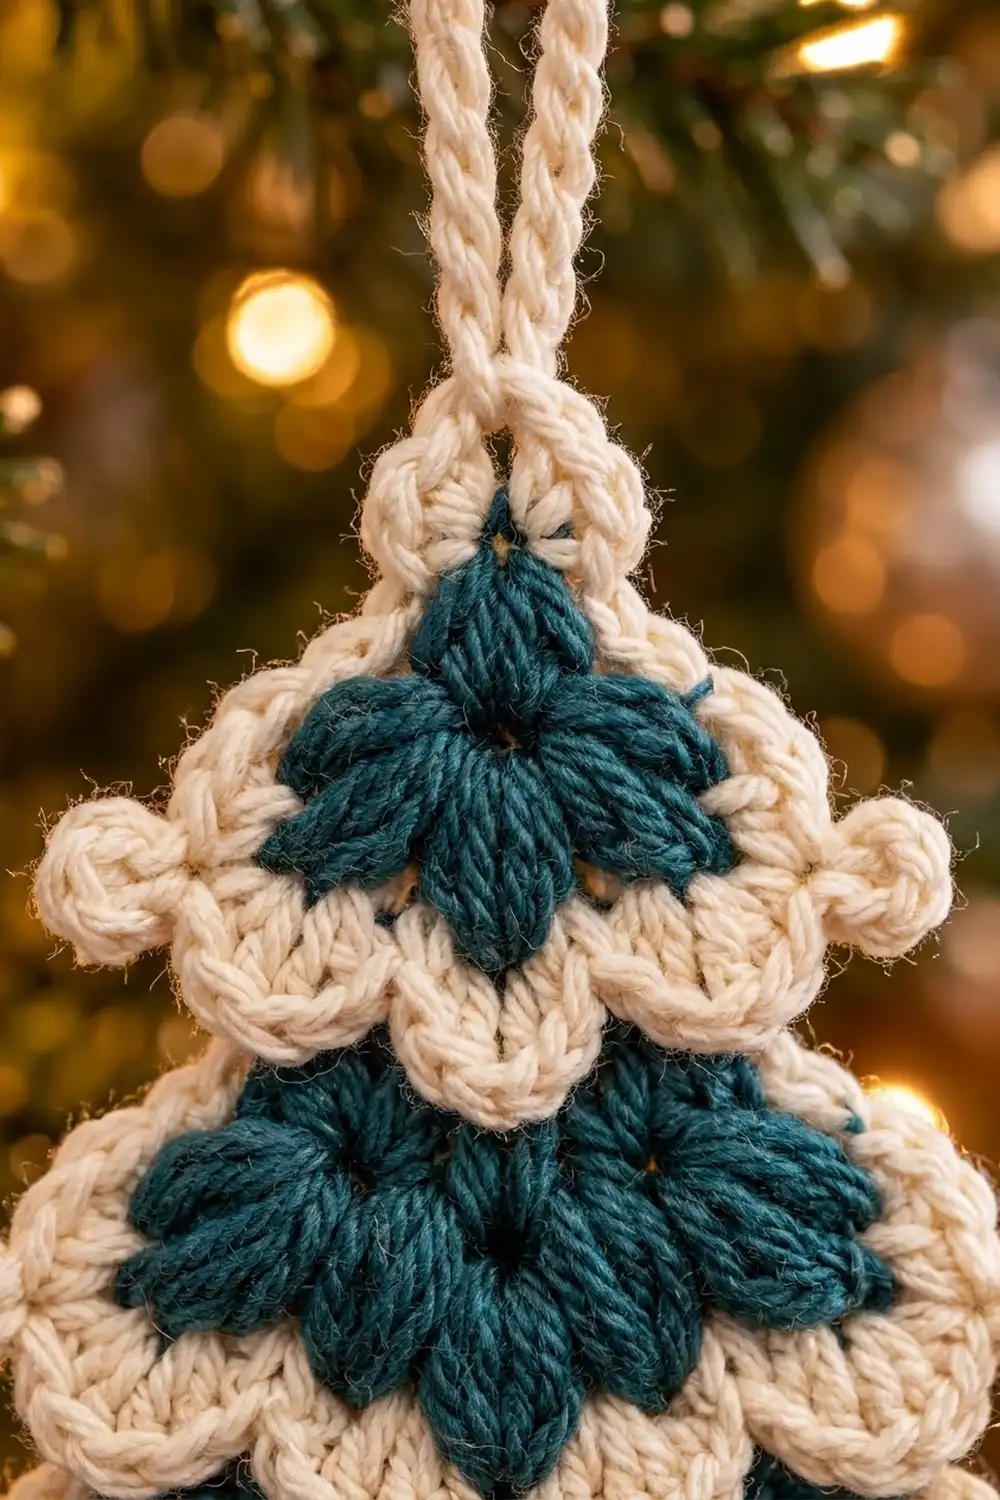
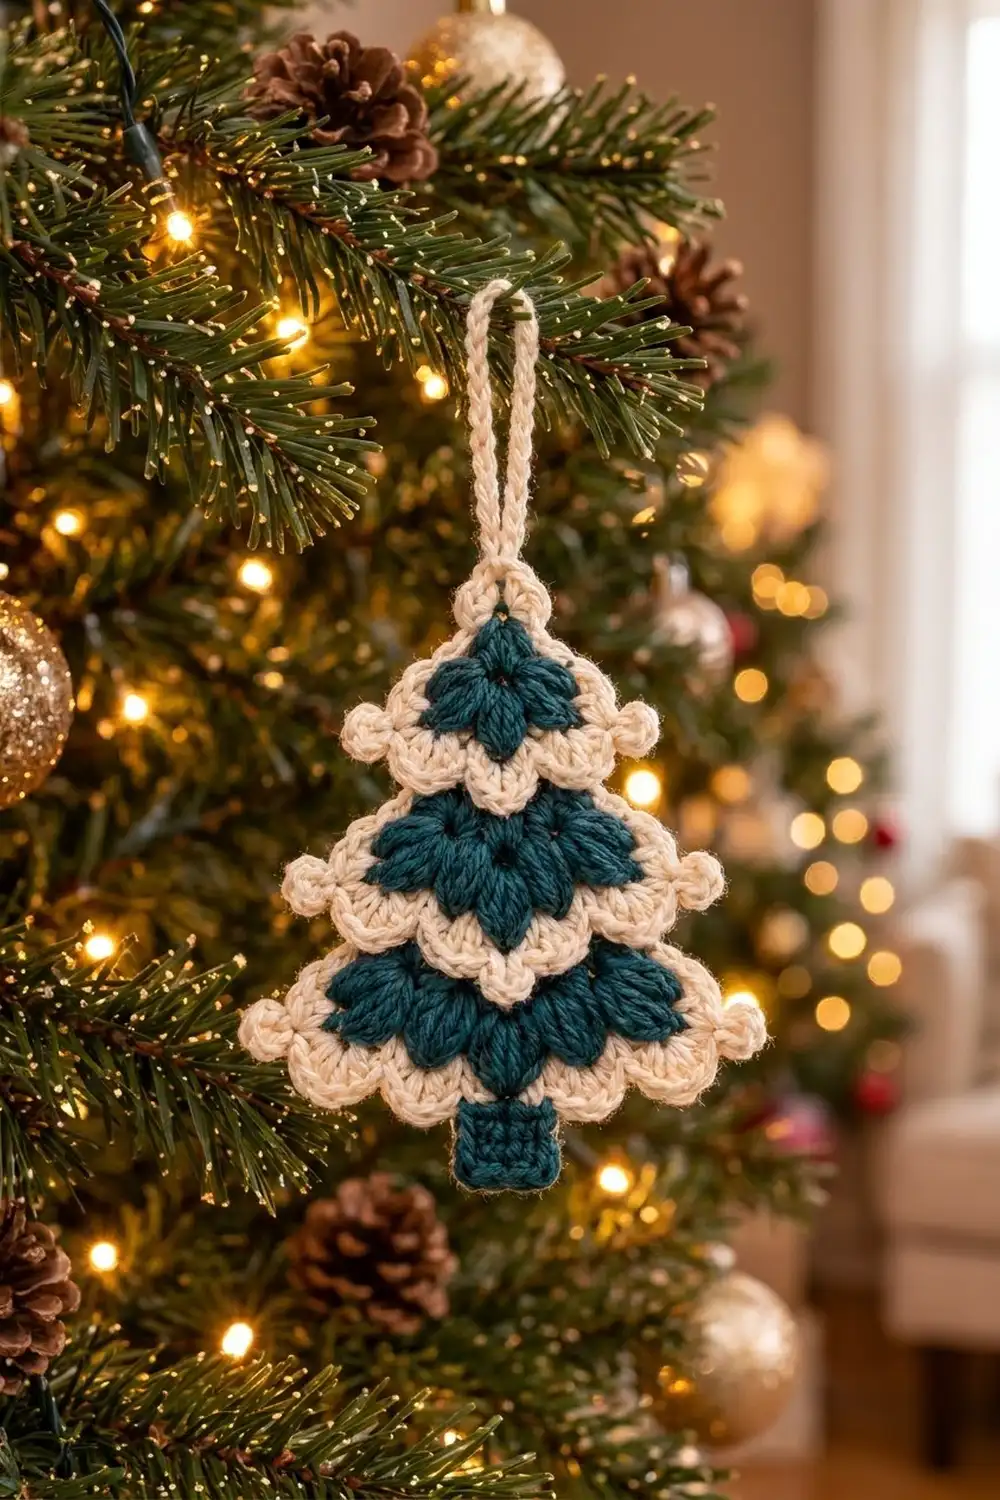
This little tree is a quick, cozy ornament with a lot of texture. It has three teal tiers filled with puff stitches. A cream band finishes off each tier, and a small picot sits at every tip, so the edges look like snow-dusted branches.
The palette has just two colors, deep teal and warm cream, which looks classic on a tree, a gift tag, or a wreath. The pattern uses US crochet terms throughout.
The finished ornament is 3.75 in (9.5 cm) wide across the bottom tier and 5 in (12.7 cm) tall with the trunk, not counting the hanging loop. The loop adds about 1.5 in (3.8 cm).
The tree is one flat piece. You work it in rows from the top point down. Each tier gets wider through its teal rows and ends with one cream half double crochet row. The next tier starts two stitches in from each edge, which creates the stepped outline. After that, one cream border round traces the outline, adds the picots, and makes the loop. Last, a teal trunk is worked down from the bottom edge.
Finished Size and Construction
- Finished size: 3.75 in (9.5 cm) wide × 5 in (12.7 cm) tall, loop excluded
- Skill level: Easy / advanced beginner
- Terminology: US crochet terms
- Yarn weight: Worsted (#4)
- Hook: 4.0 mm (US G-6)
- Number of pieces: 1
- Layout: Single flat tree, worked top-down in 18 rows, plus border and trunk
- Piece size before border: 3.25 in (8.3 cm) wide × 3.75 in (9.5 cm) tall
- Border depth: 0.25 in (0.6 cm) per side
- Trunk: 3 stitches × 4 rows, about 0.75 in (1.9 cm) square
Materials
Choose a smooth worsted-weight cotton or cotton blend. Cotton shows the puff stitches clearly and stays crisp when hung. Acrylic also works, but it makes a softer, puffier tree.
- Teal (Color A): 8 g / 16 m (17 yd)
- Cream (Color B): 6 g / 12 m (13 yd)
These amounts include a margin of about 20 percent for tails, a test swatch, and small tension differences. One standard ball of each color is enough for a whole set of ornaments.
Tools:
– 4.0 mm (US G-6) crochet hook
– Tapestry needle
– Scissors
– Stitch markers (2)
– Ruler or tape measure
– Pins and a blocking mat or folded towel
– Spray bottle with water
Abbreviations (US Terms)
- ch – chain
- sl st – slip stitch
- sc – single crochet
- hdc – half double crochet
- st(s) – stitch(es)
- RS / WS – right side / wrong side
- standing sc – make a slip knot on the hook, insert the hook into the stitch, and complete a sc as usual
Puff stitch (puff): (Yarn over, insert hook in st, yarn over and pull up a loop to about 0.5 in / 1.3 cm) 3 times, so you have 7 loops on the hook. Yarn over and pull through all 7 loops, then ch 1 to close. The closing ch does not count as a stitch. A puff counts as 1 st. On the next row, work into the top of the puff, not into the closing ch.
Picot: Ch 3, sl st in 3rd ch from hook.
Gauge and Checkpoints
Base gauge: 16 sc × 20 rows = 4 in (10.2 cm) in sc worked flat. This means 4 sts and 5 rows per inch.
In the tree pattern, each tier (5 teal rows plus 1 cream hdc row) is 1.25 in (3.2 cm) tall. The hdc row and the puffs are slightly taller than a plain sc row, and that is already included in this number.
Work Tier 1 first as your test piece, then measure:
- After Row 6: 2.25 in (5.7 cm) wide across Row 6 and 1.25 in (3.2 cm) tall
- After Row 12: 2.75 in (7.0 cm) wide across Row 12 and 2.5 in (6.4 cm) tall
- After Row 18: 3.25 in (8.3 cm) wide across Row 18 and 3.75 in (9.5 cm) tall
- After the border: 3.75 in (9.5 cm) wide at the bottom tier, not counting picots, and 4.25 in (10.8 cm) tall
- After the trunk: 5 in (12.7 cm) tall
If Tier 1 is more than 0.25 in (0.6 cm) too wide, go down one hook size. If it is too narrow, go up one size. A small size difference doesn’t matter for an ornament. What matters more is a firm fabric, so the tree hangs flat and the puffs stand out.
Tree Body
Turn at the end of every row. The ch 1 at the start of a row never counts as a stitch. Odd rows are WS rows, and even rows are RS rows, so every puff row and every cream row is worked with the RS facing.
Tier 1 (Top)
With teal:
Row 1 (WS): Ch 2, 3 sc in 2nd ch from hook. (3 sts)
Row 2 (RS): Ch 1, 2 sc in first st, puff in next st, 2 sc in last st. (5 sts: 4 sc, 1 puff)
Row 3: Ch 1, sc in each st across. (5 sts)
Row 4: Ch 1, 2 sc in first st, puff in next st, sc in next st, puff in next st, 2 sc in last st. (7 sts: 5 sc, 2 puffs)
Row 5: Ch 1, sc in each st across, changing to cream on the final yarn over. Cut teal and leave a 4 in (10.2 cm) tail. (7 sts)
Row 6 (RS, cream): Ch 1, 2 hdc in first st, hdc in next 5 sts, 2 hdc in last st. (9 sts) Fasten off cream.
Checkpoint: 2.25 in (5.7 cm) wide.
Tier 2 (Middle)
Row 7 (WS): Turn the work. Join teal with a standing sc in the 3rd st of Row 6, then sc in next 4 sts. Leave the last 2 sts unworked. (5 sts)
Check: 2 skipped + 5 worked + 2 skipped = 9, which matches Row 6. The 2 unworked cream sts at each end form the ledge that makes the stepped outline.
Row 8 (RS): Ch 1, 2 sc in first st, puff in next st, sc in next st, puff in next st, 2 sc in last st. (7 sts: 5 sc, 2 puffs)
Row 9: Ch 1, sc in each st across. (7 sts)
Row 10: Ch 1, 2 sc in first st, [puff in next st, sc in next st] twice, puff in next st, 2 sc in last st. (9 sts: 6 sc, 3 puffs)
Row 11: Ch 1, sc in each st across, changing to cream on the final yarn over. Cut teal. (9 sts)
Row 12 (RS, cream): Ch 1, 2 hdc in first st, hdc in next 7 sts, 2 hdc in last st. (11 sts) Fasten off cream.
Checkpoint: 2.75 in (7.0 cm) wide.
Tier 3 (Bottom)
Row 13 (WS): Turn the work. Join teal with a standing sc in the 3rd st of Row 12, then sc in next 6 sts. Leave the last 2 sts unworked. (7 sts; 2 + 7 + 2 = 11)
Row 14 (RS): Ch 1, 2 sc in first st, [puff in next st, sc in next st] twice, puff in next st, 2 sc in last st. (9 sts: 6 sc, 3 puffs)
Row 15: Ch 1, sc in each st across. (9 sts)
Row 16: Ch 1, 2 sc in first st, [puff in next st, sc in next st] 3 times, puff in next st, 2 sc in last st. (11 sts: 7 sc, 4 puffs)
Row 17: Ch 1, sc in each st across, changing to cream on the final yarn over. Cut teal. (11 sts)
Row 18 (RS, cream): Ch 1, 2 hdc in first st, hdc in next 9 sts, 2 hdc in last st. (13 sts) Do not fasten off. Go straight on to the border.
Checkpoint: 3.25 in (8.3 cm) wide × 3.75 in (9.5 cm) tall.
The puffs in each tier are offset from row to row, so they form small leaf clusters that point toward the center.
Border
Border gauge: Work 1 sc into the end of each sc or puff row. Work 2 sc into the end of each hdc row, because an hdc row is about twice as tall as a sc row. Work 1 sc into each unworked ledge stitch.
Border Round (RS, cream): Do not turn. Work Side 1 up the edge, then the top, then Side 2 down the other edge, then the bottom.
Side 1 (going up):
Picot (tip of Tier 3). Then:
– 2 sc in the end of Row 18
– 1 sc in the end of each of Rows 17–13 (5 sc)
– sc in each of the 2 unworked sts of Row 12 (2 sc)
– picot (tip of Tier 2)
– 2 sc in the end of Row 12
– 1 sc in the end of each of Rows 11–7 (5 sc)
– sc in each of the 2 unworked sts of Row 6 (2 sc)
– picot (tip of Tier 1)
– 2 sc in the end of Row 6
– 1 sc in the end of each of Rows 5–1 (5 sc)
Side 1 total: 2 + 5 + 2 + 2 + 5 + 2 + 2 + 5 = 25 sc and 3 picots.
Top and loop:
Working into the foundation ch at the top point, work (sc, ch 16, sc). This gives 2 sc plus the hanging loop.
Side 2 (going down, a mirror of Side 1):
– 1 sc in the end of each of Rows 1–5 (5 sc)
– 2 sc in the end of Row 6
– picot
– sc in each of the 2 unworked sts of Row 6
– 1 sc in the end of each of Rows 7–11 (5 sc)
– 2 sc in the end of Row 12
– picot
– sc in each of the 2 unworked sts of Row 12
– 1 sc in the end of each of Rows 13–17 (5 sc)
– 2 sc in the end of Row 18
– picot
Side 2 total: 25 sc and 3 picots.
Bottom:
Sc in the top of each of the 13 hdc of Row 18 (13 sc). Join with a sl st to the first sc of Side 1. Fasten off.
Round total: 25 + 2 + 25 + 13 = 65 sc, plus 6 picots and 1 ch-16 loop.
Why the math works: Each side has 15 sc or puff rows (1 sc each = 15), 3 hdc rows (2 sc each = 6), and 2 ledges (2 sc each = 4), for 25 sc. The bottom edge uses each of the 13 Row 18 sts once, so no stitches are added or skipped. The border adds a 0.25 in (0.6 cm) cream frame on every edge: 3.25 + 0.25 + 0.25 = 3.75 in (9.5 cm) wide and 3.75 + 0.25 + 0.25 = 4.25 in (10.8 cm) tall. The picots stick out past the edge only at the six tier tips.
Trunk
Hold the tree RS facing with the bottom edge on top. Count the 13 bottom border sc from either corner. The trunk uses the center 3 sts, so 5 sts stay free on each side (5 + 3 + 5 = 13).
Row 1 (RS): Join teal with a standing sc in the 6th bottom sc, then sc in next 2 sts. (3 sts)
Rows 2–4: Ch 1, turn, sc in each st across. (3 sts)
Fasten off. The trunk measures about 0.75 in (1.9 cm) square. Total height is now 4.25 + 0.75 = 5 in (12.7 cm).
Final Blocking
- Weave in all tails. Hide each teal tail inside the teal fabric and each cream tail inside the cream band, so no colors show through.
- Lay the tree RS up on a blocking mat or folded towel.
- Spray it lightly until it is damp, but not soaked.
- Pin the bottom corners 3.75 in (9.5 cm) apart. Pin the top point so the tree is 4.25 in (10.8 cm) tall from the top to the bottom border, not counting the trunk.
- Pin out each of the six picots so they round out and point slightly outward.
- Pin the trunk square and centered.
- Pin the loop straight up.
- Gently press the puffs from the WS with your fingertips so they rise on the RS.
- Let it dry completely before you unpin it.
Final Quality-Control Checklist
- Rows 6, 12, and 18 have 9, 11, and 13 hdc.
- Each tier starts exactly 2 sts in from each end of the cream row above it.
- The tier steps are the same on both sides.
- Each border side has 25 sc and 3 picots, and the bottom edge has 13 sc.
- There are six picots, one at each tier tip.
- The trunk is 3 sts wide and centered, with 5 free sts on each side.
- The ornament is 3.75 in (9.5 cm) wide and 5 in (12.7 cm) tall.
- The loop is secure and long enough to slip over a branch.
- No tails are visible from the RS.
Troubleshooting
The puffs look flat. Pull each loop up taller, to about 0.5 in (1.3 cm), and always close the puff with ch 1.
The edges ruffle. You are probably working too many sc into the row ends. Use exactly 1 per sc row and 2 per hdc row.
The edges pull in or cup. Your border tension is too tight. Loosen up, or use a hook one size larger for the border only.
The tiers lean to one side. Check that you skipped exactly 2 sts at both ends of Rows 7 and 13.
The picots look tiny. Make the chains a little looser, or use ch 4 instead of ch 3 for a rounder picot.
The tree is curling. Block it again, and let it dry flat under a light book.
Care
Hand wash in cool water, press out the water in a towel, and dry flat. Store it flat or hang it in a dry place so the puffs keep their shape.
Final Notes
Here is the full measurement chain. Tier 1 is 2.25 in (5.7 cm) wide and 1.25 in (3.2 cm) tall. Tier 2 grows the tree to 2.75 in (7.0 cm), and Tier 3 to 3.25 in (8.3 cm) × 3.75 in (9.5 cm). The border brings it to 3.75 in (9.5 cm) × 4.25 in (10.8 cm), and the trunk finishes it at 5 in (12.7 cm) tall. If each checkpoint matches, the final tree will too.
Make one in an evening, then make a few more for gifts, gift tags, or a matching set on your tree.
Happy crocheting!