

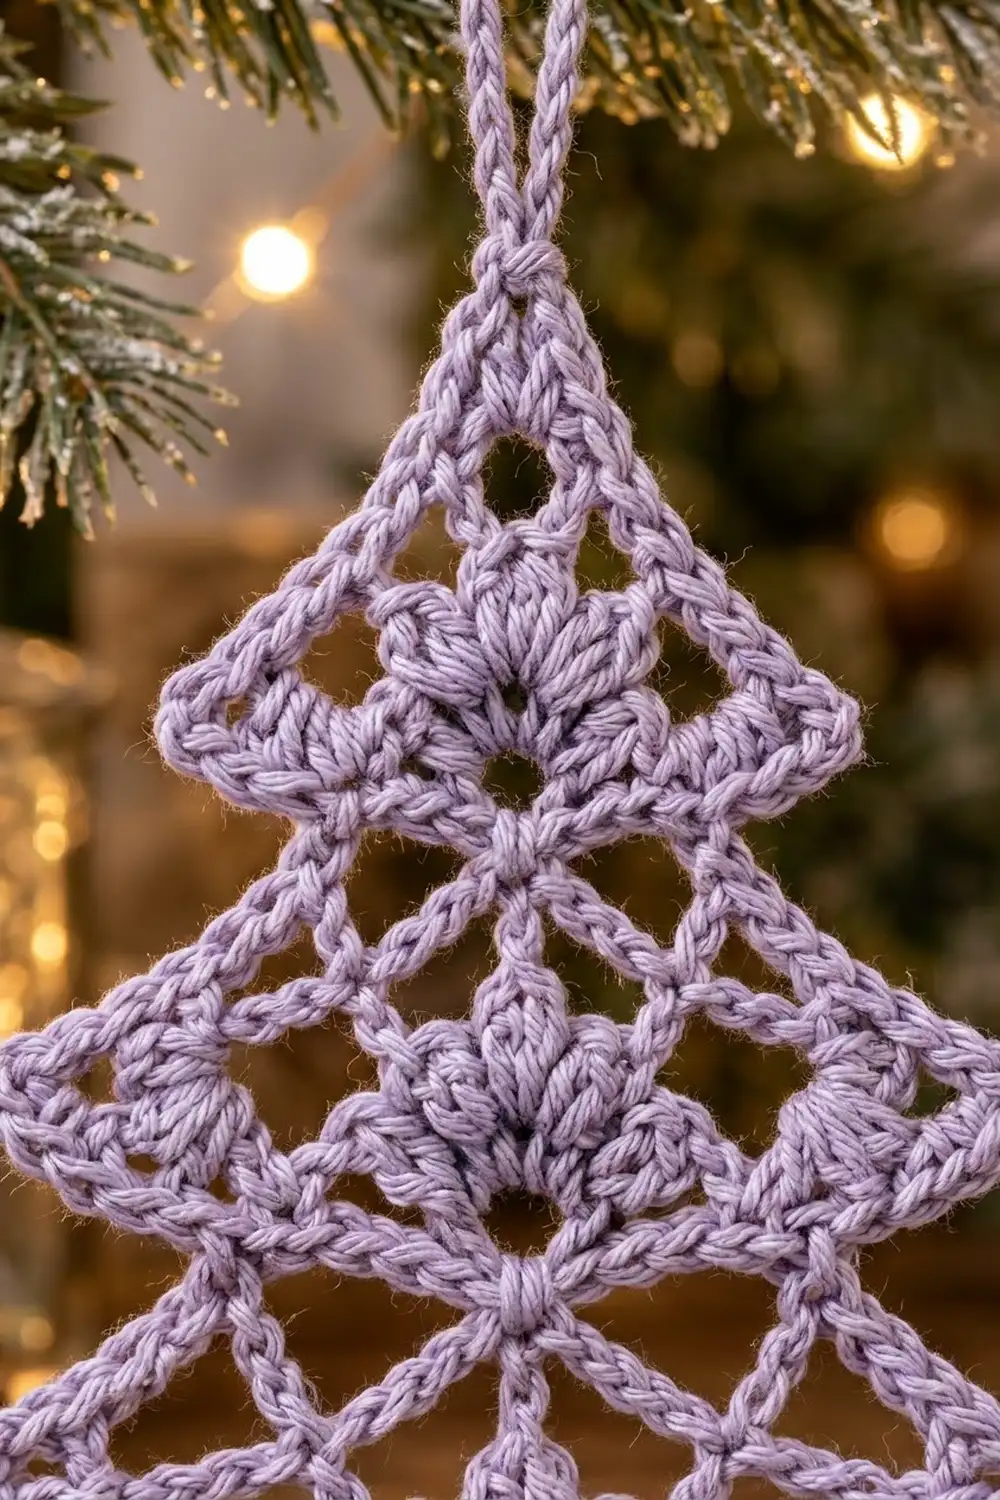
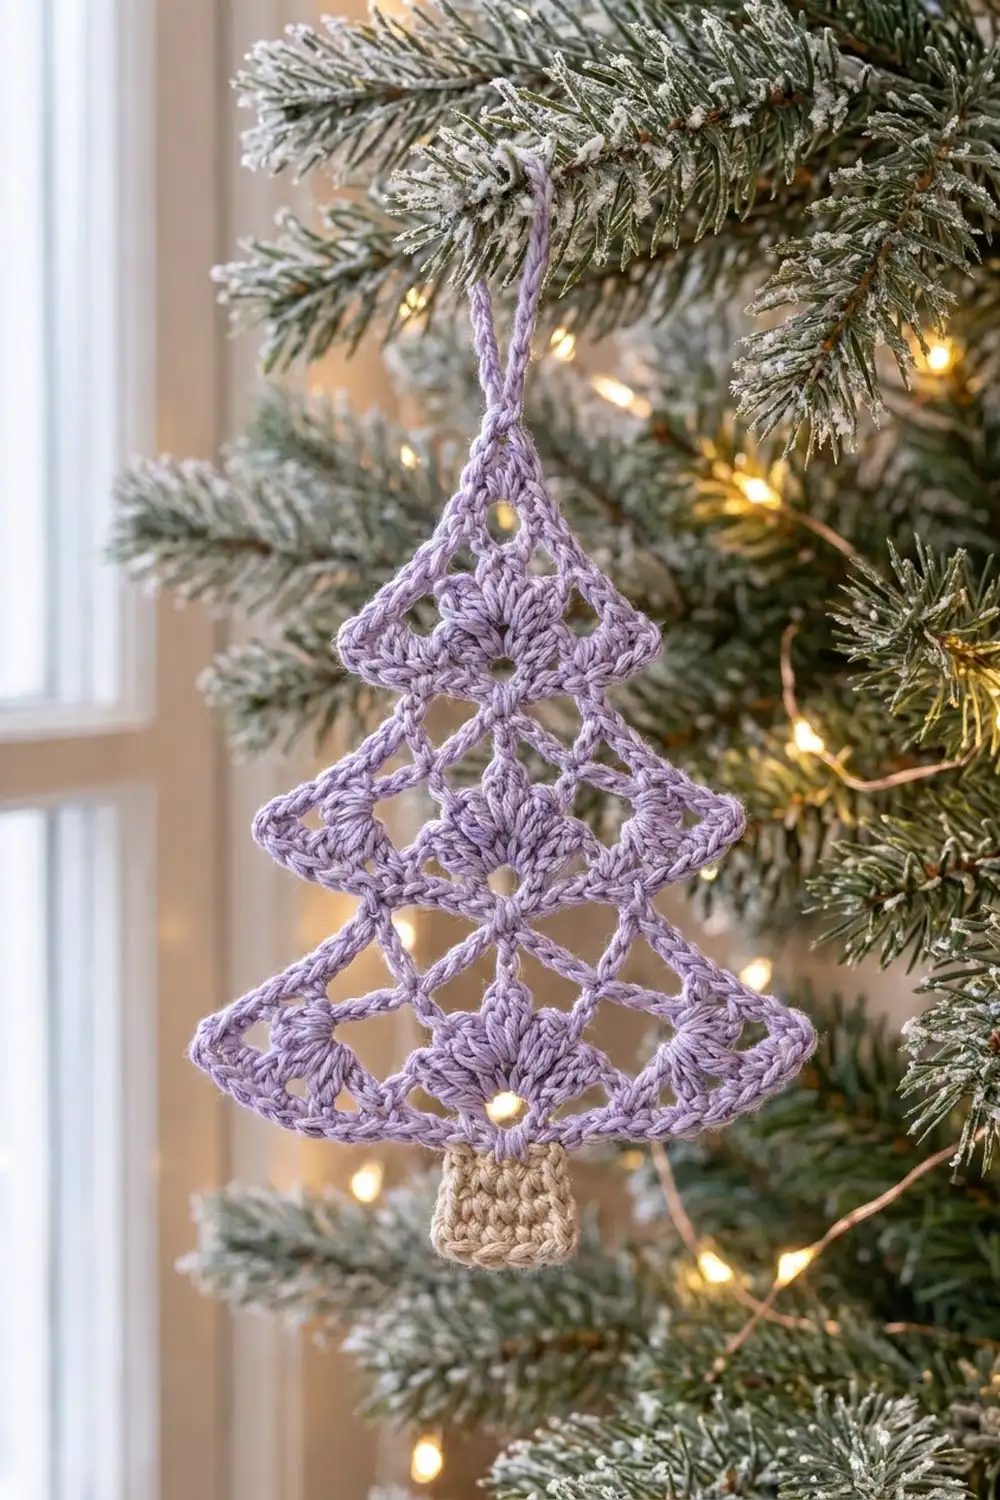
The Lavender Frost Tree is a small lace ornament with three flared tiers. It has a crisp single crochet outline and a solid little trunk. The center of the tree is an open diamond lattice, and five-stitch fans run down the middle like stacked snowflakes.
The sample uses soft lavender cotton for the tree and a warm tan for the trunk. The pale color makes it look like a frosted, Scandinavian-style ornament. It shows up well on dark green branches or in a window with a snowy view behind it.
This pattern uses US crochet terms. The finished ornament is about 4.4 in (11.2 cm) wide and 5 in (12.7 cm) tall from the top point to the bottom of the trunk. The hanging loop adds about 1.5 in (3.8 cm).
You work the whole tree in one piece, in rows, from the top point down. Each new tier starts by slip stitching inward, which leaves the corners of the tier above free as points. After the lace is done, you work one round of single crochet around the outline and make the hanging loop. Then you work the trunk directly into the bottom edge. There is no sewing and no joining.
Finished Size and Construction
- Finished size: 4.4 in (11.2 cm) wide × 5 in (12.7 cm) tall, plus a 1.5 in (3.8 cm) loop
- Skill level: Intermediate (you need to count stitches and chain spaces carefully)
- Terminology: US crochet terms
- Yarn weight: Sport weight (#2) cotton
- Hook: 3.25 mm (US D-3)
- Number of pieces: 1 (the trunk is worked onto the tree)
- Layout: Single standalone ornament, three tiers plus trunk
- Lace body before border: 4.2 in (10.7 cm) wide × 4 in (10.2 cm) tall
- Body after border: 4.4 in (11.2 cm) wide × 4.25 in (10.8 cm) tall
- Trunk: 1.2 in (3.0 cm) wide × 0.8 in (2.0 cm) tall
- Border depth: 1 round of sc, about 1/8 in (0.3 cm)
Materials
Yarn: Use a smooth mercerized or combed sport-weight cotton. Cotton gives the stitches clear definition and holds a blocked shape well. Fuzzy or very stretchy yarns blur the lattice and let the tips curl. Pick a lavender pale enough to look frosty but dark enough that the fans still stand out.
- Color A – Lavender: 10 g, about 31 m (34 yd)
- Color B – Tan/Beige: 3 g, about 9 m (10 yd)
These quantities include a margin of about 30%, which covers your gauge test and weaving in the ends.
Tools:
– 3.25 mm (US D-3) crochet hook
– Tapestry needle
– Scissors
– 2 stitch markers
– Blocking mat and rustproof pins
– Optional: spray starch or a fabric stiffener for a crisp finish
Abbreviations (US Terms)
- ch – chain
- sl st – slip stitch
- sc – single crochet
- dc – double crochet
- sk – skip
- sp(s) – space(s)
- st(s) – stitch(es)
- tch – turning chain
- BLO – back loop only
- RS – right side
- rep – repeat
Special stitch – Fan: Work 5 dc into the same stitch or space.
Counting rules: The ch-3 at the start of a row counts as 1 dc. Each ch-1 counts as 1 stitch. A fan counts as 5 stitches.
Gauge and Checkpoints
Base gauge: 24 dc × 12 rows = 4 in (10.2 cm). That is 6 dc and 3 dc rows per 1 in (2.5 cm). In sc, you get 6 sts and 6 rows per 1 in (2.5 cm).
Test one piece first: Work Rows 1–4 (Tier 1) and lightly steam them flat. This small triangle is your gauge test. If it measures correctly, keep going on the same piece.
Checkpoints:
– After Row 4: 2.2 in (5.6 cm) wide at the tips, 1.3 in (3.3 cm) tall
– After Row 8: 3.2 in (8.1 cm) wide at the Tier 2 tips, 2.7 in (6.9 cm) tall overall
– After Row 12: 4.2 in (10.7 cm) wide, 4 in (10.2 cm) tall
– After the border: 4.4 in (11.2 cm) × 4.25 in (10.8 cm)
– After the trunk: 5 in (12.7 cm) total height
If your Tier 1 is too big by more than 1/8 in (0.3 cm), go down half a hook size. If it is too small, go up half a size. Check the row height as well as the width. If the tiers look short and squat, pull up a slightly taller first loop on each dc. If they look tall and narrow, snug the loops down.
Pattern
The rows alternate direction, so turn at the end of every row except Row 12. Each regular row adds 1 stitch at each edge, because you work 2 dc into the first stitch and 2 dc into the last stitch. The number in brackets after each row is the total stitch count for that row.
How the tiers work: Each tier has 4 rows. The first row of a tier steps in. You slip stitch past 2 stitches, and those 2 skipped stitches on each side become the pointed corners of the tier above. The two middle rows are plain mesh rows. The fourth row flares out and places a fan in the center. Because every new tier starts narrower than the tier above it ends, the outline steps in and out like a classic tree.
Tier 1
Row 1 (RS): With Color A, ch 4 and sl st in the first ch to form a ring. Ch 3 (counts as dc), then work 4 dc in the ring. Turn. [5 sts] These 5 stitches form the top fan.
Row 2: Ch 3, dc in the first st, ch 1, sk next dc, dc in next dc (center), ch 1, sk next dc, 2 dc in top of tch. Turn. [7 sts]
Row 3 (mesh row): Ch 3, dc in the first st, ch 1, sk next dc, dc in next ch-1 sp, ch 1, sk next dc; rep from * 2 times in total, then 2 dc in top of tch. Turn. [9 sts]*
From here on, each dc in a mesh row sits above a ch-1 space in the row below. That staggers the holes so they form diamonds.
Row 4 (flare + fan): Ch 3, dc in the first st, ch 1, sk next dc, dc in next ch-1 sp, sk next dc, Fan in next ch-1 sp (center), sk next dc, dc in next ch-1 sp, ch 1, sk next dc, 2 dc in top of tch. Turn. [13 sts]
Count check: 2 + 1 + 1 + 5 + 1 + 1 + 2 = 13. The fan uses 3 stitches of the row below (the skipped dc, the ch-1 sp, and the second skipped dc) and replaces them with 5. Together with the edge increases, that gives this row its extra flare.
Tier 2
Row 5 (step-in): Sl st in each of the first 2 dc, then sl st in the next ch-1 sp. Ch 3, dc in the same sp, ch 1, sk next dc, dc in first fan dc, ch 1, sk next fan dc, dc in center fan dc, ch 1, sk next fan dc, dc in last fan dc, ch 1, sk next dc, 2 dc in next ch-1 sp. Leave the last 2 dc unworked. Turn. [11 sts]
The 2 unworked stitches on each side become the Tier 1 points.
Row 6: Work as for Row 3, but work the repeat 4 times. [13 sts]
Row 7: Work as for Row 3, but work the repeat 5 times. [15 sts]
Row 8 (flare + fan): Ch 3, dc in the first st, ch 1, sk next dc, [dc in next ch-1 sp, ch 1, sk next dc] 2 times, sk next ch-1 sp, Fan in next dc (center), sk next ch-1 sp, ch 1, sk next dc, [dc in next ch-1 sp, ch 1, sk next dc] 2 times, 2 dc in top of tch. Turn. [19 sts]
Count check: 2 + 1 + 4 + 5 + 1 + 4 + 2 = 19.
Tier 3
Row 9 (step-in): Sl st in each of the first 2 dc, then sl st in the next ch-1 sp. Ch 3, dc in the same sp, ch 1, sk next dc, dc in next ch-1 sp, ch 1, sk next dc, dc in next ch-1 sp, ch 1, sk first fan dc, dc in next fan dc, ch 1, sk center fan dc, dc in next fan dc, ch 1, sk last fan dc, dc in next ch-1 sp, ch 1, sk next dc, dc in next ch-1 sp, ch 1, sk next dc, 2 dc in next ch-1 sp. Leave the last 2 dc unworked. Turn. [17 sts]
Row 10: Work as for Row 3, but work the repeat 7 times. [19 sts]
Row 11: Work as for Row 3, but work the repeat 8 times. [21 sts]
Row 12 (flare + fan): Ch 3, dc in the first st, ch 1, sk next dc, [dc in next ch-1 sp, ch 1, sk next dc] 3 times, dc in next ch-1 sp, sk next dc, Fan in next ch-1 sp (center), sk next dc, [dc in next ch-1 sp, ch 1, sk next dc] 4 times, 2 dc in top of tch. [25 sts]
Count check: 2 + 1 + 6 + 1 + 5 + 8 + 2 = 25. Fasten off and do not turn.
Lace checkpoint: 4.2 in (10.7 cm) wide × 4 in (10.2 cm) tall. You should see the top fan from Row 1 plus one fan at the bottom center of each tier, all lined up on the center line.
Border
Border gauge: Work 2 sc into each dc row-end and 1 sc into each stitch or ch-1 sp along the bottom. Each tier tip gets a ch-2 point. The ch-2 tips and the hanging loop are not counted as sc.
Border Round (RS): With RS facing, join Color A in the ring at the top point. Then work these steps:
- Top: Ch 1, sc in the ring, ch 24 for the hanging loop, sc in the ring again. [2 sc, 1 for each side]
- First side, going down:
- 2 sc in each row-end of Rows 1–4 (8 sc), ch 2 for the tip, then 1 sc in each of the 2 slip-stitched sts on the underside (2 sc).
- 2 sc in each row-end of Rows 5–8 (8 sc), ch 2, then 1 sc in each of the 2 slip-stitched sts on the underside (2 sc).
- 2 sc in each row-end of Rows 9–12 (8 sc), ch 2.
- Bottom: 1 sc in each dc and each ch-1 sp across Row 12. [25 sc] Ch 2 for the opposite tip.
- Second side, going up: Work the first side in reverse: 8 sc, 2 sc, ch 2, 8 sc, 2 sc, ch 2, 8 sc. Sl st to the first sc and fasten off.
Per-side totals: Each side has 1 top sc + 8 + 2 + 8 + 2 + 8 = 29 sc. The bottom has 25 sc. The round total is 29 + 29 + 25 = 83 sc, plus 6 ch-2 tips and the ch-24 loop.
Optional firmer loop: Before you fasten off, sl st into the back bump of each loop chain. This gives a rounder cord like the one in the sample.
Why the math works: One dc row is as tall as 2 sc rows (3 rows per inch versus 6), so 2 sc per row-end keeps the sides flat. Along the bottom, Row 12 has 6 sts per inch and the border has 6 sc per inch, so 1 sc per stitch is an exact match. The ch-2 at each tip lets the point turn sharply instead of cupping.
Trunk
Row 1: With RS facing, count 9 sc in from one bottom tip. Join Color B in the BLO of the 10th sc. Ch 1, then sc in the BLO of the same st and in each of the next 6 sts. [7 sc] This leaves 9 border sc on each side of the trunk (9 + 7 + 9 = 25).
Rows 2–5: Ch 1, turn, sc in each sc across. [7 sc]
Fasten off. The trunk should measure 1.2 in (3.0 cm) wide × 0.8 in (2.0 cm) tall.
Final Blocking
- Weave in all ends along the sc outline, where they won’t show through the lattice.
- Soak the ornament in cool water for 10 minutes, then roll it in a towel to squeeze out the water.
- Pin it flat so the bottom tier is 4.4 in (11.2 cm) wide and the body is 4.25 in (10.8 cm) tall.
- Put a pin in every ch-2 tip and angle each tip slightly outward and down.
- Pin the trunk straight, centered under the bottom fan.
- Gently open each fan and diamond with a pin tip.
- Optional: spray with starch while the ornament is pinned.
- Let it dry completely, then unpin it and shape the hanging loop.
Final Quality-Control Checklist
- Row counts for Rows 1–12: 5, 7, 9, 13, 11, 13, 15, 19, 17, 19, 21, 25
- Three tiers, each with a free point on each side
- Fans lined up down the center
- Border: 29 sc per side, 25 sc on the bottom, 6 ch-2 tips
- Trunk: 7 sc × 5 rows, centered under the tree
- Tree measures 4.4 in (11.2 cm) wide and 5 in (12.7 cm) tall overall
- Loop sits straight above the top point
Troubleshooting
Tiers cup or ruffle: Your dc are loose for the number of increases. Go down a hook size, or block more firmly.
Tips curl under: Check that you worked the ch-2 at each tip, and pin the tips firmly while blocking.
The count is off after a mesh row: You probably missed the top of the tch at the end of the previous row. Work into it every time.
Fans look lopsided: Each fan must go into the exact center stitch or space. On Row 8 it goes into a dc. On Rows 4 and 12 it goes into a ch-1 sp.
A step-in row starts in the wrong place: Make exactly 2 sl sts in dc, then 1 sl st in the ch-1 sp. Mark that space before you turn.
The trunk is off-center: Count 9 border sc in from both tips before you join Color B.
The sides pull in or ripple: Check that you worked exactly 2 sc into every row-end, not 1 or 3.
Care
Hand wash in cool water and lay flat to dry, reshaping the tips. Store flat between sheets of tissue so the lattice stays crisp.
Final Notes
You can check the size at every stage:
- Tier 1 measures 2.2 in (5.6 cm). This confirms your gauge.
- Tier 2 reaches 3.2 in (8.1 cm).
- Tier 3 finishes at 4.2 in (10.7 cm) × 4 in (10.2 cm).
- The border brings the body to 4.4 in (11.2 cm) × 4.25 in (10.8 cm).
- The trunk brings the total height to 5 in (12.7 cm), plus a 1.5 in (3.8 cm) loop.
If your counts match at Rows 4, 8, and 12, the outline and border will come out right.
Happy crocheting!