

The Evergreen Leaf Tree is a flat, lacy Christmas ornament built from leaves. A slim spine runs up the middle, and almond-shaped leaves with raised veins branch off in four tiers. A crisp chain outline gives the tree its stepped pine silhouette.
The palette is simple: olive green for the tree and cream for the small trunk. It looks natural and Scandinavian on a real tree, in a window, or tied to a gift.
The pattern uses US crochet terms. The finished ornament is 4.5 in (11.4 cm) wide and 6 in (15.2 cm) tall. The hanging loop adds about 1.25 in (3.2 cm), for a total of about 7.25 in (18.4 cm).
Construction is in one piece. You crochet the trunk, chain the spine and hanging loop, and work down one side of the spine and up the other, adding leaves as you go. Two outline rounds then create the silhouette, and a final round of single crochet finishes the loop.
Finished Size and Construction
- Finished size: 4.5 in (11.4 cm) wide × 6 in (15.2 cm) tall; 7.25 in (18.4 cm) including the loop
- Skill level: Intermediate
- Terminology: US
- Yarn weight: #3 light (DK) mercerized cotton
- Hook: 3.0 mm
- Number of pieces: 1
- Layout: Single standalone motif, no joining
- Piece size before border: 2.7 in (6.9 cm) across the bottom leaf tips × 6 in (15.2 cm) tall
- Border depth: about 0.9 in (2.3 cm) added on each side at the bottom corners; the outline itself is 0.2 in (0.5 cm) thick
Materials
Use a smooth, tightly plied mercerized cotton. It gives clear stitch definition, and the leaves keep their shape. Avoid fuzzy or very stretchy yarn, because the leaf veins and the outline will blur.
- Olive green: 10 g, about 21 m
- Cream: 2 g, about 4 m
These quantities are for one ornament and include a margin of about 20%. A 50 g ball of green makes four ornaments with yarn to spare.
Tools:
– 3.0 mm crochet hook
– Tapestry needle
– Scissors
– Blocking mat and rustproof pins
– Spray bottle with water
– Optional: fabric stiffener
Abbreviations (US Terms)
- ch – chain
- sl st – slip stitch
- sc – single crochet
- hdc – half double crochet
- dc – double crochet
- st(s) – stitch(es)
Special stitches
Small Leaf (SL): Ch 5, sl st in 2nd ch from hook, sc in next ch, hdc in next ch, sl st in last ch. You finish back at the base of the leaf. (4 sts)
Medium Leaf (ML): Ch 7.
– Side 1: Sl st in 2nd ch from hook, sc in next ch, hdc in next 2 ch, sc in next ch, sl st in last ch (6 sts).
– Ch 1 and rotate.
– Side 2: Working in the unused loops on the other side of the same 6 ch, sl st in first ch, sc in next ch, hdc in next 2 ch, sc in next ch, sl st in last ch (6 sts).
– Sl st in the tip ch (the one you skipped at the start).
– Vein: Insert the hook through the center of each foundation ch, between the two halves, and sl st in each of the 6 ch back to the base.
Large Leaf (LL): Ch 9.
– Side 1: Sl st in 2nd ch from hook, sc in next ch, hdc in next ch, dc in next 2 ch, hdc in next ch, sc in next ch, sl st in last ch (8 sts).
– Ch 1 and rotate.
– Side 2: Work the same 8 sts in the unused loops on the other side.
– Sl st in the tip ch.
– Vein: Sl st through the center of each of the 8 ch back to the base.
The vein slip stitches return you to the spine and form the raised center line on each leaf.
Gauge and Checkpoints
- Stitch gauge: 10 sc and 12 rows = 2 in (5.1 cm)
- Chain gauge: 20 ch = 3 in (7.6 cm), measured lightly relaxed
The trunk is your gauge swatch. Make it first and measure it before you go on.
Checkpoints:
1. Trunk: 1 in (2.5 cm) wide × 0.8 in (2.0 cm) tall.
2. Spine: the 35 spine chains measure 5.2 in (13.2 cm).
3. Leaves: a Medium Leaf is 0.9 in (2.3 cm) long; a Large Leaf is 1.2 in (3.0 cm) long.
4. Before the border: 2.7 in (6.9 cm) across the bottom leaf tips.
5. Finished: 4.5 in (11.4 cm) × 6 in (15.2 cm).
If your pieces measure too big, go down 0.25 mm in hook size. If they measure too small, go up 0.25 mm. Check your chain tension separately from your stitches. Loose chains make a floppy outline, and tight chains pull the tiers upward.
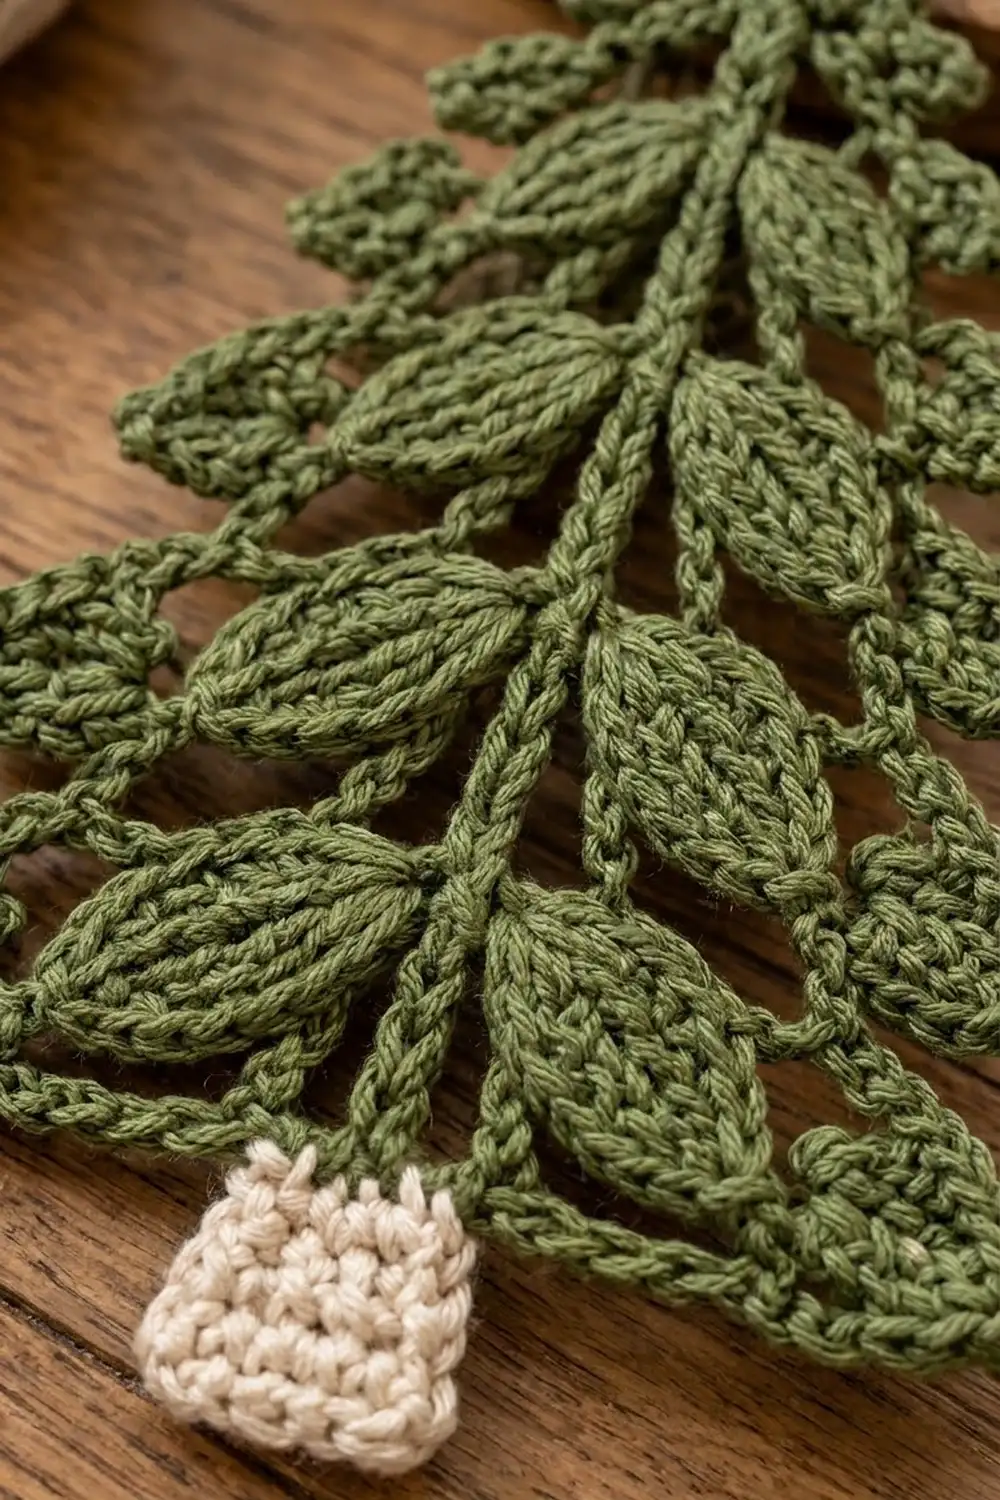
Trunk (Cream)
Row 1: Ch 6, sc in 2nd ch from hook and in each ch across. (5 sc)
Rows 2–5: Ch 1, turn, sc in each st across. (5 sc)
Fasten off and weave in the ends. The trunk should measure 1 in (2.5 cm) × 0.8 in (2.0 cm).
Spine and Hanging Loop (Green)
With the right side facing and Row 5 at the top, join green with a sl st in the center (3rd) st of Row 5.
Foundation: Ch 53, then sl st in the 18th ch from hook. This closes a ring of 18 ch for the hanging loop.
That leaves 35 spine chains between the loop and the trunk. In the instructions below, spine chains are numbered 1 to 35 counting down from the loop.
Row A: Left Side (Worked Downward)
Work into the front loop of each spine chain, moving down toward the trunk. All leaves on this row point to the left.
- Sc in ch 1 and ch 2, SL, sc in ch 3 to ch 5. (Top tip: 5 sc, 1 SL)
- Tier 1: Sc in ch 6, ML, sl st in the same sc.
- Sc in ch 7 to ch 12. (6 sc)
- Tier 2: Sc in ch 13, ML, sl st in the same sc.
- Sc in ch 14 to ch 20. (7 sc)
- Tier 3: Sc in ch 21, LL, sl st in the same sc.
- Sc in ch 22 to ch 29. (8 sc)
- Tier 4: Sc in ch 30, LL, sl st in the same sc.
- Sc in ch 31 to ch 35. (5 sc)
- Sl st in the trunk join st.
Row A totals: 35 sc (5 + 1 + 6 + 1 + 7 + 1 + 8 + 1 + 5), 1 SL, 2 ML, and 2 LL.
Row B: Right Side (Worked Upward)
Rotate the work. Now work into the back loop and back bump of each spine chain, moving up toward the loop. All leaves on this row point to the right.
- Sc in ch 35 to ch 31. (5 sc)
- Tier 4: Sc in ch 30, LL, sl st in the same sc.
- Sc in ch 29 to ch 22. (8 sc)
- Tier 3: Sc in ch 21, LL, sl st in the same sc.
- Sc in ch 20 to ch 14. (7 sc)
- Tier 2: Sc in ch 13, ML, sl st in the same sc.
- Sc in ch 12 to ch 7. (6 sc)
- Tier 1: Sc in ch 6, ML, sl st in the same sc.
- Sc in ch 5 to ch 3, sc in ch 2, SL, sc in ch 1.
- Sl st in the loop junction.
Row B totals: 35 sc, 1 SL, 2 ML, and 2 LL, a mirror image of Row A.
Checkpoint: Lay the piece flat. The bottom pair of Large Leaf tips should measure 2.7 in (6.9 cm) from tip to tip, and the tree should be 6 in (15.2 cm) tall including the trunk. Do not cut the yarn.
Border
Border gauge: 20 ch = 3 in (7.6 cm). Every outline chain length below is based on this rate.
Round 1: Outline Chains
This round builds the zigzag edge.
Left side, worked downward from the loop junction:
– Ch 4, sl st in the Tier 1 leaf tip.
– Ch 3, SL.
– Ch 4, sl st in the Tier 2 tip.
– Ch 4, SL.
– Ch 5, sl st in the Tier 3 tip.
– Ch 4, SL.
– Ch 6, sl st in the Tier 4 tip.
– Ch 5, SL.
– Ch 12, sl st in the trunk join st.
Right side, worked upward:
– Ch 12, SL.
– Ch 5, sl st in the Tier 4 tip.
– Ch 6, SL.
– Ch 4, sl st in the Tier 3 tip.
– Ch 5, SL.
– Ch 4, sl st in the Tier 2 tip.
– Ch 4, SL.
– Ch 3, sl st in the Tier 1 tip.
– Ch 4, sl st in the loop junction.
Per side: 4 + 3 + 4 + 4 + 5 + 4 + 6 + 5 + 12 = 47 ch, plus 4 SL and 4 tip sl sts.
Round total: 94 ch, 8 SL.
Round 2: Outline Reinforcement
This round turns the chains into the firm, braided-looking outline.
Work down the left side and up the right side, as in Round 1:
– Sc in each Round 1 ch.
– Skip each tip sl st and the trunk sl st.
– At each SL, sl st in its base so the leaf stays free and points outward.
At the end, sl st in the first sc.
Per side: 47 sc and 4 sl sts. Round total: 94 sc.
Hanging Loop
Work 20 sc into the 18-ch loop ring, sl st in the first sc, and fasten off. The loop hangs about 1.25 in (3.2 cm) above the tree.
Why the Math Works
- Both sides have the same 47-ch sequence, so the tree is symmetrical.
- Round 2 puts exactly one sc in each chain, so the outline keeps its length and won’t ruffle or pucker.
- The 12-ch bottom edge works out to 1.8 in (4.6 cm) at border gauge. That matches the distance from each bottom corner to the edge of the trunk, so the base sits straight.
- At the bottom corners, the border adds 0.9 in (2.3 cm) per side to the 2.7 in (6.9 cm) leaf span: 2.7 + 0.9 + 0.9 = 4.5 in (11.4 cm).
Final Blocking
- Weave in all ends along the spine or inside the outline.
- Mist the ornament until it is evenly damp, not soaked.
- Lay it face up on the blocking mat.
- Pin the loop junction and the trunk so the tree is 6 in (15.2 cm) tall.
- Pin the two bottom Small Leaves 4.5 in (11.4 cm) apart.
- Pin each remaining Small Leaf so the corners on the two sides line up level with each other.
- Shape every Medium and Large Leaf into a point with your fingers and straighten its vein.
- Leave it to dry completely. For a stiff, window-ready ornament, brush on fabric stiffener before drying.
Final Quality-Control Checklist
- [ ] Trunk is 5 sc wide and 5 rows tall, centered under the spine
- [ ] 35 sc on each side of the spine
- [ ] 4 tiers per side: 2 Medium Leaves on top, 2 Large Leaves below
- [ ] Every leaf has a visible raised vein
- [ ] 47 ch per side in Round 1, and 47 sc per side in Round 2
- [ ] 8 outer Small Leaves and 2 top-tip Small Leaves, all pointing outward
- [ ] Finished size is 4.5 in (11.4 cm) × 6 in (15.2 cm)
- [ ] Loop is firm and centered
Troubleshooting
- Tree leans to one side: Your Row B count is probably off. Recount the sc between the tiers.
- Outline sags: Your chains are too loose. Redo Round 1 with a hook 0.25 mm smaller.
- Tiers curl upward: Your chains are too tight. Loosen your chain tension and block firmly.
- Leaves twist: Work the vein slip stitches loosely, and keep them through the center of the chains.
- Trunk gaps at the join: Before weaving in the cream tail, run it once through the join stitch.
Care
Hand wash in cool water, press out the excess with a towel, and re-block flat to dry. Stiffened ornaments should only be spot-cleaned.
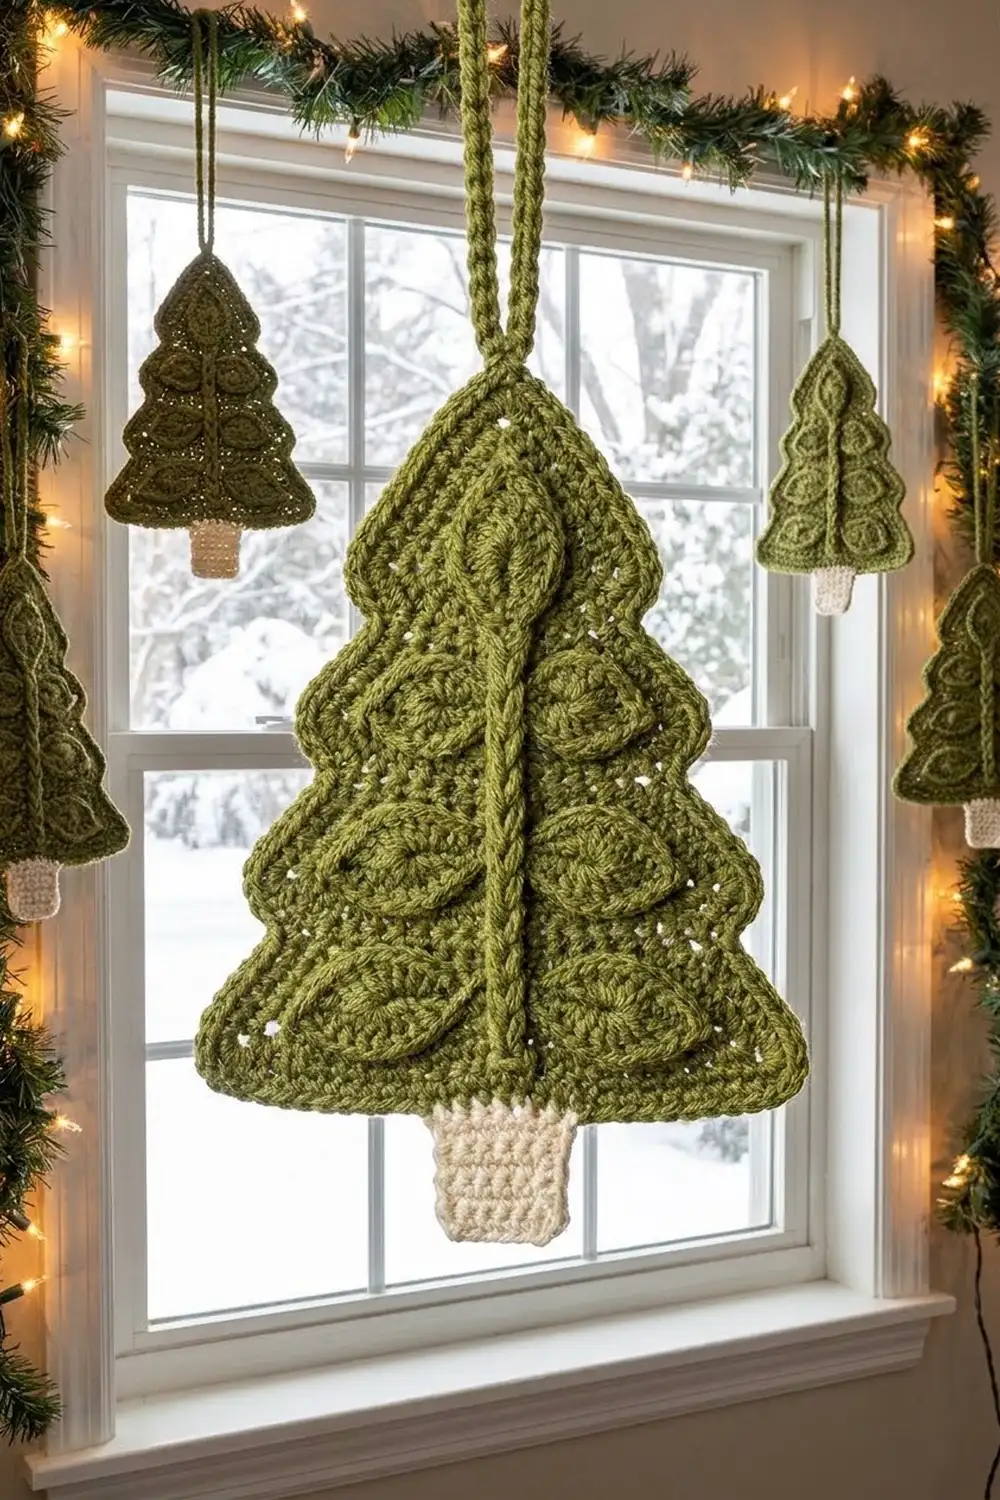
Final Notes
Each stage builds on the one before it:
- The trunk sets your gauge at 1 in (2.5 cm).
- The spine sets the height at 5.2 in (13.2 cm), for a 6 in (15.2 cm) tree.
- The leaves span 2.7 in (6.9 cm) across the bottom tips.
- The 47-chain border on each side brings the width to 4.5 in (11.4 cm).
Check each measurement as you go, and the finished tree will come out the right size. Make one, then make several for a window display.
Happy crocheting!