

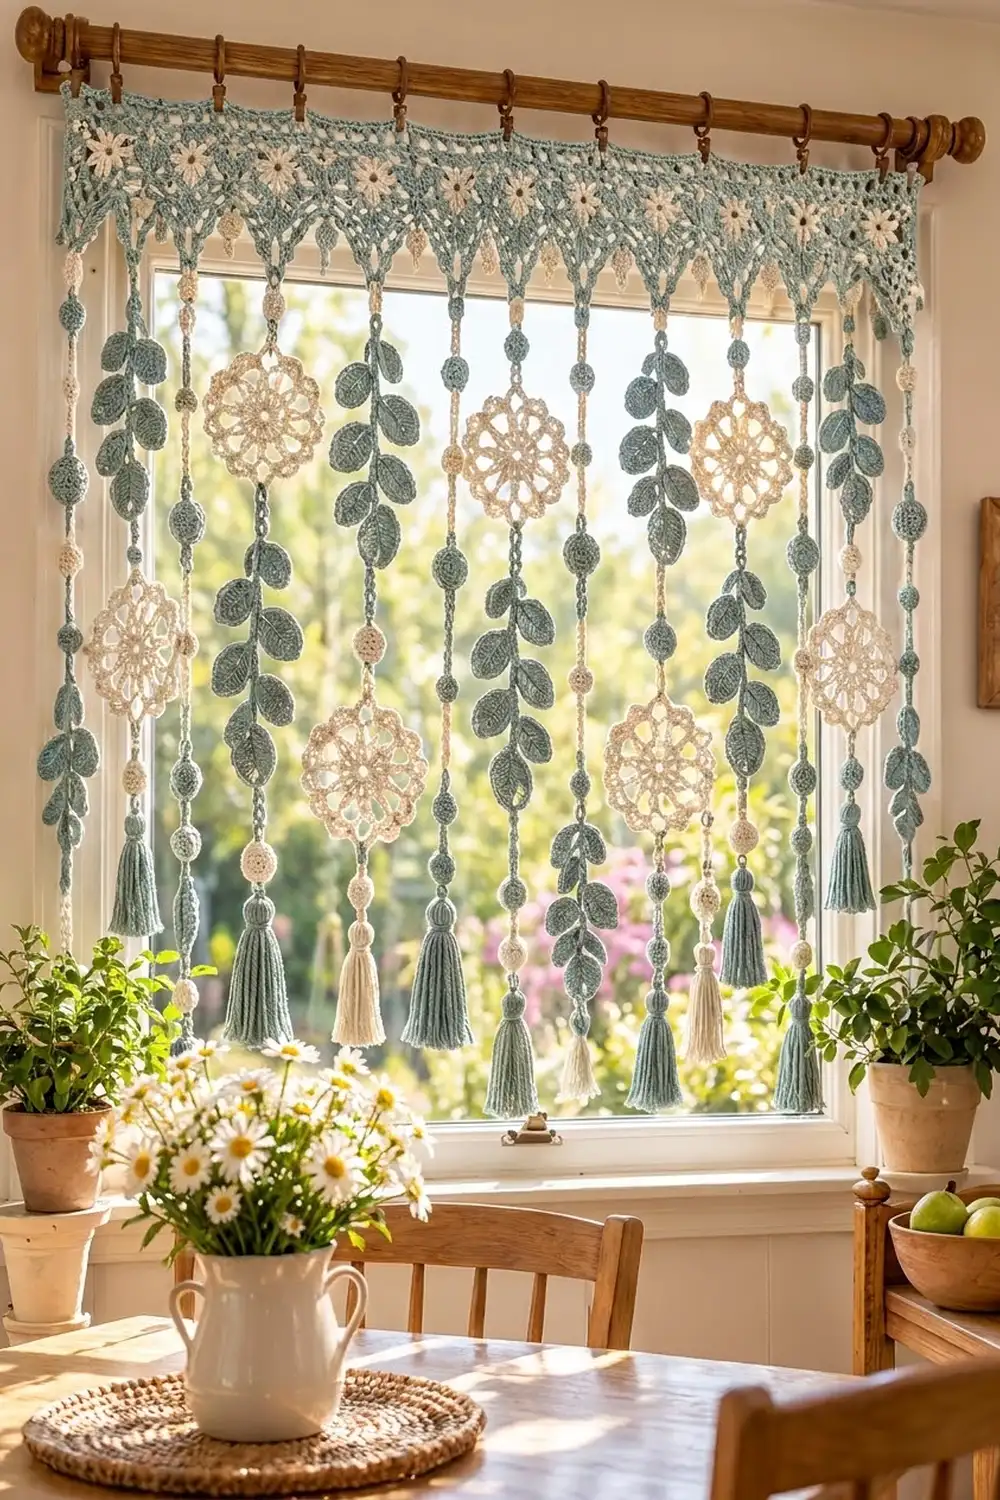
This curtain brings a garden indoors. A sage lace valance with small cream flowers runs along the rod. Below it, twelve strands of leaf vines, cream doily medallions, stuffed crochet beads and full tassels catch the light.
The palette is two colors: a soft sage blue-green and a warm cream. The style is cottage-boho. It is airy enough to let sunlight through and detailed enough to look good up close. All instructions use US crochet terms.
The finished valance measures 36 in (91.4 cm) wide and 8 in (20.3 cm) deep, measured to the point tips. Each strand drops 27.25 in (69.2 cm) below its point, so the total length is 35.25 in (89.5 cm), plus the rod tabs.
Construction is modular. You make 24 small flower squares, join them into a strip two squares deep, and then add a border with rod tabs along the top and twelve triangle points along the bottom. Next you make the strand parts (beads, leaf vines, medallions, cords and tassels), assemble twelve strands, and hang one from each point.
Finished Size and Construction
- Finished size: 36 in x 8 in (91.4 cm x 20.3 cm) valance; 35.25 in (89.5 cm) total drop
- Skill level: Intermediate
- Terminology: US
- Yarn weight: DK / light (#3) cotton
- Hook: 4.0 mm (G-6)
- Number of pieces: 24 valance squares, plus 12 assembled strands
- Layout: 12 squares wide x 2 squares deep
- Piece size: 3 in (7.6 cm) square
- Size before border: 36 in x 6 in (91.4 cm x 15.2 cm)
- Border depth: 2 in (5.1 cm) at the points; the top tabs are extra
Materials
Use a smooth mercerized or matte cotton in DK weight, about 225 m per 100 g. Cotton holds the lace shape and doesn’t stretch much when it hangs.
- Sage blue-green: 400 g (about 900 m), for the square surrounds, border, cords, leaf vines, 18 beads and 6 tassels
- Cream: 250 g (about 560 m), for the flower centers, 12 medallions, 30 beads and 6 tassels
These quantities include roughly a 10% margin for gauge swatches and tassel trimming.
Tools:
- 4.0 mm (G-6) hook
- Large-eye tapestry needle
- Small amount of polyester fiberfill
- Stiff card, 4 in (10.2 cm) tall, for wrapping tassels
- Stitch markers
- Rust-proof pins and a blocking mat
- Spray bottle
- Measuring tape
- Scissors
Abbreviations (US Terms)
- ch – chain
- sl st – slip stitch
- sc – single crochet
- hdc – half double crochet
- dc – double crochet
- sc2tog – single crochet 2 together
- sc3tog – single crochet 3 together
- dc2tog – double crochet 2 together
- sp – space
- FLO / BLO – front loop only / back loop only
- MR – magic ring
- RS / WS – right side / wrong side
Special stitch:
- Picot: Ch 3, then sl st into the first of those 3 ch.
Gauge and Checkpoints
Make one complete square before anything else. Gauge matters more here than usual, because the width of the valance decides where every strand hangs.
Checkpoints for one square:
- After Round 2 (the cream flower): 1.5 in (3.8 cm) across
- After Round 4: 2.75 in (7.0 cm) across
- After Round 5: 3 in (7.6 cm) square, with 11 sc per side
If your square is too big: Go down to a 3.75 mm hook.
If your square is too small: Go up to a 4.5 mm hook.
Don’t fix the size by changing stitch counts. Every border count below depends on exactly 11 sc per side.
Valance Square (make 24)
Round 1 (cream): MR, ch 1, work 8 sc in the ring. Join with a sl st to the first sc. (8 sc)
Round 2 (cream, petals): Working in FLO, work (sl st, ch 2, 2 dc, ch 2, sl st) in each sc around. Fasten off. (8 petals)
Round 3 (sage): Fold the petals forward. Join sage in the back loop of any Round 1 sc. Sc in BLO of the same st, ch 3; repeat from * to * in each Round 1 sc around. Join to the first sc. (8 sc, 8 ch-3 sps)
The round sits behind the flower, so the petals stand out in relief.
Round 4 (sage, squaring): Sl st into the next ch-3 sp. Ch 3 (counts as dc), then work (2 dc, ch 2, 3 dc) in the same sp for the first corner. 3 dc in the next sp (side), then (3 dc, ch 2, 3 dc) in the next sp (corner). Repeat from * to * twice more, then work 3 dc in the last sp. Join to the top of the ch-3. (36 dc: 9 dc per side between the ch-2 corners)
Round 5 (sage, trim): Ch 1. Sc in each dc around. In each corner ch-2 sp, work (sc, ch 2, sc). Join and fasten off, leaving a 6 in (15.2 cm) tail. (36 sc worked 1 per dc + 8 corner sc = 44 sc, plus 4 ch-2 corner sps)
Each side now has 11 sc, which includes both corner sc. The ch-2 corner spaces are not counted as stitches.
Weave in the ends and lightly steam-block each square to 3 in (7.6 cm).
Make All Pieces
Square totals
- Valance squares: 24 (cream used for Rounds 1–2, sage for Rounds 3–5)
Stuffed beads (make 48: 30 cream, 18 sage)
- Round 1: MR, work 6 sc in the ring. (6 sc)
- Round 2: Work 2 sc in each st. (12 sc)
- Round 3: Sc in each st. (12 sc)
- Round 4: Sc2tog 6 times. (6 sc) Stuff the bead firmly, close the hole and fasten off.
Each bead is 0.75 in (1.9 cm) across.
Leaf vine (make 6, sage)
Node 1:
- Ch 5 for the stem.
- First leaf: Ch 8. Starting in the 2nd ch from the hook, work sc, hdc, 3 dc, hdc, sc (7 sts). Ch 1, rotate, and work down the other side of the chain: sc, hdc, 3 dc, hdc, sc (7 sts). Sl st at the leaf base. (14 sts per leaf)
- Second leaf: Repeat the first leaf, so the pair opens in a V.
Nodes 2–7: Ch 5 and make another leaf pair. Repeat until you have 7 nodes (14 leaves) and the vine is 14 in (35.6 cm) long. Fasten off.
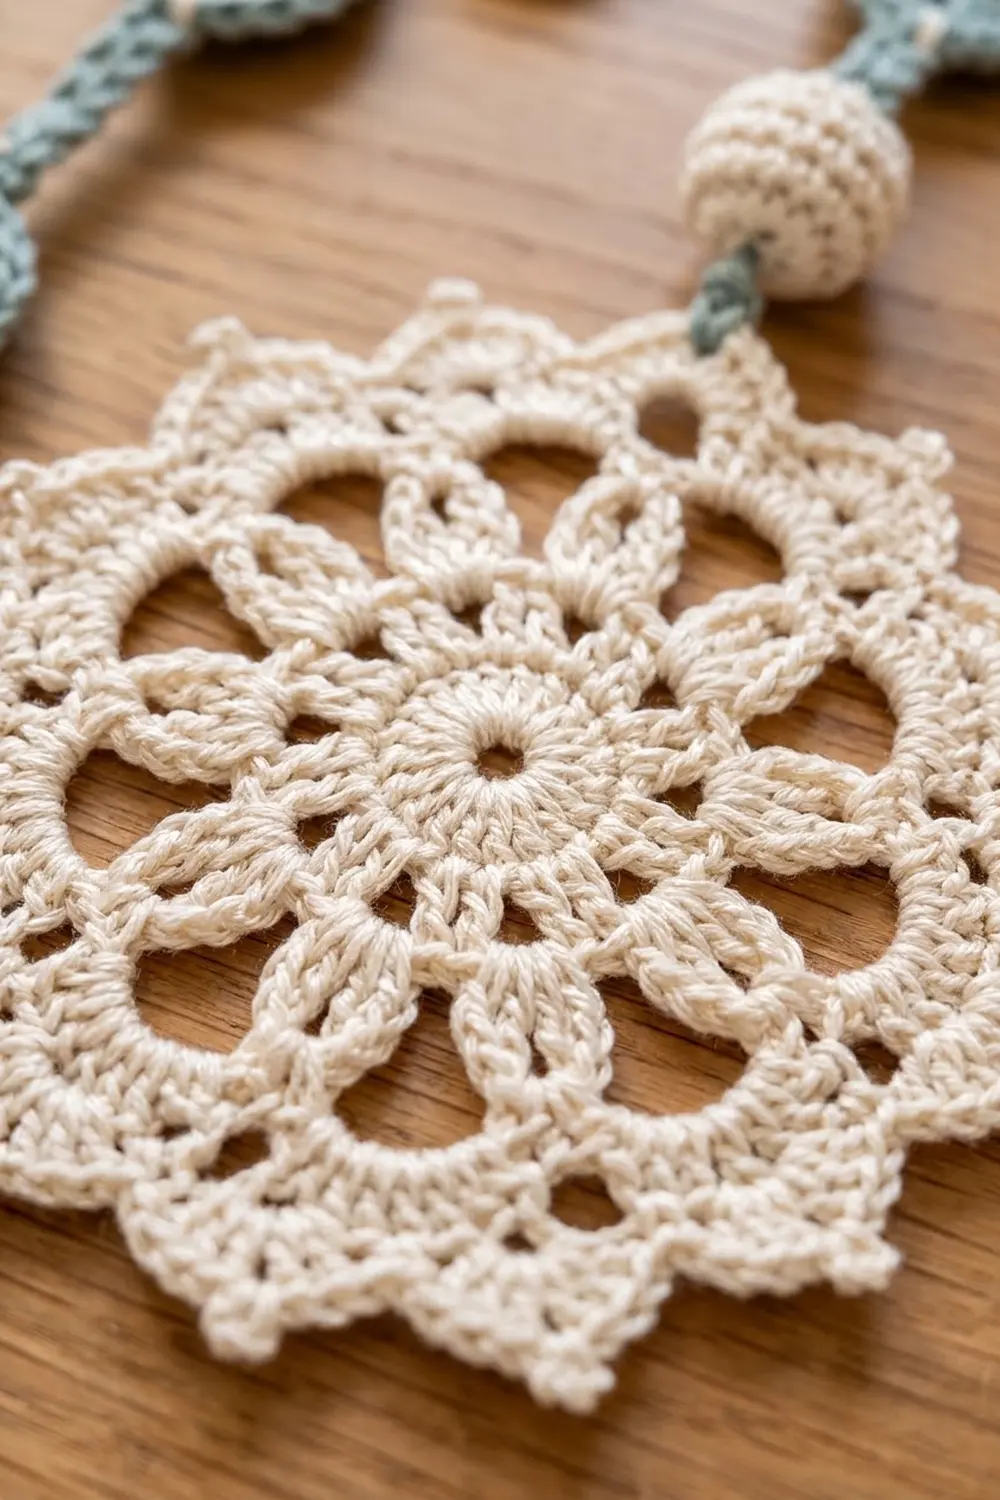
Doily medallion (make 12, cream)
- Round 1: MR, ch 3 (counts as dc), work 11 dc in the ring. (12 dc)
- Round 2: Ch 3, dc in the same st, then 2 dc in each st around. (24 dc)
- Round 3: Sc in the next st, ch 3, skip the next st; repeat around. (12 sc, 12 ch-3 sps)
- Round 4: Work (sc, hdc, dc, hdc, sc) in each sp. (12 petals, 60 sts)
- Round 5: Working behind the petals, sc around the post of the next Round 3 sc, ch 5; repeat around. (12 ch-5 loops)
- Round 6: Work (3 sc, picot, 3 sc) in each loop. (72 sc, 12 picots)
Checkpoint: each medallion is 3.5 in (8.9 cm) across.
Tassels (make 12: 6 sage, 6 cream)
- Wrap yarn 30 times around the 4 in (10.2 cm) card.
- Tie the wraps together at the top and cut the loops at the bottom.
- Wrap a band of yarn 0.75 in (1.9 cm) below the top tie to form the head.
Trim the tassel to 4 in (10.2 cm) long.
Cords (make 12, sage)
Chain until the chain measures 23.25 in (59.1 cm). Sl st in the back bump of each chain back along its length. Leave a 10 in (25.4 cm) tail at each end.
Layout
Strand A is a leaf-vine strand, and Strand B is a medallion strand.
Row 1:  [S][S][S][S][S][S][S][S][S][S][S][S]
Row 2:  [S][S][S][S][S][S][S][S][S][S][S][S]
Points:  V  V  V  V  V  V  V  V  V  V  V  V
Strand:  A  B  A  B  A  B  A  B  A  B  A  B
Joining
Valance squares:
- Place two squares RS together and match their edges.
- Sl st through the outer loops of both squares: 1 sl st per matching pair of sc, so all 11 sts on each side are joined one to one. Work 1 sl st through the matched corner ch-2 sps at each end. Joining adds no stitches.
- Join the squares into 2 rows of 12, then join the two rows together along the long seam.
Keep your tension loose enough that each seam lies as flat as the squares themselves. If a seam puckers, take it out and redo it with a hook one size larger.
Size checkpoint: The joined strip measures 36 in x 6 in (91.4 cm x 15.2 cm).
Border
Border gauge: 11 sc per 3 in (7.6 cm), the same as Round 5 of each square. The border follows each square’s own stitches exactly.
Round 1 (sage, all around)
Join at any outer corner and work 1 sc in each sc around the strip. Skip the joined ch-2 sps at the internal seams. At each of the 4 outer corners, ch 2 across the corner sp. Join to the first sc.
- Long sides: 12 squares x 11 sc = 132 sc each
- Short sides: 2 squares x 11 sc = 22 sc each
- Total: 308 sc, plus 4 corner ch-2 sps
Fasten off.
Top edge, Row 2 (rod tabs)
Work along the 132 top sc. Over each square’s 11 sts: sc 3, ch 15, skip 5 sts, sc 3. Repeat across. (12 tabs, 72 sc + 12 ch-15 loops)
Top edge, Row 3
Sc in each sc, and work 20 sc into each ch-15 loop. (72 sc + 240 sc = 312 sc)
The finished tabs fit a rod up to 1.25 in (3.2 cm) thick.
Bottom points (work 12 separately)
Each point is worked over the 11 bottom sc belonging to one square.
- Row 1: Sc in each of the 11 sts. (11)
- Row 2: Ch 2 (doesn’t count). Dc2tog, dc 7, dc2tog. (9)
- Row 3: Ch 2. Dc2tog, dc 5, dc2tog. (7)
- Row 4: Ch 2. Dc2tog, dc 3, dc2tog. (5)
- Row 5: Ch 1. Sc2tog, sc 1, sc2tog. (3)
- Row 6: Ch 1. Sc3tog. (1) Fasten off.
Point edging
Starting at the left end, work 9 sc up the first slanted edge, 3 sc in the tip, and 9 sc down the second slanted edge. Sl st in the valley at each seam. (21 sc per point, 252 sc total)
Why the math works
Each point uses exactly one square’s 11 bottom sts, so the 12 points meet neatly at the 11 seams. Each tab sits over the 5 center sts of a square, so the tabs line up directly above the flowers.
Each point loses 2 sts per row until 1 st is left at the tip. That gives a centered tip for every strand.
Assembling and Attaching the Strands
Thread each cord’s top tail through the middle sc of a point tip and tie a secure knot. Then add the components to the cord from top to bottom. Use the large-eye needle to pass the cord through the center of each bead, and anchor each bead with one stitch of the cord tail.
Strand A (leaf vine):
- 2 in (5.1 cm) of bare cord, then a cream bead
- 1 in (2.5 cm) of cord, then a sage bead
- 1 in (2.5 cm) of cord, then the vine: whipstitch its stem along 14 in (35.6 cm) of cord
- 1 in (2.5 cm) of cord, then a cream bead
- 2 in (5.1 cm) of cord, then a sage tassel
Strand B (medallion):
- 4 in (10.2 cm) of bare cord, then a cream bead
- 1 in (2.5 cm) of cord, then a sage bead
- 1 in (2.5 cm) of cord, then a medallion: sew its top and bottom picots to the cord
- 1 in (2.5 cm) of cord, then a cream bead
- 1 in (2.5 cm) of cord, then a sage bead
- 1 in (2.5 cm) of cord, then a second medallion
- 1 in (2.5 cm) of cord, then a cream bead
- 2 in (5.1 cm) of cord, then a cream tassel
Both strand types come to 27.25 in (69.2 cm). Tie each tassel’s top tie around the end of its cord and bury the tails inside the tassel head.
Final Blocking
- Lay the valance face down on a blocking mat.
- Pin it to 36 in x 6 in (91.4 cm x 15.2 cm), plus the points.
- Pin each point tip straight down so it stays exactly 2 in (5.1 cm) below the body.
- Pin each medallion flat to 3.5 in (8.9 cm), with one pin in every picot.
- Pin the leaves open in their V pairs.
- Mist everything until it is damp, not soaked.
- Leave it until fully dry, at least 12 hours.
- Steam the tassels and comb them straight, then trim them evenly.
Final Quality-Control Checklist
- 24 squares, each 3 in (7.6 cm) with 11 sc per side
- The valance body measures 36 in x 6 in (91.4 cm x 15.2 cm)
- 12 rod tabs, each centered over a flower
- 12 points, each 2 in (5.1 cm) deep with a single-stitch tip
- 48 beads (30 cream, 18 sage), all stuffed firmly
- 6 leaf vines with 14 leaves each, and 12 medallions with 12 picots each
- All strands 27.25 in (69.2 cm) long and alternating A/B
- Every knot is secure and every tail is buried
Troubleshooting
Squares ruffle: Round 4 is too tight around the corners. Go up a hook size for Round 4 only.
Points lean sideways: You missed a dc2tog at one end. Count each row; the counts should be 11, 9, 7, 5, 3, 1.
Medallions cup: Lengthen the ch-5 loops in Round 5 to ch 6.
Leaves curl: Steam them flat and pin them while damp.
Strands hang at different lengths: Measure from the point tip, not from the top of the valance, and adjust the knot.
Beads slide down the cord: Add a second anchoring stitch above each bead.
Tabs are too tight on the rod: Work 24 sc into each loop instead of 20.
Care
Hand wash in cool water with a mild soap and gently press out the water. Lay the curtain flat to dry, pinning the points and medallions back into shape, and never tumble dry.
Final Notes
The measurements build on each other in a single chain. One 3 in (7.6 cm) square with 11 sc per side gives a 36 in x 6 in (91.4 cm x 15.2 cm) joined strip. The border keeps that 11-stitch count, so the tabs center over the flowers and the 2 in (5.1 cm) points bring the valance to 8 in (20.3 cm) deep. Twelve strands of 27.25 in (69.2 cm) then give a total drop of 35.25 in (89.5 cm).
Check your gauge on the first square and the rest of the measurements will follow from it.
Happy crocheting!