

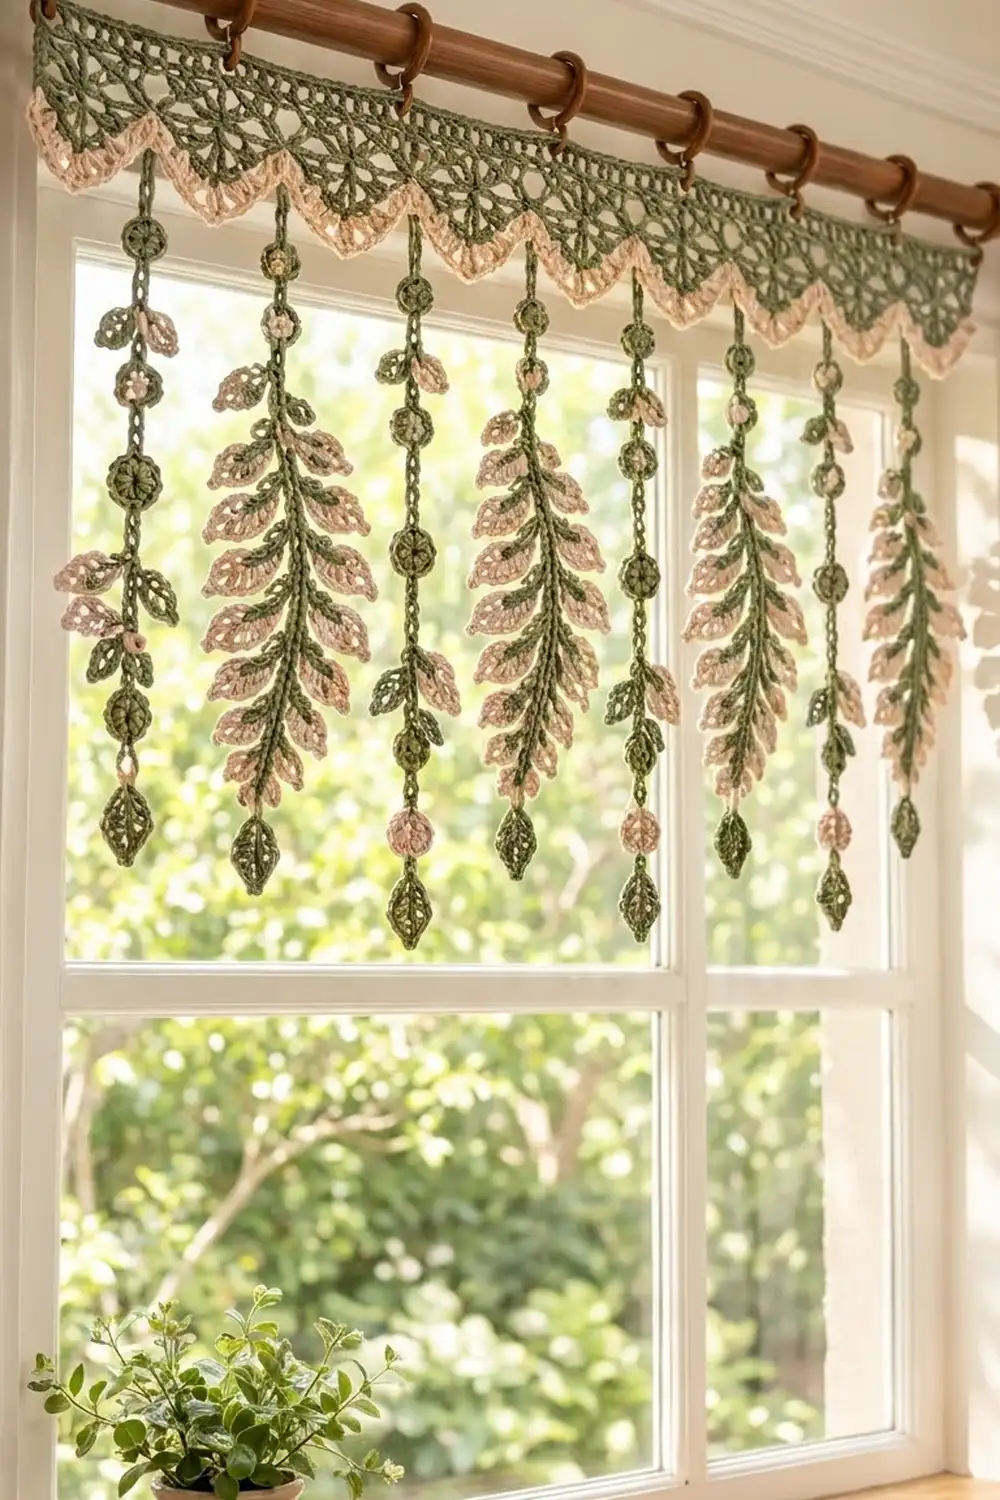
The Fernlight Window Valance has a lacy header and nine hanging strands. The header is sage-green mesh lace with a row of rounded fan scallops along the bottom, edged in blush-pink picots. Below each scallop hangs a strand: either a full fern frond with pink leaves on a green spine, or a slim vine with round discs and small leaves.
The palette is just two colors, sage green and blush pink, so the valance feels soft and botanical. When sun comes through the window, the pink leaves glow and the open lace throws delicate shadows.
This pattern uses US crochet terms. The finished header measures about 36.5 in (92.7 cm) wide by 4.25 in (10.8 cm) deep at the scallop centers. Fern strands hang 19 in (48.3 cm) below the header and vine strands hang 18 in (45.7 cm).
You’ll make the header flat in rows from the top down, finishing with the scallops and pink edging. Next you’ll make four fern strands and five vine strands, each top-down in green with the pink details added afterward. Then you’ll sew each strand to the center of a scallop and work a short top border that holds ten curtain rings.
Finished Size and Construction
- Finished size: 36.5 in (92.7 cm) wide; total drop 23.25 in (59.1 cm) at the ferns
- Skill level: Intermediate
- Terminology: US crochet terms
- Yarn weight: DK (light worsted) cotton
- Hook: 3.5 mm (E-4)
- Number of pieces: 10 (1 header + 4 fern strands + 5 vine strands)
- Layout: 9 strands, one under each scallop, in the order V-F-V-F-V-F-V-F-V
- Header size before border: 36.2 in (91.9 cm) wide x 3.75 in (9.5 cm) deep
- Strand spacing: 4 in (10.2 cm) center to center
- Border depth: 0.5 in (1.3 cm), along the top edge
Materials
Use a smooth mercerized or combed cotton in DK weight, about 115 m per 50 g. Cotton holds the leaf points and scallops crisply and doesn’t stretch much when it hangs. Avoid fuzzy yarns, which hide the lace.
- Sage green: 120 g (275 m)
- Blush pink: 70 g (160 m)
Both quantities include a margin of about 20 percent for gauge differences and a test piece.
Tools:
– 3.5 mm (E-4) crochet hook
– Yarn needle
– 10 wooden curtain rings, about 1.5 in (3.8 cm) across
– Stitch markers (at least 10)
– Rustproof pins and a blocking surface
– Measuring tape and scissors
Abbreviations (US Terms)
- ch – chain
- sl st – slip stitch
- sc – single crochet
- hdc – half double crochet
- dc – double crochet
- tr – treble crochet
- sk – skip
- sp(s) – space(s)
- st(s) – stitch(es)
- RS – right side
Picot: Ch 3, sl st in 3rd ch from hook.
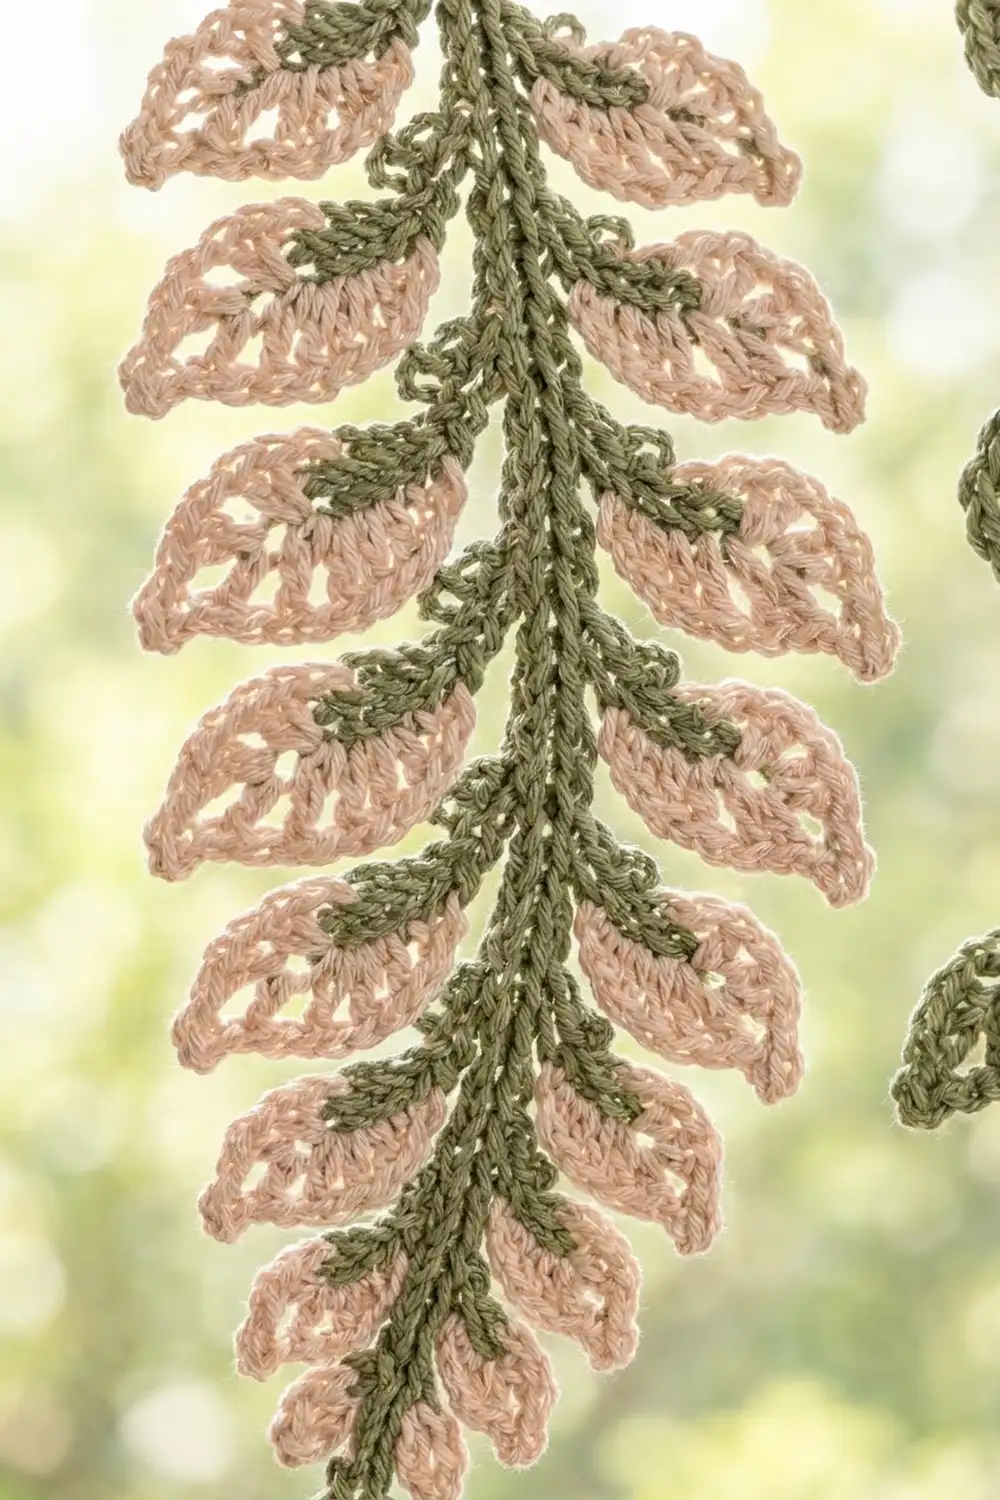
Pink fern leaf (worked around a green vein): The vein is a 7-ch branch with 6 sl sts and 1 unworked point ch. Working into the 6 vein sts from base to point: sc, hdc, dc, (dc, ch 1, dc) in next, dc, hdc. In the point ch: (sc, ch 2, sc). Working back down the other side of the vein from point to base: hdc, dc, (dc, ch 1, dc) in next, dc, hdc, sc. Each leaf has 16 sts, 2 ch-1 eyelets, and 1 ch-2 point.
Gauge and Checkpoints
- Dc gauge: 20 dc and 10 rows = 4 in (10.2 cm)
- Sc gauge: 20 sc = 4 in (10.2 cm)
- Chain gauge: 5 ch = 1 in (2.5 cm)
Before you start the header, make one vine strand as a test piece. It’s small, it uses most of the stitches in the pattern, and you can use it in the finished valance. It should measure 18 in (45.7 cm) from top to drop point, and its discs should be 1 in (2.5 cm) across.
Checkpoints:
– After header Row 1: 36.2 in (91.9 cm) wide
– After header Row 5: 2 in (5.1 cm) deep
– After header Row 8: 3.75 in (9.5 cm) deep at the scallop centers
– Each fern leaf: 1.4 in (3.6 cm) long
– Each fern frond: 3 in (7.6 cm) wide
If your pieces are too big, go down to a 3.25 mm hook. If they’re too small, go up to a 3.75 mm hook. Chain tension matters most for the strands, so if only the strands are off, change hooks for the strands alone.
Header
The header is worked in green from the top edge down. The bottom of the foundation chain will become the top edge.
Foundation: Ch 183.
Row 1: Dc in 4th ch from hook and in each ch across, turn. (181 dc, counting the skipped ch-3 as a dc)
Row 2 (mesh): Ch 4 (counts as dc + ch 1), sk next dc, dc in next dc, ch 1, sk next dc, dc in next dc; repeat from * across, working the last dc in the top of the turning ch, turn. (91 dc, 90 ch-1 sps)
Row 3: Ch 3 (counts as dc), dc in next ch-1 sp, dc in next dc; repeat from * across, turn. (181 dc: 91 worked into dc + 90 worked into sps)
Row 4: Repeat Row 2. (91 dc, 90 ch-1 sps)
Row 5: Repeat Row 3. (181 dc)
Checkpoint: the header should be 2 in (5.1 cm) deep and 36.2 in (91.9 cm) wide.
Row 6 (fans): Ch 1, sc in first dc, sk 9 dc, (tr, ch 2) 8 times in next dc, tr in same dc, sk 9 dc, sc in next dc; repeat from * 8 more times, turn. (10 sc and 9 fans; each fan has 9 tr and 8 ch-2 sps)
The sc stitches land on Row 5 sts 1, 21, 41, and so on up to 181. The fans land on sts 11, 31, and so on up to 171. That gives each repeat 20 sts, or 4 in (10.2 cm).
Row 7: Ch 1, sc in first sc, 3 dc in each of the next 8 ch-2 sps, sc in next sc; repeat from * across. Fasten off green. (216 dc + 10 sc = 226 sts; 24 dc per fan)
Row 8 (pink edging): With RS facing, join pink in the first sc of Row 7. Ch 1, sc in same sc, sk 1 dc, sc in next 2 dc, (picot, sc in next 2 dc) 10 times, sk 1 dc, sc in next sc; repeat from * across. Fasten off. (208 sc: 10 valley sc + 22 sc per fan; 10 picots per fan, 90 total)
In each fan, the 11th and 12th pink sc sit directly over the center tr. Place a marker in each of these center pairs. These 9 markers show where the strands attach.
Fern Strands (Make 4)
Green pass (spine and veins): Leave an 8 in (20.3 cm) tail. Ch 96. The first ch you made is the top of the stem, and the ch closest to the hook is the bottom tip.
Sl st in 2nd ch from hook and in each of next 5 ch. (This is the tip vein: 6 sl sts plus the skipped point ch.)
Sl st in next 5 ch, [ch 7, sl st in 2nd ch from hook and in each of next 5 ch] twice; repeat from * 14 more times. (15 pairs of veins, 1 in or 2.5 cm apart)
Sl st in each of the remaining 14 ch for the stem. Fasten off and leave an 8 in (20.3 cm) tail.
Check: 6 + 75 + 14 = 95 sl sts on the spine, plus the tip ch, uses all 96 ch. The stem is 2.8 in (7.1 cm) and the frond is about 16.2 in (41.1 cm).
Pink pass (leaves): Lay the fern flat so that one vein of each pair points left and one points right. Join pink at the base of the left vein of the pair closest to the stem.
- Work a pink fern leaf around this vein, then sl st into the spine at the leaf base.
- Sl st loosely into the back of the next 5 spine sts. Stay on the wrong side so the green spine shows on the front.
- Work the left leaf of the next pair. Repeat steps 2 and 3 down the frond.
- After the last left leaf, sl st into the back of the 5 spine sts to the tip and work a leaf around the tip vein.
- Work back up the frond, making the right leaf of each pair and sl st-ing into the back of the 5 spine sts between leaves.
Fasten off. (31 leaves: 15 pairs + 1 tip leaf; 496 leaf sts)
The green vein sl sts stay visible as a ridge down the center of each pink leaf.
Vine Strands (Make 5)
Each vine is worked in one continuous green chain from the top down.
Stem: Leave an 8 in (20.3 cm) tail. Ch 15. (3 in / 7.6 cm)
Unit (work 4 times):
- Disc: Ch 4, sl st in 4th ch from hook to form a ring.
- Rnd 1: Ch 1, 12 sc in ring, sl st in first sc. (12 sc)
- Rnd 2: Ch 1, (sc in next sc, 2 sc in next sc) 6 times, sl st in first sc. (18 sc; disc is 1 in / 2.5 cm across)
- Sl st in next 9 sc. This moves you to the bottom point of the disc.
- Cord: Ch 6. (1.2 in / 3.0 cm)
- Leaf node: In Units 1 and 3, work [ch 7, sc in 2nd ch from hook, hdc in next ch, dc in next 2 ch, hdc in next ch, sc in last ch, sl st in last cord ch] twice. (2 single-sided leaves, 6 sts each) In Units 2 and 4, don’t make leaves; place a marker in the last cord ch instead.
- Cord: Ch 6.
Drop: Ch 8, sc in 2nd ch from hook, hdc in next ch, dc in next 3 ch, hdc in next ch, sc in last ch (7 sts). Ch 1, then work along the opposite side of the same chain: sc, hdc, dc in next 3, hdc, sc (7 sts). Sl st in the first sc at the point. Fasten off. (14 sts; 1.4 in / 3.6 cm long)
Pink leaves: At each marked ch, join pink with a sl st. Work [ch 7, sc in 2nd ch from hook, hdc in next ch, dc in next 2 ch, hdc in next ch, sc in last ch, sl st in marked ch] twice. Fasten off.
Length check: 3 in stem + 4 units at 3.4 in (8.6 cm) each + 1.4 in drop = 18 in (45.7 cm).
Make All Pieces
- Header: 1, in green with a pink Row 8
- Fern strands: 4, each with a green pass and a pink pass
- Vine strands: 5, each in green with 2 pink leaf pairs
Layout (S = scallop, V = vine, F = fern):
[ S1 ][ S2 ][ S3 ][ S4 ][ S5 ][ S6 ][ S7 ][ S8 ][ S9 ]
   V     F     V     F     V     F     V     F     V
Weave in all tails except the 8 in (20.3 cm) top tail on each strand.
Joining
Method: Sew each strand to its scallop with the strand’s own top tail.
Stitch-to-stitch logic: Thread the top tail onto a yarn needle. Line up the first ch of the stem with the marked center pair of pink sc (the 11th and 12th sc of that fan). Pass the needle under both loops of the 11th sc, through the top ch, then under both loops of the 12th sc. Repeat this path twice more and secure the tail on the wrong side. Each fan center sits 10 sts (2 in or 5.1 cm) from its neighboring valleys, so the strands hang exactly 20 sts (4 in or 10.2 cm) apart.
Tension: Sew snugly but not tightly. If you pull too hard, the picots pucker and the scallop flattens into a point.
Checkpoint: Measure between the centers of Strands 1 and 9. It should be 32 in (81.3 cm), which is 8 gaps x 4 in.
Border
The border covers the top edge and both short sides, which gives the rings a firm edge to hang from.
Border gauge: 20 sc = 4 in (10.2 cm), or 5 sc per inch; each sc row is about 0.25 in (0.6 cm) tall.
Row B1 (top): With RS facing, join green in the first foundation ch at the right corner. Ch 1, sc in each ch across, turn. (181 sc)
Row B2 (ring row): Ch 1, sc in each sc across. At sts 1, 21, 41, 61, 81, 101, 121, 141, 161, and 181, work a ring tab right after the sc: ch 3, sc around the lower edge of a ring, ch 3, sl st in the same sc. (181 sc, 10 ring tabs) Don’t turn.
Side 1: Rotate and work down the short edge: 1 sc in the end of each of Rows B2 and B1, then 2 sc in the end of each of Rows 5 to 1. (12 sc) Fasten off.
Side 2: Join green at the other end of Row 5. Work 2 sc in the end of each of Rows 5 to 1, then 1 sc in the end of each of Rows B1 and B2. (12 sc) Sl st to the corner sc of Row B2 and fasten off.
Corners: The side stitches go only into row ends. The corner stitches are already counted in the 181 sc of Rows B1 and B2, so don’t add any extra corner stitches.
Why the math works:
– 181 = 9 x 20 + 1, so the rings sit exactly above the 10 valley sc of Row 6, every 4 in (10.2 cm).
– Each side covers 2 in of header rows plus 0.5 in of border, or 2.5 in (6.4 cm). At 5 sc per inch that would be 12.5 sc, so 12 sc lies flat without flaring.
– The finished width is 36.2 in plus about 0.15 in (0.4 cm) of edging on each side, which comes to about 36.5 in (92.7 cm).
Final Blocking
- Soak the valance in cool water for 10 minutes, then roll it in a towel to remove excess water.
- Pin the header flat to 36.5 in (92.7 cm) wide, keeping the top edge straight.
- Pin each fan into a rounded scallop 1.75 in (4.4 cm) deep, and pin out each picot.
- Lay each fern straight and pin its leaves outward at about 45 degrees, pointing slightly downward. Each frond should be 3 in (7.6 cm) wide.
- Pin the vine leaves flat and pin each disc into a round.
- Let everything dry completely before unpinning.
Final Quality-Control Checklist
- Header is 36.5 in (92.7 cm) wide with 9 even scallops
- 10 rings are spaced 4 in (10.2 cm) apart
- Every fan has 10 picots and a centered strand
- Each fern has 31 leaves with a visible green vein
- Each vine has 4 discs, 4 leaf pairs (2 green, 2 pink), and a pointed drop
- Strands follow V-F-V-F-V-F-V-F-V
- All tails are woven in and none show on the front
Troubleshooting
- Header ripples: Your foundation chain is too tight. Remake it with a hook one size larger.
- Fans cup instead of opening: Check that each fan has 8 ch-2 sps and that you skipped exactly 9 dc on each side.
- Leaves curl: Work the vein sl sts more loosely, then steam-block.
- Green spine is hidden: Keep the pink sl sts on the back of the spine.
- Discs ruffle: Make sure Rnd 2 has 18 sc, not more.
- Strands twist when hung: Wet-block them hanging straight with a light clip on each tip.
Care
Hand wash in cool water with mild soap and dry flat. Re-pin the leaves if they curl over time.
Final Notes
The measurements build on each other. A gauge of 20 dc = 4 in (10.2 cm) gives a header of 181 sts = 36.2 in (91.9 cm). That header holds 9 fans of 20 sts each, which places the strands 4 in (10.2 cm) apart. The 2-row top border brings the width to 36.5 in (92.7 cm) and holds 10 rings above the valleys. If your gauge and checkpoints match at each stage, the finished valance will match too.
Happy crocheting!