

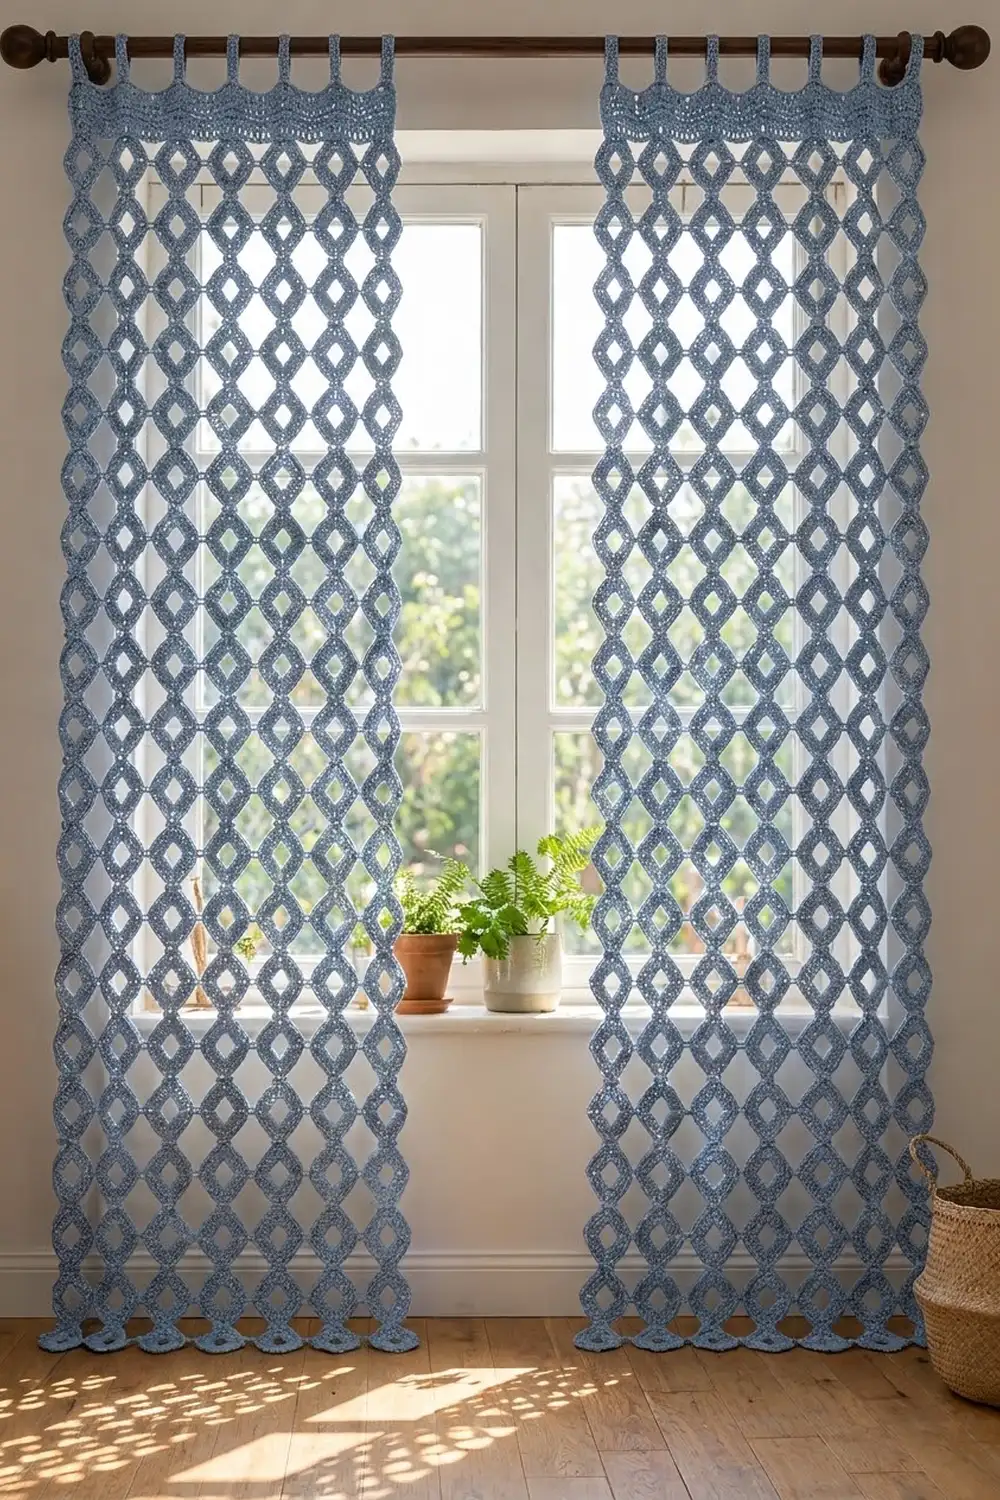
These curtains filter light softly through a grid of open diamonds. Each panel is made from small, dense square motifs turned on point. They join only at their tips, so open diamond windows form between them and sunlight makes a lattice pattern on the floor.
The Bluebell Lattice is worked in a single dusty denim blue. One quiet color lets the geometry show and fits farmhouse, coastal, and modern rooms alike. A solid header band with tab loops across the top hides the rod hardware and keeps each panel hanging straight.
This pattern uses US crochet terms. Each finished panel measures about 33 in (83.8 cm) wide and 80 in (203.2 cm) long, from the top of the header to the lowest point. The tabs sit above that measurement.
You’ll make 168 identical motifs and join them as you go into two panels. Each panel is a grid 6 motifs wide and 14 motifs tall. Then you add a solid header with seven hanging tabs to each panel.
Finished Size and Construction
- Finished panel size: 33 in x 80 in (83.8 cm x 203.2 cm), including header
- Skill level: Easy-intermediate (simple stitches, high repetition)
- Terminology: US
- Yarn weight: Worsted (#4), cotton or cotton blend
- Hook: 5.0 mm (H-8)
- Number of pieces: 168 motifs (84 per panel), plus 2 headers worked directly onto the panels
- Layout per panel: 6 motifs across x 14 motifs down, set on point
- Single motif size: 3.75 in (9.5 cm) per side; 5.3 in (13.5 cm) from point to point
- Joined motif pitch (center to center): 5.5 in (14.0 cm)
- Size before header: 33 in x 77 in (83.8 cm x 195.6 cm)
- Header depth: 3 in (7.6 cm), plus tabs 5.6 in (14.2 cm) long before folding
Materials
Yarn: Use a smooth worsted-weight cotton or cotton blend with good stitch definition. Cotton keeps the diamond holes crisp, hangs heavily enough to stay straight, and holds up to sunlight better than most acrylics. Avoid fuzzy yarns, because they blur the open centers.
- Dusty denim blue: 2,000 g (about 4,000 m / 4,374 yd), for example 20 skeins of 100 g / 200 m
Each motif uses about 9 g (18 m), and each header with its tabs uses about 80 g (80 m). The total above includes a margin of roughly 20 percent for gauge differences, swatching, and dye-lot safety. Buy all your yarn from one dye lot.
Tools:
- 5.0 mm (H-8) crochet hook
- Tapestry needle
- Stitch markers
- Measuring tape
- Blocking mats and rust-proof pins
- Spray bottle or steamer
- Scissors
Abbreviations (US Terms)
- ch – chain
- sl st – slip stitch
- sc – single crochet
- hdc – half double crochet
- dc – double crochet
- sp – space
- st(s) – stitch(es)
- rep – repeat
Special technique – Joining Corner (JC): Work this in place of a normal corner on the last round of a motif. Work (sc, ch 1) in the corner ch-2 sp. Then sl st into the corner ch-2 sp of the neighbouring finished motif. Finish with (ch 1, sc) back in the corner sp of the current motif. This makes the small bar-shaped join you see at each diamond tip.
Gauge and Checkpoints
Dc gauge: 16 dc = 4 in (10.2 cm).
Hdc gauge (header): 16 hdc x 10 rows = 4 in x 4 in (10.2 cm x 10.2 cm).
Make one complete motif before anything else, then block it lightly. Check it at each stage, measuring flat along one side from corner space to corner space:
- After Round 1: 2.25 in (5.7 cm) per side; the center hole is about 1.25 in (3.2 cm) per side
- After Round 2: 3.25 in (8.3 cm) per side
- After Round 3: 3.75 in (9.5 cm) per side; 5.3 in (13.5 cm) point to point
If your motif is too big: go down to a 4.5 mm hook.
If your motif is too small: go up to a 5.5 mm hook.
If only the center hole is wrong but the outer size is right, tighten or loosen your foundation chain rather than changing hook size. A 0.25 in (0.6 cm) error per motif adds up to 1.5 in (3.8 cm) across the width and 3.5 in (8.9 cm) down the length, so correct it now.
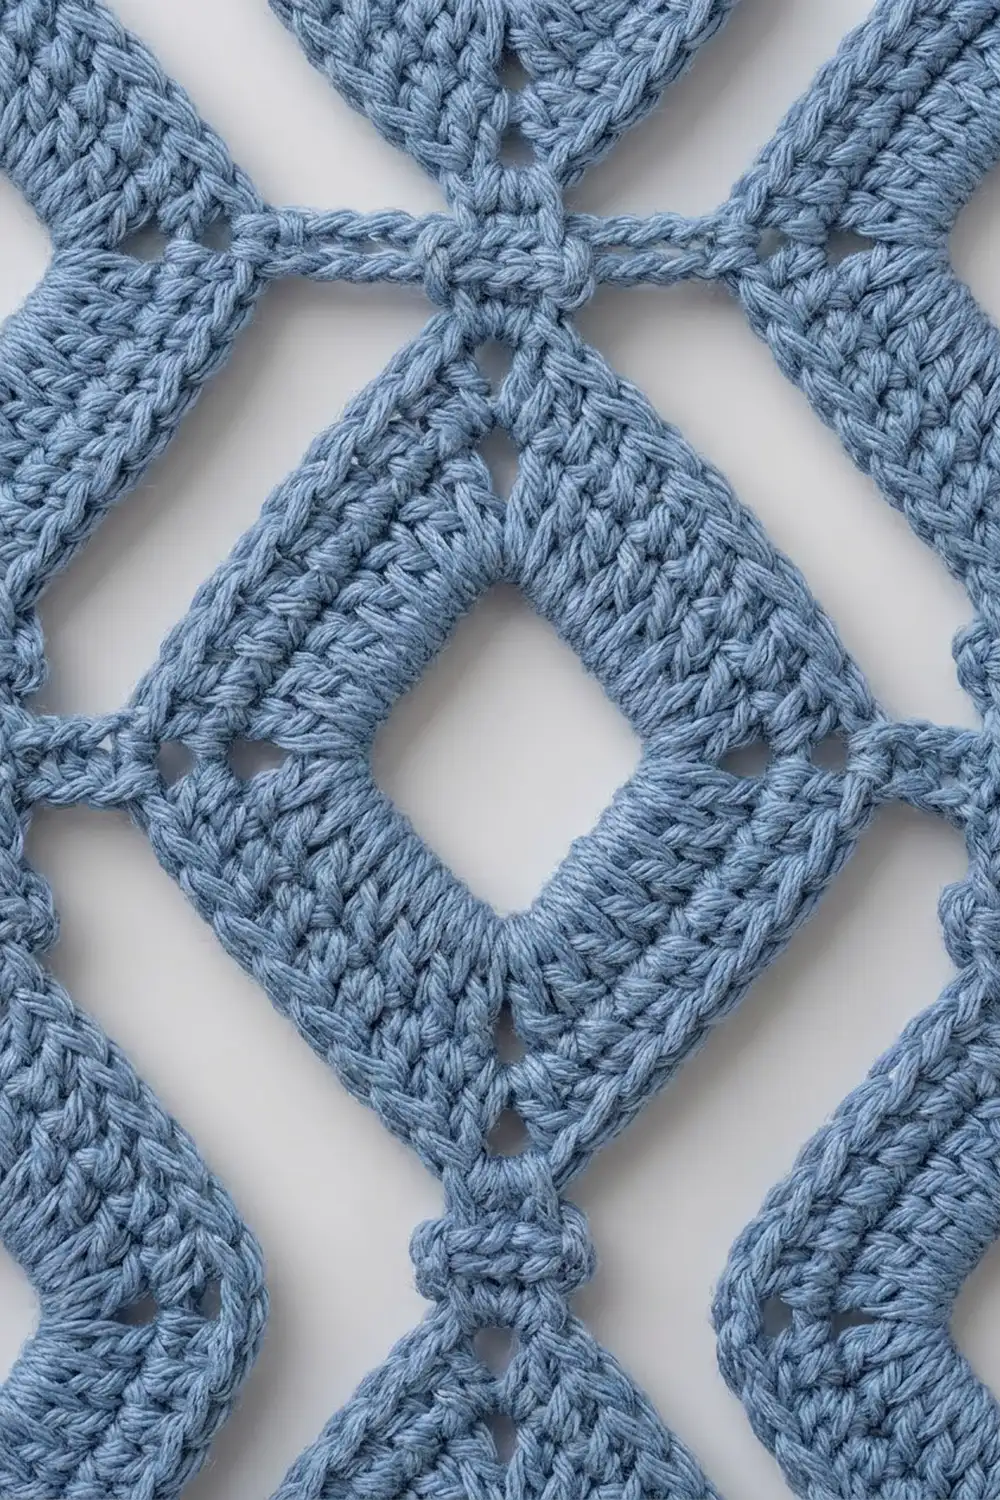
The Motif
Make 1 motif first, which is the gauge motif.
Foundation: Ch 32, then sl st to the first ch to form a ring. Don’t twist the chain. This ring becomes the edge of the open square center, with 8 ch per side.
Round 1: Ch 3 (counts as dc), dc in the next 6 ch, (dc, ch 2, dc) in the next ch. Dc in the next 7 ch, (dc, ch 2, dc) in the next ch; rep from * 2 more times. Sl st to the top of the beginning ch-3.
36 dc* total: 9 dc per side (7 side dc + 1 dc on each side of each corner), and 4 corner ch-2 sps.
Round 2: Ch 3 (counts as dc), dc in each dc to the first corner. (2 dc, ch 2, 2 dc) in the corner ch-2 sp, then dc in each dc to the next corner; rep from * around, ending with dc in the remaining dc. Sl st to the top of the beginning ch-3.
52 dc* total: 13 dc per side, and 4 corner ch-2 sps.
Round 3 (trim round): Ch 1, sc in the same st and in each dc to the first corner. (Sc, ch 2, sc) in the corner ch-2 sp, then sc in each dc to the next corner; rep from * around. Sl st to the first sc, then fasten off.
60 sc* total = 52 (1 sc per existing dc) + 8 (2 sc added at each of 4 corners). That gives 15 sc per side including the corner sc, plus 4 corner ch-2 sps.
On every motif after the first, you’ll work Round 3 with Joining Corners wherever the motif meets a finished neighbour. The stitch count stays at 60 sc.
The two dc rounds form the thick, ridged diamond frame. The sc trim gives it a firm, clean edge, and the 32-ch ring keeps the center open at about one-third of the motif’s width.
Make All Pieces
- Total motifs: 168 in dusty denim blue
- Per panel: 84 motifs (6 across x 14 down)
Work Rounds 1–2 on all motifs first if you like, then join them during Round 3. Each panel is laid out like this, with every M being a motif turned on point:
Column:   1   2   3   4   5   6
Row 1:    M - M - M - M - M - M     <- top points anchor to header
          |   |   |   |   |   |
Row 2:    M - M - M - M - M - M
          |   |   |   |   |   |
 ...     (rows 3 to 13 repeat)
          |   |   |   |   |   |
Row 14:   M - M - M - M - M - M     <- bottom points hang free
In the grid, “-” is a join at the left and right side points and “|” is a join at the top and bottom points. The open spaces between the joins become the negative-space diamonds.
Joining
Method: Join as you go on Round 3, connecting points only. Motif sides are never joined to each other. Leaving the sides free is what creates the open diamonds between motifs.
Order: Work across Row 1 from left to right, then across Row 2, and so on down the panel.
- Row 1, Column 1: Complete Round 3 normally.
- Row 1, Columns 2–6: Use a JC at the left point to join to the right point of the previous motif.
- Rows 2–14, Column 1: Use a JC at the top point to join to the bottom point of the motif above.
- Rows 2–14, Columns 2–6: Use a JC at the top point (to the motif above) and a JC at the left point (to the motif on the left).
Stitch-to-stitch logic: Each point joins to only one other point, and each join consumes no extra stitches. Every motif keeps exactly 60 sc. The top points of Row 1, the outer points of Columns 1 and 6, and the bottom points of Row 14 stay as normal (sc, ch 2, sc) corners.
Tension: Keep the ch 1 on each side of the join sl st the same size as your other chains. If those chains are tight, the panel will pucker and the diamonds will skew. If they’re loose, the panel will grow longer. Each join bar adds about 0.2 in (0.5 cm), which turns the 5.3 in (13.5 cm) motif into a 5.5 in (14.0 cm) pitch.
Size checkpoint: After joining Row 1, the strip should measure 33 in (83.8 cm) from the outer left point to the outer right point. Each finished panel body should measure 33 in x 77 in (83.8 cm x 195.6 cm).
Border: Header Band and Hanging Tabs
The header is the only border on this design. The side and bottom edges are left as free points to match the lattice look.
Border gauge: 16 hdc = 4 in (10.2 cm), which is 4 sts per inch.
Why the count works: This header doesn’t pick up stitches along motif sides. It bridges the six top points instead. The points sit 5.5 in (14.0 cm) apart, and 5.5 x 4 = 22 sts, so the anchors are spaced 22 sts apart. The outermost points sit 2.75 in (7.0 cm) in from the panel edges, which is about 10 sts. That gives 10 + (5 x 22) + 1 = 131 sts. At 4 sts per inch, 131 sts measures 32.75 in (83.2 cm), which matches the 33 in (83.8 cm) body after light blocking.
Foundation: Ch 132.
Row 1 (anchor row): Sc in the 2nd ch from the hook and in each ch across, for 131 sc. On sc numbers 11, 33, 55, 77, 99, and 121, first insert your hook through the top-point ch-2 sp of the matching Row 1 motif (Columns 1 to 6 in order), then into the chain, and complete the sc. This ties the motifs to the header. Turn.
Rows 2–8: Ch 2 (does not count), hdc in each st across, turn. 131 hdc in each row.
After Row 8, the header measures 3 in (7.6 cm) deep: 0.25 in (0.6 cm) of sc plus 7 rows x 0.4 in (1.0 cm). Don’t fasten off.
Tabs (7 per panel): The 131 sts divide into 7 tabs of 5 sts each and 6 gaps of 16 sts each: (7 x 5) + (6 x 16) = 35 + 96 = 131. The tabs sit over sts 1–5, 22–26, 43–47, 64–68, 85–89, 106–110, and 127–131.
For each tab, rejoin the yarn at its first stitch if needed and work in rows over its 5 sts:
- Tab Rows 1–14: Ch 2 (does not count), hdc in each of the 5 sts, turn. 5 hdc per row.
Each tab measures 1.25 in x 5.6 in (3.2 cm x 14.2 cm). Fold each tab to the back and whipstitch its last row along header Row 4. The finished loops fit rods up to 1.25 in (3.2 cm) in diameter.
Repeat the header and tabs on the second panel.
Final Blocking
- Weave in all ends along the dc rounds of the motifs, never across the open centers.
- Lay one panel flat on mats or on a clean floor protected with towels.
- Pin the header straight at 33 in (83.8 cm) wide.
- Pin the side points every 5.5 in (14.0 cm) down both edges so the panel length is 80 in (203.2 cm).
- Mist the panel thoroughly, or steam it from 1 in (2.5 cm) above. Never press an iron onto the stitches.
- Square each center hole with your fingers. Each hole should be about 1.25 in (3.2 cm) per side.
- Let the panel dry completely before unpinning it, then repeat with the second panel.
Final Quality-Control Checklist
- Every motif has 60 sc in Round 3 and measures 3.75 in (9.5 cm) per side.
- Each panel has 84 motifs in a 6 x 14 grid.
- Every interior point is joined to exactly one neighbour, and no sides are joined.
- The header has 131 sts in each row, and the six anchors sit at sts 11, 33, 55, 77, 99, and 121.
- There are seven tabs, each 5 sts wide and evenly spaced 16 sts apart.
- Each panel measures 33 in x 80 in (83.8 cm x 203.2 cm).
- Both panels match in length to within 0.5 in (1.3 cm).
Troubleshooting
- Center holes close up or look round: Your foundation ring is too tight. Chain more loosely, or work the foundation with a hook one size larger.
- Motifs cup: Your dc tension is tighter than your chain tension. Relax your dc stitches, or go up a hook size.
- Motifs ruffle: Check that each corner has only (2 dc, ch 2, 2 dc) in Round 2.
- Panel leans diagonally: One or more joins were made at the wrong point. Check each motif’s top and left points.
- Header wider than the body: Your hdc gauge is loose. Rework the header with a 4.5 mm hook while keeping the 131-st count.
- Panels differ in length: Reblock the shorter panel, pinning its side points at the 5.5 in (14.0 cm) pitch.
Care
Hand wash in cool water, or machine wash on a gentle cycle in a mesh bag, then reshape and dry flat. Rotate the panels now and then to even out sun fading.
Final Notes
The measurement chain is simple. Each 3.75 in (9.5 cm) motif becomes 5.3 in (13.5 cm) on point, and the join bars give a 5.5 in (14.0 cm) pitch. Six motifs across make 33 in (83.8 cm), and fourteen down make 77 in (195.6 cm). The 3 in (7.6 cm) header brings each panel to 80 in (203.2 cm). If your first motif matches gauge, everything after it will fall into place.
Happy crocheting!