

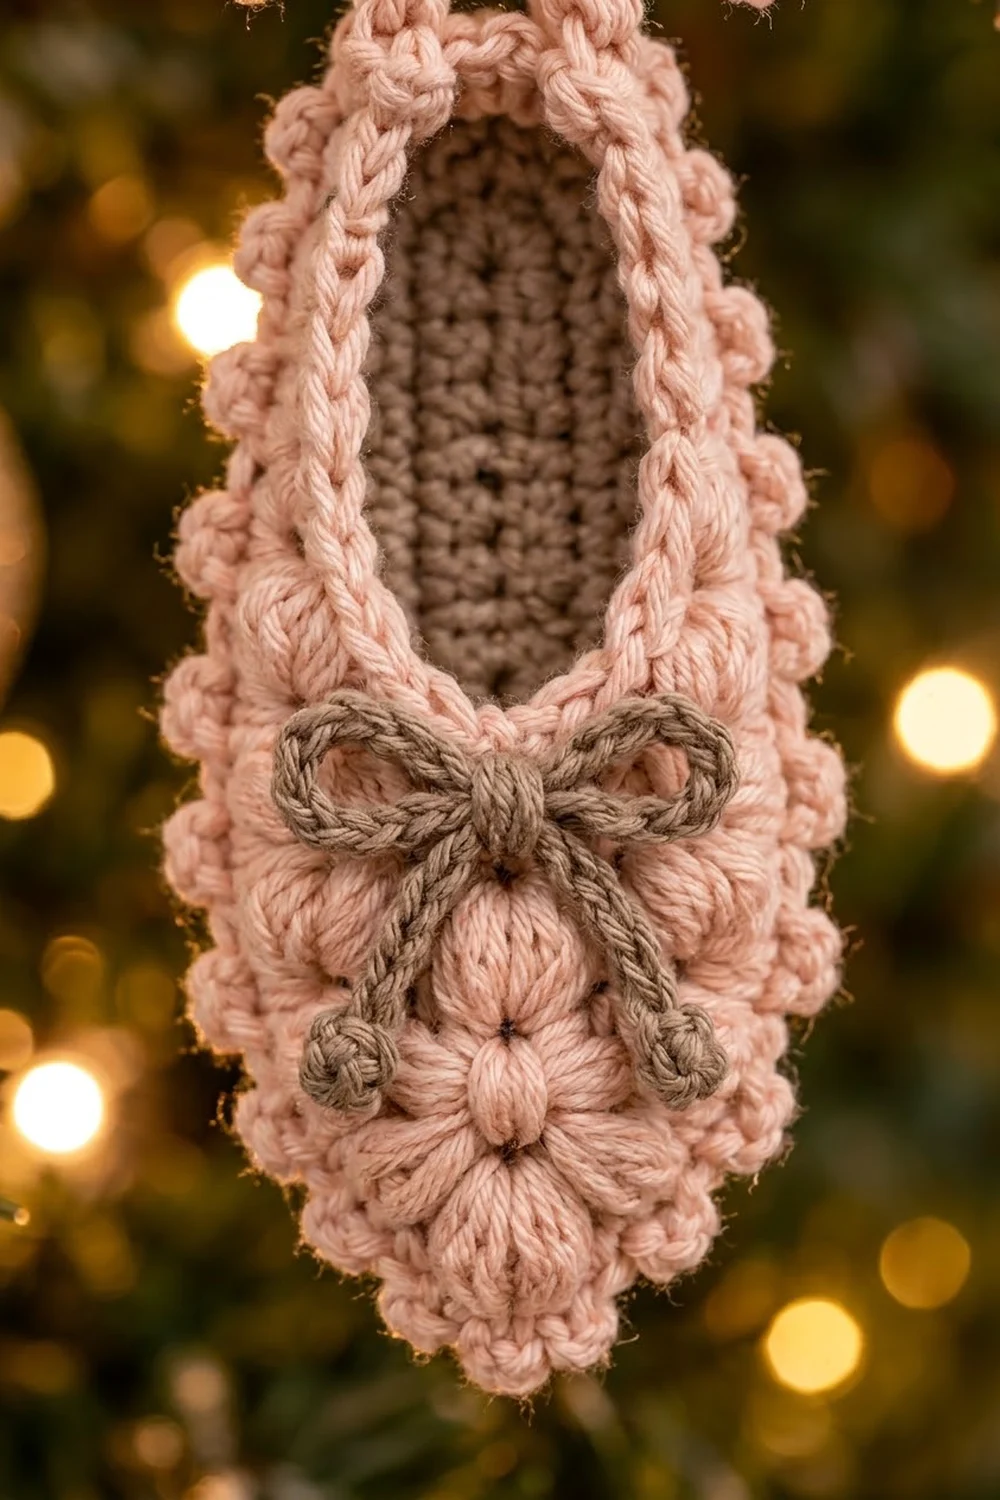
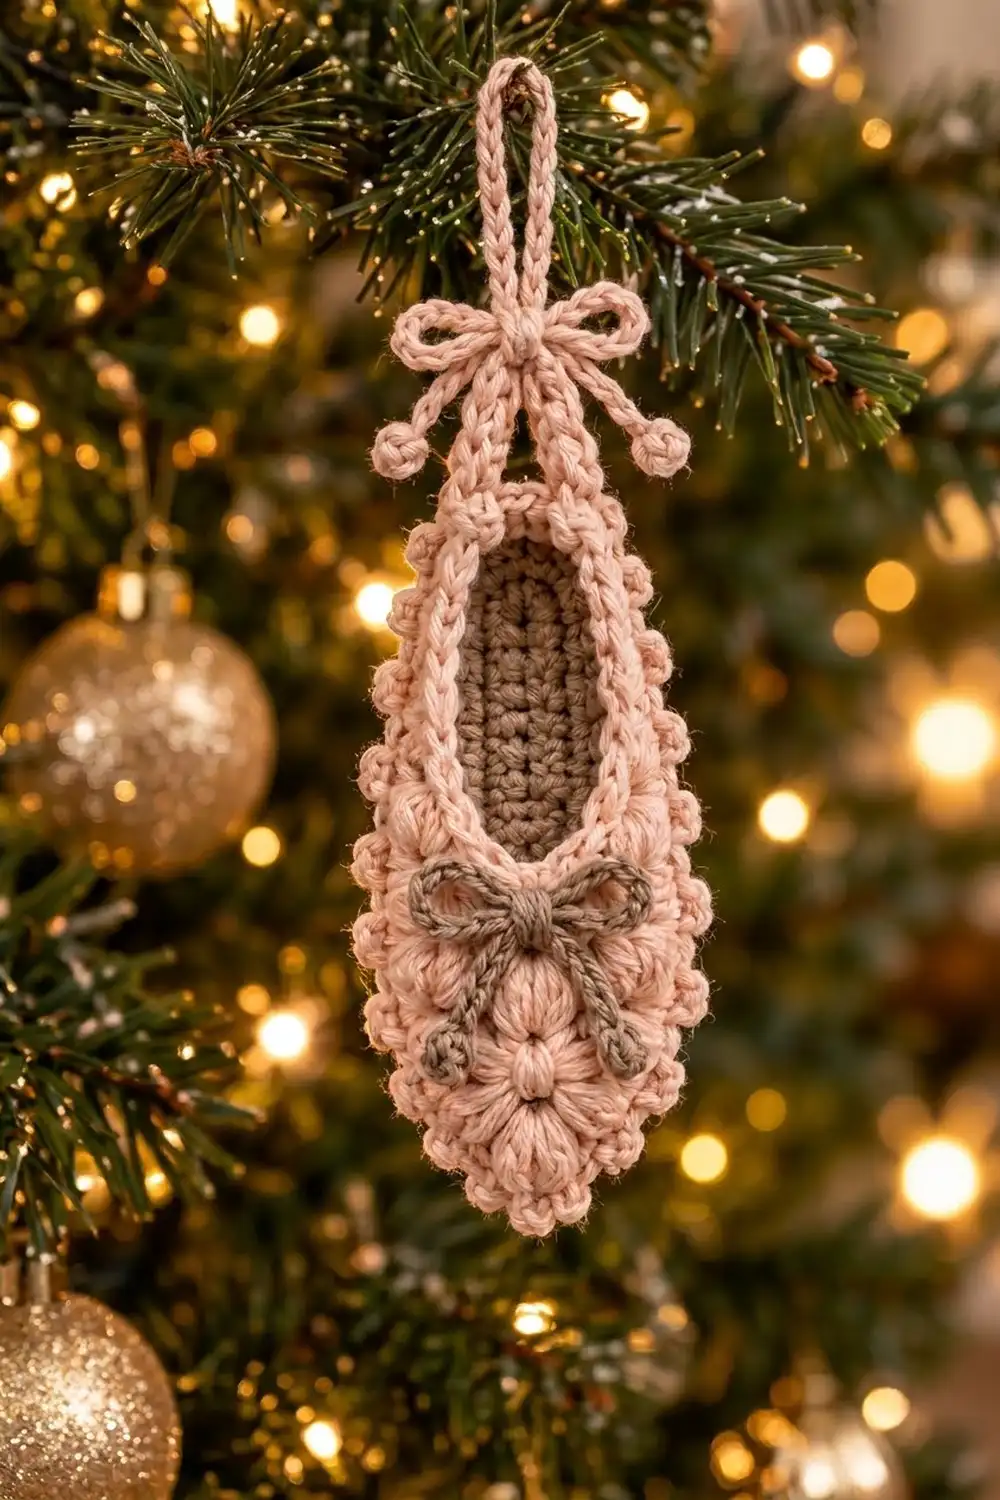
This little ballet slipper ornament is a soft, romantic piece for the tree. It has a taupe oval “insole” framed in blush pink, a toe covered in plump puff stitches, a bobbled picot edge, and two tiny chain-cord bows: a taupe one on the toe and a pink one at the top of the hanging loop.
The palette is just two colors: blush pink and warm taupe. The style is vintage nursery meets Nutcracker. It looks lovely on a tree, on a gift package, or hung from a doorknob in a dancer’s room.
This pattern uses US crochet terms. The finished ornament measures 2.75 in (7.0 cm) wide and 6.25 in (15.9 cm) long, not counting the loop. With the 2.5 in (6.4 cm) hanging loop, it is 8.75 in (22.2 cm) tall overall.
Construction is simple. You crochet a taupe oval in rounds and add one pink round. Next you work the puffed toe in short rows off one end, then crochet a three-round border all the way around. Last, you chain the loop and make two bows.
Finished Size and Construction
- Finished size: 2.75 in x 6.25 in (7.0 cm x 15.9 cm), loop not included
- Overall hanging length: 8.75 in (22.2 cm)
- Skill level: Easy (advanced beginner)
- Terminology: US crochet terms
- Yarn weight: DK (light #3), cotton or cotton blend
- Hook: 3.5 mm (E-4)
- Number of pieces: 1 ornament body, plus 2 chain-cord bows
- Layout: single flat piece; nothing to join
- Taupe oval: 3.25 in x 1.25 in (8.3 cm x 3.2 cm)
- Size before border: 5.25 in x 1.75 in (13.3 cm x 4.4 cm)
- Border depth: 0.5 in (1.3 cm) on every edge
Materials
Use a smooth DK cotton or cotton blend. Cotton shows puffs and picots crisply and holds a flat shape on the tree. Fuzzy or brushed yarns will blur the texture, so avoid them.
- Blush pink (main color): 15 g, about 38 m (42 yd)
- Taupe (contrast color): 5 g, about 13 m (14 yd)
These quantities include a margin for your gauge check and tails. One ornament actually uses a bit less.
Tools:
- 3.5 mm (E-4) crochet hook
- Tapestry needle
- 2 locking stitch markers
- Scissors
- Blocking mat and rust-proof pins
- Spray bottle with water
- Ruler or tape measure
Abbreviations (US Terms)
- ch – chain
- sl st – slip stitch
- sc – single crochet
- sc2tog – single crochet 2 together (insert in next st, pull up loop, insert in following st, pull up loop, yo, pull through all 3 loops)
- st(s) – stitch(es)
- sk – skip
- sp – space
- yo – yarn over
- RS / WS – right side / wrong side
- Rnd – round
Special stitches:
- Puff: [Yo, insert hook in st or sp, yo, pull up a loop to about 0.25 in (0.6 cm)] 3 times (7 loops on hook). Yo, pull through all 7 loops. Puffs bulge toward the side facing you, so always work them with the RS facing.
- Picot: Ch 3, sl st in 3rd ch from hook.
Gauge and Checkpoints
Gauge: 20 sc and 20 rounds = 4 in (10.2 cm), so 5 sc and 5 rounds = 1 in (2.5 cm).
Gauge matters more than usual here. The toe rows are built on exact stitch counts, so a loose oval makes a floppy, oversized toe. Make the taupe oval first and measure it before going any further.
Checkpoints:
- After Rnd 3 (taupe oval): 3.25 in x 1.25 in (8.3 cm x 3.2 cm)
- After Rnd 4 (pink round): 3.5 in x 1.75 in (8.9 cm x 4.4 cm)
- After the toe rows: 5.25 in (13.3 cm) long, 1.75 in (4.4 cm) wide
- After the border: 6.25 in x 2.75 in (15.9 cm x 7.0 cm)
If your oval is too big, go down to a 3.25 mm or 3 mm hook and start over. If it is too small, go up to 3.75 mm or 4 mm. Do not change the stitch counts. Every later section depends on them.
Ballet Slipper Body
Taupe Oval (Insole)
With taupe, ch 12.
Rnd 1: Sc in 2nd ch from hook and in next 9 ch. Work 3 sc in last ch. Rotate to work along the opposite side of the foundation chain: sc in next 9 ch, then 2 sc in the ch that already holds the first sc. Join with sl st to first sc. (24 sts)
You now have two ends of 3 sts each and two sides of 9 sts each. The end where you started is the heel. The opposite end is the toe.
Rnd 2: Ch 1. 2 sc in first st, sc in next 9, 2 sc in each of next 3, sc in next 9, 2 sc in each of last 2. Join. (30 sts)
Rnd 3: Ch 1. Sc in first st, 2 sc in next st, sc in next 9, [sc in next st, 2 sc in next st] 3 times, sc in next 9, [sc in next st, 2 sc in next st] 2 times. Join. (36 sts: 9 per side, 9 per end)
Fasten off taupe. Checkpoint 1: the oval measures 3.25 in x 1.25 in (8.3 cm x 3.2 cm).
Pink Frame Round
Rnd 4: Join pink with sl st in the first st of Rnd 3. Ch 1. Sc in same st and next st, 2 sc in next st, sc in next 9, [sc in next 2, 2 sc in next] 3 times, sc in next 9, [sc in next 2, 2 sc in next] 2 times. Join. (42 sts)
Rnd 4 layout:
- Sts 1–4: heel (first part)
- Sts 5–13: side 1 (9 sts)
- Sts 14–25: toe end (12 sts)
- Sts 26–34: side 2 (9 sts)
- Sts 35–42: heel (second part)
Each end has 12 sts and each side has 9. 12 + 9 + 12 + 9 = 42. Fasten off.
Put a marker in st 13 and another in st 26. Checkpoint 2: 3.5 in x 1.75 in (8.9 cm x 4.4 cm).
Puffed Toe (Worked in Rows)
The toe is worked back and forth over the 14 sts from marker to marker: 1 side st, the 12 toe sts, and 1 more side st. Puff rows are worked on the RS. On the WS rows, you decrease once at each end so the toe narrows to a point.
Row 1 (RS): With RS facing, join pink with sl st in marked st 13. Ch 1, sc in same st, [puff in next st, sc in next st] 6 times, sc in marked st 26. Turn. (14 sts: 8 sc + 6 puffs)
Row 2 (WS): Ch 1, sc2tog, sc in next 10, sc2tog. Turn. (12 sts)
Row 3 (RS): Ch 1, sc in first st, [puff in next st, sc in next st] 5 times, sc in last st. Turn. (12 sts: 7 sc + 5 puffs)
Row 4: Ch 1, sc2tog, sc in next 8, sc2tog. Turn. (10 sts)
Row 5: Ch 1, sc in first st, [puff in next st, sc in next st] 4 times, sc in last st. Turn. (10 sts: 6 sc + 4 puffs)
Row 6: Ch 1, sc2tog, sc in next 6, sc2tog. Turn. (8 sts)
Row 7: Ch 1, sc in first st, [puff in next st, sc in next st] 3 times, sc in last st. Turn. (8 sts: 5 sc + 3 puffs)
Row 8: Ch 1, sc2tog, sc in next 4, sc2tog. (6 sts)
Fasten off. That gives 18 puffs in total (6 + 5 + 4 + 3), arranged as a little pyramid. Remove the markers.
Checkpoint 3: the body is now 5.25 in (13.3 cm) long and 1.75 in (4.4 cm) wide at its widest. Lay it flat. If the toe cups up a little, that’s normal, and blocking fixes it.
Border
Border gauge: the sc round follows the main gauge, 5 sts per 1 in (2.5 cm). In the puff round, each puff plus its ch-1 covers 2 sts, so you get about 2.5 puffs per 1 in (2.5 cm).
The border runs around four sections:
- Heel: Rnd 4 sts 35–42 and 1–4, 12 sts
- Side 1: Rnd 4 sts 5–12 plus 8 row ends of the toe
- Toe tip: the 6 sts of Row 8
- Side 2: 8 row ends of the toe plus Rnd 4 sts 27–34
Border Rnd 1 (sc): With RS facing, join pink with sl st in Rnd 4 st 1 (at the heel). Ch 1, sc in same st and next 3 sts (4 heel sts). Sc in next 8 side sts. Work 8 sc down the toe edge, 1 sc in each row end. Then 3 sc in first st of Row 8, sc in next 4, 3 sc in last st. Work 8 sc up the other toe edge, 1 in each row end. Sc in next 8 side sts, then sc in last 8 heel sts. Join to first sc.
Count: (50 sts worked 1 per existing st or row end) + (4 extra corner sts at the toe tip) = 54 sts
By section:
- Heel: 4 + 8 = 12
- Side 1: 8 + 8 = 16
- Toe tip: 6 worked + 4 extra = 10
- Side 2: 8 + 8 = 16
12 + 16 + 10 + 16 = 54.
Border Rnd 2 (puffs): Ch 1, puff in same st as join, ch 1, sk next st, [puff in next st, ch 1, sk next st] 26 times. Join to top of first puff. (27 puffs and 27 ch-1 sps)
By section: heel 6 puffs, side 1 8 puffs, toe tip 5 puffs, side 2 8 puffs. 6 + 8 + 5 + 8 = 27.
Border Rnd 3 (picot): Ch 1. [Sc in top of next puff, (sc, picot, sc) in next ch-1 sp] 27 times. Join to first sc. (81 sc and 27 picots)
By section: heel 6 picots, each side 8, toe tip 5. Fasten off.
Why the math works: Each section of Border Rnd 1 has an even count (12, 16, 10, 16), so the 2-st puff repeat divides evenly into every section. Puffs and picots therefore land the same way on both sides. The 4 extra sts at the toe tip turn the two sharp corners without cupping. Because of the 1:1 ratio on row ends, the edge won’t ruffle along the toe sides.
Hanging Loop
Find the center of the heel and join pink in the sc on top of the puff nearest to it. Ch 40, then sl st in the same sc to form a loop. Sl st in each ch around the loop to firm the cord (40 sl sts). Join and fasten off. Weave the tail down through the heel.
The loop stands about 2.5 in (6.4 cm) tall.
Pink Bow
With pink, ch 60 and fasten off, leaving short tails. Tie an overhand knot at each end so the tails end in small bobbles. Tie the chain into a bow around the base of the hanging loop, about 0.75 in (1.9 cm) above the heel picots.
The bow measures about 1.5 in (3.8 cm) wide. Add a stitch through the knot with the tail to secure it.
Taupe Toe Bow
With taupe, ch 55, fasten off, and knot each end the same way. Tie a bow with small loops. Center it on the toe over Rows 1–3, just below the pink frame. Tack the center knot, both loops, and both tails flat with taupe yarn so the knotted tails rest on the puffs.
The bow is about 1.5 in (3.8 cm) wide.
Final Blocking
- Weave in all remaining ends on the WS. Leave the bows for now.
- Lay the ornament RS up on the blocking mat.
- Mist it until damp, but not soaking.
- Pin the heel curve, the two sides, and the toe tip to 6.25 in x 2.75 in (15.9 cm x 7.0 cm).
- Put one pin in each picot along the sides so the edge looks crisp. Don’t flatten the puffs.
- Ease the toe tip into a soft rounded point.
- Let it dry completely, about 6–8 hours.
- Unpin, then sew or tie on the bows if you haven’t yet.
Final Quality-Control Checklist
- Taupe oval: 36 sts, no gaps at the ends
- Pink frame round: 42 sts, smooth all round
- Toe: 8 rows with 6, 5, 4, and 3 puffs, all on the RS
- Border Rnd 1: 54 sts. Rnd 2: 27 puffs. Rnd 3: 27 picots.
- Puffs line up symmetrically on both sides
- Size is 6.25 in x 2.75 in (15.9 cm x 7.0 cm)
- Loop is centered at the heel and firm
- Both bows are secure, and all tails end in knots
- No ends visible on the RS
Troubleshooting
The toe flares or ruffles. The puffs are too tall. Pull each loop up to only about 0.25 in (0.6 cm).
The oval ends cup into a bowl. You probably missed increases. Recount Rnds 2–4 against the listed totals.
The oval ends ripple. Your tension is loose at the ends. Go down a hook size for Rnds 2–4.
Puffs land unevenly around the border. Border Rnd 1 isn’t 54. Recount by section (12, 16, 10, 16) and fix the section that’s off.
The picot edge pulls in. Make the picot chains a little looser, or work them on a hook one size larger.
The loop twists. Block the loop flat, or work the sl st round more loosely.
The bow droops. Add one more tacking stitch through each bow loop.
Care
Hand wash in cool water with mild soap and press out the water in a towel. Lay flat to dry, reshaping the puffs and picots. Store flat between seasons.
Final Notes
The measurement chain is short and reliable:
- Taupe oval: 3.25 in x 1.25 in (8.3 cm x 3.2 cm)
- Pink frame: 3.5 in x 1.75 in (8.9 cm x 4.4 cm)
- Puffed toe: 5.25 in x 1.75 in (13.3 cm x 4.4 cm)
- Border adds 0.5 in (1.3 cm) on each edge, for a finished 6.25 in x 2.75 in (15.9 cm x 7.0 cm)
Check the oval before you add the toe, and check the 54-st count before the puff round. If both are right, everything after them will fall into place.
Make one for every little dancer you know, or hang a whole row of them on the tree.
Happy crocheting!