

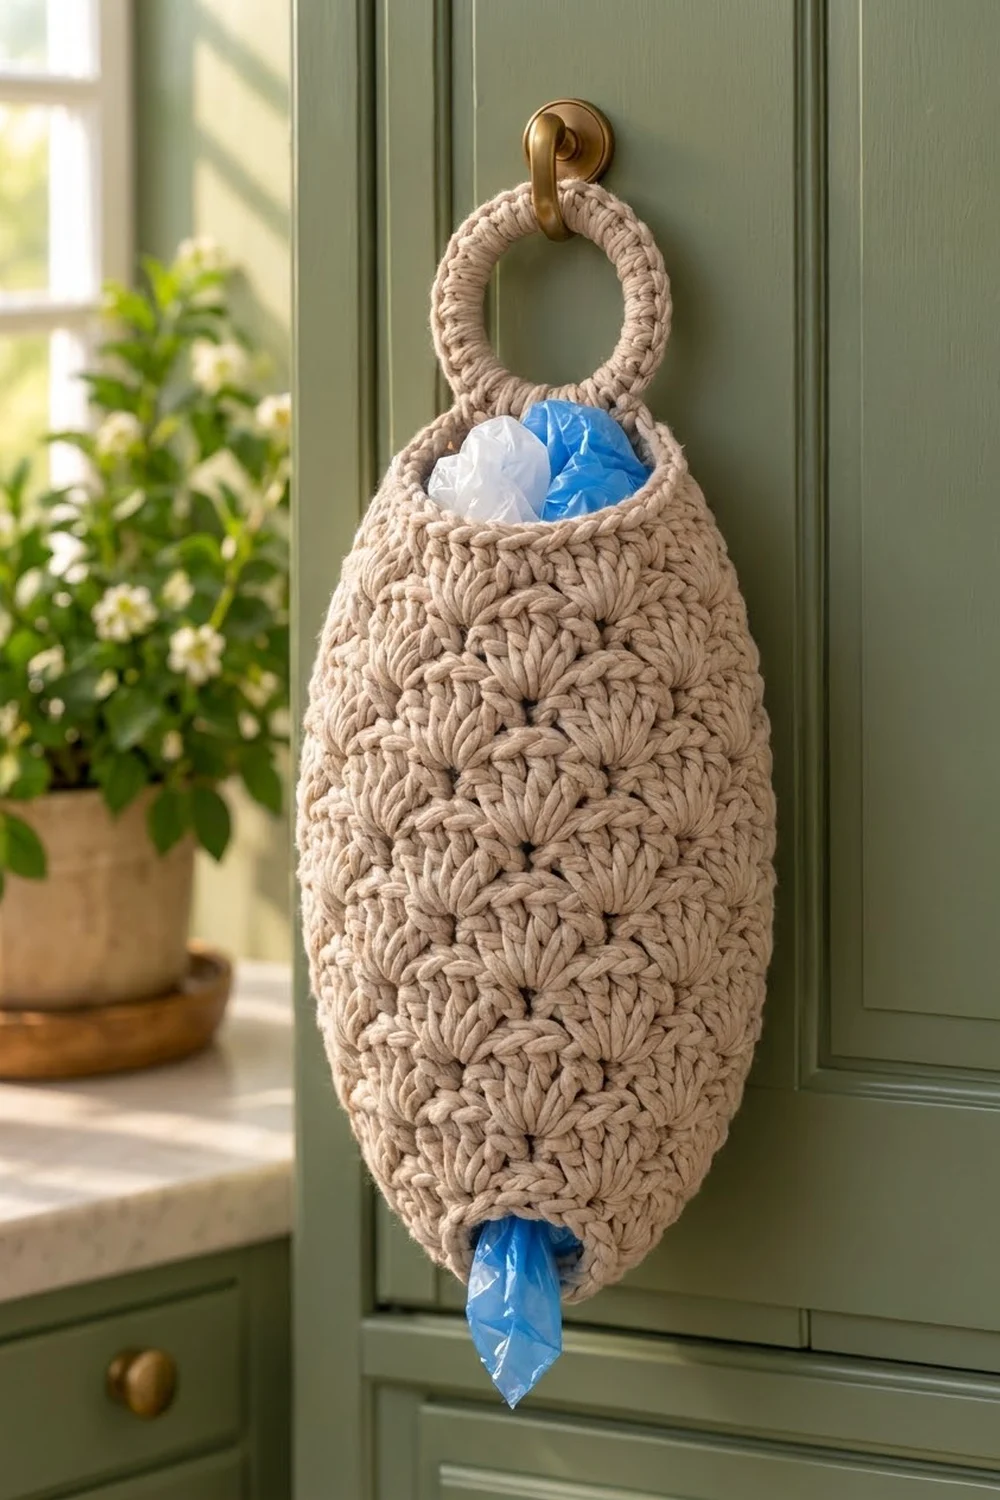
Plastic bags tend to pile up in a drawer. The Seashell Pod gives them a neat home: a soft, egg-shaped holder that hangs from a cabinet knob or hook. You push bags in at the top and pull them out one at a time through the small opening at the bottom.
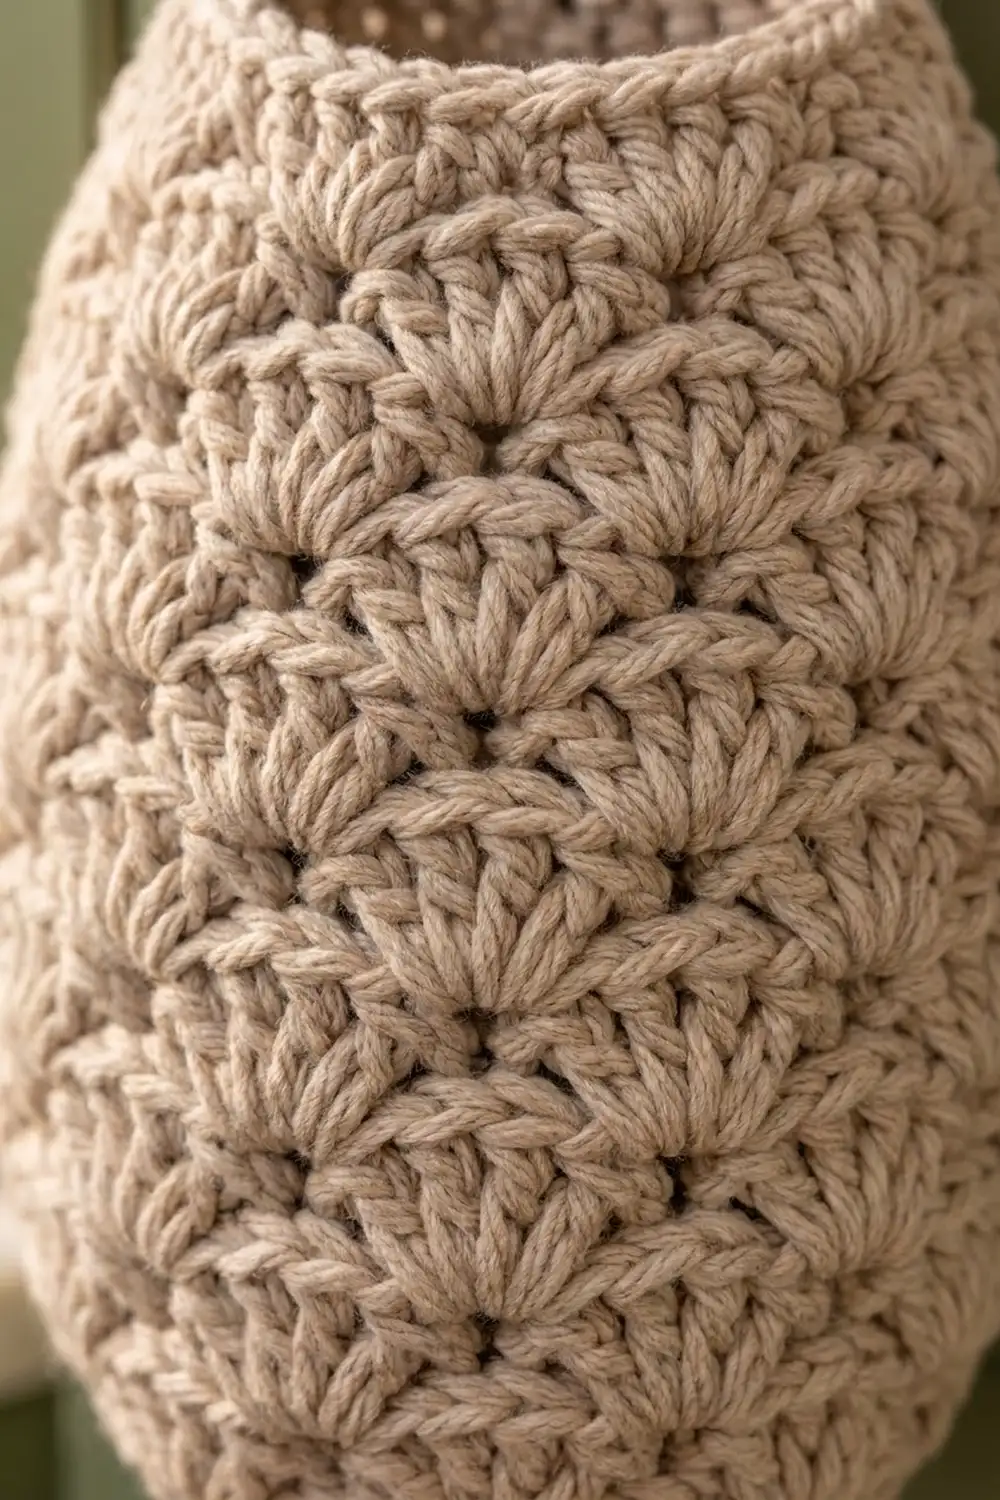
The holder is worked in one warm taupe shade. Offset shells cover the whole body. They are smaller at the top and bottom and fuller across the middle, so the piece looks rounded and relaxed rather than like a straight tube. A firm single crochet rim finishes the top, and a thick covered ring makes hanging easy.
This pattern uses US crochet terms. The finished holder is about 8 in (20.3 cm) wide when laid flat, 13.25 in (33.7 cm) tall for the body, and about 17.25 in (43.8 cm) long overall including the hanging ring.
Construction is simple. You work the body bottom-up in joined rounds: first a short single crochet band around the bottom opening, then shell rounds, then a single crochet rim. You cover a ring with single crochet and attach it with a small tab worked from the back of the rim. The finished item is one piece.
Finished Size and Construction
- Finished size: 8 in (20.3 cm) wide flat at the widest point; body 13.25 in (33.7 cm) tall; about 17.25 in (43.8 cm) overall with the ring
- Skill level: Easy / advanced beginner
- Terminology: US crochet terms
- Yarn weight: Bulky (#5)
- Hook: 6.0 mm (J-10)
- Number of pieces: 1 (body with an attached covered ring)
- Layout: Single piece, worked in joined rounds from bottom to top
- Piece size: 16 in (40.6 cm) around at the widest point; bottom opening about 2.5 in (6.4 cm) across; top opening about 3.4 in (8.6 cm) across
- Size before border: 12.25 in (31.1 cm) tall after the last shell round
- Border depth: 3 rim rounds, about 1 in (2.5 cm), plus 1 bottom edge round
Materials
Yarn: Choose a bulky (#5) cotton or cotton blend in a plied, round construction. Cotton keeps its shape when the holder is full and shows the shell texture clearly. Avoid very fuzzy yarn, because it hides the shells and catches on plastic bags.
- Taupe / oatmeal: 200 g, about 280 m
This amount includes a margin of roughly 15% for your gauge swatch and small differences in tension.
Tools:
- 6.0 mm (J-10) crochet hook
- One 3 in (7.6 cm) metal or plastic ring, such as a macramé ring
- 1 stitch marker
- Tapestry needle
- Scissors
- Tape measure
- A rolled towel or an inflated balloon for blocking
Abbreviations (US Terms)
- ch – chain
- sl st – slip stitch
- sc – single crochet
- dc – double crochet
- sk – skip
- st(s) – stitch(es)
- rnd(s) – round(s)
- rep – repeat
Special stitches:
- Small shell: 3 dc in the same stitch. The center dc is the 2nd dc.
- Large shell: 5 dc in the same stitch. The center dc is the 3rd dc.
Every shell round has 8 shells and 8 sc. The stitch count changes only when the shell size changes. That is how the egg shape is built.
Gauge and Checkpoints
Single crochet gauge: 12 sc and 13 rnds = 4 in (10.2 cm).
Shell gauge: 2 large-shell repeats (12 sts) = 4 in (10.2 cm) wide; 4 shell rnds = 3 in (7.6 cm) tall.
Make Rnds 1–6 first and treat them as your test piece. Then measure:
- After Rnd 3: The bottom opening measures 8 in (20.3 cm) around, which is about 2.5 in (6.4 cm) across. The edge of Rnd 3 measures 10.7 in (27.2 cm) around, or 5.3 in (13.5 cm) when laid flat.
- After Rnd 6: Laid flat, Rnd 6 measures about 8 in (20.3 cm) wide. The piece is about 3.25 in (8.3 cm) tall.
- After Rnd 16: Height is about 10.75 in (27.3 cm).
- After Rnd 18: Height is about 12.25 in (31.1 cm).
- After Rnd 21: Height is about 13.25 in (33.7 cm).
If your piece is too big, go down to a 5.5 mm (I-9) hook. If it is too small, go up to a 6.5 mm (K-10.5) hook. A difference of half an inch (1.3 cm) in flat width is fine, because the holder stretches when filled. Do not change the stitch counts. The shaping depends on 8 repeats in every round.
Pattern: Body
Bottom Opening Band
Foundation: Ch 24 and join with a sl st to the first ch to form a ring. Take care not to twist the chain.
Rnd 1: Ch 1, sc in each ch around, then join with a sl st to the first sc. (24 sts)
Rnd 2: Ch 1, sc in each st around, join. (24 sts)
Rnd 3 (growth round): Ch 1, sc in each of the next 2 sts, 2 sc in the next st; rep from * 8 times total, join. (32 sts)
Lower Small Shells
Rnd 4: Ch 1, sc in the first st, sk 1 st, small shell in the next st, sk 1 st, sc in the next st; rep from * 7 more times, but leave out the final sc on the last repeat. Join to the first sc. (8 small shells + 8 sc = 32 sts)
Each repeat uses 4 stitches of Rnd 3, so 8 repeats × 4 = 32.
Rnd 5: Ch 1, sk the first dc, sc in the center dc of the first shell. Sk 1 dc, small shell in the next sc, sk 1 dc, sc in the center dc of the next shell; rep from * 6 more times. Sk 1 dc, small shell in the first sc of the previous round (the sc you joined into), then join to the first sc. (8 small shells + 8 sc = 32 sts)
Each new shell sits on the sc between two shells below it. Each new sc sits in the center of a shell below it. This creates the offset fan pattern.
Large Shells (Body Width)
Rnd 6 (growth round): Ch 1, sk the first dc, sc in the center dc of the first shell. Sk 1 dc, large shell in the next sc, sk 1 dc, sc in the center dc of the next shell; rep from * 6 more times. Sk 1 dc, large shell in the first sc of the previous round, join. (8 large shells + 8 sc = 48 sts)
Rnds 7–16: Ch 1, sk the first 2 dc, sc in the center dc of the first shell. Sk 2 dc, large shell in the next sc, sk 2 dc, sc in the center dc of the next shell; rep from * 6 more times. Sk 2 dc, large shell in the first sc of the previous round, join. (48 sts in each round)
These 10 rounds make up the main belly of the holder. The join moves slightly to one side each round. That is normal, and the join should sit at the back.
Upper Small Shells
Rnd 17: Ch 1, sk the first 2 dc, sc in the center dc of the first shell. Sk 2 dc, small shell in the next sc, sk 2 dc, sc in the center dc of the next shell; rep from * 6 more times. Sk 2 dc, small shell in the first sc of the previous round, join. (8 small shells + 8 sc = 32 sts)
Rnd 18: Work as Rnd 5. (32 sts)
Checkpoint: The body is about 12.25 in (31.1 cm) tall and 5.3 in (13.5 cm) wide flat at the top edge. Do not fasten off.
Pattern: Covered Hanging Ring
With a separate length of yarn, make a slip knot on your hook. Hold the 3 in (7.6 cm) ring and work the sc around the ring by inserting the hook through the center of the ring each time.
Rnd 1: Work 44 sc around the ring and push the stitches together as you go so no ring shows. Join with a sl st to the first sc. (44 sts)
Fasten off and weave in the ends. The covered ring measures about 3.5 in (8.9 cm) across on the outside. If you can still see the ring, add 2 to 4 more sc before joining.
Make All Pieces / Joining
This is a single-piece design. There are no motifs to multiply or join. The ring is attached with the tab in the Border section.
Border: Top Rim, Bottom Edge, and Tab
Border gauge: 12 sc = 4 in (10.2 cm), the same as the bottom band.
Top Rim
Rnd 19 (conversion round): Ch 1, sc in each st around. That means one sc in each sc and one in each dc. Join. (32 worked 1-per-existing-stitch + 0 extra = 32 sts)
Rnd 20: Ch 1, sc in each st around, join. (32 sts)
Rnd 21: Ch 1, sc in each st around, join. (32 sts) Fasten off.
Why the math works: Rnd 18 has 32 stitches, which measures 10.7 in (27.2 cm) at shell gauge. The rim has 32 sc at 3 sts per inch, which is also 10.7 in (27.2 cm). Because the two measurements match, the rim neither flares nor pinches, and the top opening stays about 3.4 in (8.6 cm) across.
Bottom Edge
Edge Rnd: Join yarn to any remaining loop of the foundation chain. Ch 1, sc in each of the 24 remaining loops, then join. (24 worked 1-per-existing-stitch + 0 extra = 24 sts) Fasten off.
This round matches the 24 stitches of Rnd 1. It firms up the bottom opening so it holds bags in but still lets one pull through.
Hanging Tab
- Lay the body flat with the round joins at the back.
- Find the center 6 stitches of Rnd 21 on the back.
- Row 1: Join yarn in the first of these 6 sts, ch 1, sc in the same st and in the next 5 sts. (6 sts)
- Rows 2–5: Ch 1, turn, sc in each st across. (6 sts per row) The tab measures about 2 in (5.1 cm) wide and 1.5 in (3.8 cm) tall.
- Thread the tab through the covered ring from front to back. Fold it down inside the rim.
- Whipstitch the last row of the tab to the inside of Rnd 19, stitch for stitch, over the same 6 sts.
The folded tab holds the ring about 0.5 in (1.3 cm) above the rim.
Final Blocking
- Weave in all ends on the inside, going through at least 2 in (5.1 cm) of stitches.
- Soak the holder in cool water for 10 minutes, then gently press out the water. Don’t wring it.
- Roll it in a towel to remove extra moisture.
- Fill the body with a rolled towel, or put in a balloon and inflate it until the body measures 8 in (20.3 cm) flat across Rnds 6–16.
- Shape the bottom into a rounded taper and the top into a gentle curve leading into the rim.
- Gently pull each shell open so the fans spread evenly.
- Let it dry completely, then remove the towel or balloon.
Final Quality-Control Checklist
- 8 shells in every shell round, and every round fully joined
- Rnd 3 and Rnd 18 have 32 sts; Rnds 6–16 have 48 sts
- Body is 13.25 in (33.7 cm) tall and 8 in (20.3 cm) wide flat
- Bottom opening is about 2.5 in (6.4 cm) across
- Rim lies flat, with 32 sts in each rim round
- No ring shows through the cover
- Tab is centered at the back and sewn firmly
- All ends woven in securely
Troubleshooting
The shells lean in a spiral. The joins move slightly by design, but a strong lean usually means you skipped the wrong stitch. Always put the sc in the center dc.
The middle looks boxy rather than rounded. Block over a balloon. You can also go down half a hook size for Rnds 4–5 and 17–18.
Bags fall out of the bottom. Work the bottom edge round tighter, or add a second sc round.
The bottom opening is too tight. Use a larger hook for the foundation chain only.
The rim ruffles. Check that Rnd 19 has 32 sts and not more.
The tab pulls the rim out of shape. Sew it over exactly 6 sts, and don’t pull the whipstitches too tight.
Care
Hand wash in cool water and lay flat to dry, reshaping it while it is damp. Machine drying is not recommended, because cotton can shrink and lose its shape.
Final Notes
The measurement chain is simple:
- A 24-stitch opening of about 2.5 in (6.4 cm) across grows to 32 stitches.
- Small shells hold 32 stitches, then large shells widen the body to 48 stitches, 8 in (20.3 cm) flat.
- Small shells bring it back to 32 stitches.
- A 32-stitch rim matches the last shell round exactly.
- The body totals 13.25 in (33.7 cm), and the 3.5 in (8.9 cm) ring brings the overall length to about 17.25 in (43.8 cm).
Check your counts at each stage and the shape will come out right.
Happy crocheting!