

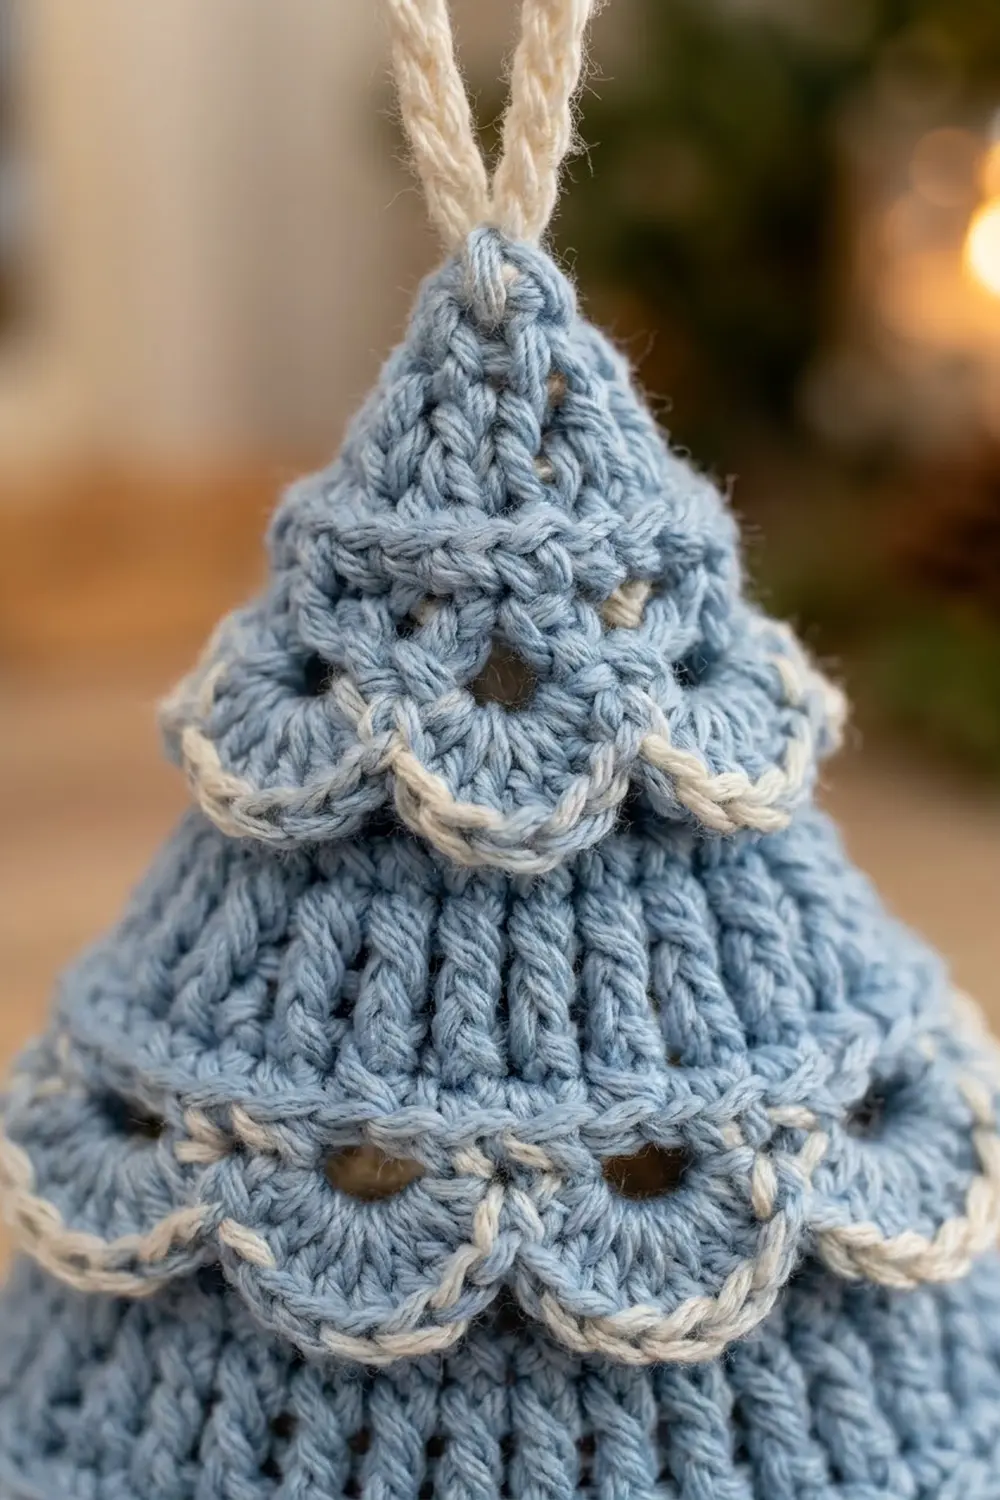
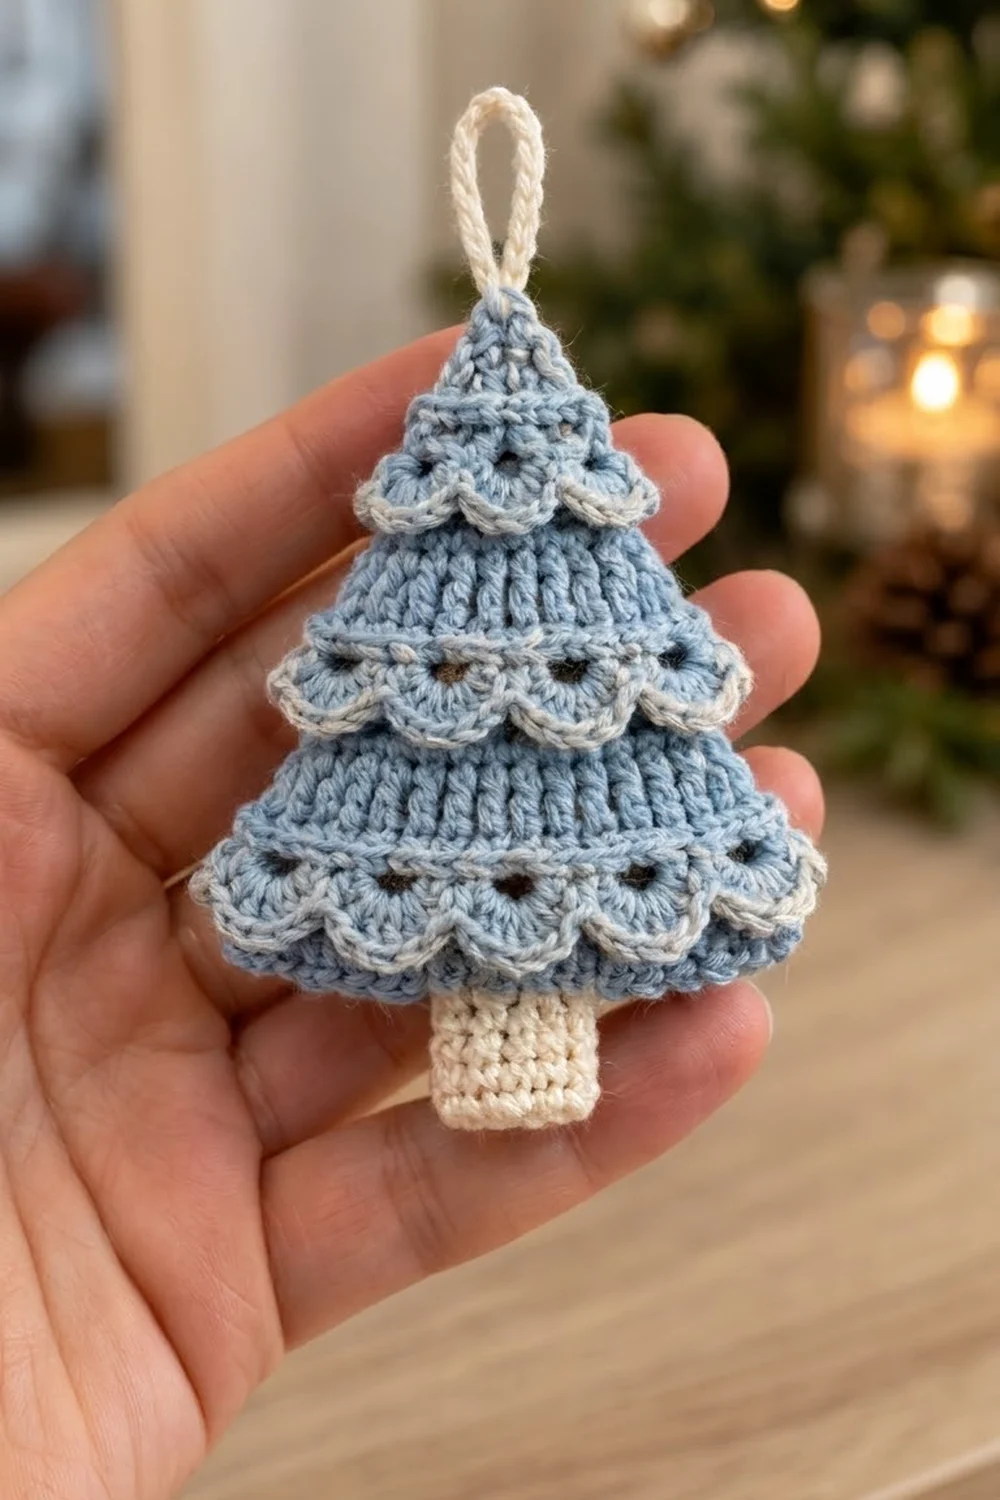
This little tree is made to hang from a rear-view mirror. It also works on a tree branch, a gift bag or a door handle. It is one flat, triangular piece in soft dusty blue, with three cream-edged scallop frills that layer down the front like snowy branches. A short cream trunk and a cream cord loop finish it off.
The look is quiet and wintry rather than bright. The body is made of plain double crochet bands, and two of them have a row of small eyelets near the top. Each scallop tier is worked into loops left free on the front of the tree. The fans lie over the rows below and give a layered look, but the piece stays flat.
This pattern uses US crochet terms. The finished tree measures 4.0 in (10.2 cm) wide at the base and 4.9 in (12.4 cm) tall from tip to trunk, not counting the hanging loop.
Construction is simple. You work the body in turned rows from the tip down, adding 2 stitches every row. Then you add a blue single crochet border, the three scallop tiers with their cream edging, the trunk and finally the hanging loop.
Finished Size and Construction
- Finished size: 4.0 in (10.2 cm) wide x 4.9 in (12.4 cm) tall, excluding loop
- Skill level: Easy-intermediate
- Terminology: US terms
- Yarn weight: Sport (#2), cotton or cotton blend
- Hook: 2.75 mm (US C-2)
- Number of pieces: 1
- Layout: One flat triangle with a trunk below and a loop at the tip
- Body size before border: 3.8 in (9.7 cm) wide x 3.7 in (9.4 cm) tall
- Border depth: about 0.1 in (0.3 cm) per edge
- Trunk: 1.2 in (3.0 cm) wide x 1.0 in (2.5 cm) tall
- Hanging loop: about 2.0 in (5.1 cm) tall when folded
Materials
Choose a smooth, mercerized or matte cotton in sport weight. Cotton keeps the scallops crisp and handles car heat and sunlight better than acrylic, which can go limp. Avoid fuzzy yarns, because they blur the eyelets and the cream outline.
- Color A, dusty light blue: 10 g, about 30 m
- Color B, cream: 5 g, about 15 m
Quantities include a margin of about 30 percent for a test piece and weaving in ends.
Tools:
- 2.75 mm (US C-2) crochet hook
- Tapestry needle
- Scissors
- 2 locking stitch markers
- Blocking mat and rust-proof pins
- Optional: spray starch or fabric stiffener
Abbreviations (US Terms)
- ch – chain
- sl st – slip stitch
- sc – single crochet
- dc – double crochet
- st(s) – stitch(es)
- sk – skip
- sp – space
- tch – turning chain
- RS / WS – right side / wrong side
- BLO / FLO – back loop only / front loop only
Special stitch – Shell: 5 dc in the same stitch or loop.
Free loops: On Rows 4, 7 and 10 you work into one loop only, so the unused loop of the row below stays on the RS face. These leftover loops on Rows 3, 6 and 9 are called “free loops,” and the scallop tiers are worked into them.
Gauge and Checkpoints
Gauge: 24 dc and 12 rows = 4 in (10.2 cm), in dc worked flat. That is 6 dc per inch and 3 rows per inch.
Instead of making a separate swatch, use Rows 1–6 of the body as your test piece. It is small enough to rip out and start over if needed.
Checkpoints (body, unblocked, measured flat):
- After Row 3: 7 sts wide = 1.2 in (3.0 cm); height 1.0 in (2.5 cm)
- After Row 6: 13 sts wide = 2.2 in (5.6 cm); height 2.0 in (5.1 cm)
- After Row 9: 19 sts wide = 3.2 in (8.1 cm); height 3.0 in (7.6 cm)
- After Row 11: 23 sts wide = 3.8 in (9.7 cm); height 3.7 in (9.4 cm)
Measure the width across the last row, not along the slanted sides.
If your tree is too big, go down to a 2.5 mm hook. If it is too small, go up to a 3.0 mm hook. If only the height is off, change how high you pull up the loops on your dc. Tall, loose dc make a long, skinny tree.
Tree Body
The turning ch-3 counts as a dc throughout. Row 1 is a WS row, so all even rows are RS rows.
Increase row (used on most rows): Ch 3, turn, dc in first st, dc in each st across to tch, 2 dc in top of tch. This adds 1 st at each edge.
Row 1 (WS): With A, ch 4, 2 dc in 4th ch from hook. The skipped ch count as the first dc. (3 sts)
Place a marker in the 4th ch from hook. This is the tip of the tree.
Row 2 (RS): Work increase row. (5 sts)
Row 3 (WS): Work increase row. (7 sts)
Row 4 (RS): Ch 3, turn, dc in BLO of first st, dc in BLO of each st across, 2 dc in BLO of top of tch. (9 sts) The front loops of Row 3 are now free on the RS.
Row 5 (WS, eyelets): Ch 3, turn, dc in first st, dc in next st, ch 1, sk next st, dc in next st; repeat from * 2 more times, 2 dc in top of tch. (11 sts: 8 dc + 3 ch-1 sps)
Row 6 (RS): Work increase row, with 1 dc in each ch-1 sp. (13 sts)
Row 7 (WS): Ch 3, turn, dc in FLO of first st, dc in FLO of each st across, 2 dc in FLO of top of tch. (15 sts) Because you are on the WS, the loops left free on Row 6 face the RS.
Row 8 (RS, eyelets): Ch 3, turn, dc in first st, dc in next st, ch 1, sk next st, dc in next st; repeat from * 5 more times, 2 dc in top of tch. (17 sts: 11 dc + 6 ch-1 sps)
Row 9 (WS): Work increase row, with 1 dc in each ch-1 sp. (19 sts)
Row 10 (RS): Work as Row 4, in BLO. (21 sts) The free loops of Row 9 now sit on the RS.
Row 11 (WS): Work increase row. (23 sts)
Do not fasten off. Check the Row 11 checkpoint before moving on.
Border
Border gauge: 6 sc per inch, the same as the body stitch gauge.
Border Round (RS): Ch 1, turn so the RS faces you.
- Bottom edge: 3 sc in first st, sc in next 21 sts, 3 sc in last st.
- First slanted side: Work into the row ends from Row 11 up to Row 1. Work 2 sc in each row end, except 3 sc in the row ends of Rows 3, 6 and 9. (25 sc)
- Tip: (sc, ch 2, sc) in the marked tip ch.
- Second slanted side: Work down from Row 1 to Row 11 with the same spacing. (25 sc)
- Sl st to the first sc. Fasten off A.
Counts per side. The center sc of each 3-sc group is a bottom corner stitch. The tip sc on each side counts as that side’s top corner stitch.
- Bottom side: 1 corner + 1 + 21 + 1 + 1 corner = 25 sc
- Each slanted side: 1 bottom corner + 1 + 25 + 1 tip sc = 28 sc
- Round total: 27 sc on the bottom row + 50 sc in row ends + 2 tip sc = 79 sc, plus the ch-2 tip sp
Check: 25 + 28 + 28 = 81. Subtract the 2 bottom corners that were counted twice, and you get 79.
Why the math works. Each dc row is 1/3 in tall, but the slanted edge also steps outward 1/6 in per row. That makes each row end a little longer than the stitch is tall. The slanted side measures about 4.1 in (10.4 cm), so at 6 sc per inch it needs about 25 sc. Only 22 sc (2 per row) would pull the edge in and make the tree cup. The 3 extra sc at Rows 3, 6 and 9 bring each side to 25 and keep the edges flat.
Checkpoint: 4.0 in (10.2 cm) wide x 3.9 in (9.9 cm) tall.
Scallop Tiers
Work all tiers with the RS facing and the tip pointing up, moving from right to left along the free loops.
Scallop row (any tier): Join A with sl st in first free loop, sk next free loop, shell in next free loop, sl st in next free loop; repeat from * across.
Cream edging (any tier): Join B with sl st in first sl st, sc in first 2 dc of shell, 2 sc in center dc, sc in last 2 dc, sl st in next sl st; repeat from * across. Fasten off. Each shell gets 6 sc.
Tier 1 (free loops of Row 3, 7 loops): Scallop row: 2 shells, 3 sl sts. Cream edging: 12 sc, 3 sl sts.
Tier 2 (free loops of Row 6, 13 loops): Scallop row: 4 shells, 5 sl sts. Cream edging: 24 sc, 5 sl sts.
Tier 3 (free loops of Row 9, 19 loops): Scallop row: 6 shells, 7 sl sts. Cream edging: 36 sc, 7 sl sts.
Each repeat uses 3 loops, plus 1 loop for the starting sl st. So each row needs a multiple of 3 plus 1, and 7, 13 and 19 all fit exactly.
Press each tier down with your fingers so the fans overlap the rows below. The fans hang about 0.3 in (0.8 cm) below their base row. Tier 3 sits just above the bottom border, and the eyelets on Rows 5 and 8 show just above Tiers 2 and 3.
Trunk
With the RS facing, count along the 25 sts of the bottom side. Starting at a corner sc, skip 9 sts.
Row 1: Join B in the 10th st, ch 1, sc in same st and next 6 sts. (7 sc) This leaves 9 sts free on each side: 9 + 7 + 9 = 25.
Rows 2–5: Ch 1, turn, sc in each st across. (7 sc)
Fasten off. The trunk measures 1.2 in (3.0 cm) wide x 1.0 in (2.5 cm) tall.
Hanging Loop
Join B with sl st in the ch-2 tip sp. Ch 40, which is about 4 in (10.2 cm). Sl st in the same tip sp. Turn, sl st in each ch back around the loop, then sl st in the tip sp again. (40 sl sts) Fasten off.
This makes a firm cord loop about 2.0 in (5.1 cm) tall. Weave in all ends on the WS, hiding each one in stitches of the same color.
Final Blocking
- Mist the tree lightly with water until it is damp but not soaked.
- Lay it RS up on the blocking mat.
- Pin the tip and the two bottom corners so the tree measures 4.0 in (10.2 cm) across the base and 3.9 in (9.9 cm) from tip to bottom edge.
- Pin the trunk straight down and centered, 1.0 in (2.5 cm) long.
- Shape each fan with your fingertips and flatten it over the row below. Don’t pin through the fans, because that leaves dents.
- Spray with starch or stiffener if you want a crisper hanger.
- Let it dry fully before unpinning, usually 4–6 hours.
Final Quality-Control Checklist
- Row 11 of the body has 23 sts and measures 3.8 in (9.7 cm) wide before the border.
- The border has 79 sc plus the ch-2 tip sp.
- Each slanted side has 25 sc in row ends and lies flat without cupping or rippling.
- The tiers have 2, 4 and 6 shells, each outlined with 6 cream sc.
- Rows 5 and 8 show 3 and 6 evenly spaced eyelets.
- The trunk is centered, with 9 border sts free on each side.
- The hanging loop is firmly anchored in the tip sp.
- The finished tree is 4.0 in (10.2 cm) x 4.9 in (12.4 cm), not counting the loop.
- All ends are woven in on the WS.
Troubleshooting
Tree leans or twists: You probably missed an increase at one edge. Count each row. Every row should have 2 sts more than the one before.
Scallops are on the back: You used the wrong loop on Row 4, 7 or 10. Rows 4 and 10 use BLO on the RS, and Row 7 uses FLO on the WS.
Sides ripple: Your row-end sc are too loose, or you added extra sc. Keep exactly 25 per side.
Sides cup inward: Your border is too tight. Check that you worked 3 sc into the row ends of Rows 3, 6 and 9, or go up a hook size for the border.
Fans flip upward: Mist them, press them down and let them dry flat. A light spray of starch holds them in place.
Eyelets are uneven: Make each ch-1 the same size as the top of a dc, and work exactly 1 dc into each ch-1 sp on the next row.
Trunk is off-center: Count 9 sts from the corner sc again before joining.
Care
Hand wash in cool water with mild soap, then reshape and dry flat. Re-block if the fans start to droop, and expect some fading if the tree hangs in direct sun for a long time.
Final Notes
Every measurement in this tree builds on the one before it. A gauge of 6 dc and 3 rows per inch gives a body of 23 sts and 11 rows, which is 3.8 in (9.7 cm) wide and 3.7 in (9.4 cm) tall. The 79-sc border, with 25 row-end sc on each slanted side, brings it to 4.0 in (10.2 cm) by 3.9 in (9.9 cm). The 7-st trunk adds 1.0 in (2.5 cm), for a finished tree 4.9 in (12.4 cm) tall. Check each stage, and the scallops, eyelets and trunk will line up on their own.
Happy crocheting!