

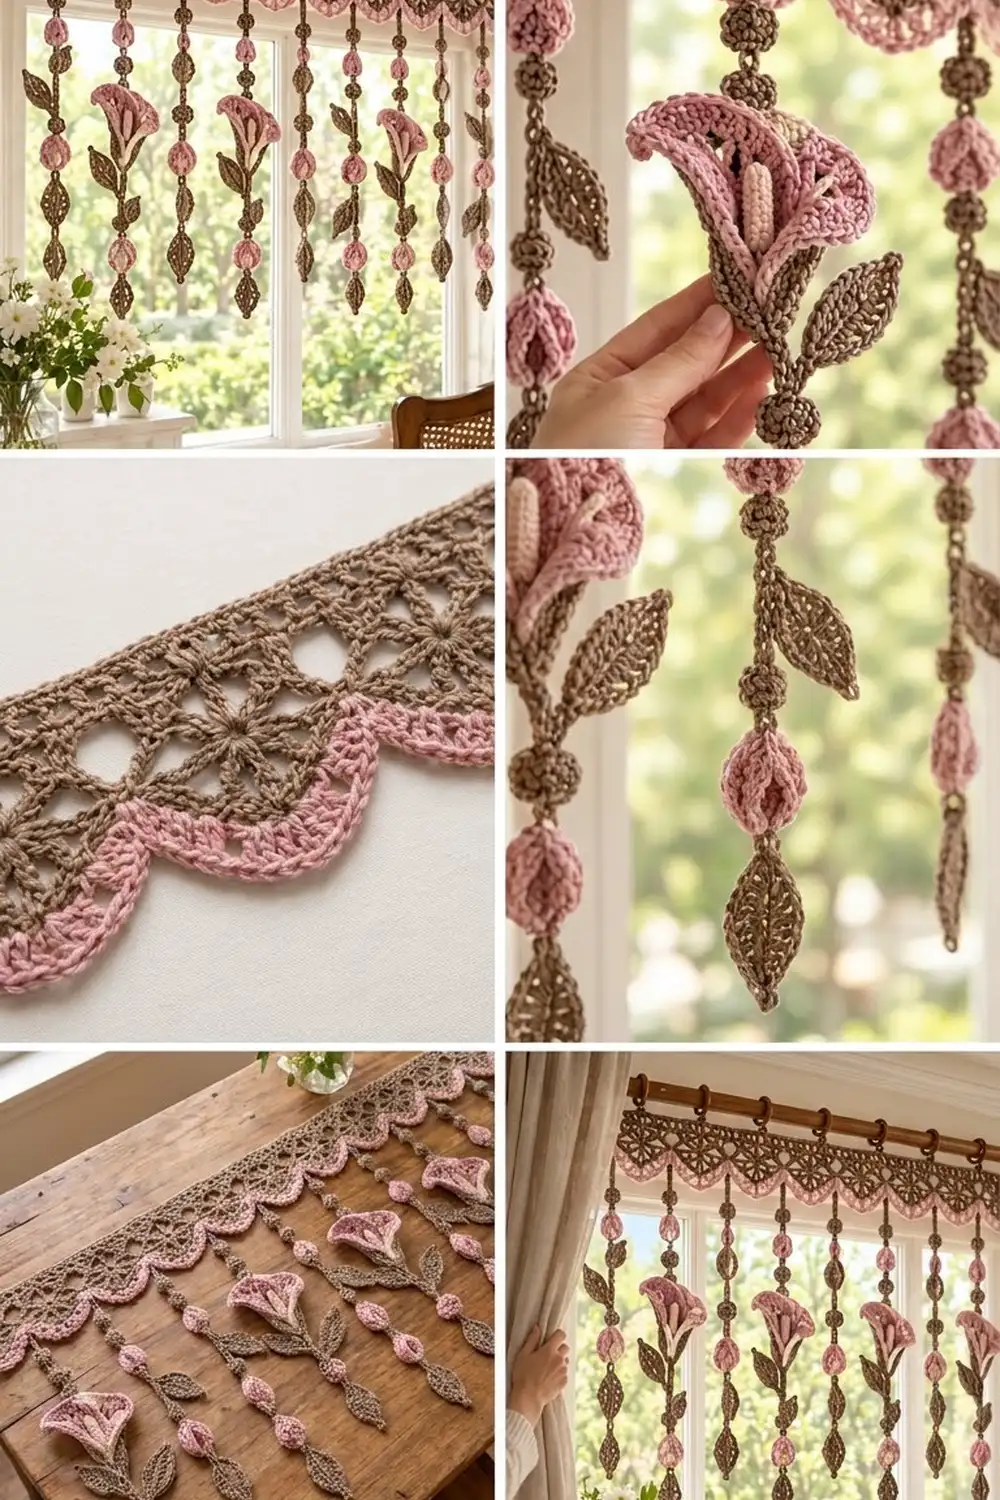
The Rosewood Calla Window Valance is a lace header band with nine strands hanging from it. The header is a row of lace motifs with star-flower centers in warm taupe-brown, finished with a dusty-rose scalloped edge. Below each scallop hangs a strand of brown balls, pink buds, and leaves. Four of the strands also carry a calla lily with a cream spadix.
The colors are soft and earthy: mocha brown, dusty rose, and a touch of cream. With light behind it, the lace looks almost vintage, and the lilies give it a gentle botanical feel without looking busy.
This pattern uses US crochet terms. The finished valance is 36.5 in (92.7 cm) wide. The header is 5.5 in (14.0 cm) deep at the scallop peaks, and the strands hang 18 in (45.7 cm) below it, for a total drop of 23.5 in (59.7 cm).
Construction overview: you make nine square motifs and join them into one strip, then work a border all the way around. Next you add a two-row pink scallop trim to the bottom edge. Finally, you make the small parts (balls, buds, leaves, and lilies), put together nine strands, and sew one to the center of each scallop.
Finished Size and Construction
- Finished size: 36.5 in x 5.5 in (92.7 cm x 14.0 cm) header; 23.5 in (59.7 cm) total drop
- Skill level: Intermediate
- Terminology: US
- Yarn weight: DK (#3) cotton or cotton blend
- Hook: 4.0 mm (G-6)
- Number of pieces: 9 header motifs, 9 strands (36 balls, 23 buds, 27 leaves, 4 lilies)
- Layout: 9 motifs in one row (9 x 1)
- Motif size: 4 in (10.2 cm) square
- Strip size before border: 36 in x 4 in (91.4 cm x 10.2 cm)
- Border depth: 0.25 in (0.6 cm) on the top and sides; 1.25 in (3.2 cm) on the bottom at the scallop peaks
Materials
Choose a smooth, mercerized or matte DK cotton. Cotton holds the scallops and lily shapes well and won’t sag in sunlight the way acrylic can. The quantities below assume about 2.5 m per gram (125 m per 50 g).
- Color A, taupe-brown: 200 g (500 m) for the motifs, border round, cords, balls, leaves, and calyxes
- Color B, dusty rose: 110 g (275 m) for the scallop trim, buds, and lily spathes
- Color C, cream: 10 g (25 m) for the spadixes
All quantities include about a 15% margin.
Tools:
– 4.0 mm (G-6) crochet hook
– Tapestry needle with a large eye
– Stitch markers
– Small amount of polyester fiberfill
– 10 clip curtain rings
– Blocking mats, rust-proof pins, and a spray bottle
– Optional: fabric stiffener for the lilies
– Scissors and a tape measure
Abbreviations (US Terms)
- ch – chain
- sl st – slip stitch
- sc – single crochet
- hdc – half double crochet
- dc – double crochet
- tr – treble crochet
- sc2tog – single crochet 2 together
- BLO – back loop only
- sp(s) – space(s)
- st(s) – stitch(es)
- MR – magic ring
- RS / WS – right side / wrong side
Special technique: chain cord. Make a chain to the stated length. Then, starting in the 2nd ch from the hook, sl st into the back bump of each ch to the end. This gives a firm, non-stretch cord.
Gauge and Checkpoints
The gauge to match is 17 sc = 4 in (10.2 cm), measured on Round 5 of the motif.
Make one motif and block it before you make the rest. Measure at each round:
- Round 1: 1.25 in (3.2 cm) across
- Round 2: 2 in (5.1 cm) across
- Round 3: 2.75 in (7.0 cm) square
- Round 4: 3.5 in (8.9 cm) square
- Round 5: 4 in (10.2 cm) square
If your blocked motif is larger than 4.25 in (10.8 cm), go down 0.5 mm in hook size. If it’s smaller than 3.75 in (9.5 cm), go up 0.5 mm. Even a small difference adds up over nine motifs: being 0.25 in (0.6 cm) off per motif changes the strip width by 2.25 in (5.7 cm).
Header Motif (Make 9, Color A)
Round 1: MR, ch 3 (counts as dc), 15 dc in ring; join with sl st to top of ch-3. (16 dc)
Round 2: Ch 1, sc in same st, ch 5, sk next st, sc in next st, ch 5, sk next st 7 times; join to first sc. (8 sc, 8 ch-5 sps)
This round makes the star-flower center.
Round 3: Sl st into first ch-5 sp, ch 3 (counts as dc), (2 dc, ch 3, 3 dc) in same sp for the corner, ch 1, 3 dc in next sp, ch 1, (3 dc, ch 3, 3 dc) in next sp, ch 1, 3 dc in next sp, ch 1 3 times; join to top of ch-3. (36 dc, 4 ch-3 corner sps, 8 ch-1 sps)
Round 4: Sl st in next 2 dc and into the corner sp, ch 3, (2 dc, ch 3, 3 dc) in same sp, ch 1, (3 dc in next ch-1 sp, ch 1) twice, (3 dc, ch 3, 3 dc) in next corner sp, ch 1, (3 dc in next ch-1 sp, ch 1) twice 3 times; join. (48 dc, 4 ch-3 corner sps, 12 ch-1 sps)
Each side now has 12 dc and 3 ch-1 sps between its corner spaces.
Round 5: Ch 1, sc in same st as join. Sc in each dc and each ch-1 sp to the corner, then work (sc, ch 2, sc) in the corner sp. Repeat around and join. (68 sc, 4 ch-2 corner sps)
Per-side count: 17 sc. This is 1 corner sc + 12 dc + 3 sps + 1 corner sc, and it already includes both corner stitches. 4 sides x 17 = 68.
Fasten off, leaving a 12 in (30.5 cm) tail on four of the motifs to use for joining. Block every motif to 4 in (10.2 cm) square before joining.
Make All Pieces
Color A: 9 motifs, 9 cords, 36 balls, 27 leaves, 4 calyxes
Color B: 23 buds, 4 spathes
Color C: 4 spadixes
Header layout (1 row, left to right):
[M1][M2][M3][M4][M5][M6][M7][M8][M9]
 A   B   A   B   A   B   A   B   A     <- strand below each motif
A = bead-and-leaf strand (5 total); B = calla lily strand (4 total).
Ball (Make 36, Color A)
Rnd 1: 6 sc in MR. (6)
Rnd 2: 2 sc in each st. (12)
Rnds 3–4: Sc in each st. (12)
Stuff firmly.
Rnd 5: Sc2tog 6 times. (6)
Close the hole and weave in the end. The ball is about 0.75 in (1.9 cm) across.
Bud (Make 23, Color B)
Rnd 1: 6 sc in MR. (6)
Rnd 2: (Sc in next st, 2 sc in next st) 3 times. (9)
Rnd 3: (Sc in next 2 sts, 2 sc in next st) 3 times. (12)
Rnd 4: Sc in each st. (12)
Stuff the bud.
Rnd 5: (Sc in next st, sc2tog) 4 times. (8)
Rnd 6: Sc2tog 4 times. (4)
Close the hole. The bud is 1 in (2.5 cm) long, and the slow increases at the start give it a pointed tip.
Leaf (Make 27, Color A)
Ch 11.
Side 1: Sc in 2nd ch from hook, hdc in next ch, dc in next 2 ch, tr in next 2 ch, dc in next 2 ch, hdc in next ch, (sc, ch 2, sc) in last ch for the tip.
Side 2: Rotate the work and continue along the other side of the foundation chain: hdc in next ch, dc in next 2 ch, tr in next 2 ch, dc in next 2 ch, hdc in next ch, sc in last ch. Join to first sc. (20 sts + ch-2 tip)
With a long tail of Color A, sl st along the center from the base to the tip on the surface of the leaf to make the vein. The leaf is 2.25 in (5.7 cm) long and 1 in (2.5 cm) wide.
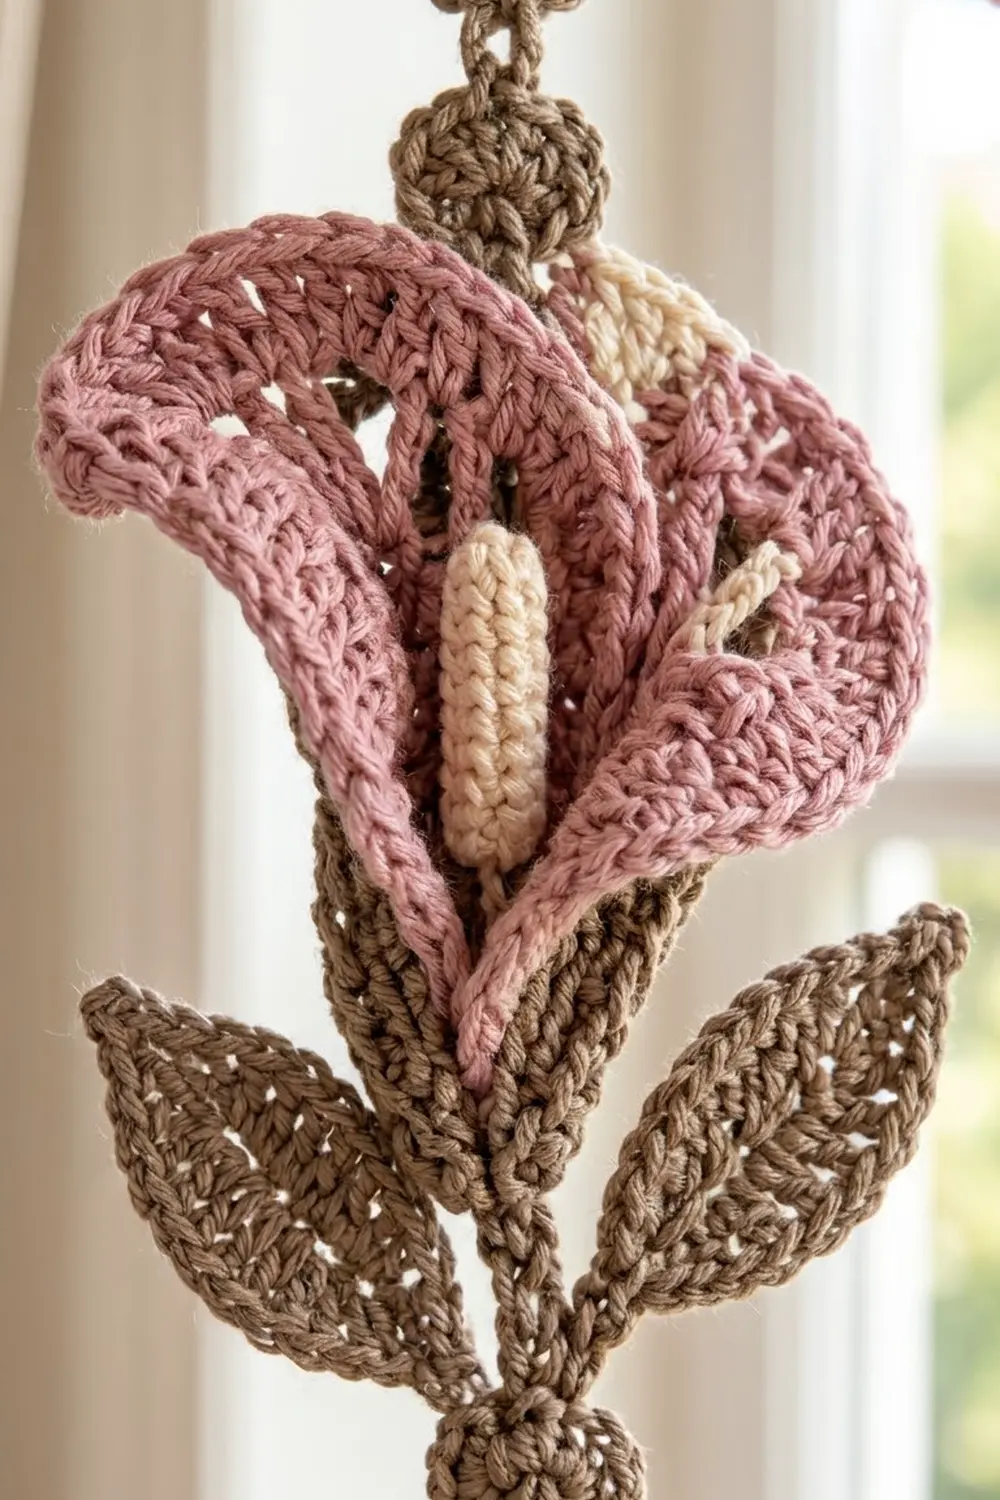
Calla Lily (Make 4)
Spathe (Color B): Ch 13.
Row 1: Dc in 4th ch from hook and in each ch across, turn. (11 dc, counting the skipped chains as 1 dc)
Row 2: Ch 3 (counts as dc), dc in first st, dc in next 9 sts, 2 dc in top of turning ch, turn. (13 dc)
Row 3: Ch 4 (counts as dc + ch 1), dc in next st, ch 1 11 times, dc in last st, turn. (13 dc, 12 ch-1 sps)
This mesh row gives the spathe its lacy body.
Row 4: Ch 3, dc in first st, dc in next ch-1 sp, dc in next dc 11 times, dc in last ch-1 sp, 2 dc in 3rd ch of turning ch, turn. (27 dc: 25 worked one per st/sp + 2 increases)
Row 5 (lip): Ch 1, sc in first 3 sts, hdc in next 3, dc in next 4, tr in next 3, (tr, ch 3, tr) in next st, tr in next 3, dc in next 4, hdc in next 3, sc in last 3, turn. (27 worked one per st + 1 added = 28 sts + ch-3 point)
Row 6 (edge): Ch 1, sc in next 14 sts, (2 sc, ch 2, 2 sc) in ch-3 sp, sc in last 14 sts. (32 sc + ch-2 point)
Fasten off.
Spadix (Color C):
Rnd 1: 5 sc in MR. (5)
Rnds 2–8: Working in BLO, sc in each st. (5)
Working in BLO makes the small ridges. Stuff lightly. The spadix is 1.75 in (4.4 cm) long.
Calyx (Color A):
Rnd 1: 6 sc in MR. (6)
Rnd 2: (Sc in next st, 2 sc in next st) 3 times. (9)
Rnd 3: (Sc in next 2 sts, 2 sc in next st) 3 times. (12)
Rnd 4: (Sc in next 3 sts, 2 sc in next st) 3 times. (15)
Rnd 5: Sc in each st. (15)
Rnd 6: Sc in next 2 sts, (hdc, dc, ch 2, dc, hdc) in next st, sc in next 2 sts 3 times. (15 worked one per st + 9 added = 24 sts + 3 ch-2 points)
Assembly:
1. With the RS facing out, roll the spathe so that the two row-end edges overlap at the front bottom and the pointed lip sits at the back.
2. Sew the bottom 1 in (2.5 cm) of the overlap closed.
3. Push the spadix into the cone and stitch its base to the inside bottom of the cone.
4. Set the cone into the calyx and sew around the calyx’s Round 5.
The finished lily is about 3 in (7.6 cm) tall and 2.5 in (6.4 cm) across the opening.
Cords (Make 9, Color A)
Make a chain cord about 80 ch long. Adjust the count until the relaxed cord measures 18 in (45.7 cm). Leave a 6 in (15.2 cm) tail at the top for attaching.
Strand Assembly
Thread each part onto its cord through its center with the large-eye needle, then secure it with two small stitches at the top and bottom. Place end leaves so the cord runs up the back of the leaf, with the leaf tip at the bottom end of the cord.
Strand A (make 5), working from the top down:
1. Leave 0.75 in (1.9 cm) of bare cord.
2. Ball, bud, ball, leaf, bud, ball, leaf, bud, ball, end leaf.
3. Leave 0.5 in (1.3 cm) of bare cord between parts.
Check: 3 in (balls) + 3 in (buds) + 6.75 in (leaves) + 0.75 in + 9 gaps x 0.5 in = 18 in (45.7 cm).
Strand B (make 4), working from the top down:
1. Leave 0.75 in (1.9 cm) of bare cord.
2. Ball, bud, ball, lily, ball, bud, ball, end leaf.
3. Leave 1 in (2.5 cm) between parts.
4. In the gap just below the lily, sew two leaves to the cord, angled out about 45 degrees on each side.
Check: 3 + 2 + 3 + 2.25 + 0.75 + 7 x 1 = 18 in (45.7 cm).
Joining
Hold two blocked motifs RS together with their edges matched. Using Color A, work sl sts through both loops of both layers:
– 1 sl st in the corner ch-2 sp
– 17 sl sts, matching st to st
– 1 sl st in the next corner ch-2 sp
Each stitch of one motif is joined to the stitch opposite it, so the seam lies flat on the WS and adds no stitches to the long edges. Continue until all nine motifs are joined in a row, M1 to M9.
Keep the tension relaxed and even. Tight slip stitches pull the strip in, and loose ones let the seams gape. After joining, the strip should measure 36 in x 4 in (91.4 cm x 10.2 cm). If it’s shorter, rework the tightest seams with a larger hook.
Border
Border gauge is the same as the motif: 17 sc = 4 in (10.2 cm).
Starting counts:
– Long side: 9 motifs x 17 sts = 153 sts
– Short side: 17 sts
Corner stitches are already included in these counts, and the seams add nothing.
Round 1 (Color A, all the way around): With the RS facing, join yarn at the top right corner. Sc in each st around. Do not work into the ch-2 sps at the seams, which were used up in the joining. At each of the 4 outer corner ch-2 sps, work 1 sc. Join.
(153 + 17 + 153 + 17 worked one per st, + 4 corner sc = 344 sc)
Fasten off. The bottom edge now has 155 sts from corner sc to corner sc: 1 + 153 + 1.
Row 2 (Color B, bottom edge only, scallops): With the RS facing, join in the bottom right corner sc and sc in it. Then, for each of the 9 motifs, work across its 17 sts as follows:
sl st in st 1, sc in st 2, hdc in st 3, dc in sts 4–5, 2 dc in st 6, tr in st 7, 2 tr in st 8, 3 tr in st 9, 2 tr in st 10, tr in st 11, 2 dc in st 12, dc in sts 13–14, hdc in st 15, sc in st 16, sl st in st 17
Each scallop is 17 worked one per st + 6 added = 23 sts. Finish with sc in the last corner sc, turn.
(1 + 9 x 23 + 1 = 209 sts)
Row 3 (Color B): Ch 1, sc in each st across, including the sl sts. (209 sc)
Fasten off.
Why the math works: Round 1 is worked one stitch for each motif stitch, so every block of 17 border stitches sits exactly under one motif. Each scallop is centered on its motif, and the center of each scallop is the 12th of its 23 stitches. The top edge and sides are 0.25 in (0.6 cm) deep. The bottom edge is 1.25 in (3.2 cm) deep at the peaks. The finished header is 36.5 in x 5.5 in (92.7 cm x 14.0 cm).
Attach the strands: Sew the top of each cord to the 12th sc of each scallop in Row 3, following the A/B layout above.
Final Blocking
- Lightly mist the header and pin it to 36.5 in x 5.5 in (92.7 cm x 14.0 cm).
- Pin each scallop peak so it points straight down, then pin the star centers open.
- Lay the strands out straight below the header and pin the leaf tips flat.
- Shape each lily cone around a rolled tube of paper. If you’d like a crisper lily, brush on fabric stiffener.
- Let everything dry completely, usually 12–24 hours.
- Clip 10 rings along the top edge: one at each top corner and one at each of the 8 seams.
Final Quality-Control Checklist
- [ ] Every motif is 4 in (10.2 cm) square with 17 sc per side
- [ ] The joined strip is 36 in (91.4 cm) long
- [ ] Border Round 1 has 344 sc
- [ ] Scallop Rows 2 and 3 each have 209 sts, with 9 even scallops
- [ ] Each strand is 18 in (45.7 cm) long
- [ ] Strands alternate A/B/A, starting and ending with A
- [ ] Each lily’s spadix is centered and its calyx is sewn securely
- [ ] All ends are woven in and the clip rings are evenly spaced
Troubleshooting
Motif corners curl. Your Round 3 or Round 4 tension is tight. Go up 0.5 mm in hook size for those rounds only.
The strip ripples after joining. The slip stitches are too loose. Rework the seam with a smaller hook.
Scallops are lopsided. You’ve probably miscounted 17 sts. Place a marker at each seam before starting Row 2.
The lily won’t hold its cone shape. Sew a little higher up the overlap, or use stiffener.
Strands twist. Steam the cords lightly, then let them hang with a small weight at the bottom while they dry.
Balls look lumpy. Use smaller pinches of fiberfill and add it a little at a time.
Care
Remove the clip rings, hand wash in cool water with mild soap, and press out the water in a towel. Re-block flat so the scallops and lilies dry in shape.
Final Notes
Here is the measurement chain from start to finish:
- A 4 in (10.2 cm) motif with 17 sc per side.
- Nine motifs joined into a 36 in (91.4 cm) strip, giving 153 stitches along each long side.
- Border Round 1 brings the width to 36.5 in (92.7 cm).
- Nine 23-stitch scallops bring the header depth to 5.5 in (14.0 cm).
- Nine strands of 18 in (45.7 cm) give a total drop of 23.5 in (59.7 cm).
If each checkpoint matches, the valance will hang straight, even, and balanced.
Happy crocheting!