

The Fernwood Lace Tier Tree is a flat Christmas tree wall hanging made in one piece. Four tiers of open, airy mesh step out toward the bottom, and each tier ends in a soft band of shell scallops. A solid brown trunk peeks out from under the lowest tier. A small loop at the tip lets you hang the tree on a wall, a door or a branch.
The colors are quiet and woodsy: deep olive green for the lace, light sage for the scallops and chocolate brown for the trunk. The dark mesh shows through and the light scallops sit on top, so the tree looks layered even though it’s only one layer of fabric.
This pattern uses US crochet terms. The finished tree measures about 8.5 in (21.6 cm) wide by 8.6 in (21.8 cm) tall without the loop, or 9.8 in (24.9 cm) tall with the loop.
You work the tree from the top down in turned rows, starting from a small ring at the tip. Each tier has three mesh rows and a solid base row. You work the sage scallop band into the front loops of that base row, and the next tier into its back loops. You then work the trunk down from the center of the last base row and edge it in single crochet.
Finished Size and Construction
- Finished size: 8.5 in (21.6 cm) wide x 8.6 in (21.8 cm) tall; 9.8 in (24.9 cm) tall with the loop
- Skill level: Intermediate (front and back loop work, color changes, counting mesh)
- Terminology: US crochet terms
- Yarn weight: DK (weight 3), cotton or cotton blend
- Hook: 4.0 mm (G-6)
- Number of pieces: 1
- Layout: 4 stacked tiers with the trunk centered below
- Piece size (widest base row): 37 sts = 8.2 in (20.8 cm)
- Size before border: 8.2 in (20.8 cm) wide x 8.4 in (21.3 cm) tall (tree body plus trunk)
- Border depth: 1 row of sc around the trunk, about 0.2 in (0.5 cm)
Materials
Use a smooth DK cotton or cotton blend with clear stitch definition. Mercerized cotton shows the mesh columns best. Avoid fuzzy yarns, because they fill in the lace.
- Color A – Deep Olive Green (tree body, loop): about 20 g / 46 m
- Color B – Light Sage Green (scallop bands): about 12 g / 28 m
- Color C – Chocolate Brown (trunk): about 6 g / 14 m
These amounts include about 15% extra to allow for gauge differences and weaving in ends.
Tools:
- 4.0 mm (G-6) crochet hook
- Tapestry needle
- Scissors
- 2–3 locking stitch markers
- Ruler or tape measure
- Blocking mat, rust-proof pins and a spray bottle
Abbreviations (US Terms)
- ch – chain
- sl st – slip stitch
- sc – single crochet
- dc – double crochet
- st(s) – stitch(es)
- sp – space
- sk – skip
- FLO – front loop only
- BLO – back loop only
- RS / WS – right side / wrong side
- tc – turning chain
Special stitch – Shell: 5 dc worked into the same stitch.
Mesh terms: A “post” is one dc column, including a turning chain that counts as a dc. A mesh row with n posts has n – 1 ch-2 spaces.
Gauge and Checkpoints
Gauge: 18 dc and 10 rows = 4 in (10.2 cm) in dc rows.
Since the tree is a single piece, Tier 1 is your gauge test. Work Rows 1–4 and measure before you add the first scallop band.
Checkpoints (measure flat, before blocking):
- After Row 4: base row of 19 sts = 4.2 in (10.7 cm) wide; Rows 1–4 = 1.6 in (4.1 cm) tall
- After Row 8: base row of 25 sts = 5.6 in (14.2 cm) wide; total height 3.2 in (8.1 cm)
- After Row 12: base row of 31 sts = 6.9 in (17.5 cm) wide; total height 4.8 in (12.2 cm)
- After Row 16: base row of 37 sts = 8.2 in (20.8 cm) wide; total height 6.4 in (16.3 cm)
- Trunk: 1.6 in (4.1 cm) wide at the top, 2.4 in (6.1 cm) at the bottom, 2.0 in (5.1 cm) tall
If Row 4 is wider than 4.2 in (10.7 cm): change to a 3.5 mm hook and start again.
If Row 4 is narrower: change to a 4.5 mm hook.
Fix it early. A difference of 0.2 in (0.5 cm) at Row 4 grows to nearly 0.4 in (1.0 cm) by Row 16.
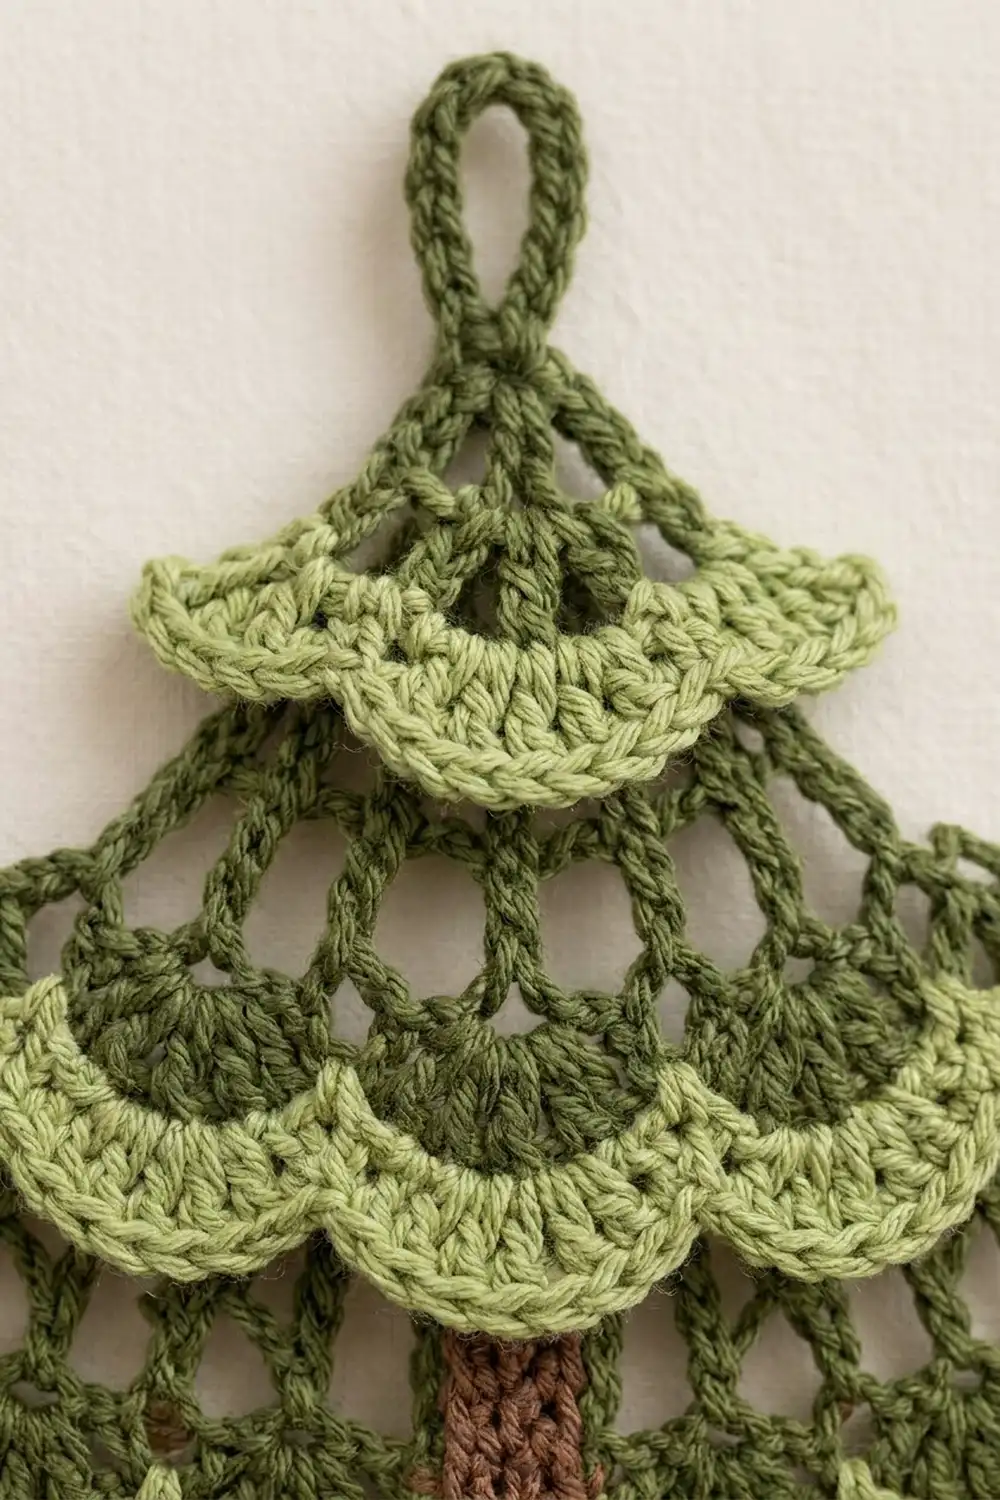
Tier 1 (Top)
With A, ch 4 and sl st in the first ch to form a ring.
Row 1 (RS): Ch 5 (counts as dc + ch 2), dc in ring, ch 2, dc in ring. Turn. (3 posts, 2 ch-2 sp)
Row 2 (WS, increase mesh row): Ch 5 (counts as dc + ch 2), dc in first dc (the st at the base of the ch). Ch 2, dc in next dc; repeat until you reach the turning chain. Ch 2, dc in 3rd ch of tc, ch 2, dc in same ch. Turn. (5 posts, 4 ch-2 sp)
This row adds one post at each edge, so every increase row has 2 more posts than the row before it.
Row 3 (RS): Repeat Row 2. (7 posts, 6 ch-2 sp)
Row 4 (WS, base row): Ch 3 (counts as dc), 2 dc in next ch-2 sp. Dc in next dc, 2 dc in next ch-2 sp; repeat until you reach the turning chain. Dc in 3rd ch of tc. (19 dc)
A base row always has 3 x posts – 2 stitches. Here that’s 7 posts + (6 spaces x 2 dc) = 19.
Don’t fasten off. With the RS facing you, your working loop is now at the right-hand edge. Take the hook out and put a stitch marker in the loop.
Scallop Band 1 (B):
Band Row 1 (RS): With RS facing, join B with sc in FLO of the first st at the right-hand edge (the stitch holding the A loop). Sc in FLO of each st across. Turn. (19 sc)
Band Row 2 (WS): Ch 1, sc in first sc. Sk 2, Shell in next sc, sk 2, sc in next sc; repeat across. Fasten off B. (3 shells + 4 sc = 19 sts)
Each repeat uses 6 stitches, plus 1 for the first sc. That’s why every base row in this pattern is a multiple of 6, plus 1.
Tiers 2–4
You work each new tier into the back loops of the base row above it. The first row of each tier starts 3 stitches in from each edge. This makes the top of the tier narrower, so it tucks under the scallops above.
Tier 2
Row 5 (RS, setup row): Fold the scallop band down toward you and put the A loop back on your hook. Sl st in BLO of the first 4 sts. Ch 5 (counts as a dc on st 4 + ch 2), sk next 2 sts, dc in BLO of next st. Ch 2, sk 2, dc in BLO of next st; repeat until the last dc is on st 16. Leave the last 3 sts unworked. Turn. (5 posts, 4 ch-2 sp)
The posts sit on sts 4, 7, 10, 13 and 16. In every tier, the setup row has 2 fewer posts than the last mesh row of the tier above it.
Row 6 (WS): Repeat Row 2. (7 posts, 6 ch-2 sp)
Row 7 (RS): Repeat Row 2. (9 posts, 8 ch-2 sp)
Row 8 (WS, base row): Repeat Row 4. (25 dc)
Put the A loop on a marker.
Scallop Band 2 (B): Work Band Rows 1–2 in FLO of Row 8, the same way as for Tier 1. Fasten off B. (Band Row 1: 25 sc; Band Row 2: 4 shells + 5 sc = 25 sts)
Tier 3
Row 9 (RS, setup row): Pick up A. Sl st in BLO of the first 4 sts, then ch 5. Continue as in Row 5, placing posts on sts 4, 7, 10, 13, 16, 19 and 22. Leave the last 3 sts unworked. Turn. (7 posts, 6 ch-2 sp)
Row 10 (WS): Repeat Row 2. (9 posts, 8 ch-2 sp)
Row 11 (RS): Repeat Row 2. (11 posts, 10 ch-2 sp)
Row 12 (WS, base row): Repeat Row 4. (31 dc)
Scallop Band 3 (B): Work Band Rows 1–2 in FLO of Row 12. Fasten off B. (Band Row 1: 31 sc; Band Row 2: 5 shells + 6 sc = 31 sts)
Tier 4 (Bottom)
Row 13 (RS, setup row): Pick up A. Sl st in BLO of the first 4 sts, then ch 5. Place posts on sts 4, 7, 10, 13, 16, 19, 22, 25 and 28. Leave the last 3 sts unworked. Turn. (9 posts, 8 ch-2 sp)
Row 14 (WS): Repeat Row 2. (11 posts, 10 ch-2 sp)
Row 15 (RS): Repeat Row 2. (13 posts, 12 ch-2 sp)
Row 16 (WS, base row): Repeat Row 4. Fasten off A. (37 dc)
Scallop Band 4 (B): Work Band Rows 1–2 in FLO of Row 16. Fasten off B. (Band Row 1: 37 sc; Band Row 2: 6 shells + 7 sc = 37 sts)
Tier summary:
| Tier | Mesh posts (setup → last) | Base row | Shells |
|---|---|---|---|
| 1 | 3 → 7 | 19 | 3 |
| 2 | 5 → 9 | 25 | 4 |
| 3 | 7 → 11 | 31 | 5 |
| 4 | 9 → 13 | 37 | 6 |
Trunk
The trunk sits on the center 7 back loops of Row 16. Out of 37 sts, those are sts 16–22, which leaves 15 sts free on each side. You can count from either edge and get the same stitches.
Trunk Row 1 (RS): Fold Scallop Band 4 up out of the way. With RS facing, join C in BLO of st 16. Ch 3 (counts as dc), dc in BLO of next 6 sts. Turn. (7 dc)
Trunk Row 2 (WS): Ch 3, dc in each st across, ending with a dc in top of tc. Turn. (7 dc)
Trunk Row 3 (RS): Ch 3, dc in first st (increase), dc in next 5 sts, 2 dc in top of tc. Turn. (9 dc)
Trunk Row 4 (WS): Ch 3, dc in each st across. Turn. (9 dc)
Trunk Row 5 (RS): Ch 3, dc in first st, dc in next 7 sts, 2 dc in top of tc. Fasten off. (11 dc)
The trunk widens from 1.6 in (4.1 cm) at the top to 2.4 in (6.1 cm) at the bottom, which gives it a slight flare.
Hanging Loop
With RS facing, join A with a sl st around the top of the starting ring, between the Row 1 turning chain and the first dc. Ch 14, then sl st around the ring in the same place. Turn, work 20 sc into the ch-14 loop and sl st into the first sc. Fasten off.
The loop stands about 1.2 in (3.0 cm) above the tip.
Border
The tiers already have scalloped edges, so the only border is one row of C around the trunk. It hides the dc row ends and makes the base firmer.
Border gauge: Work 2 sc into the end of each dc row. One dc row is 0.4 in (1.0 cm) tall, and 2 sc are about the same width, so the sides lie flat without ruffling or pulling in.
Border Row (RS): With RS facing, join C with sc in the end of Trunk Row 1 on the right side, just below the scallops.
- Right side: 2 sc in the end of each of the 5 rows. (10 sc; row ends only, no corners)
- Bottom: 3 sc in the first st of Trunk Row 5, sc in next 9 sts, 3 sc in last st. (15 sc, including both corner groups)
- Left side: 2 sc in the end of each of the 5 rows. (10 sc)
Sl st into Row 16 next to the trunk and fasten off. (35 sc total)
Why the math works: The bottom has 11 sts plus 2 extra sc at each corner, so 11 + 4 = 15. Each side gets 2 sc for each of its 5 rows, so 5 x 2 = 10. The total is 10 + 15 + 10 = 35. The corner stitches are only counted once, in the bottom total.
After the border, the trunk is 2.8 in (7.1 cm) wide at the bottom and 2.2 in (5.6 cm) tall.
Final Blocking
- Weave in all ends first. Hide A ends along the mesh columns, B ends inside the shells and C ends inside the trunk.
- Lay the tree RS up on the blocking mat.
- Spray it evenly until it’s damp but not dripping.
- Pin the tip and the center of the trunk bottom 8.6 in (21.8 cm) apart.
- Pin each base row straight and level. The bottom tier should be 8.2 in (20.8 cm) wide.
- Pin the center of each shell so the scallops curve evenly over the tier below.
- Gently open each ch-2 space with your fingers so the mesh columns stand straight.
- Pin the trunk into a neat trapezoid, 2.8 in (7.1 cm) across the bottom.
- Let it dry completely (usually 12–24 hours) before you remove the pins.
Final Quality-Control Checklist
- The base rows have 19, 25, 31 and 37 sts.
- The scallop bands have 3, 4, 5 and 6 shells.
- Each setup row leaves 3 sts free at each edge.
- The scallops are in the front loops, the next tier is in the back loops, and no sage shows through the dark mesh.
- The trunk is centered, with 15 free sts on each side.
- The trunk border has 10 + 15 + 10 = 35 sc and lies flat.
- The loop is centered at the tip.
- The blocked tree is 8.5 in (21.6 cm) wide x 8.6 in (21.8 cm) tall without the loop.
Troubleshooting
The mesh leans to one side: Make sure every increase row ends with (dc, ch 2, dc) in the turning chain. If you miss one edge increase, the tree will be lopsided.
The last scallop doesn’t fit: The base row must be a multiple of 6, plus 1. Recount it, and check that each ch-2 space has exactly 2 dc.
The scallops cup or ruffle: The shells are too tight or too loose for the base. Change your hook by 0.5 mm for the band rows only.
The top of a tier is too wide: You probably worked the setup row into every stitch. Remember to sl st across the first 3 and leave the last 3 unworked.
The trunk is off-center: Count to st 16 from the edge again. Each side should have 15 free stitches.
The trunk border ruffles: Use 2 sc per row end, not 3, and crochet a little tighter.
Care
Hand wash in cool water with mild soap. Press the water out in a towel, then reshape the scallops and dry flat. Don’t tumble dry.
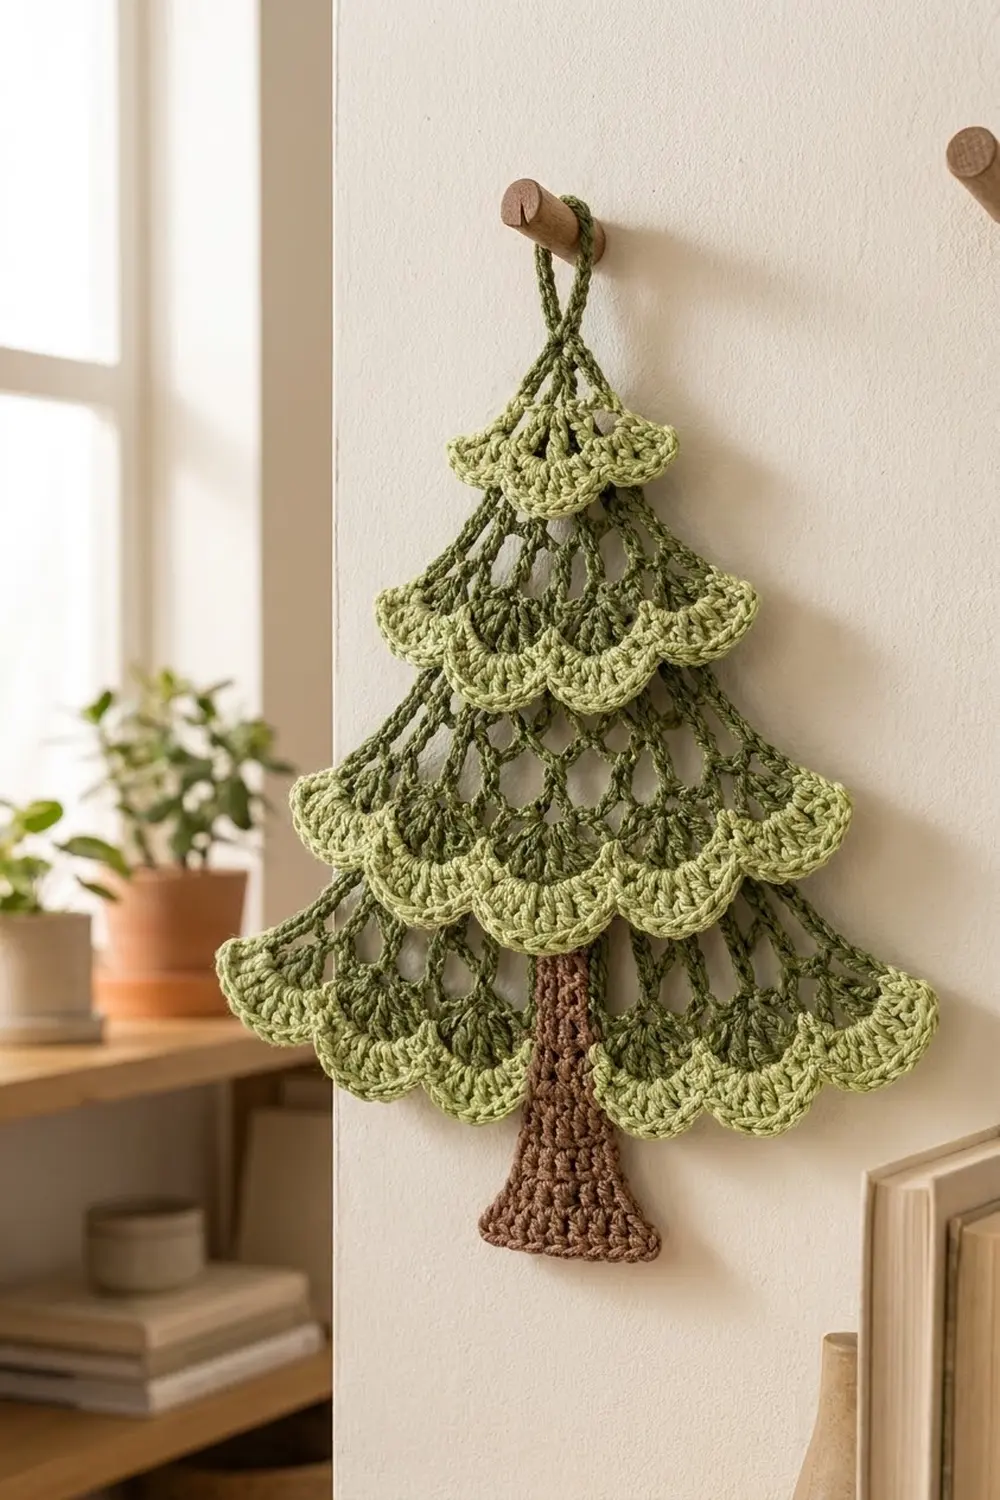
Final Notes
The measurements build on each other. If Tier 1 is 4.2 in (10.7 cm) wide at Row 4, each tier after it adds 6 base-row stitches, or about 1.3 in (3.3 cm). That gives widths of 5.6 in (14.2 cm), 6.9 in (17.5 cm) and finally 8.2 in (20.8 cm). Sixteen tree rows make 6.4 in (16.3 cm) of height. The trunk adds 2.0 in (5.1 cm) and its border adds 0.2 in (0.5 cm), for a total of 8.6 in (21.8 cm). The loop brings it to 9.8 in (24.9 cm). Get the gauge right at Tier 1, and the rest of the tree will come out the right size.
Happy crocheting!