

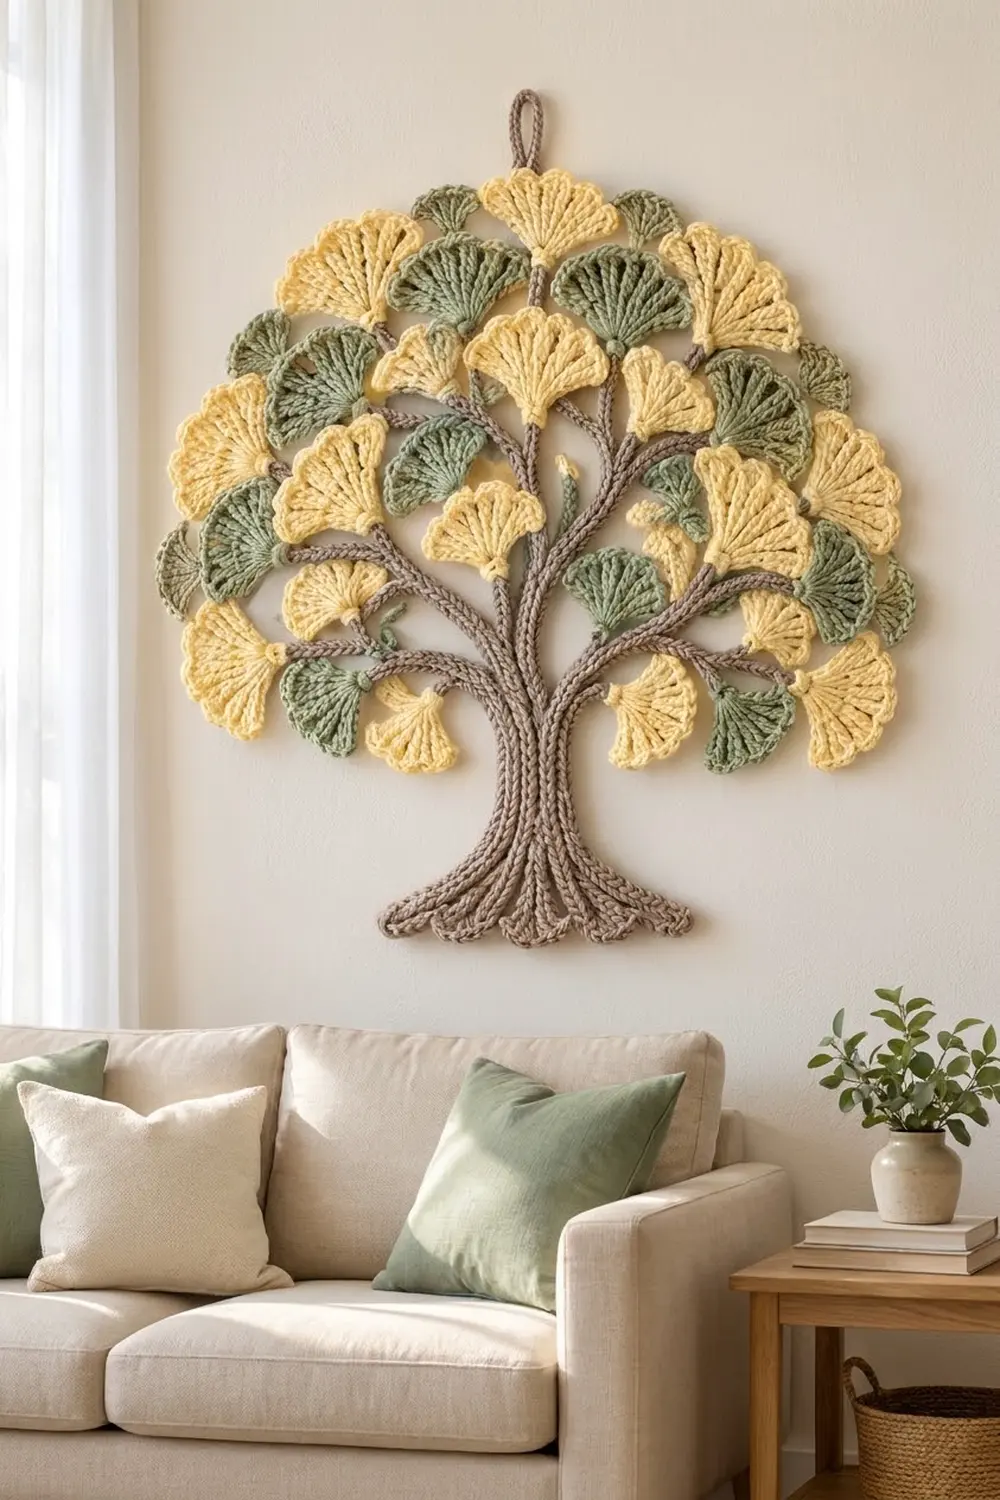
This wall hanging is a stylized ginkgo tree. Forty fan-shaped leaves in butter yellow and sage green overlap into a soft dome. They sit on a taupe trunk made of braided-look cords that curl into roots at the base and spread into branches at the top.
The palette is warm and calm, so the hanging suits a neutral living room, a reading corner, or a nursery. Each leaf has radiating double-crochet ribs, a scalloped edge, and the small center notch that makes a ginkgo leaf easy to recognize.
This pattern uses US crochet terms. The finished hanging measures 15 in (38.1 cm) wide and 17 in (43.2 cm) tall without the loop, or 19 in (48.3 cm) tall with the loop.
The hanging is made of many small pieces. You crochet 40 leaves flat in rows from a magic ring, and add a scalloped edge and a stem to each one. Next you make 21 cords: 8 for the trunk, 12 twigs, and 1 loop. You sew the cords into a tree shape and then sew the leaves on top in overlapping tiers.
Finished Size and Construction
- Finished size: 15 in (38.1 cm) wide × 17 in (43.2 cm) tall; 19 in (48.3 cm) tall including the loop
- Skill level: Intermediate (simple stitches, careful assembly)
- Terminology: US
- Yarn weight: DK (#3)
- Hook: 3.5 mm (US E-4)
- Number of pieces: 61 (40 leaves, 8 trunk cords, 12 twig cords, 1 loop cord)
- Layout: Leaves layered in 7 tiers over a branching cord framework
- Leaf size (finished): 3 in (7.6 cm) wide × 1.75 in (4.4 cm) tall, plus a 1 in (2.5 cm) stem
- Leaf size before border: 2.5 in (6.4 cm) wide × 1.25 in (3.2 cm) tall
- Border depth: 0.5 in (1.3 cm) at the top edge and 0.25 in (0.6 cm) at each side
Materials
Use a smooth, matte DK yarn in cotton or a cotton blend. It shows the leaf ribs clearly and blocks crisply. Avoid fuzzy yarn, because it hides the cord texture. The amounts below assume a yarn with about 115 m per 50 g.
- Butter yellow: 45 g / 104 m (22 leaves)
- Sage green: 40 g / 92 m (18 leaves)
- Taupe brown: 30 g / 69 m (cords and sewing)
All quantities include a margin of about 30% for gauge differences and sewing tails.
Tools:
– 3.5 mm (US E-4) crochet hook
– Tapestry needle
– Locking stitch markers
– Rustproof pins and a blocking board
– Spray bottle
– Ruler or tape measure
– Scissors
Abbreviations (US Terms)
- ch – chain
- sl st – slip stitch
- sc – single crochet
- dc – double crochet
- sk – skip
- st(s) – stitch(es)
- MR – magic ring
- RS – right side
Special stitch – back-bump cord: Make a chain. Then work 1 sc into the back bump (the ridge on the back of the chain) of the 2nd chain from the hook and of every chain after it. This leaves the neat chain “V”s on the front, so the cord looks braided.
Gauge and Checkpoints
Cord gauge: 5 sc = 1 in (2.5 cm) along a back-bump cord.
Leaf gauge: after Row 3, the leaf measures 2.5 in (6.4 cm) across the straight bottom edge.
Make one leaf (with its border) and one 20-st cord before you start the full set. The test cord should be 4 in (10.2 cm) long.
Leaf checkpoints:
– After Row 1: 1 in (2.5 cm) wide × 0.5 in (1.3 cm) tall
– After Row 2: 1.75 in (4.4 cm) wide × about 0.9 in (2.3 cm) tall
– After Row 3: 2.5 in (6.4 cm) wide × 1.25 in (3.2 cm) tall
– After the border: 3 in (7.6 cm) wide × 1.75 in (4.4 cm) tall, plus the stem
If your piece is too big, go down one hook size, to 3.25 mm. If it is too small, go up to 3.75 mm. Fix the leaf gauge first. The cords can be a little off, because you can trim their length during assembly.
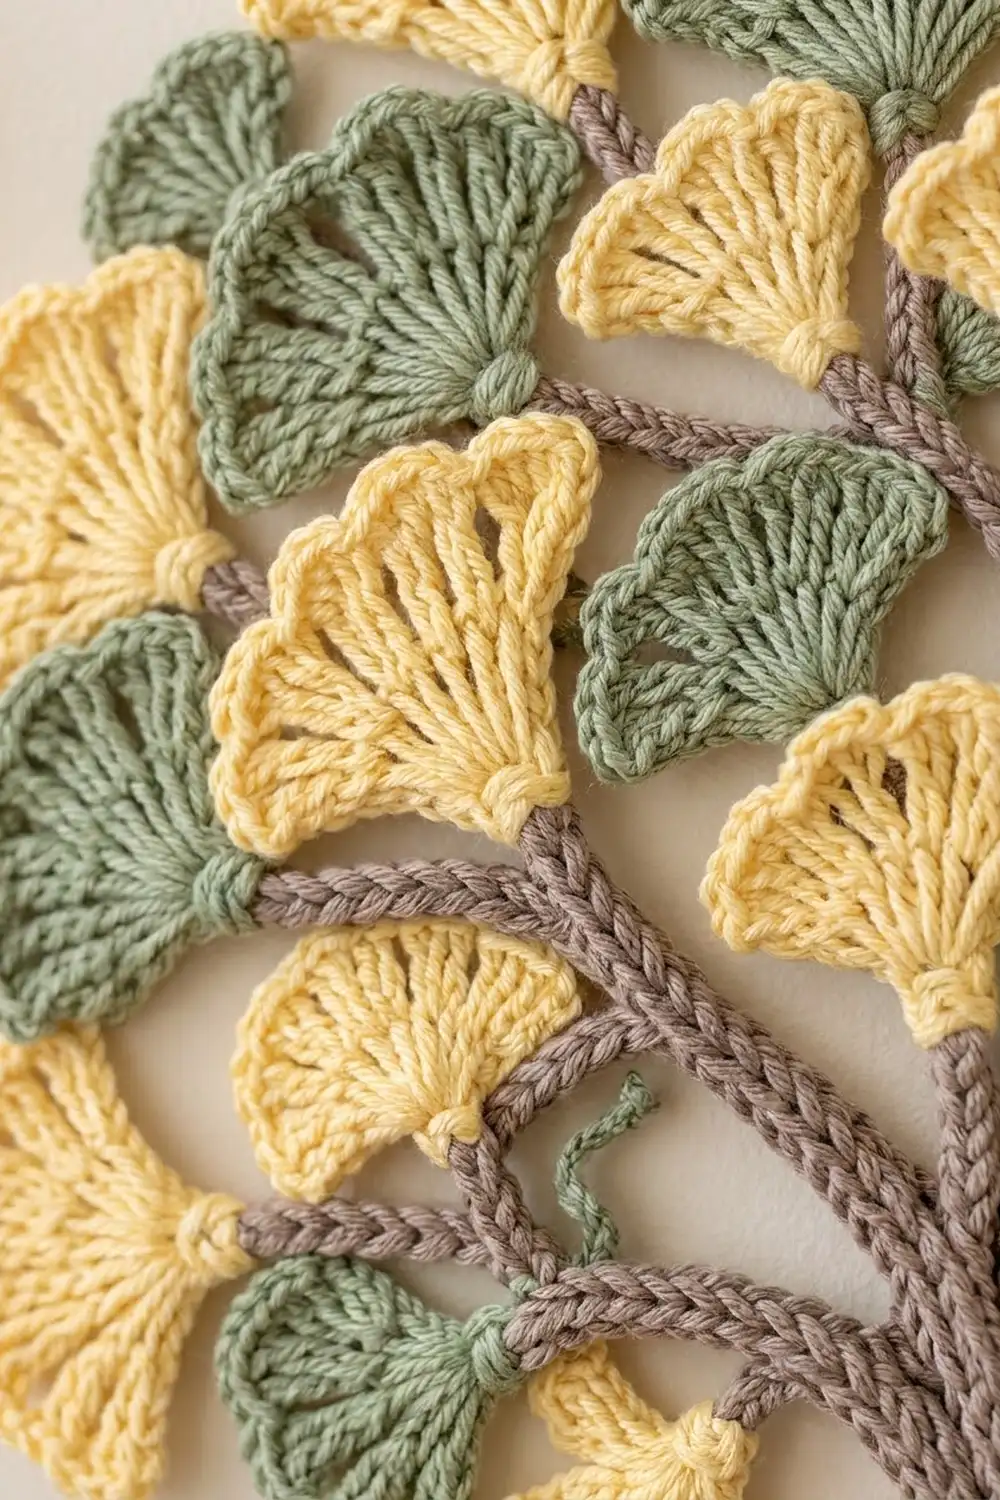
Leaves (Make 40)
The leaf is worked flat in rows from a magic ring. The beginning ch 3 counts as 1 dc throughout.
Row 1: MR. Ch 3, then work 6 dc into the ring. Pull the ring closed. Turn. (7 dc)
Row 2: Ch 3, 1 dc in the first st, then 2 dc in each of the next 6 sts. Turn. (14 dc)
Row 3: Ch 3, 1 dc in the first st, 1 dc in the next st, 2 dc in the next st, 1 dc in the next st; repeat from * 6 times. Do not turn. (21 dc)
Check the count: the first 2 sts give 3 dc, and the 6 repeats give 18 dc, for 21 dc. You have used 14 stitches, which is every stitch of Row 2.
At this point the leaf is a ribbed fan, 2.5 in (6.4 cm) wide. Go straight on to the Scalloped Edge Border (see the Border section below) on every leaf. The edge and stem must be done before any leaf is sewn down.
Trunk and Branch Cords
All cords are back-bump cords in taupe. Leave a 10 in (25.4 cm) tail at both ends of each cord for sewing.
Trunk cords (make 8, in pairs):
| Pair | Make | Chain | Sc | Length |
|---|---|---|---|---|
| A (center) | 2 | 76 | 75 | 15 in (38.1 cm) |
| B | 2 | 66 | 65 | 13 in (33.0 cm) |
| C | 2 | 56 | 55 | 11 in (27.9 cm) |
| D (outer) | 2 | 46 | 45 | 9 in (22.9 cm) |
Twig cords (make 12): Ch 16, then sc in back bumps across. (15 sc) Each twig is 3 in (7.6 cm) long.
Hanging loop (make 1): Ch 26, then sc in back bumps across. (25 sc) The loop cord is 5 in (12.7 cm) long.
Roots: On each trunk cord, count the first 5 sts from the starting end. These form a 1 in (2.5 cm) root section. Weave the starting tail through these 5 sts and pull gently until the end curls. Pin the curl in place.
Make All Pieces
Totals:
– Butter yellow leaves: 22
– Sage green leaves: 18
– Taupe trunk cords: 8 (2 each of A, B, C, D)
– Taupe twig cords: 12
– Taupe loop cord: 1
Crown layout (top tier to bottom tier; Y = yellow, G = green):
Tier 1:          Y  G  Y
Tier 2:        G  Y  G  Y  G
Tier 3:      Y  G  Y  G  Y  G  Y
Tier 4:    Y  G  Y  G  G  Y  G  Y
Tier 5:    G  Y  G  Y  Y  G  Y  G
Tier 6:      Y  G  Y  Y  G  Y
Tier 7:          Y  G  Y
Tier totals are 3 + 5 + 7 + 8 + 8 + 6 + 3 = 40 leaves (22 Y, 18 G). Tier 1 sits at the top of the crown. Tier 7 is the lowest row of leaves, at the sides of the trunk split.
Joining
All joining is done with a taupe tail or a strand of leaf color and the tapestry needle. Sew with a whip stitch through the back loops or back bumps so the stitches don’t show on the front.
Step 1 – Trunk. Lay the 8 trunk cords side by side, RS up, in this order: D, C, B, A, A, B, C, D. Line up the starting (root) ends. Skip the 5 root sts on every cord. Then sew neighboring cords together stitch to stitch, from st 6 through st 30. That is 25 sts, or 5 in (12.7 cm). Match st 6 to st 6, st 7 to st 7, and so on, so the trunk stays straight.
The finished trunk is 8 cords × 0.25 in (0.6 cm) = 2 in (5.1 cm) wide. Fan the 8 roots out to a span of 4.5 in (11.4 cm) and tack each curl down to its neighbor.
Step 2 – Branches. The cords separate above st 30, which is 6 in (15.2 cm) up from the root tips.
– Pair A: Sew the two A cords together for 20 more sts (sts 31–50, 4 in / 10.2 cm). Above that, let them part slightly as a central leader.
– B cords: Angle out about 30° from vertical.
– C cords: Angle out about 45°.
– D cords: Angle out about 70°. These are the lowest and widest branches.
Pin each branch to the blocking board as you place it. Check the spread: the two D tips should be 13 in (33.0 cm) apart.
Step 3 – Twigs. Sew the first 2 sts of each twig to the side of a branch, angling the twig upward.
– 2 twigs on each A cord
– 2 twigs on each B cord
– 1 twig on each C cord
– 1 twig on each D cord
That gives 4 + 4 + 2 + 2 = 12 twigs in total.
Step 4 – Leaves. You have 20 cord tips: 8 trunk cords plus 12 twigs. Sew one leaf stem to each tip, overlapping the stem onto the cord by 3 sts. Then sew the remaining 20 leaves along the branches, stem first, to fill the gaps.
Follow the layout grid, starting at Tier 7 and working up to Tier 1. That way each higher leaf overlaps the bottom of the leaf below it. Tack the overlapping leaves together at 2–3 points along the scalloped edges so nothing flaps.
Step 5 – Loop. Fold the loop cord in half and sew the two ends together. Sew 0.5 in (1.3 cm) of the folded ends behind the center leaf of Tier 1. This leaves 2 in (5.1 cm) of loop showing above the crown.
Tension advice: Pull each sewing stitch just snug. If you pull too tight, the trunk will cup and the leaves will curl forward. If you sew too loosely, the leaves will droop when the tree hangs.
Size checkpoint: With the tree laid flat, the crown should measure 15 in (38.1 cm) wide. The tree should measure 17 in (43.2 cm) from the root tips to the top of Tier 1, and the lowest leaves should start 5 in (12.7 cm) above the root tips. That puts the crown at 12 in (30.5 cm) tall.
Border: Scalloped Leaf Edge
Work this border on each leaf straight after Row 3, before any assembly. The tree has no outer frame, so each leaf’s edge serves as the border of the design.
Border gauge: each 5-dc shell measures 0.5 in (1.3 cm) wide and 0.5 in (1.3 cm) tall. Each side sc row adds 0.25 in (0.6 cm).
Border Round: Continue in the same color. Ch 1 and turn so you are working back across the top of Row 3.
Top edge (21 sts): Sc in st 1, sk 1, 5 dc in next st, sk 1, sc in next st; repeat from * once more. You are now at st 9. Sk st 10, sl st in st 11 (the center notch), sk st 12, sc in st 13, sk 1, 5 dc in next st, sk 1, sc in next st; repeat from * once more, ending with sc in st 21.
(4 shells, 6 sc, 1 sl st = 27 sts)
First side (3 row ends): Work 2 sc into each row end down to the ring.
(6 sc)
Stem: At the ring, ch 6. Sc in the back bump of the 2nd ch from the hook and of the next 4 chs. Sl st into the ring.
(5 sc stem, 1 in / 2.5 cm)
Second side (3 row ends): Work 2 sc into each row end up to the top.
(6 sc)
Sl st into the first sc of the top edge. Fasten off, leaving a 10 in (25.4 cm) tail for sewing.
Edge total: 27 + 6 + 6 = 39 sts around the leaf body, plus 5 sc on the stem. The corner sc are st 1 and st 21. They count only in the 27-st top edge. The side counts of 6 do not include them.
Why the math works: The top edge has 21 sts, and 21 = 4 × 5 + 1. Each repeat (sk 1, shell, sk 1, sc) uses exactly 4 sts. Two repeats on the left take you from st 1 to st 9, and two on the right take you from st 13 to st 21.
That leaves sts 10–12 for the notch. Skipping st 10 and st 12 and placing only a sl st in st 11 pulls the center down into a V between two shells. That V is the ginkgo split.
On the sides, 2 sc per dc row end lies flat because a dc row is about twice as tall as an sc is wide.
Final Blocking
- Lightly mist the assembled tree with water until it is damp but not wet.
- Lay it face up on the blocking board.
- Pin the trunk straight, then pin the root curls at a 4.5 in (11.4 cm) spread.
- Pin each branch tip to the planned angle.
- Pin each leaf into a fan, with one pin in each shell and one in the notch.
- Measure: 15 in (38.1 cm) wide and 17 in (43.2 cm) tall. Ease the pins until you get these measurements.
- Leave the tree to dry completely, which takes 12–24 hours, before you unpin it.
- Hang it from the loop and check that it falls straight.
Final Quality-Control Checklist
- 22 yellow and 18 green leaves, each with 4 shells and a center notch
- Every leaf is 3 in (7.6 cm) wide, with a 1 in (2.5 cm) stem
- Trunk cords are sewn stitch to stitch from st 6 to st 30, and the trunk is 2 in (5.1 cm) wide
- 8 roots are curled and tacked down
- 12 twigs are attached, angled upward
- Leaf colors follow the tier grid
- No sewing stitches show on the front
- Overall size is 15 × 17 in (38.1 × 43.2 cm) with a 2 in (5.1 cm) loop
- All tails are woven in and trimmed
Troubleshooting
- The leaf ruffles: Your stitches are too loose. Go down a hook size, or check that you made 21 sts in Row 3, not 22.
- The leaf cups: Your tension is tight. Go up a hook size and block the leaf flat.
- The notch doesn’t show: Make sure you skipped sts 10 and 12. Pull the sl st firmly.
- The cords twist: This is normal for back-bump cords. Pin them straight, mist them, and let them dry before sewing.
- The trunk is bowed: You sewed with mismatched stitches. Unpick the section and match the stitch numbers.
- The crown is too narrow: Open up the branch angles a little before you attach the Tier 4 and Tier 5 leaves.
- Leaves droop on the wall: Add an extra tack stitch where the leaves overlap.
Care
Dust the hanging with a soft brush or a cool hair dryer. If it needs cleaning, hand wash it gently in cool water, press out the water in a towel, and re-block it flat.
Final Notes
The measurements build on each other. Each leaf measures 2.5 in (6.4 cm) after Row 3 and 3 in (7.6 cm) after the border. Each cord stitch is 0.2 in, so 5 sc = 1 in (2.5 cm), and that sets the 5 in (12.7 cm) of sewn trunk and the 15 in (38.1 cm) center cords. Forty leaves in seven tiers fill a 15 × 12 in (38.1 × 30.5 cm) crown, and the 2 in (5.1 cm) loop brings the full height to 19 in (48.3 cm). Check your gauge on the first leaf and cord, and the rest of the tree will come out at the right size.
Happy crocheting!