

This little tree is built from six red wheel motifs, each with a crisp white picot edge, joined into a neat triangle. The red and white give it a candy-cane, peppermint look. A small brown trunk and a white hanging loop finish it off, so it reads as a tree right away, whether it hangs on a branch or gets tucked into a gift tag.
The style is lacy but sturdy. Each wheel has an open center and twelve spokes, and the white edging links the motifs into one firm piece. It feels like vintage doily work at ornament size.
The pattern uses US crochet terms. The finished ornament is about 4 in (10.2 cm) wide and 4.15 in (10.5 cm) tall including the trunk. The hanging loop adds about 1 in (2.5 cm).
Here is the construction. You make each red wheel in three rounds, then add a white picot round, joining each new motif to the earlier ones as you go. One white border round then outlines the whole triangle. Last, you crochet the trunk, sew it on, and add the hanging loop.
Finished Size and Construction
- Finished size: 4 in (10.2 cm) wide x 4.15 in (10.5 cm) tall, plus a 1 in (2.5 cm) hanging loop
- Skill level: Easy-intermediate
- Terminology: US
- Yarn weight: Super fine (#1) fingering-weight mercerized cotton, or size 3 crochet thread
- Hook: 2.25 mm (B-1)
- Number of pieces: 6 round motifs plus 1 trunk, joined into a single ornament
- Layout: Triangle in rows of 1, 2 and 3 motifs (hexagonal packing)
- Motif size: 1 in (2.5 cm) after the red rounds; 1.25 in (3.2 cm) after the white round
- Size before border: 3.75 in (9.5 cm) wide x 3.4 in (8.6 cm) tall
- Border depth: about 0.125 in (0.3 cm)
Materials
Pick a smooth mercerized cotton. It shows the stitches clearly, keeps the wheels flat, and blocks well. Avoid fuzzy or very stretchy yarns, because the spokes will lose their shape.
- Red (main color): 8 g, about 27 m
- White (edging, border, loop): 5 g, about 17 m
- Dark brown (trunk): 2 g, about 7 m
These amounts are for one ornament and include a margin for gauge swatching and weaving in ends.
Tools:
– 2.25 mm (B-1) crochet hook
– Tapestry needle
– Scissors
– Stitch markers (2-3)
– Rustproof pins and a blocking mat or folded towel
– Spray bottle with water
– Ruler or tape measure
Abbreviations (US Terms)
- ch – chain
- sl st – slip stitch
- sc – single crochet
- dc – double crochet
- sp – space
- st(s) – stitch(es)
- rep – repeat
- standing sc – start with the new color’s slip knot on your hook, insert the hook into the stitch, and work a sc as usual
Special stitch – Joining loop (JL): Where the pattern calls for a ch-3 loop that joins a neighbor, work ch 1, sl st into the matching ch-3 loop of the finished motif, ch 1. The joined loop counts as a ch-3 loop on both motifs.
Gauge and Checkpoints
Gauge is measured on one motif, not a flat swatch. Make one full motif with its white round (unjoined) and check these measurements:
- After Round 1: 0.5 in (1.3 cm) across
- After Round 2: 0.85 in (2.2 cm) across
- After Round 3: 1 in (2.5 cm) across
- After Round 4 (white): 1.25 in (3.2 cm) from loop tip to opposite loop tip
Trunk gauge: 4 sc and 6 rows = 0.6 in (1.5 cm) wide x 0.75 in (1.9 cm) tall.
If your motif comes out larger than 1.25 in (3.2 cm), try a 2 mm hook. If it’s smaller than about 1.2 in (3 cm), try a 2.5 mm hook. A small difference is fine as long as all six motifs match, but the tree’s width and height will each change by three times that difference. If the spokes cup or ruffle, see Troubleshooting before you change hooks.
This test motif doesn’t go to waste. If it measures correctly, use it as Motif A at the top of the tree.
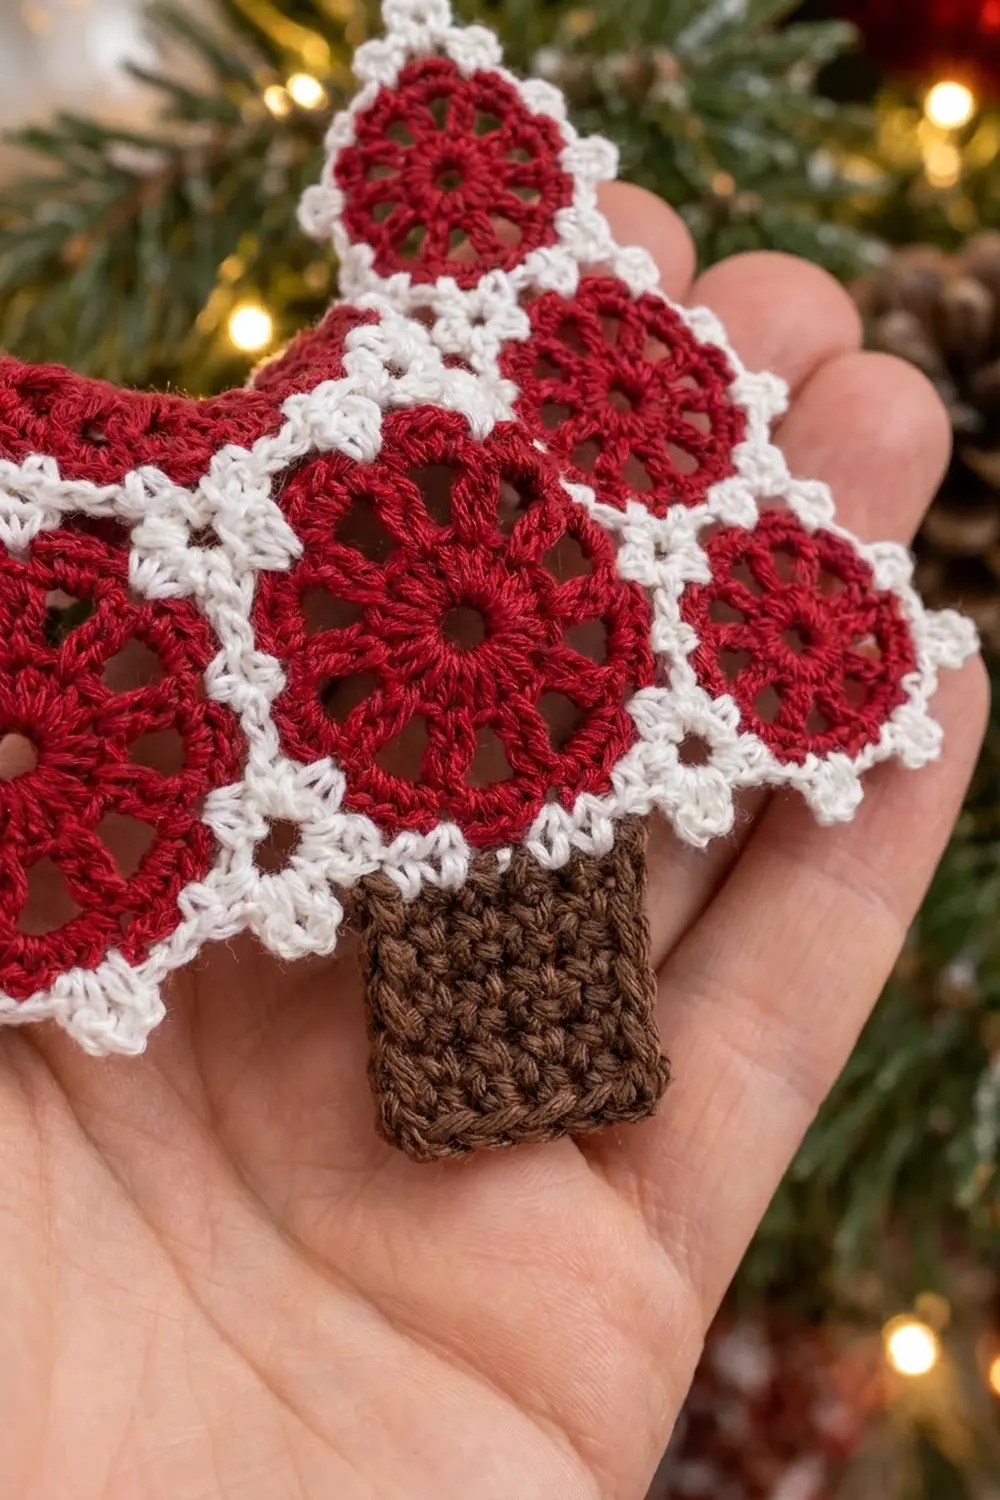
Motif (Make 6)
Red Rounds
Round 1: With red, ch 5, sl st to the first ch to form a ring. Ch 3 (counts as dc), work 11 dc in the ring, sl st to the top of the beginning ch-3. (12 dc)
Round 2: Ch 5 (counts as dc + ch 2), dc in next dc, ch 2; rep from * 10 more times, sl st to the 3rd ch of the beginning ch-5. (12 dc, 12 ch-2 sps)*
This round makes the 12 spokes and the open windows between them.
Round 3 (conversion round): Ch 1, sc in the next dc, 2 sc in the next ch-2 sp; rep from * 11 more times, sl st to the first sc. Fasten off red. (12 sc over spokes + 24 sc in spaces = 36 sc)*
This round is the solid red outer ring. Every third sc sits right on top of a spoke. You’ll call these “spoke sc.”
Checkpoint: The red motif lies flat and measures 1 in (2.5 cm) across.
White Round (Round 4)
Loop numbering: This round makes 12 loops. Number them clockwise like a clock face: Loop 1 at the top (12 o’clock), Loop 4 at 3 o’clock, Loop 7 at the bottom, Loop 10 at 9 o’clock. These numbers are used for joining.
Round 4, first motif (no joins): Join white with a standing sc in any spoke sc. Ch 3, sc in the same st (this is Loop 1). Sc in the next 2 sc, (sc, ch 3, sc) in the next sc (a spoke sc); rep from * 10 more times, sc in the next 2 sc, sl st to the first sc. Fasten off. (36 sc worked 1-per-stitch + 12 extra sc = 48 sc; 12 ch-3 loops)*
Each loop sits right above a spoke, with 4 sc between loops.
Joining Motifs as You Go
On every motif after the first, work Round 4 exactly as written, but use a Joining loop (JL) for each loop listed below instead of ch 3. Count your loops from Loop 1 as you work, and turn the motif so the loop you need lines up with its partner.
Motif positions:
        A
      B   C
    D   E   F
Joining order and loops:
- A (top): No joins.
- B: Loop 2 joins A Loop 8.
- C: Loop 12 joins A Loop 6; Loop 10 joins B Loop 4.
- D: Loop 2 joins B Loop 8.
- E: Loop 12 joins B Loop 6; Loop 2 joins C Loop 8; Loop 10 joins D Loop 4.
- F: Loop 12 joins C Loop 6; Loop 10 joins E Loop 4.
That gives 9 joins in total. Each joined pair touches at a single point, so the wheels sit in true hexagonal packing, and the gaps between them form small white triangles with free picot loops.
Stitch-to-stitch logic: A joined loop takes the place of a normal ch-3. It’s still worked between the same (sc, sc) pair in the same spoke sc, so the count stays at 48 sc and 12 loops per motif. Nothing is added at the seams.
Tension advice: Keep the ch 1 on each side of the joining sl st snug but not tight. If they’re too tight, the wheels pucker toward each other. If they’re too loose, the tree wobbles. Insert the hook from the front for every join so all the joins face the same way.
Before each join, lay the work flat and check that the new motif’s Loop 1 points straight up, just like Motif A’s. If every motif keeps the same orientation, the loop numbers in the list will always line up.
Checkpoint: Two joined motifs measure 2.5 in (6.4 cm) across. The bottom row of three measures 3.75 in (9.5 cm). The full triangle measures 3.75 in (9.5 cm) wide x 3.4 in (8.6 cm) tall.
Border
Border gauge: One round adds about 0.125 in (0.3 cm) on every side.
Free outer loops: Count the loops that face outward and aren’t joined.
- Corner motifs A, D and F: 9 outer loops each
- Middle-of-side motifs B, C and E: 5 outer loops each
- Total: 3 x 9 + 3 x 5 = 42 outer loops
The corner loops are A Loop 1 (top point), D Loop 9 (bottom-left point) and F Loop 5 (bottom-right point).
Per side: Every side runs past 3 motifs, and each motif shows 5 loops toward that side. That’s 3 x 5 = 15 loops per side, counting both corner loops. Each corner loop belongs to two sides, so the total is 3 x 15 − 3 = 42 unique loops. This matches the count above.
Border Round: Join white with a standing sc in A Loop 1 (top corner).
- Corner loop: (sc, ch 3, sc, ch 3, sc) in the loop. The middle sc is the corner point. (Here, the standing sc counts as the first sc.)
- Between two loops on the same motif: ch 3.
- Edge loop (any other outer loop): (sc, ch 3, sc) in the loop.
- Valley (where two outer motifs meet): ch 2, sc in the joining sl st, ch 2.
Work your way around the triangle like this, then sl st to the first sc and fasten off.
Counts per side (between corners): 13 edge loops x 2 sc = 26 sc, plus 2 valley sc = 28 sc, with 13 picots. There are also 12 ch-3 spans within motifs and 2 valleys.
Round totals: 3 sides x 28 sc = 84 sc, plus 3 corners x 3 sc = 9 sc, for 93 sc. Picots: 3 x 13 + 3 x 2 = 45.
Why the math works: Each motif’s 12 loops are spaced 30 degrees apart, and neighbors in hexagonal packing sit at 60-degree steps. So every join lands exactly on a loop, and each side of the triangle meets the same 5 loops on each of its 3 motifs. The ch-3 between loops covers the 4 white sc below it. The sc in each valley pulls the dip in slightly, so the sides look straight instead of scalloped.
Checkpoint: 4 in (10.2 cm) wide x 3.65 in (9.3 cm) tall.
Trunk
With brown, ch 5.
Row 1: Sc in the 2nd ch from the hook and in each ch across, turn. (4 sc)
Rows 2-6: Ch 1, sc in each sc across, turn. (4 sc)
Fasten off, leaving a 6 in (15.2 cm) tail. The trunk measures 0.6 in (1.5 cm) x 0.75 in (1.9 cm).
Center the trunk behind E Loop 7 so that 0.25 in (0.6 cm) is hidden behind the motif and 0.5 in (1.3 cm) shows below the border. Whipstitch the top edge to the back of the white round of E. Total height is now 4.15 in (10.5 cm).
Hanging Loop
Join white in the middle sc of the top corner. Ch 14, sl st in the same sc. Fasten off. This makes a 1 in (2.5 cm) loop. The total height including the loop is 5.15 in (13.1 cm).
Final Blocking
- Weave in all ends along the white sc. Keep them out of the open spokes.
- Lightly mist the ornament until it’s damp, not soaked.
- Lay it face up on the blocking mat.
- Pin the three corner loops first: 4 in (10.2 cm) across the base, with the top point centered 3.65 in (9.3 cm) above the base edge.
- Pin out each picot along the sides so the edges are straight.
- Use your fingertip to open the center ring of each wheel and space the spokes evenly.
- Square up the trunk and pin it.
- Let it dry completely, at least 4 hours, then unpin.
Final Quality-Control Checklist
- [ ] All 6 motifs have 12 spokes and 36 red sc
- [ ] Each white round has 48 sc and 12 loops
- [ ] There are 9 joins, all made from the front
- [ ] The border has 93 sc and 45 picots
- [ ] Each side passes 15 loops, including its corners
- [ ] Width is 4 in (10.2 cm); height is 4.15 in (10.5 cm) with the trunk
- [ ] The trunk is centered under E and sewn on the back only
- [ ] The hanging loop is centered at the top point
- [ ] No ends show on the front
Troubleshooting
- Wheel cups: Round 2 chains are too short or the dc are tight. Try ch 3 in place of ch 2 only if the motif still cups after blocking.
- Wheel ruffles: Round 3 is too full. Check that you have exactly 2 sc per space.
- Loops don’t line up for joining: Make sure Loop 1 sits on a spoke sc and that you’re counting clockwise.
- Tree leans or twists: One join used the wrong loop. Check it against the joining list and redo just that join.
- Sides look scalloped: Tighten the valley ch-2s, or use ch 1.
- Border ruffles: Use ch 2 instead of ch 3 between loops.
- Trunk too wide: Work 3 sc per row instead of 4.
Care
Hand wash in cool water with mild soap, roll it in a towel, and dry it flat, re-pinning if needed. Store flat or hanging so the picots don’t get crushed.
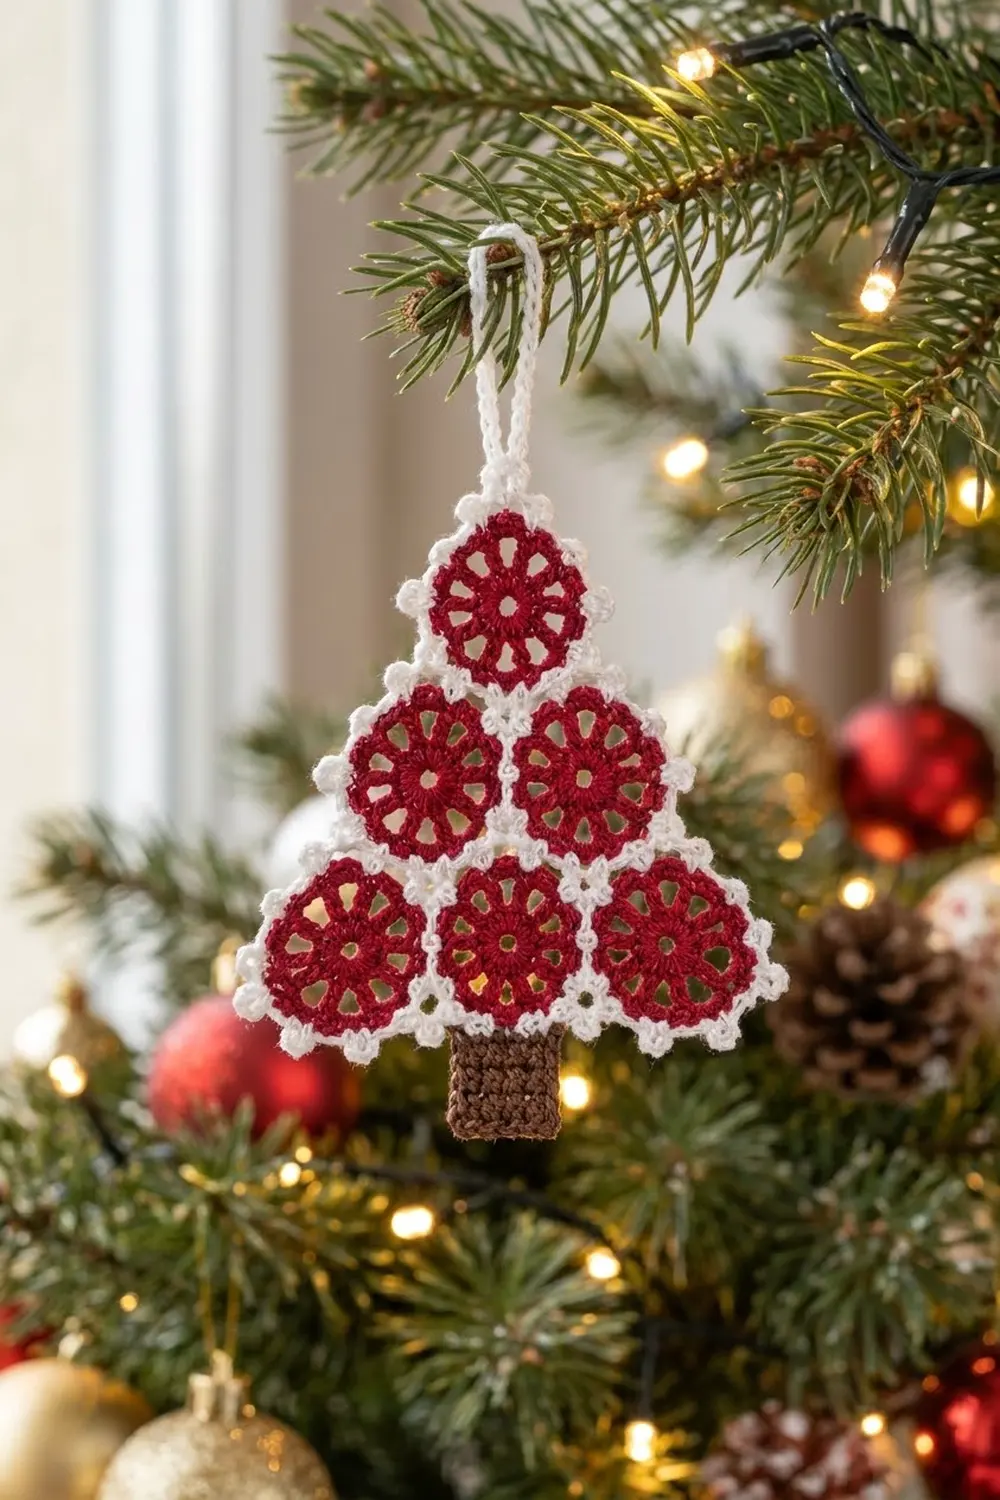
Final Notes
The measurement chain is short and easy to check. The red wheel is 1 in (2.5 cm), the white round brings it to 1.25 in (3.2 cm), and three motifs across make 3.75 in (9.5 cm). The border brings that to 4 in (10.2 cm), and the trunk brings the height to 4.15 in (10.5 cm). If your first motif matches, the whole tree will too. Make one, then make a whole set for your tree.
Happy crocheting!