

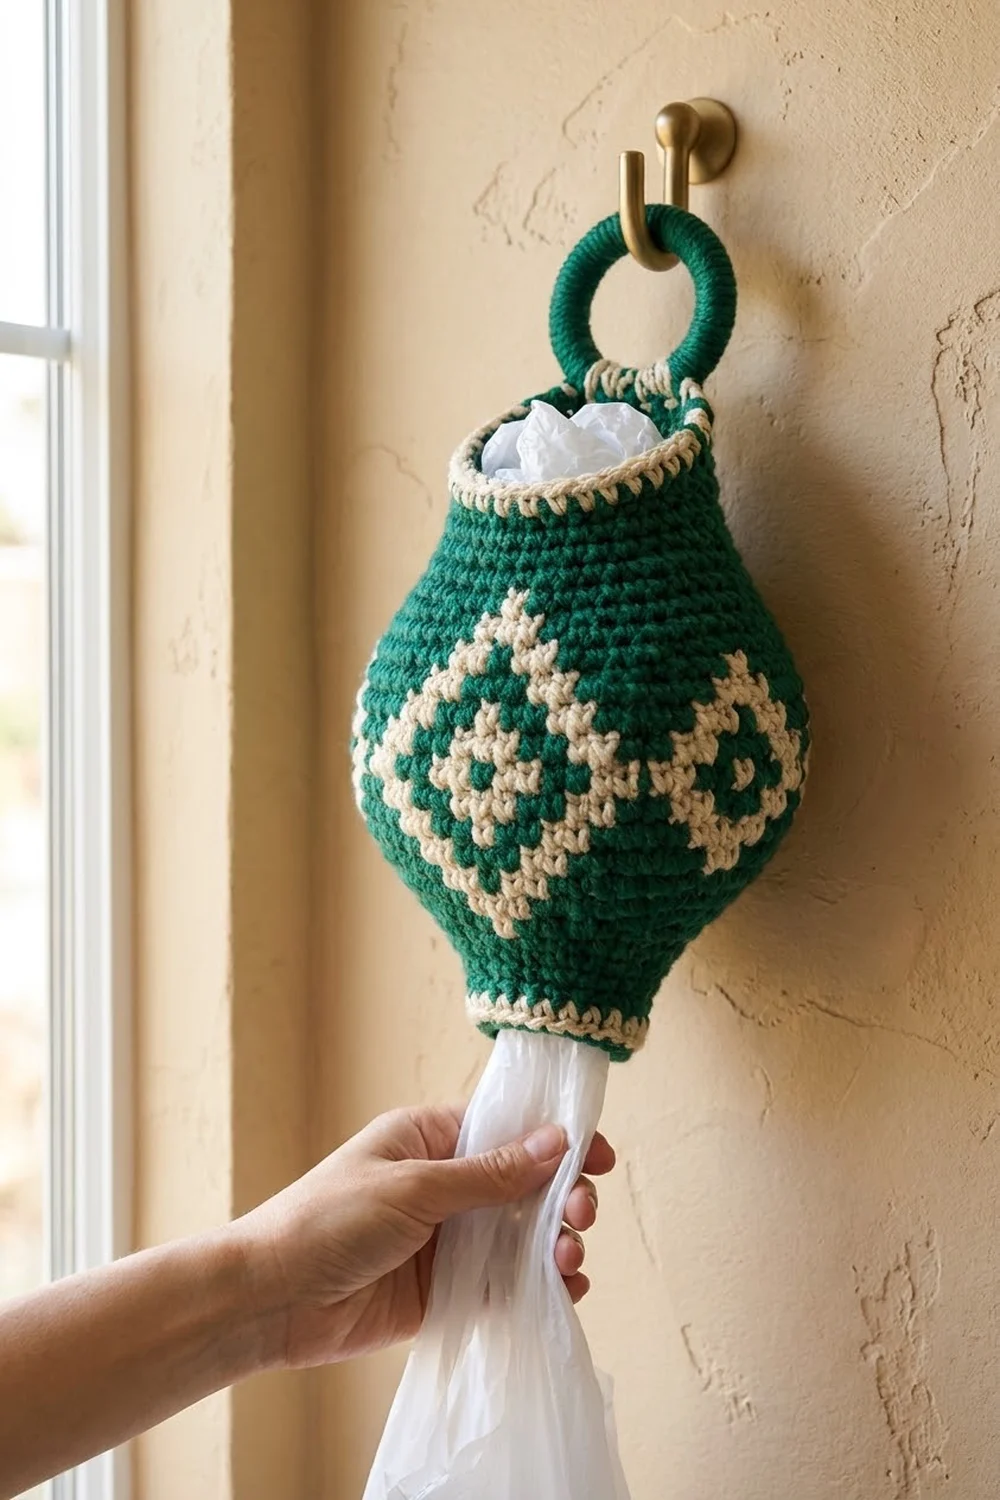
The Emerald Lantern Bag Holder is a plump, vase-shaped dispenser that hangs from a wall hook and keeps plastic grocery bags out of sight. You stuff bags in through the top opening and pull them out one at a time through the narrower bottom opening. A crochet-covered ring at the back of the rim hangs it on the hook.
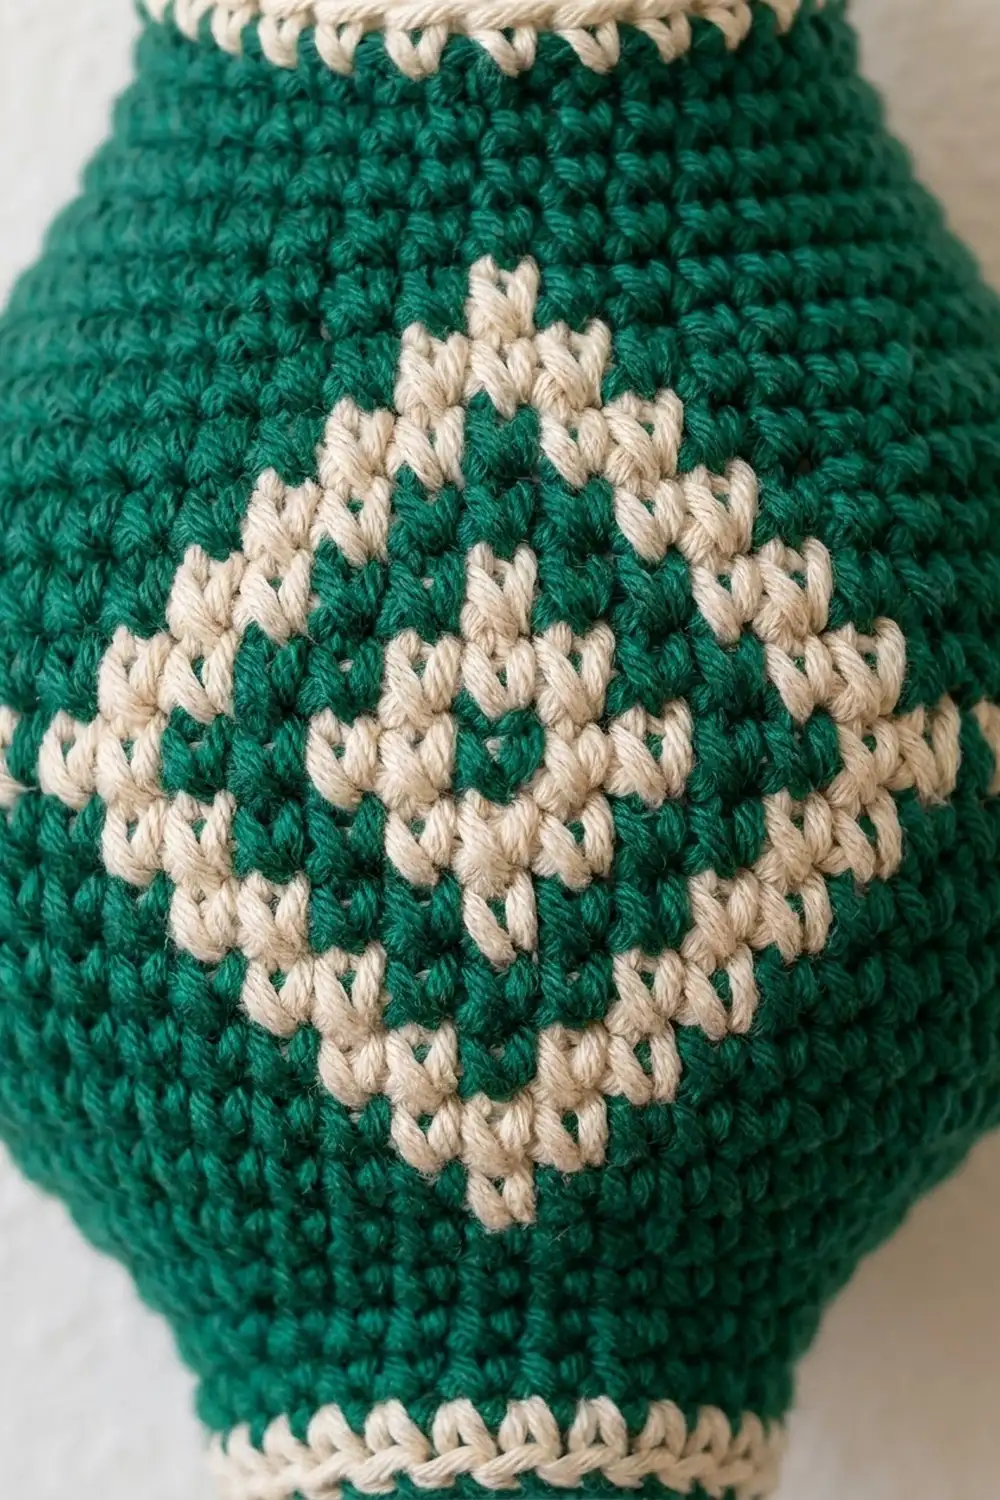
The body is worked in tapestry single crochet in deep emerald green with a natural cream contrast. A large stepped diamond sits on the widest part. Inside it are a smaller cream diamond and a cream ring around a single green center stitch. The diamond repeats four times around, so from the front you see one whole diamond with half diamonds at each side. Checkered stripes and a cream crab-stitch edge trim both openings.
This pattern uses US crochet terms. The finished holder is 24 in (61.0 cm) around at its widest point, about 7.6 in (19.3 cm) across when it hangs, and about 11.25 in (28.6 cm) long measured along the side. It hangs roughly 10 in (25.4 cm) tall.
The body is worked top-down in one seamless piece. You start with a chain ring for the top opening, increase out to the widest round, work the diamond band without shaping, and then decrease to the bottom opening. To finish, you edge both openings, cover a ring and attach it with a small tab.
Finished Size and Construction
- Finished size: 24 in (61.0 cm) around at the widest point, 12 in (30.5 cm) wide laid flat, about 11.25 in (28.6 cm) long along the side
- Skill level: Intermediate (tapestry crochet, shaping in the round)
- Terminology: US crochet terms
- Yarn weight: Worsted (#4) cotton or cotton blend
- Hook: 4.0 mm (G-6)
- Number of pieces: 1 body plus 1 covered ring, attached during finishing
- Layout: One tube in continuous rounds, with the diamond repeated 4 times around
- Piece size: Top opening 12 in (30.5 cm) around, bottom opening 9 in (22.9 cm) around
- Size before border: 10.5 in (26.7 cm) along the side (42 rounds)
- Border depth: About 3/8 in (1.0 cm) at each opening
Materials
Use a smooth, firm worsted cotton or cotton blend. Cotton holds the lantern shape and keeps the stitches dense enough that bags don’t poke through. Fuzzy or very stretchy yarn will blur the diamond and let the body sag.
- Color A, emerald green: 160 g, about 290 m
- Color B, natural cream: 70 g, about 125 m
These amounts include a margin of about 15%. Tapestry crochet carries the unused color inside every stitch, so it uses more yarn than plain sc. To make a second holder in another color, such as purple, use the same amount of your new Color A.
Tools:
- 4.0 mm (G-6) crochet hook
- One 3 in (7.6 cm) metal or wooden ring
- Stitch marker
- Tapestry needle
- Scissors
- Measuring tape
- Spray bottle for blocking
Abbreviations (US Terms)
- ch: chain
- sl st: slip stitch
- sc: single crochet
- inc: 2 sc in the same stitch
- sc2tog: single crochet 2 together
- rev sc: reverse single crochet (crab stitch)
- st(s): stitch(es)
- rnd(s): round(s)
- A / B: Color A / Color B
Tapestry sc: Lay the unused color along the tops of the stitches and work each sc over it, so the strand is hidden inside. To change color, work the last sc of the old color until 2 loops remain on the hook. Then yarn over with the new color and pull it through both loops. Carry B through every round from Rnd 2 to Rnd 42, including the solid green rounds, so the fabric stays the same thickness throughout.
rev sc: Work sc backward, from left to right (right-handed). Insert the hook into the next stitch to the right, pull up a loop, yarn over and pull through both loops.
Gauge and Checkpoints
Gauge: 16 sts and 16 rnds = 4 in (10.2 cm) in tapestry sc worked in the round with B carried.
Test first: Ch 32 and join into a ring. Work 16 rnds of tapestry sc in a spiral, using Motif Rnds 1–9 on any 24 sts so you can test the color changes too. Flatten the tube. It should measure 4 in (10.2 cm) wide and 4 in (10.2 cm) tall.
Checkpoints:
- After Rnd 3: 12 in (30.5 cm) around and 0.75 in (1.9 cm) tall
- After Rnd 9: 96 sts, 24 in (61.0 cm) around, or 12 in (30.5 cm) wide laid flat
- After Rnd 28: 7 in (17.8 cm) from the foundation along the side. Each diamond is 4.25 in (10.8 cm) wide and 4.25 in (10.8 cm) tall.
- After Rnd 42: 10.5 in (26.7 cm) along the side, with a 9 in (22.9 cm) bottom opening
If your piece is too big, switch to a 3.75 mm (F-5) hook and hold the carried strand a little snugger. If it is too small, switch to a 4.5 mm (7) hook. Don’t change the stitch counts, because the diamond repeat needs exactly 96 sts.
Body
Work in a continuous spiral with no joins and no turning. Move the marker up to the first stitch of each round as you go.
Foundation: With A, ch 48. Join with a sl st to the first ch, making sure the chain isn’t twisted.
Rnd 1: With A, ch 1, then sc in each ch around. Place a marker in the first sc. (48 sts)
Rnd 2: Join B and carry it from here on. *Sc 1 A, sc 1 B; repeat from * around. (48 sts: 24 A, 24 B)
Rnd 3: With A, sc in each st around. (48 sts)
Shoulder Increases (A, carrying B)
Rnd 4: *Sc 5, inc; repeat from * 8 times. (56 sts)
Rnd 5: *Sc 6, inc; repeat from * 8 times. (64 sts)
Rnd 6: *Sc 7, inc; repeat from * 8 times. (72 sts)
Rnd 7: *Sc 8, inc; repeat from * 8 times. (80 sts)
Rnd 8: *Sc 9, inc; repeat from * 8 times. (88 sts)
Rnd 9: *Sc 10, inc; repeat from * 8 times. (96 sts)
Rnds 10–11: With A, sc in each st around. (96 sts)
Diamond Band (Rnds 12–28)
Each motif round is a 24-st repeat worked 4 times around. The counts below are for one repeat, and every line adds up to 24 sts. All the diamond lines are 1 stitch wide and shift 1 stitch per round, which gives the stepped, pixel look.
- Motif Rnd 1 (Rnd 12): A 11, B 1, A 12
- Motif Rnd 2 (Rnd 13): A 10, B 1, A 1, B 1, A 11
- Motif Rnd 3 (Rnd 14): A 9, B 1, A 3, B 1, A 10
- Motif Rnd 4 (Rnd 15): A 8, B 1, A 5, B 1, A 9
- Motif Rnd 5 (Rnd 16): A 7, B 1, A 3, B 1, A 3, B 1, A 8
- Motif Rnd 6 (Rnd 17): A 6, B 1, A 3, B 1, A 1, B 1, A 3, B 1, A 7
- Motif Rnd 7 (Rnd 18): A 5, B 1, A 3, B 1, A 3, B 1, A 3, B 1, A 6
- Motif Rnd 8 (Rnd 19): A 4, B 1, A 3, B 1, A 2, B 1, A 2, B 1, A 3, B 1, A 5
- Motif Rnd 9 (Rnd 20, center): A 3, B 1, A 3, B 1, A 2, B 1, A 1, B 1, A 2, B 1, A 3, B 1, A 4
- Motif Rnds 10–17 (Rnds 21–28): Work Motif Rnds 8, 7, 6, 5, 4, 3, 2 and 1, in that order.
(96 sts in every motif round)
The outer diamond is 17 sts wide and 17 rnds tall. Inside it is a 9-st cream diamond. Motif Rnds 8–10 form a cream ring around a single green center stitch. At the widest point, 7 green sts separate neighboring diamonds. Plan for the start of the round to fall at the side of the holder, where the small spiral jog won’t be noticed.
Rnds 29–30: With A, sc in each st around. (96 sts)
Lower Taper (A, carrying B)
Rnd 31: *Sc 6, sc2tog; repeat from * 12 times. (84 sts)
Rnd 32: Sc in each st around. (84 sts)
Rnd 33: *Sc 5, sc2tog; repeat from * 12 times. (72 sts)
Rnd 34: Sc in each st around. (72 sts)
Rnd 35: *Sc 4, sc2tog; repeat from * 12 times. (60 sts)
Rnd 36: *Sc 3, sc2tog; repeat from * 12 times. (48 sts)
Rnd 37: *Sc 2, sc2tog; repeat from * 12 times. (36 sts)
Rnds 38–40: Sc in each st around. (36 sts)
Rnd 41: *Sc 1 A, sc 1 B; repeat from * around. (36 sts: 18 A, 18 B)
Rnd 42: With A, sc in each st around. (36 sts) Sl st to the next st. Fasten off A, and leave B attached.
The taper is steeper than the shoulder, and that is what gives the lantern its full belly and narrow bottom collar.
Border
Border gauge: One border stitch for each body stitch, at 4 sts per 1 in (2.5 cm), the same as the body. The border never adds or removes stitches.
Bottom Border, Rnd 1: With B, sc in each st around. (36 sts)
Bottom Border, Rnd 2: With B, rev sc in each st around. (36 sts) Sl st to the first st and fasten off.
Top Border, Rnd 1: Turn the holder upside down. Join B in any free loop of the foundation chain. Ch 1, then sc in each loop around. (48 sts)
Top Border, Rnd 2: With B, rev sc in each st around. (48 sts) Sl st to the first st and fasten off.
Why the math works: At 4 sts per inch, the 48-st top opening measures 12 in (30.5 cm) and the 36-st bottom opening measures 9 in (22.9 cm). The border keeps those counts exactly, so the openings stay true to size and simply gain about 3/8 in (1.0 cm) of cream edge. Both checker rounds have an even count (48 and 36), so A and B alternate all the way around with no break in the pattern.
Covered Ring and Hanging Tab
Ring: Join A to the 3 in (7.6 cm) ring with a sl st. Work about 60 sc tightly around the ring, pushing them together until none of the ring shows. Sl st to the first sc and fasten off.
Tab: Find the center 8 sts at the back of Top Border Rnd 1. From the inside of the holder, join A to the first of these sts.
Tab Rows 1–6: Ch 1, sc in each of the 8 sts, turn. (8 sts) The tab measures 2 in (5.1 cm) wide and 1.5 in (3.8 cm) tall.
Fold the tab over the bottom of the covered ring toward the inside and whipstitch the last row to the base of the tab. When the holder hangs, its rim lifts into a soft point under the ring.
Final Blocking
- Weave in all ends on the inside, running them through the carried strands.
- Mist the holder until it is evenly damp. Don’t soak it.
- Stuff it firmly with bags or a rolled towel until the belly is about 7.6 in (19.3 cm) across.
- Nudge the stitches of each diamond into straight diagonal lines.
- Shape the top collar to 3.8 in (9.7 cm) across and the bottom collar to 2.9 in (7.4 cm) across.
- Let it dry completely, still stuffed, either hanging from its ring or standing upright.
- Remove the stuffing and check the measurements against the checkpoints.
Final Quality-Control Checklist
- The widest round measures 24 in (61.0 cm) around.
- There are four complete diamonds, evenly spaced, each 17 sts by 17 rnds.
- No carried yarn shows through the stitches.
- Both checker rounds alternate cleanly all the way around.
- The top opening is 12 in (30.5 cm) around and the bottom opening is 9 in (22.9 cm) around.
- The crab-stitch edges lie flat with no ruffling.
- The ring is fully covered and the tab is stitched securely.
- All ends are woven in and trimmed.
Troubleshooting
Carried yarn peeks through: Tighten the working yarn slightly and keep the carried strand flat along the stitch tops.
Diamond leans to one side: This is normal for tapestry sc worked in a spiral. Straighten it during blocking.
Fabric puckers at color changes: The carried strand is too tight. Stretch the fabric gently every few stitches to loosen it.
Shoulder ruffles: Your gauge is loose. Go down a hook size and rework from Rnd 4.
Bags fall out of the bottom: Work Rnds 38–42 with a hook one size smaller.
Ring shows between stitches: Add more sc and pack them tighter. Going over 60 sc is fine.
Care
Hand wash in cool water with mild soap, roll it in a towel to press out the water, and dry it stuffed into shape. Don’t tumble dry.
Final Notes
Every measurement in this pattern comes from one gauge: 16 sts and 16 rnds = 4 in (10.2 cm). The 48-st start gives a 12 in (30.5 cm) top opening. Six increase rounds reach 96 sts, which is 24 in (61.0 cm) around and fits four 24-st diamond repeats. The taper rounds bring the count back down to a 36-st, 9 in (22.9 cm) bottom opening. The 42 body rounds measure 10.5 in (26.7 cm), and the borders add about 3/8 in (1.0 cm) at each end, for about 11.25 in (28.6 cm) along the side. If your swatch matches gauge, every later checkpoint should match as well.
Happy crocheting!