

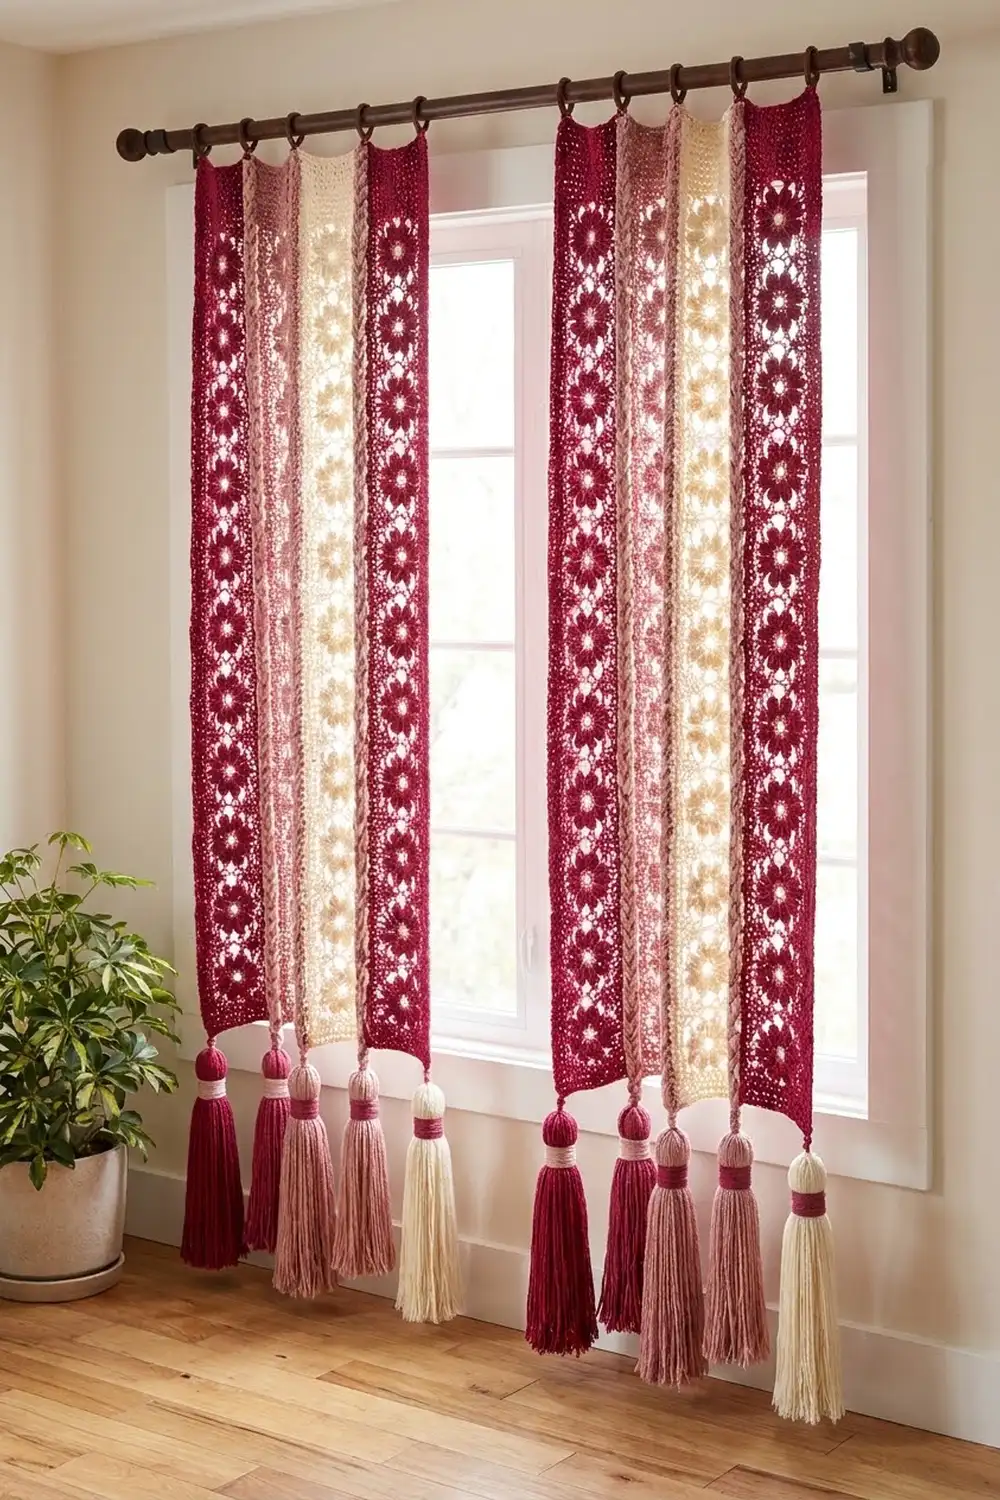
The Berry Blossom Cascade is a lacy curtain panel. It is made of small four-petal flowers stacked in columns and held in place by braided cords. Light comes through the open spaces, the flowers make a soft diagonal pattern, and full tassels finish the bottom edge.
The colors are deep raspberry, dusty rose and cream. Raspberry carries the structure: cords, tabs and most tassels. All three colors share the flowers evenly, so the panel looks romantic and a little boho without being busy.
This pattern uses US crochet terms. One finished panel measures about 22 1/4 in (56.5 cm) wide and 60 in (152.4 cm) long in the flower section. With tabs and tassels it measures 66 1/2 in (168.9 cm) from the top of the rod to the tassel tips.
Here is how it goes together. You crochet 75 flowers, joining each one to the flower above it as you finish its last round. That gives you five columns. Then you work six braided cords and hook each cord into the side petal tips as you go. Finally you add six folded tabs at the top and 11 tassels at the bottom. Make two panels if you want a pair.
Finished Size and Construction
- Panel size (flower section): 22 1/4 in × 60 in (56.5 cm × 152.4 cm)
- Overall drop: 66 1/2 in (168.9 cm): 2 1/2 in (6.4 cm) of tab + 60 in (152.4 cm) of panel + 4 in (10.2 cm) of tassel
- Skill level: Intermediate
- Terminology: US
- Yarn weight: Worsted (#4)
- Hook: 5.0 mm (US H-8)
- Number of pieces: 75 flowers, 6 cords, 6 tabs, 11 tassels
- Layout: 5 flower columns × 15 flowers each, with 6 cords
- Piece size: each flower is 4 in (10.2 cm) from tip to tip
- Size before border: 22 1/4 in × 60 in (56.5 cm × 152.4 cm)
- Border depth: tabs add 2 1/2 in (6.4 cm) at the top and tassels add 4 in (10.2 cm) at the bottom
Materials
Use a smooth worsted-weight cotton or cotton blend, about 200 yd (183 m) per 100 g. Cotton keeps the stitches crisp and hangs without stretching. Avoid very fuzzy yarns because they blur the flower centers.
- Raspberry: 330 g / 600 m (flowers, cords, tabs, 6 tassels)
- Dusty rose: 175 g / 320 m (flowers, 2 tassels, all tassel wraps)
- Cream: 175 g / 320 m (flowers, 3 tassels)
All quantities include a margin of about 12–15% for gauge differences, joins and tails.
Tools
– 5.0 mm (US H-8) crochet hook
– Tapestry needle
– Scissors
– Stiff card, 4 1/2 in (11.4 cm) tall, for wrapping tassels
– Rust-proof pins and a large blocking surface
– Stitch markers
– Tape measure
Abbreviations (US Terms)
- ch: chain
- sl st: slip stitch
- sc: single crochet
- hdc: half double crochet
- dc: double crochet
- tr: treble crochet
- sk: skip
- sp: space
- st(s): stitch(es)
- yo: yarn over
- rep: repeat
Special stitch: Lanyard cord (braided cord)
1. Ch 2, then sc in the 2nd ch from the hook. This is Row 1.
2. Turn the work clockwise, like turning a page from right to left. Two loops now sit on the left edge.
3. Insert the hook under both of those loops, yo and pull up a loop (2 loops on the hook), then yo and draw through both loops. This is one cord row.
Rep step 2 and step 3 for each new row. The cord comes out as a firm square braid about 3/8 in (1.0 cm) wide.
Joining cord row: work a normal cord row, but put the hook through the side loops and also through the ch-2 tip of the flower (or through both flower tips on an inner cord) before you pull up the loop.
Gauge and Checkpoints
Make one test flower and 2 in (5.1 cm) of cord before you start the panel.
- Flower after Rnd 1: 1 1/4 in (3.2 cm) across
- Flower after Rnd 2: 2 in (5.1 cm) across
- Finished flower: 4 in (10.2 cm) from tip to tip, measured blocked, both up-down and left-right
- Cord: 4 rows = 1 in (2.5 cm); width is 3/8 in (1.0 cm)
- Tab fabric: 16 sc × 16 rows = 4 in × 4 in (10.2 cm × 10.2 cm)
If your flower is too big (over 4 1/4 in / 10.8 cm), go down to a 4.5 mm hook. If it is too small (under 3 3/4 in / 9.5 cm), go up to a 5.5 mm hook.
Cord gauge matters most for the length. Every 16 cord rows have to match one flower height of 4 in (10.2 cm). If your cord comes out longer or shorter, change hooks for the cord only, so the join points line up with the flower tips.
Flower Motif
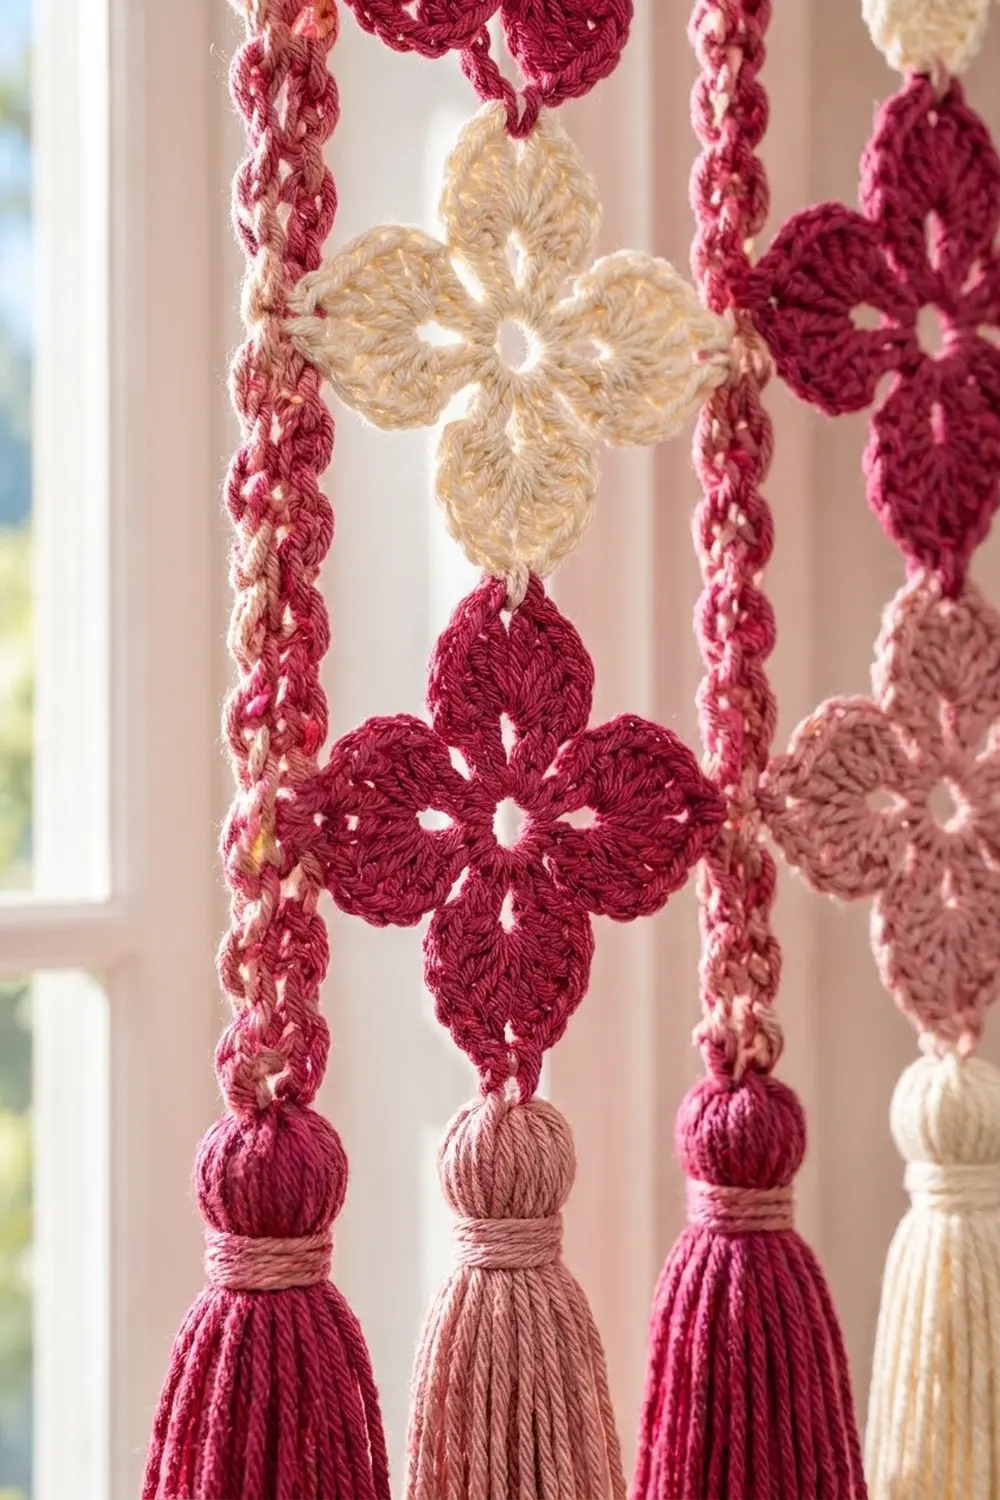
The petals point up, down, left and right. Each petal ends in a ch-2 tip, and those four tips are your joining points.
Rnd 1: Ch 4 and sl st to the first ch to form a ring. Ch 3 (counts as dc), then work 11 dc into the ring. Sl st to the top of the ch-3. (12 dc)
Rnd 2: Ch 1. Sc in the same st, ch 4, sk 2 dc. Sc in the next dc, ch 4, sk 2 dc. Rep from * twice more, then sl st to the first sc. (4 sc, 4 ch-4 sps)
Rnd 3 (petals): Sl st into the first ch-4 sp. In the same sp, work (sc, hdc, 2 dc, tr, ch 2, tr, 2 dc, hdc, sc). Rep in each of the remaining 3 ch-4 sps. Sl st to the first sc and fasten off. (40 sts and 4 ch-2 tips; each petal has 10 sts + 1 ch-2 tip)
Each petal grows from sc to tr and back down to sc. That gives a rounded petal that comes to a gentle point at the ch-2 tip, which is the shape in the photo.
Join-As-You-Go Within a Column
Work the first flower of each column exactly as written. For every flower after that, change the last round as follows.
Work Rnd 3 until you reach the petal that will point up. In that petal, work (sc, hdc, 2 dc, tr, ch 1). Then sl st into the ch-2 tip of the bottom petal of the flower above. Finish with (ch 1, tr, 2 dc, hdc, sc). Complete the other petals as usual.
The joined tip becomes ch 1, sl st, ch 1. That replaces the ch-2 tip, so the stitch count stays at 40 sts. The side tips stay free for the cords.
Column checkpoint: a column of 15 flowers measures 15 × 4 in = 60 in (152.4 cm) from the top tip to the bottom tip, laid flat without stretching.
Make All Pieces
Flowers: 75 in total, 25 of each color.
– Raspberry (R): 25
– Dusty rose (P): 25
– Cream (C): 25
Build each column from the top down. Use this grid, where Row 1 is the top of the panel:
         Col1 Col2 Col3 Col4 Col5
Row 1:    R    P    C    R    P
Row 2:    P    C    R    P    C
Row 3:    C    R    P    C    R
(Repeat Rows 1–3 four more times = 15 rows)
Each 3-row block holds 5 flowers of each color. Five blocks give 25 of each color.
Cords: 6 in raspberry. You make them during joining.
Tabs: 6 in raspberry.
Tassels: 11 in total.
– 6 raspberry (one under each cord)
– 3 cream (under Columns 1, 3 and 5)
– 2 dusty rose (under Columns 2 and 4)
Joining
Lay the five columns face up, side by side, in order. Leave a gap of about 3/8 in (1.0 cm) between columns for the cords. Line up the columns at the top so all the Row 1 flowers sit level.
Where the joins fall. Each flower’s side tips sit at its middle height, 2 in (5.1 cm) below its top tip. The side tips of the next flower down are 4 in (10.2 cm) lower. At 4 rows per inch, that means:
- The first join falls on Row 8.
- After that, every 16th row is a join row.
Cord 1 (left edge): Work Rows 1–7 as plain cord rows. On Row 8, work a joining cord row into the left tip of the Row 1 flower in Column 1. Then work 15 plain rows and 1 joining row into the left tip of the next flower down. Rep from * 13 more times.
The last join lands on Row 232 (8 + 16 × 14). Work 8 more plain rows, which brings you to Row 240. Fasten off and leave a 12 in (30.5 cm) tail.
Cords 2–5 (inner cords): Work these the same way as Cord 1. On each joining row, insert the hook through the right tip of the column on the left and the left tip of the column on the right, held together. This way one cord holds both columns.
Cord 6 (right edge): Work it like Cord 1, joining only into the right tips of Column 5.
Every cord has 240 rows, which is 60 in (152.4 cm), and 15 join rows.
Tension advice: keep the panel flat on a table while you work, and slide the finished part away from you. If a cord pulls the flowers into a curve, your cord rows are tighter than gauge. Pull out back to the last join and loosen up.
Size checkpoint after joining:
– Width = 5 columns × 4 in + 6 cords × 3/8 in = 20 in + 2 1/4 in = 22 1/4 in (56.5 cm)
– Length = 60 in (152.4 cm)
Border: Top Tabs and Tassel Fringe
This panel has no stitched edging. The tabs make the top border and the tassels make the bottom border.
Tab gauge: 16 sc × 16 rows = 4 in (10.2 cm).
Tab (make 6): Ch 6, then sc in the 2nd ch from the hook and in each ch across. (5 sc)
Rows 2–20: Ch 1 and turn, then sc in each sc across. (5 sc per row)
Fasten off and leave a 12 in (30.5 cm) tail. Each tab is 1 1/4 in (3.2 cm) wide and 5 in (12.7 cm) long.
Attach the tabs: fold a tab in half crosswise. Place the top end of a cord between the two short ends, centered. Whipstitch through all three layers across the 5 sc. Folded in half, the tab makes a loop that rises 2 1/2 in (6.4 cm) above the panel, which fits a rod up to 1 1/2 in (3.8 cm) across.
Why the math works: the cords sit 4 3/8 in (11.1 cm) apart, center to center (4 in flower plus 3/8 in cord). A tab sits on each cord, so the tabs share that spacing exactly. Each 1 1/4 in (3.2 cm) tab leaves a gap of 3 1/8 in (7.9 cm), so the panel hangs evenly with no sagging between tabs.
Tassel (make 11):
1. Wrap the yarn 30 times around the 4 1/2 in (11.4 cm) card.
2. Slide a 12 in (30.5 cm) tie strand under the wraps at the top and knot it tightly.
3. Cut the wraps along the bottom edge.
4. Wrap dusty rose 6 times around the bundle, 1/2 in (1.3 cm) below the top, then knot it and bury the ends inside the tassel.
5. Trim the strands evenly so the tassel measures 4 in (10.2 cm).
Attach the tassels:
– Cord tassels: tie through the last cord row (Row 240).
– Column tassels: tie through the ch-2 bottom tip of the Row 15 flower.
All 11 tassel tops sit level, because each cord ends 2 in (5.1 cm) below its last join, which is exactly at the bottom flower tip.
Final Blocking
- Weave in all the ends except the tassel ties, running each end back through matching stitches.
- Soak the panel in cool water for 15 minutes, then gently press the water out in a towel. Do not wring it.
- Lay it flat face up and pin it to 22 1/4 in × 60 in (56.5 cm × 152.4 cm).
- Pin each flower at all four tips so it measures 4 in (10.2 cm) from tip to tip.
- Make sure the cords lie straight and the join points line up across the panel.
- Comb the tassels straight and let everything dry completely.
- Hang the panel for 24 hours before trimming the tassels a final time.
Final Quality-Control Checklist
- 75 flowers, with 25 in each color, matching the grid
- Every flower has 40 sts and 4 tips
- Each column has 15 flowers and measures 60 in (152.4 cm)
- Each cord has 240 rows and 15 join rows
- Inner cords catch both neighboring tips at every join
- Panel measures 22 1/4 in (56.5 cm) wide
- 6 tabs, each 5 sc × 20 rows, centered on the cords
- 11 tassels, all 4 in (10.2 cm), with dusty rose wraps
- No loose ends showing on the front
Troubleshooting
The flowers cup instead of lying flat. Rnd 2 chains are too tight. Use ch 5 in place of ch 4, or loosen up.
The petals look flat, not rounded. Check that each petal has its tr stitches and its ch-2 tip.
The cord joins drift above or below the flower tips. Your cord gauge is off. Count your rows and change the cord hook.
The panel bows inward at the edges. The edge cords are tighter than the inner cords. Rework them at the same tension.
Tabs twist on the rod. Center each tab on its cord and sew both short ends flat.
Tassels splay apart. Add 2 more dusty rose wraps and pull them firmly.
Care
Hand wash cool and lay flat to dry, reshaping the flowers as needed. Do not hang it wet, because the weight stretches the cords.
Final Notes
Everything rests on one measurement chain. A flower is 4 in (10.2 cm). Fifteen flowers make a 60 in (152.4 cm) column. Sixteen cord rows match each flower, so each cord is 240 rows long. Five columns plus six cords make 22 1/4 in (56.5 cm) of width. Tabs and tassels bring the full drop to 66 1/2 in (168.9 cm). Check your gauge at the first flower and the rest falls into place.
Happy crocheting!