

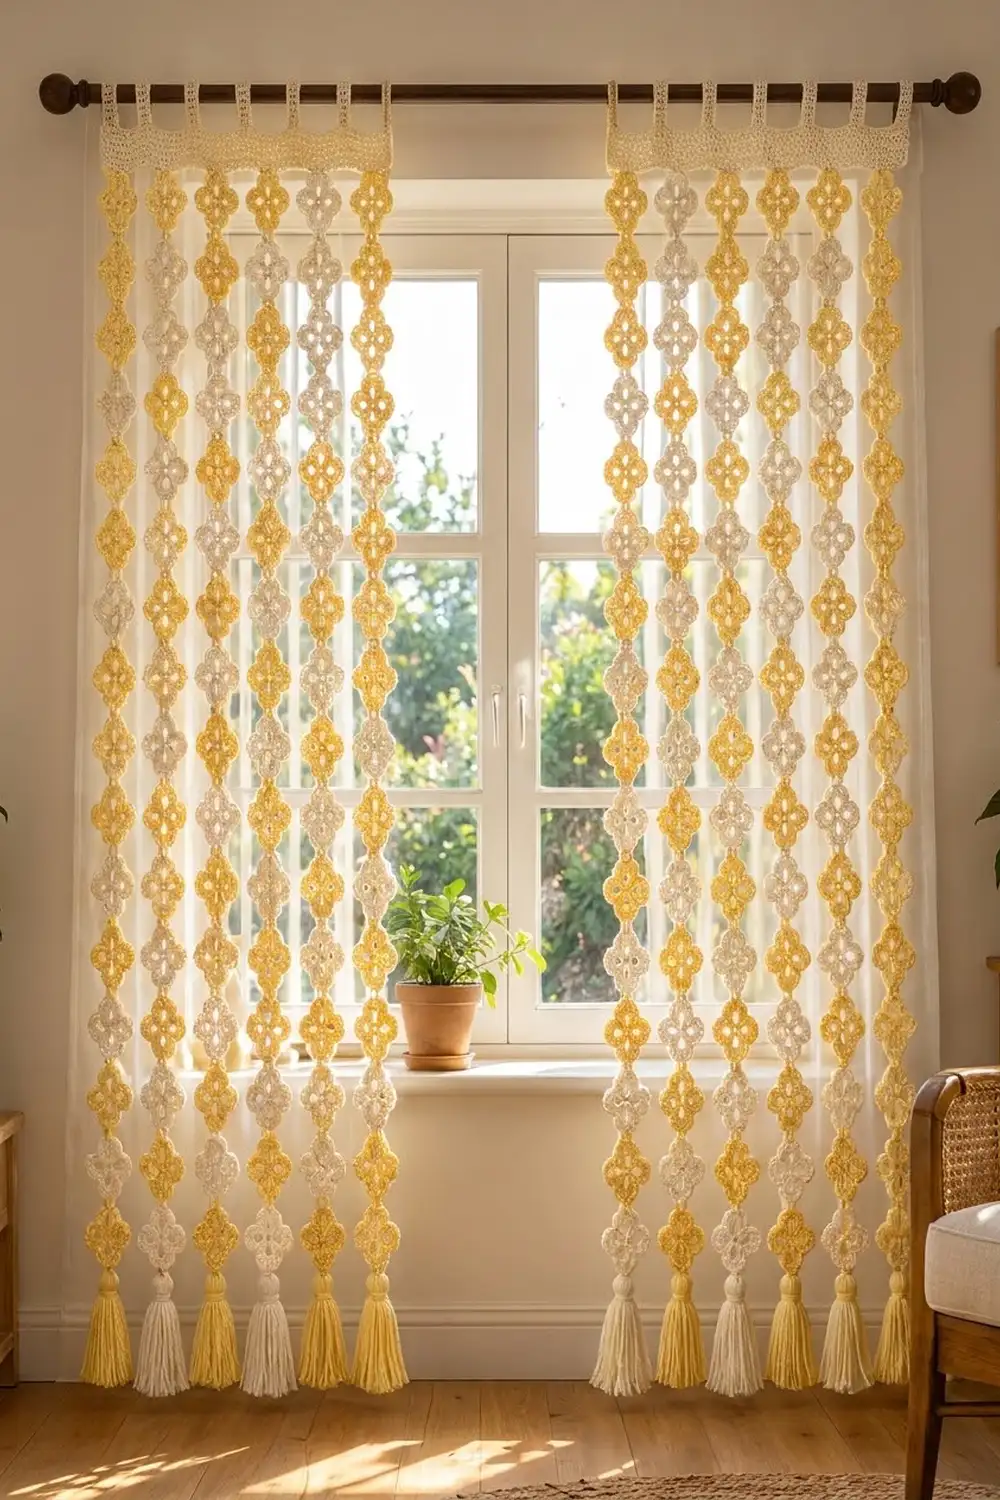
This curtain panel is made of open, four-lobed quatrefoil motifs linked into hanging strands. The strands alternate butter yellow and cream, and each one ends in a full tassel with a rounded head. A cream header band with fold-over tabs carries the whole panel on a standard curtain rod.
Light passes through the oval openings and the gaps between strands, so the panel softens a window without blocking it. The colors are offset from strand to strand, which gives a calm checkerboard rhythm from a distance.
This pattern uses US crochet terms. One finished panel measures 28 in (71.1 cm) wide and 53.85 in (136.8 cm) long from the top of the header band to the tassel tips, not counting the tabs. For a pair like the one shown, make two panels.
Construction is simple and repeated. You crochet small three-round motifs and join them as you go into 8 strands of 12 motifs each. Then you work a header band in rows, attach the strands to its lower edge with chain links, add tabs, and finish with tassels.
Finished Size and Construction
- Finished size: 28 in (71.1 cm) wide x 53.85 in (136.8 cm) long
- Skill level: Easy-intermediate
- Terminology: US crochet terms
- Yarn weight: Worsted (#4)
- Hook: 5.0 mm (H-8)
- Number of pieces: 96 motifs, 1 header band, 8 tabs, 8 tassels
- Layout: 8 strands x 12 motifs
- Piece size: each motif is 3 in (7.6 cm) tip to tip
- Size before border: each strand is 44.25 in (112.4 cm) long, and the strands are spaced 3.5 in (8.9 cm) apart, center to center
- Border (header band) depth: 2.1 in (5.3 cm)
Materials
Use a smooth worsted-weight cotton or cotton blend of about 200 m per 100 g. Cotton holds the lobe shapes crisply and hangs straight. Avoid fuzzy yarns, because they fill the openings.
- Color A, butter yellow: 250 g / 500 m (48 motifs and 4 tassels)
- Color B, cream: 350 g / 700 m (48 motifs, header band, tabs, links and 4 tassels)
The quantities include a margin of about 15% for gauge differences and swatching.
Tools:
– 5.0 mm (H-8) crochet hook
– Tapestry needle
– Scissors
– A piece of stiff card 6 in (15.2 cm) wide for winding tassels
– Rustproof pins and a blocking mat
– Spray bottle
– Measuring tape
– Locking stitch markers
Abbreviations (US Terms)
- ch: chain
- sl st: slip stitch
- sc: single crochet
- hdc: half double crochet
- dc: double crochet
- fhdc: foundation half double crochet
- sk: skip
- st(s): stitch(es)
- RS: right side
Special stitch: lobe. In the same ch-7 loop, work (2 sc, 2 hdc, 5 dc, 2 hdc, 2 sc). That makes 13 sts. The 3rd dc, which is the 7th st of the lobe, is the center dc. All joining links attach to center dcs.
Gauge and Checkpoints
Make one complete motif before you start the panel, and block it lightly.
- After Rnd 1: the center ring measures about 0.75 in (1.9 cm) across.
- After Rnd 2: the four loops span about 2 in (5.1 cm) from tip to tip.
- After Rnd 3: the motif measures 3 in (7.6 cm) from lobe tip to opposite lobe tip.
- Header gauge: 12 hdc and 10 rows make a 3.5 in (8.9 cm) square, so each row is about 0.35 in (0.9 cm) tall.
If your motif is larger than 3 in (7.6 cm), go down half a hook size. If it is smaller, go up half a size. A difference of only 1/8 in (0.3 cm) per motif adds up to 1.5 in (3.8 cm) over a 12-motif strand, so check this carefully.
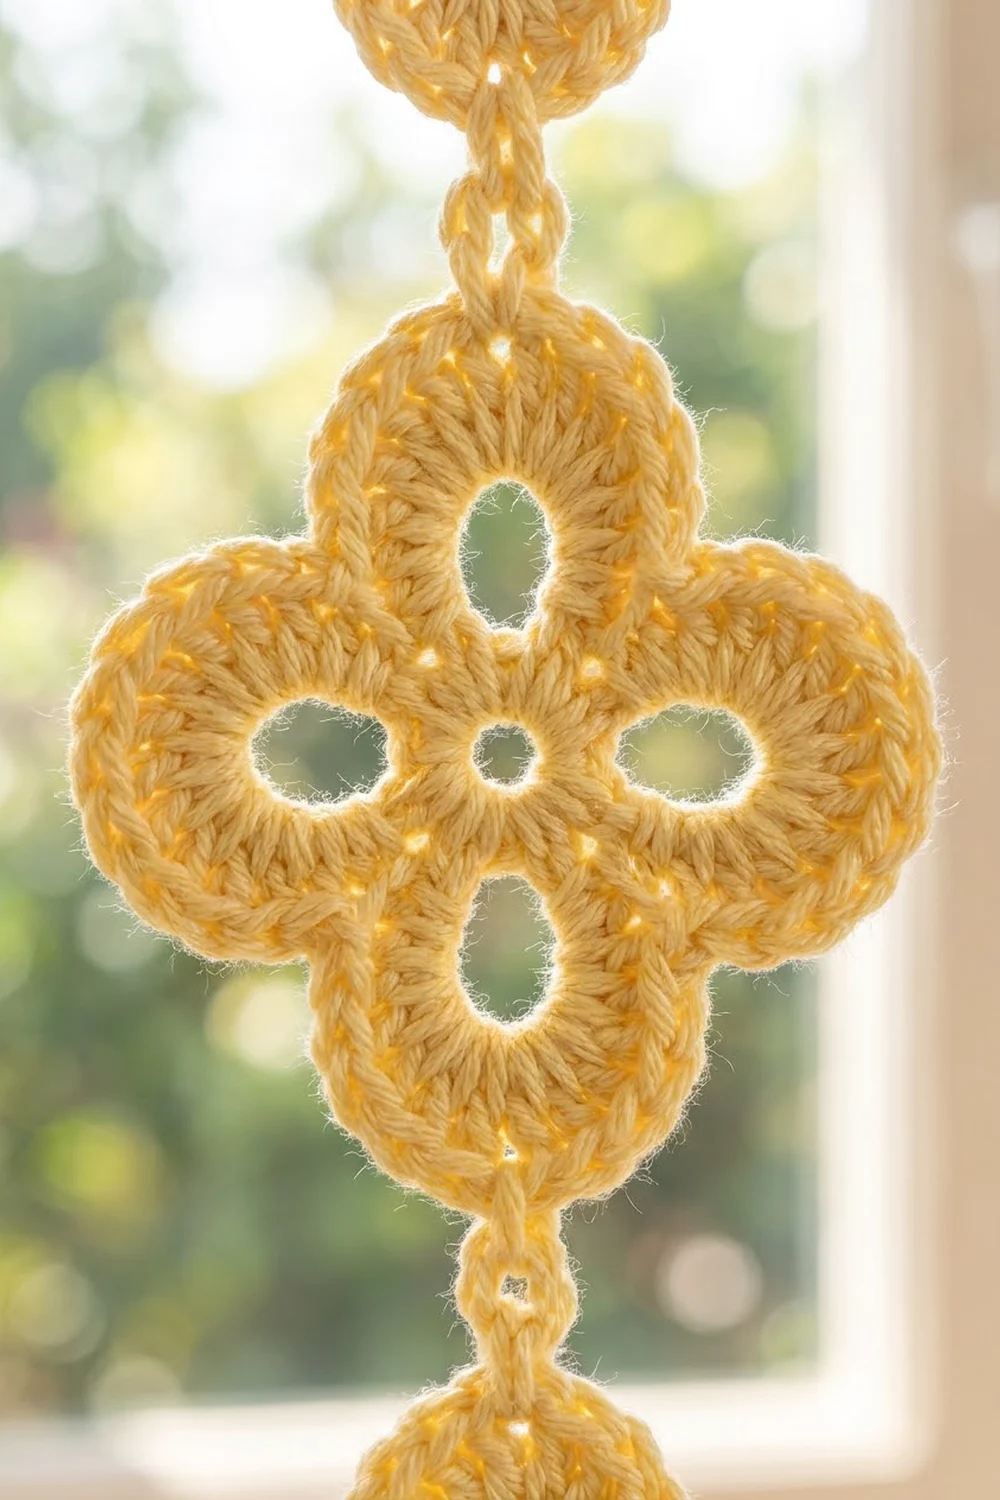
Motif Pattern
Make the motif in Color A or Color B, following the layout below.
Rnd 1: Make a magic ring. Ch 1, then work 8 sc in the ring. Pull the ring closed and sl st to the first sc. (8 sc)
Rnd 2: Ch 1. Sc in the same st, ch 7, sk the next sc. Repeat sc in the next sc, ch 7, sk the next sc 3 more times. Sl st to the first sc. (4 sc and 4 ch-7 loops)
The skipped sc leave the small center hole. The ch-7 loops become the four oval openings.
Rnd 3: Sl st into the first ch-7 loop. Repeat work 1 lobe in this loop, then sl st in the next sc 4 times. The last sl st goes into the first sc of Rnd 2. Fasten off. (52 sts in 4 lobes of 13, plus 4 sl sts)
The short sc and hdc at each side of a lobe and the 5 dc at its tip give each lobe its rounded petal shape. Each lobe sits around its ch-7 loop, so the oval opening stays clear inside it.
Orientation: The first lobe you work in Rnd 3 is the top lobe, and the third lobe is the bottom lobe. Place a marker in the center dc of the bottom lobe on every motif. The next motif joins there.
Make All Pieces
Make the first motif of each strand as written. Motifs 2 to 12 of each strand are joined to the previous motif as you work their Rnd 3 (see Joining).
- Color A (yellow): 48 motifs and 4 tassels
- Color B (cream): 48 motifs and 4 tassels
Layout: In the grid below, strands run top to bottom and Y means yellow, C means cream. Odd strands start with yellow, and even strands start with cream.
Strand:   1  2  3  4  5  6  7  8
Motif 1:  Y  C  Y  C  Y  C  Y  C
Motif 2:  C  Y  C  Y  C  Y  C  Y
Motif 3:  Y  C  Y  C  Y  C  Y  C
Motif 4:  C  Y  C  Y  C  Y  C  Y
Motif 5:  Y  C  Y  C  Y  C  Y  C
Motif 6:  C  Y  C  Y  C  Y  C  Y
Motif 7:  Y  C  Y  C  Y  C  Y  C
Motif 8:  C  Y  C  Y  C  Y  C  Y
Motif 9:  Y  C  Y  C  Y  C  Y  C
Motif 10: C  Y  C  Y  C  Y  C  Y
Motif 11: Y  C  Y  C  Y  C  Y  C
Motif 12: C  Y  C  Y  C  Y  C  Y
Tassel:   C  Y  C  Y  C  Y  C  Y
Each column has 6 Y and 6 C, so the panel uses 48 motifs of each color. Each tassel matches its strand’s bottom motif.
Joining
Method: Join as you go with a doubled chain link at the tips of the top and bottom lobes.
To join a new motif, work Rnds 1 and 2 as usual. On Rnd 3, sl st into the first ch-7 loop and begin the top lobe with (2 sc, 2 hdc, 3 dc). The 3rd dc is the center dc. Then:
- Ch 3.
- Sl st in the marked center dc of the previous motif’s bottom lobe.
- Ch 3.
- Sl st in the top of the last dc made.
Finish the lobe with (2 dc, 2 hdc, 2 sc). Complete Rnd 3 as written.
Stitch logic: The link is worked between sts and adds none to the lobe. The top lobe still has 13 sts and the round still totals 52 sts. The link joins center dc to center dc, so the motifs hang tip to tip and stay centered.
Tension: Work the link chains at the same tension as your other chains. Tight links pucker the lobe tips, and loose links make the strand sag unevenly. A finished link measures about 0.75 in (1.9 cm).
Size checkpoint: After 4 joined motifs, the strand measures 14.25 in (36.2 cm). That is 4 x 3 in plus 3 x 0.75 in. A full strand of 12 motifs measures 44.25 in (112.4 cm). That is 12 x 3 in (36 in) plus 11 links x 0.75 in (8.25 in).
Border: Header Band and Tabs
Border gauge: 12 hdc = 3.5 in (8.9 cm), and 10 rows = 3.5 in (8.9 cm).
The band is divided into 8 sections of 12 sts, one section per strand. That gives 8 strands x 12 sts = 96 sts.
Row 1 (RS): With Color B, work 96 fhdc. Turn. (96 sts)
Rows 2–6: Ch 2 (does not count as a st), then hdc in each st across. Turn after each row. (96 sts per row)
Do not fasten off at the end of Row 6. Turn and sl st loosely across the top to firm the edge. (96 sl sts) Fasten off.
Why the math works: 96 sts divided by (12 sts per 3.5 in) gives 8 x 3.5 in = 28 in (71.1 cm). Each strand sits in the center of its own 3.5 in (8.9 cm) section. The 3 in (7.6 cm) motifs leave a 0.5 in (1.3 cm) gap between neighboring strands, which is the airy spacing shown. Six rows at 0.35 in (0.9 cm) each make a band depth of 2.1 in (5.3 cm).
Attaching the strands: Count along the foundation edge of Row 1. For each section, find the space between the 6th and 7th sts. The spaces fall between sts 6/7, 18/19, 30/31, 42/43, 54/55, 66/67, 78/79 and 90/91. With Color B:
- Sl st in the center dc of the top lobe of the strand’s Motif 1.
- Ch 3.
- Sl st into the marked space on the band.
- Ch 3.
- Sl st in the first sl st.
- Fasten off.
This top link also measures 0.75 in (1.9 cm). Attach strands 1 to 8 in order from left to right.
Tabs: Make 8 tabs, each 4 sts wide. With the RS facing, work them across the top of Row 6 over sts 5–8, 17–20, 29–32, 41–44, 53–56, 65–68, 77–80 and 89–92. Each tab sits centered over its strand.
The spacing works out exactly: 4 edge sts + 8 tabs x 4 sts + 7 gaps x 8 sts + 4 edge sts = 96 sts.
- Tab Row 1: Join Color B in the first st of the tab position. Ch 2, then hdc in the same st and in each of the next 3 sts. (4 hdc)
- Tab Rows 2–16: Ch 2, turn, and hdc in each st. (4 hdc)
Fasten off, leaving a 12 in (30.5 cm) tail. Fold the tab to the back of the band and whipstitch its last row along the back of Row 5.
Each tab is about 1.2 in (3.0 cm) wide and 5.6 in (14.2 cm) long before folding. Folded, it makes a loop of about 2.8 in (7.1 cm) that fits rods up to 1.5 in (3.8 cm) in diameter.
Tassels (make 8):
- Wind yarn 30 times around the 6 in (15.2 cm) card.
- Tie the top with a 12 in (30.5 cm) strand and cut the bottom loops.
- Tuck a pea-sized ball of the same yarn under the fold to shape a rounded head.
- Wrap tightly 0.75 in (1.9 cm) below the top, and hide the wrapping tail inside the tassel.
- To attach, join the tassel color with a sl st in the bottom-lobe center dc of Motif 12. Ch 4 and fasten off.
- Tie the tassel’s top strand through the last ch.
- Trim the tassel to 6 in (15.2 cm).
Final Blocking
- Weave in all ends along the lobe stitches, never across the openings.
- Lay each strand flat on the blocking mat.
- Pin each lobe tip so every motif measures 3 in (7.6 cm), with the oval openings fully open.
- Pin the links straight at 0.75 in (1.9 cm).
- Pin the header band to 28 in x 2.1 in (71.1 cm x 5.3 cm).
- Mist everything until damp, not soaked.
- Let it dry completely, then unpin.
- Steam the tassels lightly and comb out the strands.
- Hang the panel for 24 hours to let it settle before you do a final tassel trim.
Final Quality-Control Checklist
- Every motif has 4 lobes of 13 sts each.
- Each strand has 12 motifs in the correct order, with yellow and cream alternating.
- Neighboring strands start with opposite colors.
- All links join center dc to center dc.
- Each strand measures 44.25 in (112.4 cm).
- The header band has 96 sts and is 28 in (71.1 cm) wide.
- Each strand is attached between sts 6 and 7 of its section.
- There are 8 tabs, each centered over a strand and sewn securely.
- Each tassel matches the color of its strand’s bottom motif.
- The full panel measures 53.85 in (136.8 cm) long.
Troubleshooting
- Lobes cup or ruffle: Your Rnd 2 chains are too short or too tight. Make sure each loop has 7 chains.
- Lobes look flat or pointed: Check that you worked all 5 dc at the tip.
- The strand twists: One link was joined into the wrong st. Make sure every link uses center dcs.
- Strands are different lengths: Your link tension varies. Block all strands together and compare them before attaching.
- The band ripples: The fhdc are too loose. Rework them with a smaller hook, or block the band firmly.
- Tabs pull the band unevenly: Check that every tab has 16 rows.
Care
Hand wash in cool water with mild soap. Roll the panel in a towel to remove water, then lay it flat to dry and re-pin the motifs to 3 in (7.6 cm) if needed.
Final Notes
The measurement chain is simple to follow:
- Each motif measures 3 in (7.6 cm).
- 12 motifs plus 11 links make a 44.25 in (112.4 cm) strand.
- 8 strands at a 3.5 in (8.9 cm) spacing match a 96-st, 28 in (71.1 cm) band.
- The 2.1 in (5.3 cm) band, two 0.75 in (1.9 cm) links and a 6 in (15.2 cm) tassel complete the 53.85 in (136.8 cm) panel.
Check each stage against these numbers and your panel will hang straight and even.
Happy crocheting!