

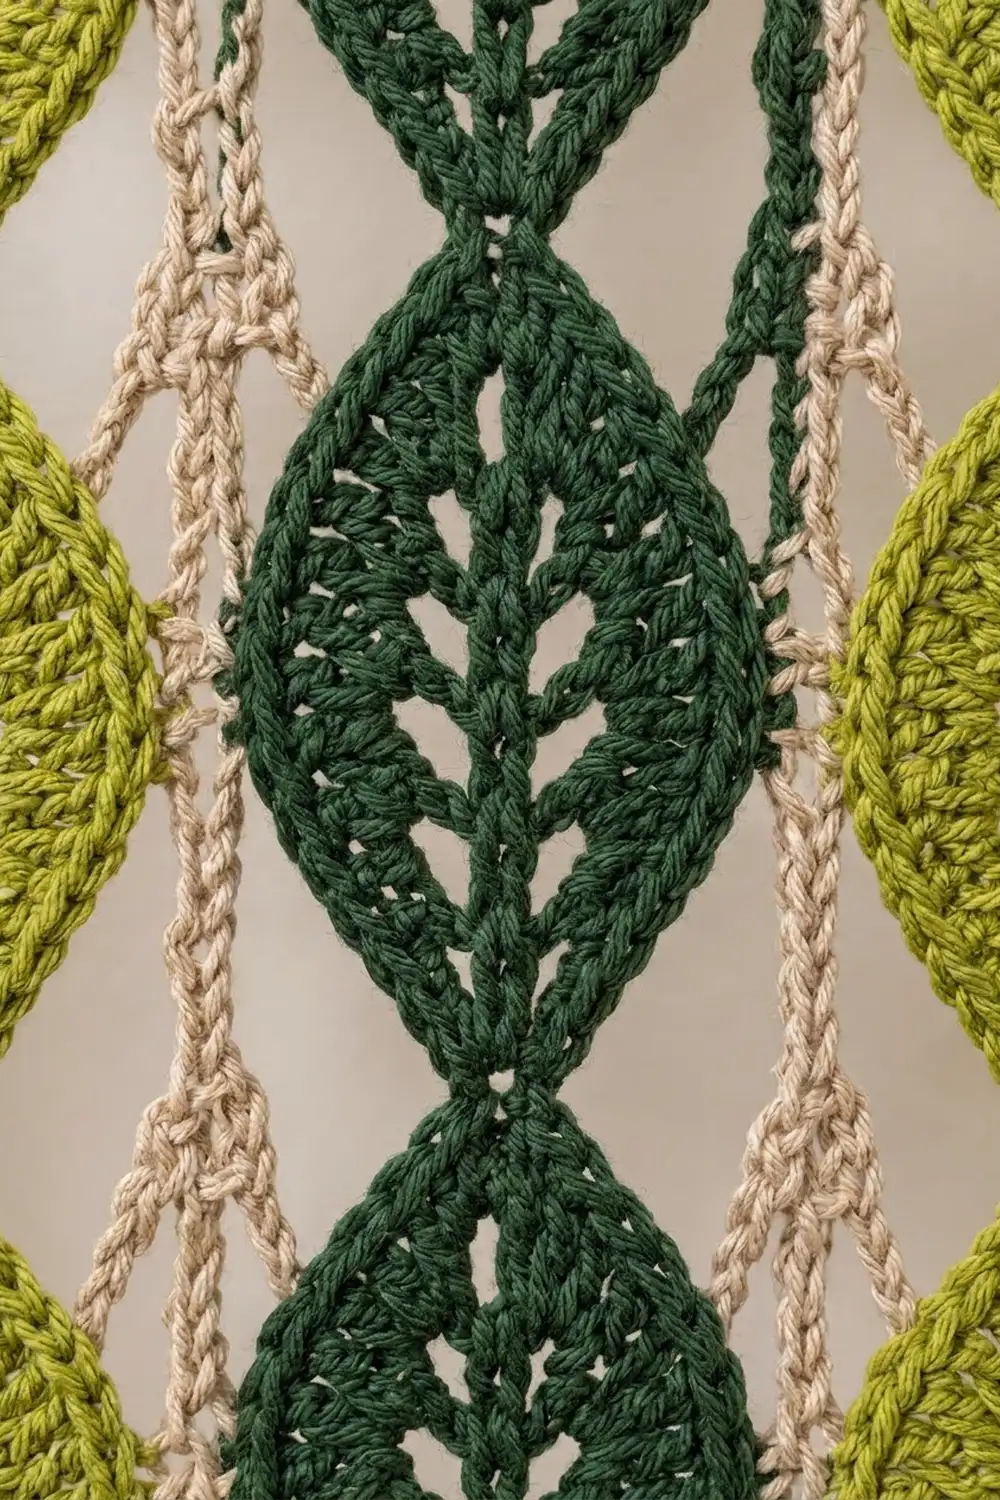
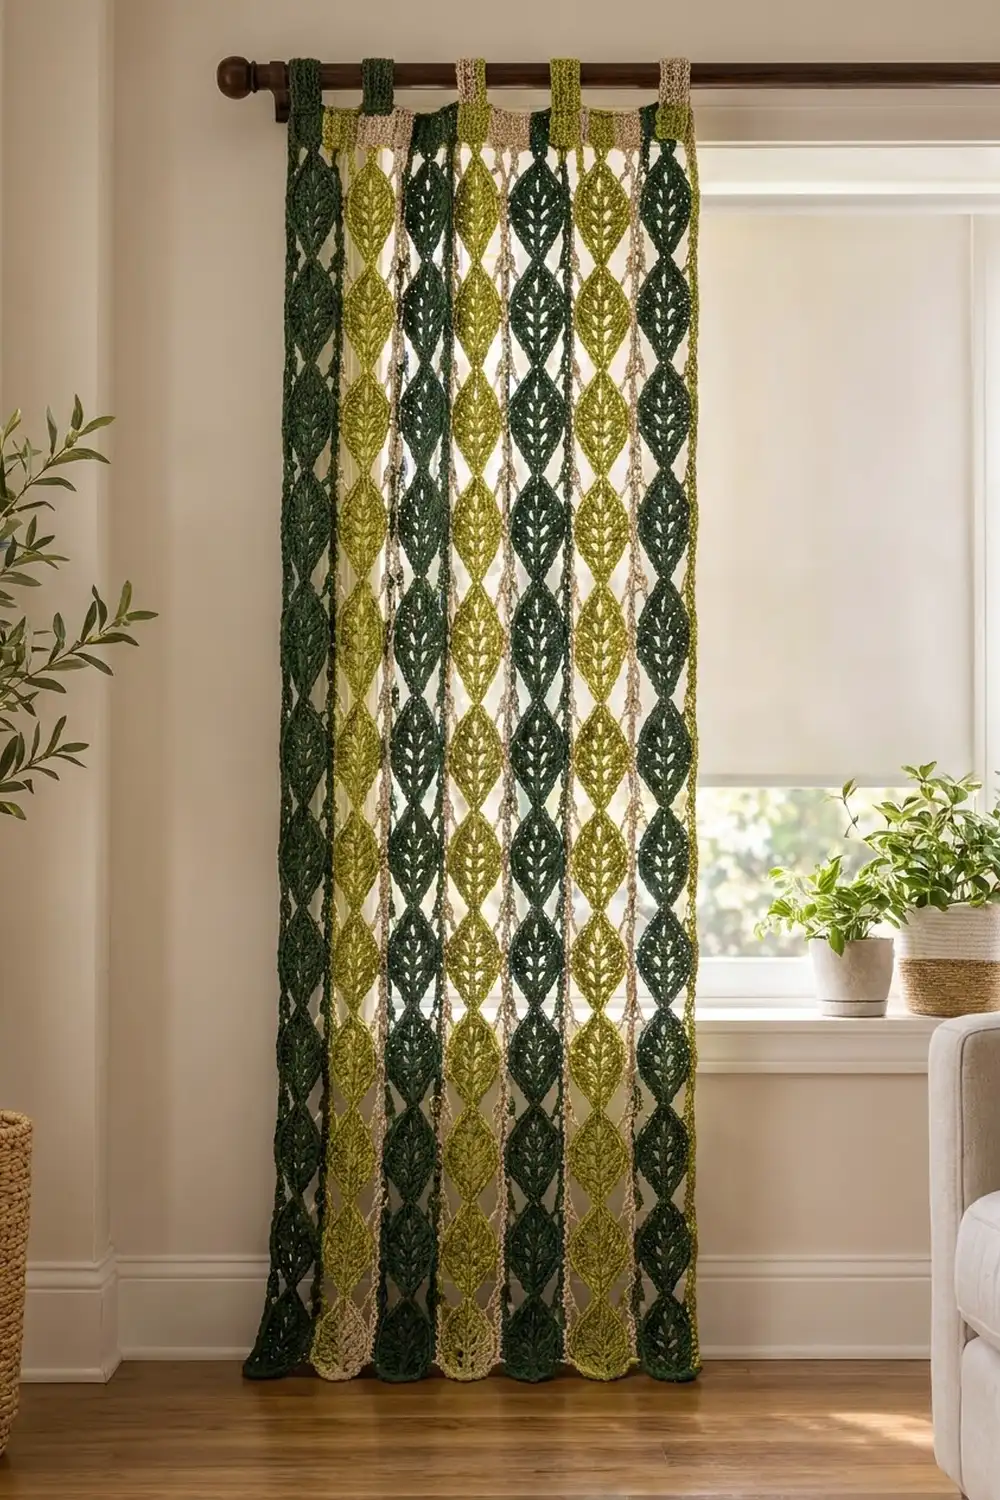
The Forest Canopy panel is a light, airy curtain made of long strands of crocheted leaves. Each leaf is almond-shaped and pointed, with a raised center vein and open fishbone gaps that let daylight through. When it hangs, the panel looks like vines falling from the rod.
The palette is three earthy shades: deep forest green, bright lime-olive green and a soft natural beige. The greens alternate strand by strand. The beige forms a chain lattice between the strands, a narrow header band across the top, and every second tab.
This pattern uses US crochet terms. One finished panel measures 23 in (58.4 cm) wide by 72 in (182.9 cm) long, not counting the tabs. Make two panels for a standard pair.
Construction is simple and modular. You make six continuous leaf strands, each starting with a small solid block. Then you join neighboring strands with a beige chain lattice, work a beige header band across the top, and add tabs in matching colors.
Finished Size and Construction
- Finished size: 23 in x 72 in (58.4 cm x 182.9 cm), with tabs adding about 2.5 in (6.4 cm) above the header
- Skill level: Intermediate
- Terminology: US crochet terms
- Yarn weight: Worsted (#4)
- Hook: 5.0 mm (H-8)
- Number of pieces: 6 leaf strands per panel
- Layout: 6 strands side by side, 1 row of strands
- Piece size: each strand is 3 in x 71 in (7.6 cm x 180.3 cm)
- Size before border: 23 in x 71 in (58.4 cm x 180.3 cm)
- Border depth: a 1 in (2.5 cm) header band, plus folded tabs
Materials
Choose a smooth worsted-weight cotton or cotton blend. Cotton holds the leaf shape, keeps the fishbone gaps crisp and doesn’t stretch much over a long drop. Avoid fuzzy yarns, because they fill the open spaces.
Yarn for one panel:
- Dark forest green: 100 g / 200 m (219 yd)
- Lime-olive green: 100 g / 200 m (219 yd)
- Natural beige: 50 g / 100 m (109 yd)
All quantities include a margin of roughly 30–50% over the estimated use. Double them for a pair of panels.
Tools:
- 5.0 mm (H-8) crochet hook
- 30 locking stitch markers
- Tapestry needle
- Scissors
- Measuring tape
- Spray bottle and rustproof pins for blocking
- A curtain rod up to 1.5 in (3.8 cm) in diameter
Abbreviations (US Terms)
- ch: chain
- sl st: slip stitch
- sc: single crochet
- hdc: half double crochet
- dc: double crochet
- tr: treble crochet (yarn over twice, insert hook, pull up a loop, then [yarn over, pull through 2 loops] 3 times)
- sp: space
- st(s): stitch(es)
- RS: right side
Special technique: working around the spine. Each leaf is worked around a foundation chain. Work up one side of the chain, put 3 sc in the last chain to turn the tip, then work back down the other side, into the free loops of the same chains.
Gauge and Checkpoints
Gauge: 16 sc and 16 rows = 4 in (10.2 cm). Chains measure about 4 ch per 1 in (2.5 cm).
Before starting a full strand, make a test piece: one block and one leaf (see below). Check these numbers:
- Block: 3 in wide x 1 in tall (7.6 cm x 2.5 cm)
- Leaf after Round 1: about 2.5 in wide x 4 in long (6.4 cm x 10.2 cm)
- Leaf after Round 2: 3 in wide x 4.5 in long (7.6 cm x 11.4 cm)
- Leaf plus connector: 5 in (12.7 cm) repeat
If your block is wider than 3 in (7.6 cm), go down half a hook size. If it is narrower, go up half a hook size. If only the leaves are too long, tighten your foundation chains. Loose spine chains are the most common cause of stretched leaves. Wash and dry the test piece the same way you plan to wash the curtain, then measure again.
Leaf Strand (make 6)
Make 3 strands in dark green and 3 strands in lime.
Top Block
Row 1: Ch 13. Sc in 2nd ch from hook and in each ch across. (12 sc)
Rows 2–4: Ch 1, turn, sc in each st across. (12 sc)
The block measures 3 in x 1 in (7.6 cm x 2.5 cm). The foundation-chain edge is the top of the strand. Leave its free loops unworked, because the header goes there later.
Row 5 (move to center): Don’t turn. Sl st in each of the first 6 sts of Row 4. This puts your hook at the center of the block’s bottom edge.
Leaf 1
Connector and spine: Ch 2 for the connector, then ch 16 for the spine.
Round 1: Number the spine chains from the hook outward: ch 1 is the 2nd ch from the hook and ch 15 is next to the connector.
- Side 1: Sc in ch 1, hdc in ch 2, dc in ch 3, [ch 1, skip next ch, tr in next ch] 4 times, ch 1, skip ch 12, dc in ch 13, hdc in ch 14.
- Top tip: 3 sc in ch 15.
- Side 2: Rotate the leaf and work into the free loops of the same chains. Hdc in ch 14, dc in ch 13, [ch 1, skip next ch, tr in next ch] 4 times (the tr go into ch 11, 9, 7 and 5), ch 1, skip ch 4, dc in ch 3, hdc in ch 2, sc in ch 1.
- Join: Sl st to the first sc.
Count: 9 sts on side 1 + 3 tip sc + 9 sts on side 2 = 21 sts, plus 10 ch-1 sps (5 per side). The ch-1 sps make the slanted fishbone gaps on each side of the vein. The tr give the leaf its widest point.
Round 2 (outline, trim round):
- Ch 1. Sc in the same st as the join, then sc in each st and each ch-1 sp along side 1.
- At the tip: sc in the first tip sc, 3 sc in the center tip sc, sc in the third tip sc.
- Sc in each st and each ch-1 sp along side 2.
- Sl st to the first sc.
Count: 31 sc worked 1 per existing st or sp, + 2 extra at the tip = 33 sc. That’s 14 per side and 5 around the tip.
Mark the widest point: On each side, place a marker in the sc worked into the 3rd ch-1 sp. That is the sp between the 2nd and 3rd tr. You will join to these markers later.
The leaf now measures 3 in x 4.5 in (7.6 cm x 11.4 cm). The rounded tip faces up and the pointed end, where Round 2 closes, faces down.
Leaves 2–14
From the sl st at the bottom point of the previous leaf, work Leaf 1 again: connector, spine, Round 1, Round 2 and markers. Do this 13 more times, for 14 leaves in total. Fasten off after the last leaf and weave in the ends.
Strand checkpoint: 1 in block + 14 x 5 in repeats = 71 in (180.3 cm). Lay the strand flat without stretching it to measure. If it is more than 2 in (5.1 cm) too long or short, check the spine chain tension on a few leaves before going on.
Make All Pieces
For one panel:
- Dark green: 3 strands
- Lime: 3 strands
- Beige: used for the joining and border only
Layout, from left to right with the RS facing you (D = dark green strand, L = lime strand, B = beige lattice):
D | B | L | B | D | B | L | B | D | B | L
That gives 6 strands and 5 beige lattice gaps.
Joining: Beige Chain Lattice
Lay the strands flat with the RS facing up and all blocks lined up at the top. Each gap is joined separately. Call the left strand A and the right strand B.
- Top bridge: Join beige with a sc in the top corner st of block A, on the edge facing B. Ch 4, then sc in the top corner st of block B, on the edge facing A.
- First diagonal: Ch 16, then sc in the marked sc on the inner side of A’s Leaf 1.
- Leaf bridge: Ch 4, then sc in the marked sc on the inner side of B’s Leaf 1.
- Repeat: [Ch 21, sc in the marked sc of the next leaf on A; ch 4, sc in the marked sc of the same-level leaf on B] 13 times.
- Fasten off.
Each gap now has 15 ch-4 bridges: 1 at the block plus 14 at the leaves. The diagonals cross the gap in a zigzag, which gives the beige chain-column and lattice look.
Stitch-to-stitch logic: Every bridge connects marked sc at the same height. The strands stay level, and each gap stays exactly 4 ch wide, about 1 in (2.5 cm).
Tension: Keep the bridges snug and the diagonals relaxed. The ch-16 diagonal spans about 3.75 in (9.5 cm) of drop plus 1 in (2.5 cm) across. Each ch-21 diagonal spans 5 in (12.7 cm) of drop plus 1 in (2.5 cm) across. They should lie flat, not pull the leaves out of shape or sag.
Size checkpoint: 6 x 3 in strands + 5 x 1 in gaps = 23 in (58.4 cm) wide, and still 71 in (180.3 cm) long.
Border: Header Band and Tabs
Border gauge: 16 sc = 4 in (10.2 cm), and 4 rows = 1 in (2.5 cm).
Header Row 1: With the RS facing you, join beige in the first free loop of block 1’s foundation chain at the top-left corner. Work along the top edge:
- Sc in each of the 12 free loops of block 1.
- 4 sc in the ch-4 top bridge.
- Repeat across: 12 sc in each block and 4 sc in each top bridge.
Count: 6 blocks x 12 sc = 72, + 5 bridges x 4 sc = 20, for 92 sc.
Header Rows 2–4: Ch 1, turn, sc in each st across. (92 sc) Fasten off.
Why the math works: Each block is 12 sc = 3 in (7.6 cm), and each bridge is 4 sc = 1 in (2.5 cm). That gives 92 sc ÷ 4 sts per inch = 23 in (58.4 cm), which matches the joined width exactly. Every header stitch sits on a block stitch or a bridge chain, so nothing ripples or pulls in.
Tab placement: Number the Row 4 sts 1–92 from the right edge of your last row. Each block takes 12 sts and each bridge takes 4, so the tabs line up like this:
- Skip sts 1–2.
- Tabs run across sts 3–90 in 8-st sections, alternating strand color and beige.
- Strand tabs sit over the center 8 sts of their block: sts 3–10, 19–26, 35–42, 51–58, 67–74 and 83–90.
- Beige tabs sit over each bridge plus 2 sts on each side: sts 11–18, 27–34, 43–50, 59–66 and 75–82.
- Sts 91–92 are left unworked.
Count: 11 tabs x 8 sts = 88, + 4 edge sts left unworked = 92.
Work each strand tab in its strand’s color, so the order across the panel matches the strand layout.
Each tab:
- Row 1: Join yarn and sc in the 8 sts of that section. (8 sc)
- Rows 2–20: Ch 1, turn, sc in each st. (8 sc)
Each tab measures 2 in x 5 in (5.1 cm x 12.7 cm). Fold the tab to the back and whipstitch its last row to the back of Header Row 1, over the same 8 sts. This makes a loop that fits a rod up to 1.5 in (3.8 cm) across.
Final Blocking
- Weave in all ends along the sc outlines, where they won’t show.
- Lay the panel flat on towels or blocking mats, with the RS up.
- Pin the header straight to 23 in (58.4 cm).
- Pin the leaves at their widest points to 3 in (7.6 cm), and open each fishbone gap with your fingertip.
- Mist everything until it is damp but not soaked.
- Check the 5 in (12.7 cm) leaf repeat along each strand, and that the overall length is 72 in (182.9 cm).
- Leave it to dry completely, unpin it, and hang it. Gravity finishes the drape within a day.
Final Quality-Control Checklist
- 6 strands with 14 leaves each, in alternating colors
- Every leaf has 33 sc in Round 2 and 5 open gaps per side
- All 5 gaps have 15 bridges
- The header has 92 sc in every row
- There are 11 tabs, each 8 sts wide, sewn securely
- The panel measures 23 in x 72 in (58.4 cm x 182.9 cm)
- All ends are woven in on the back
Troubleshooting
- Leaves curl or cup: Your Round 2 is too tight. Rework it with a looser hand, or block it firmly.
- The gaps disappeared: You skipped the ch 1 before a tr. Each side needs 5 ch-1 sps.
- The strands are uneven lengths: Your connector or spine chains vary. Count them, and measure every 4 leaves.
- The lattice puckers: The diagonals are too tight. Add 1–2 chains to each diagonal.
- The header ripples: You have more than 92 sc. Recount the 4 sc in each bridge.
- The panel leans to one side: You joined to the wrong marker. Every bridge must link leaves at the same height.
Care
Hand wash in cool water with mild soap, press the water out gently, and dry the panel flat. Re-block if needed. Don’t hang it while wet, because the weight stretches the strands.
Final Notes
The measurement chain is simple:
- Gauge of 16 sc = 4 in (10.2 cm)
- Each block 3 in (7.6 cm) wide, each leaf 3 in x 4.5 in (7.6 cm x 11.4 cm)
- Leaf repeat 5 in (12.7 cm), so each strand is 71 in (180.3 cm) long
- 6 strands plus 5 gaps of 1 in (2.5 cm) give 23 in (58.4 cm)
- A 1 in (2.5 cm) header brings the panel to 23 in x 72 in (58.4 cm x 182.9 cm)
If you check each link as you go, the finished panel will hang straight and even. Make a second panel for a full window of crocheted leaves.
Happy crocheting!