

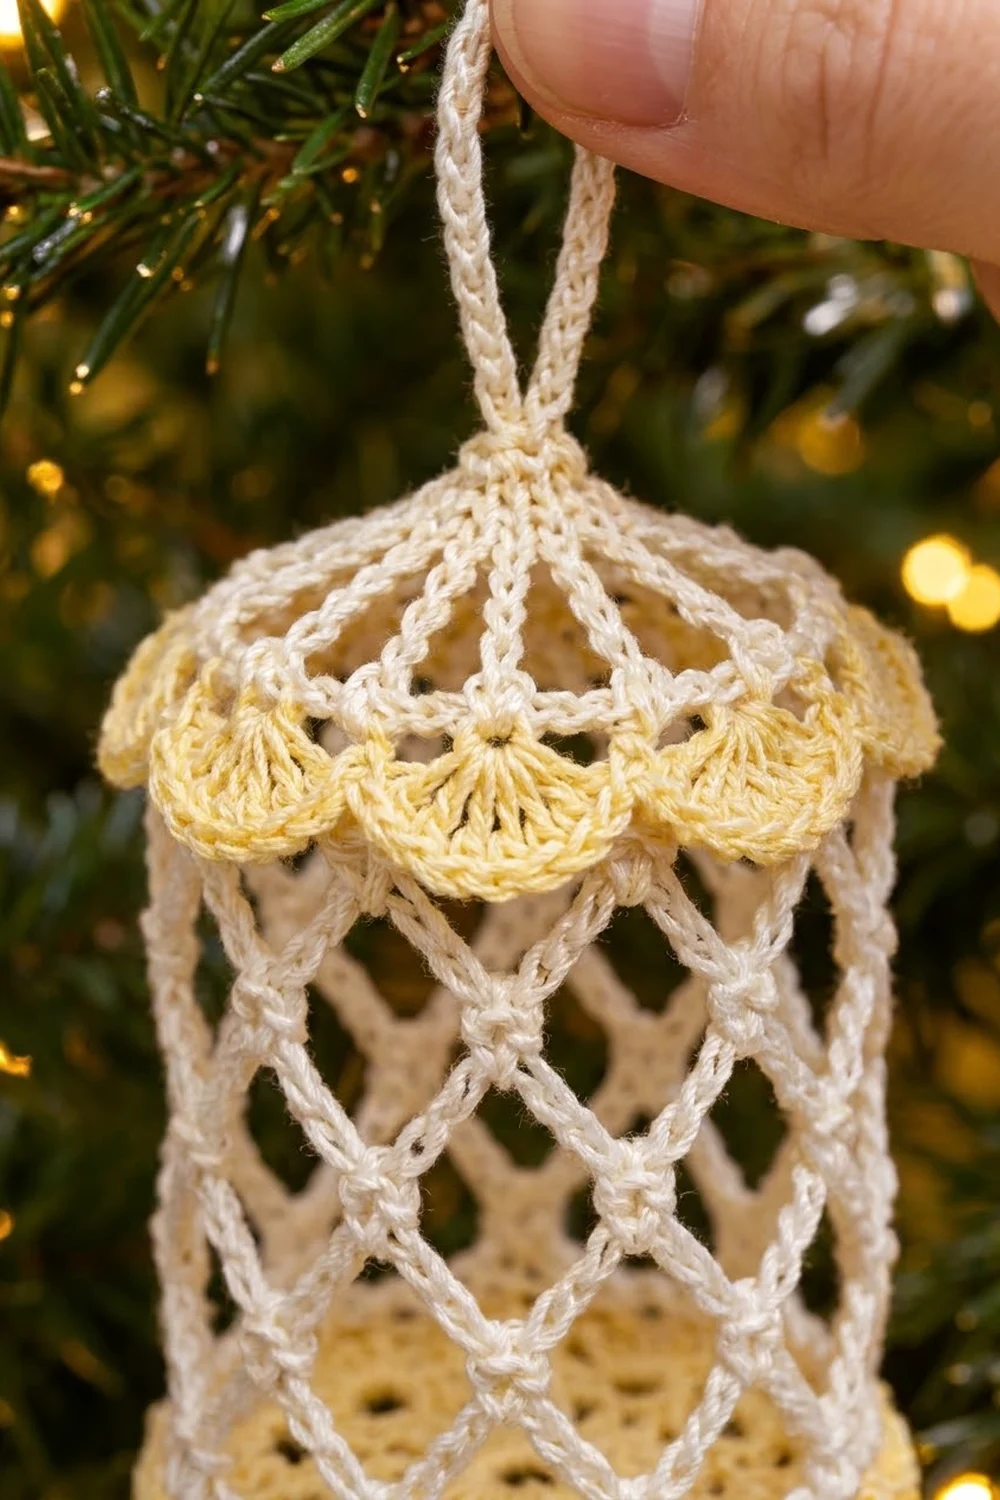
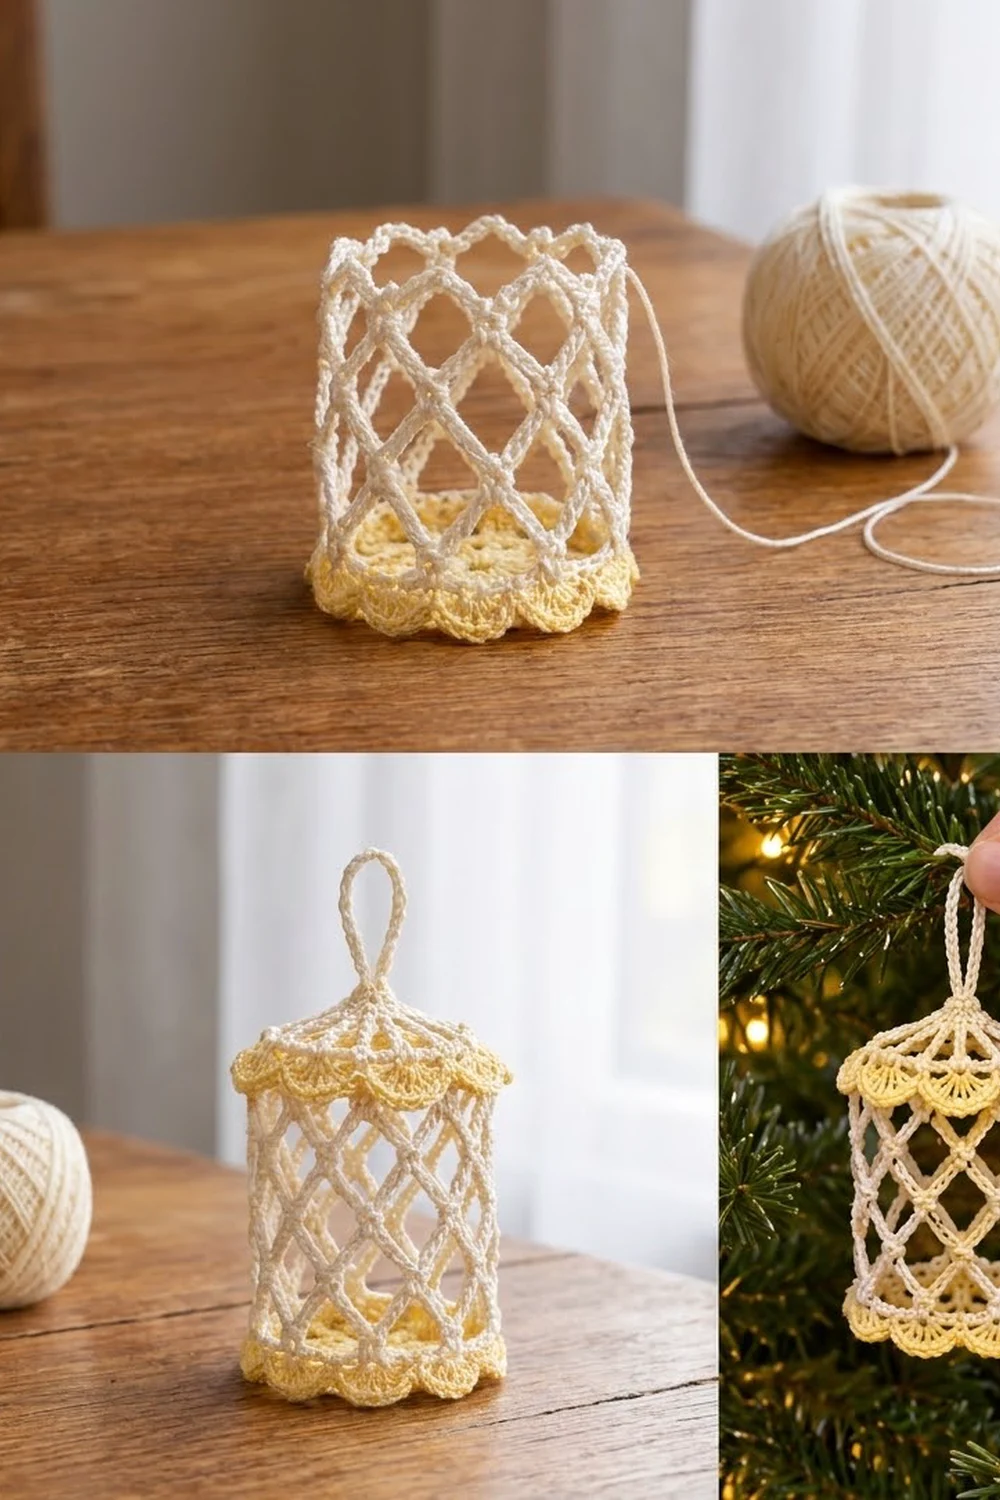
This little lantern is a delicate thread ornament with open diamond walls, a solid yellow base and a softly domed top. Small knot stitches sit at every lattice crossing, so the walls read like a tiny caged lamp when light shines through them.
The palette is cream-white and pale butter yellow. White carries the lattice, the dome and the hanging loop, while yellow forms the base and the two flaring fan-shell scallops at the top and bottom. The look is vintage and lacy, perfect for a Christmas tree or a window hook.
The pattern is written in US crochet terms. The finished lantern measures 2 in (5.1 cm) across the body, 2.5 in (6.4 cm) across the scallops, and 3.25 in (8.3 cm) tall without the loop, or 4.5 in (11.4 cm) including the loop.
Construction is continuous and bottom-up in one piece. You crochet a flat yellow base, turn the walls up in white through the back loops, build seven lattice rounds, add a solid rim, close the dome and make the loop. Finally, both yellow scallops are worked into the free front loops left behind, and the lantern is starched over a form.
Finished Size and Construction
- Finished size: 2 in (5.1 cm) body diameter, 3.25 in (8.3 cm) tall without loop
- Skill level: Intermediate
- Terminology: US crochet terms
- Yarn weight: Lace (0), size 10 cotton crochet thread
- Hook: 1.75 mm (US steel 4)
- Number of pieces: 1, worked in one piece
- Layout: single upright cylinder, worked from the base up
- Piece size: 2.5 in (6.4 cm) widest point at the scallops
- Size before border: 2 in (5.1 cm) diameter, 3.25 in (8.3 cm) tall
- Border depth: each scallop flares 0.25 in (0.6 cm) beyond the body
Materials
Choose a mercerized size 10 cotton crochet thread. Mercerized cotton has crisp stitch definition, takes starch well and keeps its shape on the tree. Avoid fuzzy or acrylic threads, which will not hold the lattice open.
- Color A, cream-white: 10 g, about 52 m (lattice walls, rim, dome, loop)
- Color B, pale butter yellow: 5 g, about 26 m (base and both scallops)
Quantities include a comfortable margin for a gauge swatch and weaving in ends.
Tools:
- 1.75 mm (US steel 4) crochet hook
- Fine tapestry needle
- Small scissors
- Stitch marker
- Fabric stiffener or heavy spray starch
- A cylinder form 2 in (5.1 cm) across, such as a pill bottle or rolled cardstock wrapped in plastic
- A small ball of plastic wrap for shaping the dome
- Rustproof pins and a foam block
Abbreviations (US Terms)
- ch – chain
- sl st – slip stitch
- sc – single crochet
- dc – double crochet
- sc2tog – single crochet 2 together
- BLO / FLO – back loop only / front loop only
- MR – magic ring
- sp(s) – space(s)
- st(s) – stitch(es)
Special stitches:
- Mesh knot (MK): sc in the indicated ch-loop, ch 3, sl st in the top of the sc just made. This makes the small round knot at each lattice crossing.
- Fan shell: (dc, ch 1) 4 times, dc, all in the same st. Each fan shell has 5 dc and 4 ch-1 sps.
Gauge and Checkpoints
Gauge is measured on the flat base. Rounds 1–3 of the base should measure 1.25 in (3.2 cm) across, and the complete 5-round base should measure 2 in (5.1 cm) across.
Make the base first and measure it before going further. It is your test piece, and everything above it depends on its 60 stitches fitting a 2 in (5.1 cm) circle.
Checkpoints:
- After base Round 1: 0.5 in (1.3 cm) across
- After base Round 3: 1.25 in (3.2 cm) across
- After base Round 5: 2 in (5.1 cm) across, lying flat
- After lattice Round 3: walls 1 in (2.5 cm) tall
- After lattice Round 7: walls 2.5 in (6.4 cm) tall
- After the rim: body 2.75 in (7.0 cm) tall
- After the dome: 3.25 in (8.3 cm) tall without loop
If your base is too big, go down to a 1.5 mm hook. If it is too small, go up to a 2 mm hook. If the base ruffles, your dc are too short; if it cups, they are too tall. Adjust tension before changing the stitch counts, because the counts are tied to the lattice repeat.
Base (Color B)
Use Color B. All rounds are joined with a sl st to the top of the beginning ch-3. The ch-3 counts as the first dc throughout the base.
Round 1: MR, ch 3, 11 dc in ring, join. Pull the ring closed. (12 dc)
Round 2: Ch 3, dc in same st, 2 dc in each remaining st around, join. (24 dc)
Round 3: Ch 3, dc in same st, dc in next st, 2 dc in next st, dc in next st; repeat from * 10 more times, join. (36 dc)*
Round 4: Ch 3, dc in same st, dc in next 2 sts, 2 dc in next st, dc in next 2 sts; repeat from * 10 more times, join. (48 dc)*
Round 5: Ch 3, dc in same st, dc in next 3 sts, 2 dc in next st, dc in next 3 sts; repeat from * 10 more times, join. (60 dc)*
Fasten off Color B and weave in the ends. Check that the base lies flat and measures 2 in (5.1 cm).
Lattice Walls (Color A)
Hold the base right side up. You will work into the back loops of Round 5 so the walls turn upward. The 60 front loops stay free on the outside for the bottom scallop.
Round 1: Join Color A with a sc in the BLO of any st of base Round 5, ch 7, skip next 4 sts, sc in BLO of next st; repeat from * 10 more times, ch 7, skip last 4 sts, join with sl st to first sc. (12 sc, 12 ch-7 loops)*
The math: 12 repeats × 5 sts (1 sc + 4 skipped) = 60 sts, exactly the base count.
Round 2: Sl st in each of next 3 ch to reach the center of the first loop, ch 1, MK in same loop, ch 7, MK in next ch-7 loop; repeat from * 10 more times, ch 7, join with sl st to first sc. (12 MK, 12 ch-7 loops)*
Each new knot sits in the middle of a loop below, so every round shifts by half a loop. This offset is what builds the diamond lattice.
Rounds 3–7: Repeat Round 2. (12 MK, 12 ch-7 loops in each round)
Each lattice round adds about 0.35 in (0.9 cm). After Round 3, the walls should be 1 in (2.5 cm) tall; after Round 7, they should be 2.5 in (6.4 cm) tall. Keep the walls standing straight as you go; they will look floppy until starched.
Rim (Color A)
Round 8: Sl st in each of next 3 ch, ch 1, 5 sc in each ch-7 loop around, join with sl st to first sc. (60 sc)
This is a conversion round: 12 loops × 5 sc = 60 sc, matching the 60-stitch base so the walls stay straight instead of flaring or narrowing. The body should now be 2.75 in (7.0 cm) tall.
Dome (Color A)
The dome is worked into the back loops of the rim so it turns inward. The 60 front loops of Round 8 stay free for the top scallop.
Dome Round 1: Ch 1, sc in BLO of first st, ch 5, skip next 4 sts, sc in BLO of next st; repeat from * 10 more times, ch 5, skip last 4 sts, join. (12 sc, 12 ch-5 loops)*
Dome Round 2: Sl st in each of next 2 ch, ch 1, sc in same loop, ch 3, sc in next ch-5 loop; repeat from * 10 more times, ch 3, join. (12 sc, 12 ch-3 sps)*
Dome Round 3: Ch 1, 1 sc in each ch-3 sp around, skipping the sc, join. (12 sc)
Dome Round 4: Ch 1, sc2tog 6 times, join. (6 sc)
The chain loops shorten each round (5, then 3, then closed), which draws the top into a shallow dome of spokes. The lantern should now be 3.25 in (8.3 cm) tall.
Hanging Loop (Color A)
Ch 30, skip next 2 sts of Dome Round 4, sl st in the following st (the stitch directly across the hub). Turn and work 40 sc over the ch-30 loop, sl st in the stitch where the chain began. Fasten off and weave in.
The 40 sc pack the chain into a firm cord. The loop stands 1.25 in (3.2 cm) above the dome, bringing the total height to 4.5 in (11.4 cm).
Border: Scalloped Trims (Color B)
Both scallops use the same round, worked into the free front loops left on the base and on the rim. Each has 60 free loops.
Border gauge: one 6-stitch repeat (1 sc plus 1 fan shell) spans about 0.63 in (1.6 cm) of edge, and each fan shell flares 0.25 in (0.6 cm) beyond the body.
Bottom scallop: Turn the lantern upside down. Join Color B with a sc in any free front loop of base Round 5, skip next 2 loops, fan shell in next loop, skip next 2 loops, sc in next loop; repeat from * 8 more times, skip next 2 loops, fan shell in next loop, skip last 2 loops, join with sl st to first sc. (10 sc, 10 fan shells)*
Top scallop: Hold the lantern upright. Join Color B with a sc in any free front loop of rim Round 8 and work exactly as the bottom scallop. (10 sc, 10 fan shells)
Each round totals 100 sts: 10 sc + 10 fan shells × 9 sts (5 dc + 4 ch). Fasten off and weave in.
Why the math works: the lantern is round, so there are no sides or corners. Each repeat uses 6 loops (1 sc, 2 skipped, 1 shell, 2 skipped), and 10 repeats × 6 = 60, matching both the base and the rim exactly. The 4 extra ch-1 sps in each shell give the fan more length than the edge beneath it, which is why it flares outward instead of lying tight.
Final Blocking
- Weave in all ends securely before stiffening.
- Wrap your 2 in (5.1 cm) cylinder form in plastic wrap.
- Soak the lantern in fabric stiffener and squeeze out the excess. Blot with a towel so no film fills the lattice.
- Slide the lantern over the form, base down. Stretch the walls to 2.5 in (6.4 cm) of lattice plus rim, about 2.75 in (7.0 cm) total body height.
- Center each knot so the diamonds are even and the lines run diagonally.
- Tuck a small ball of plastic wrap under the dome and shape it into a shallow curve.
- Pin the scallops so each fan shell flares evenly, reaching 2.5 in (6.4 cm) across.
- Stand the loop upright and let everything dry completely, at least 24 hours.
- Remove the form gently through the scallop opening.
Final Quality-Control Checklist
- Base is flat, 2 in (5.1 cm) across, with 60 dc in Round 5
- 12 ch-7 loops in every lattice round
- 12 mesh knots in each of Rounds 2–7, all sitting at diamond centers
- Rim has 60 sc
- Dome closes to 6 sc with no hole larger than the hook
- Each scallop has 10 even fan shells
- Body is 2.75 in (7.0 cm) tall; overall height is 3.25 in (8.3 cm) without loop
- Loop is firm and centered over the hub
- All ends woven in and invisible
Troubleshooting
Base ruffles: your dc are too short or tight. Loosen tension or go up a hook size.
Base cups: your dc are too tall. Go down a hook size.
Lattice twists to one side: you are not reaching the true center of each loop. Count the 3 sl sts every round and place each MK in the middle.
Walls lean outward at the top: check the rim. Exactly 5 sc per loop keeps the count at 60.
Knots disappear: pull the ch-3 snug before the sl st so the picot rounds into a bead.
Scallops flip upward: block them flat while pinning, and make sure you worked into the front loops, not the back loops.
Lantern collapses after drying: the starch was too weak. Re-soak in full-strength stiffener and dry again on the form.
Care
Store the lantern in a small box so the lattice is not crushed. If it softens or gets dusty, spot clean and re-starch it over the form.
Final Notes
The measurement chain is simple. The base sets 60 stitches across 2 in (5.1 cm). The lattice divides those 60 stitches into 12 loops of 5, and the rim converts 12 loops × 5 sc back into 60 stitches, so the walls stay at 2 in (5.1 cm) across and grow to 2.75 in (7.0 cm) tall. The dome adds 0.5 in (1.3 cm) for 3.25 in (8.3 cm), the loop brings it to 4.5 in (11.4 cm), and both scallops divide 60 loops into 10 shells for a 2.5 in (6.4 cm) flare.
Check your base first, and the rest of the lantern will follow.
Happy crocheting!