

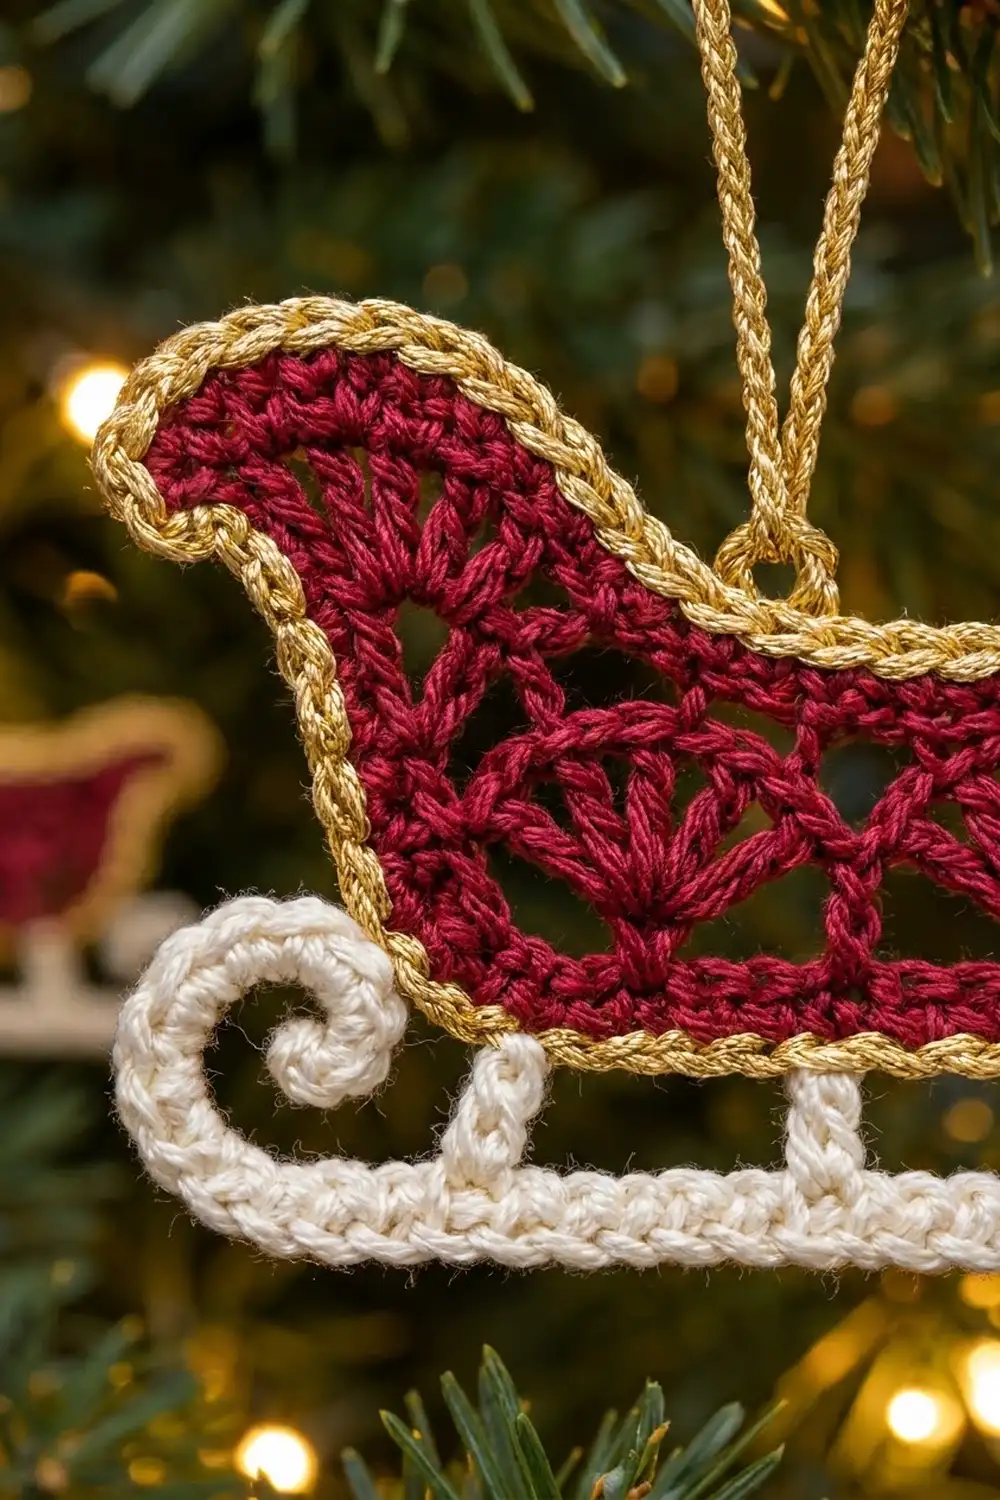
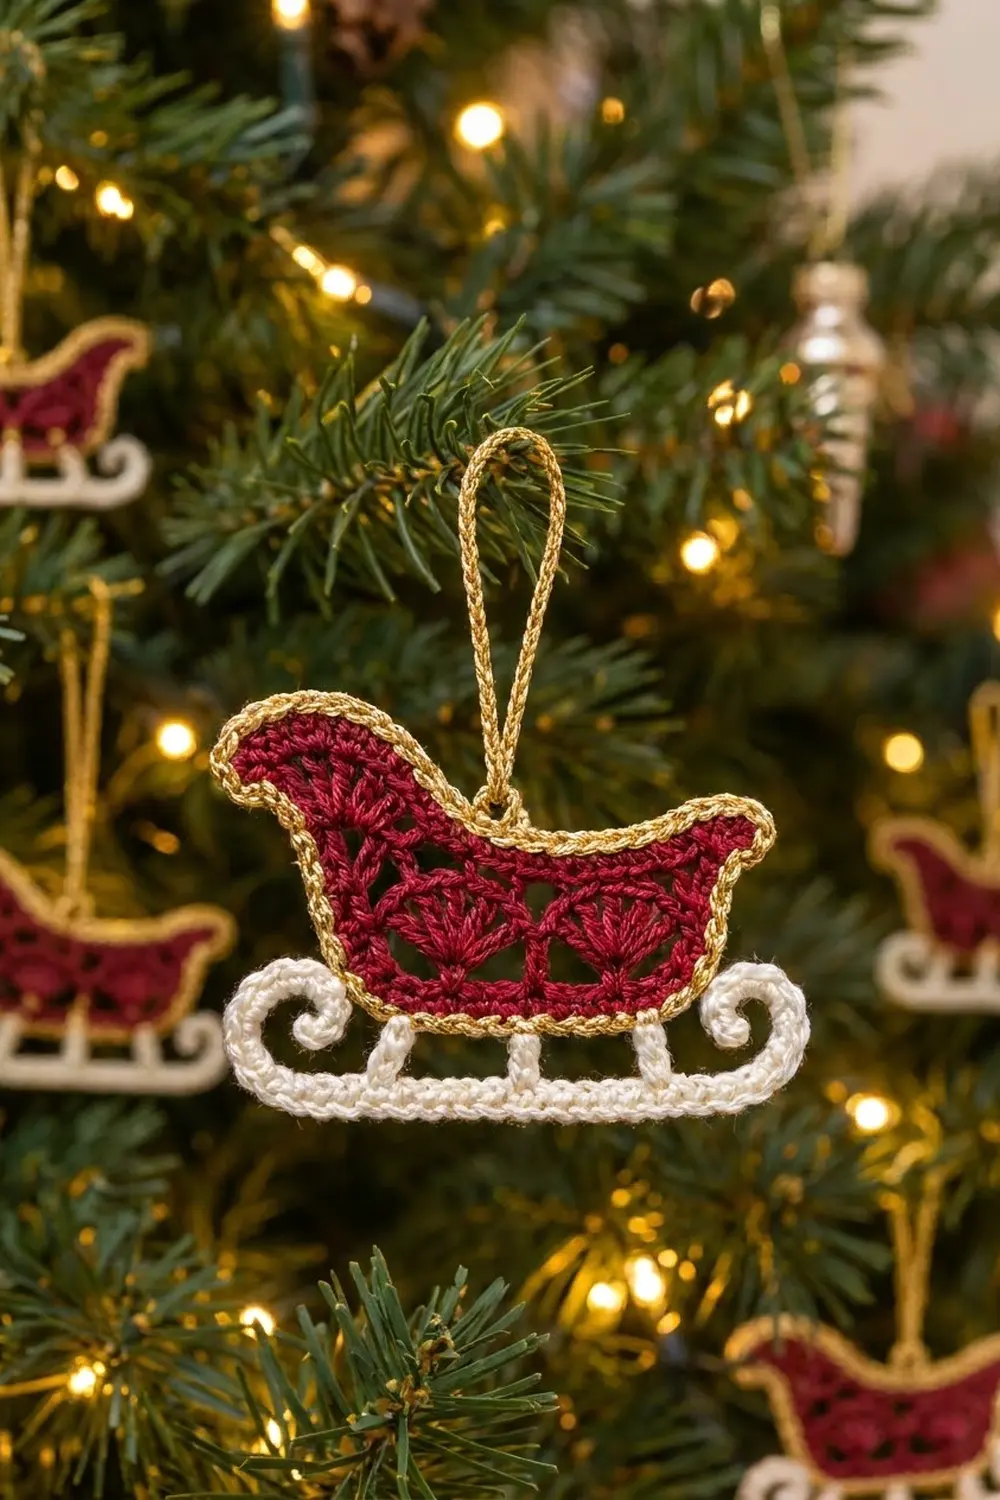
This little sleigh is a flat Christmas ornament with a cranberry red lace body, a cream runner with curled ends, and a corded gold outline. It hangs from a slim gold loop and looks lovely on a tree, on a gift, or tucked into a card.
The colors are classic: deep red, soft cream, and metallic gold. The body has a row of three fan shells between two open mesh rows, so light shows through when it hangs. The tall back and pointed front lip give it a storybook sleigh shape.
The pattern uses US crochet terms. The finished ornament measures 5 in (12.7 cm) wide and 3.5 in (8.9 cm) tall, plus a 1.5 in (3.8 cm) hanging loop.
You make the runner first. Next you work the body in rows, using short rows to shape the back and the front lip. Three cream posts join the body to the runner, and a two-round gold edging plus a loop finish it.
Finished Size and Construction
- Finished size: 5 in (12.7 cm) wide x 3.5 in (8.9 cm) tall, excluding loop
- Hanging loop: 1.5 in (3.8 cm) tall
- Skill level: Intermediate
- Terminology: US crochet terms
- Yarn weight: Fingering (#1) cotton
- Hook: 2.75 mm (US C-2)
- Number of pieces: 1 ornament, built in stages (runner, body, 3 posts, edging, loop)
- Layout: Single standalone ornament; no assembly with other pieces
- Runner: 5 in (12.7 cm) long after curling, 0.3 in (0.8 cm) thick
- Body size before border: 4.3 in (10.9 cm) at its widest x 2.6 in (6.6 cm) at its tallest
- Border depth: about 0.1 in (0.3 cm) on each edge
Materials
Use a smooth, mercerized fingering-weight cotton. It shows the fans clearly and blocks crisply. For the gold, a metallic fingering yarn or a cotton/metallic blend works well. Avoid very slippery metallic threads for the reverse single crochet round.
- Red (body): 5 g / 17 m
- Cream (runner and posts): 2 g / 7 m
- Gold (edging and loop): 3 g / 10 m
These quantities include extra for a gauge swatch and for weaving in ends.
Tools:
- 2.75 mm (US C-2) crochet hook
- Tapestry needle
- 2 locking stitch markers
- Rust-proof pins and a blocking mat or folded towel
- Spray bottle with water
Abbreviations (US Terms)
- ch – chain
- sl st – slip stitch
- sc – single crochet
- hdc – half double crochet
- dc – double crochet
- tr – treble crochet
- sk – skip
- sp – space
- st(s) – stitch(es)
- rev sc – reverse single crochet
- RS / WS – right side / wrong side
Special stitch – Fan: Work 7 dc in the same stitch.
Special stitch – Reverse single crochet (rev sc): Working from left to right (right-handed), insert the hook in the next stitch to the right. Yarn over and pull up a loop, then yarn over and pull through both loops. This makes the corded look.
Gauge and Checkpoints
Gauge: 7 sc and 8 sc rows = 1 in (2.5 cm). Three rows of dc measure about 1 in (2.5 cm) tall.
Gauge swatch: Ch 15. Sc in 2nd ch from hook and across (14 sc). Work 7 more rows of sc. The swatch should measure 2 in (5.1 cm) wide x 1 in (2.5 cm) tall.
The runner is the best test. Make it first and check it before moving on.
Checkpoints:
- Runner straight section (29 sc): 4.1 in (10.4 cm)
- Body Row 1 (25 sc): 3.6 in (9.1 cm) wide
- Body after Row 4: 1.1 in (2.8 cm) tall
- Body after Row 6: 4.1 in (10.4 cm) wide, 1.6 in (4.1 cm) tall
- Body after Row 10: 2.6 in (6.6 cm) tall at the back
- Posts: 0.4 in (1.0 cm) tall each
- Finished ornament: 5 in (12.7 cm) x 3.5 in (8.9 cm)
If it’s too big: go down to a 2.5 mm hook. If it’s too small: go up to a 3 mm hook. Small changes matter on a piece this size, so recheck the runner each time.
Runner (Cream)
The runner is a single row of sc worked along a chain. Working 3 sc into each chain at both ends makes those sections twist into tight curls.
Foundation: With cream, ch 42.
Row 1: Work 3 sc in the 2nd ch from the hook and 3 sc in each of the next 5 ch (18 sc, first curl). Sc in each of the next 29 ch (29 sc, straight section). Work 3 sc in each of the last 6 ch (18 sc, second curl). Fasten off, leaving a 6 in (15.2 cm) tail.
Stitch count: 18 + 29 + 18 = 65 sc, using all 41 chains (6 + 29 + 6).
Shape the curls: Each end will twist into a corkscrew. Coax each one into a flat spiral that rolls up and inward, so both curls rise above the straight section. Tack each spiral flat with a few stitches, using the tail at one end and a short length of cream at the other.
Mark the post positions: The sc tops along the straight section are the top of the runner. Counting from either end of the straight section, mark sc 5, 15, and 25. These positions are symmetrical, and sc 15 is the exact center.
Checkpoint: The straight section measures 4.1 in (10.4 cm). The whole runner measures 5 in (12.7 cm), with curls about 0.5 in (1.3 cm) across.
Body (Red)
The body is worked flat in rows. Rows 1–6 run the full width. Row 7 shapes the front lip, and Rows 8–10 build up the tall back.
Foundation: With red, ch 26.
Row 1: Sc in 2nd ch from hook and in each ch across, turn. (25 sc)
Row 2 (open columns): Ch 4 (counts as dc + ch 1), sk next st, dc in next st, ch 1, sk next st, dc in next st; rep from * across, turn. (13 dc + 12 ch-1 sps = 25 sts)*
The dc are now in stitches 1, 3, 5, and so on through 25.
Row 3 (fans): Ch 1, sc in first dc, sk next 3 sts, Fan in next dc, sk next 3 sts, sc in next dc; rep from * 2 more times, turn. (4 sc + 3 Fans = 4 + 21 = 25 sts)*
The sc go in stitches 1, 9, 17, and 25, and the Fans go in stitches 5, 13, and 21. All seven of these stitches are dc of Row 2.
Row 4 (leveling): Ch 4 (counts as tr), hdc in next 2 dc, sc in next 3 dc, hdc in next 2 dc, tr in next sc; rep from * 2 more times, turn. (4 tr + 12 hdc + 9 sc = 25 sts)*
Checkpoint: The body is 1.1 in (2.8 cm) tall with a level top edge.
Row 5 (open columns with flare): Ch 4 (counts as dc + ch 1), dc in same st, ch 1, sk next st, dc in next st; rep from * 11 more times, ch 1, dc in same st as last dc, turn. (15 dc + 14 ch-1 sps = 29 sts)*
This row grows from 25 to 29 sts. The extra (ch 1, dc) at each end widens the top of the sleigh.
Row 6: Ch 1, sc in each dc and each ch-1 sp across. Do not turn. (29 sc)
Place a marker at this end. This is the front, and the opposite end is the back.
Checkpoint: The body is 4.1 in (10.4 cm) wide and 1.6 in (4.1 cm) tall. This is the height of the middle dip.
Row 7 (front lip): Ch 1, turn. Working into the first 5 sts at the front end: (hdc, ch 2, hdc) in first st, hdc in next st, sc in next 2 sts, sl st in next st. Fasten off. (3 hdc + 2 sc + 1 sl st, plus 1 ch-2 tip sp)
The ch-2 makes the pointed tip, and the stitches step down toward the middle.
Row 8 (back): Join red with a sl st in the first st of Row 6 at the back end. Ch 3 (counts as dc), dc in same st, dc in next 7 sts, hdc in next st, sc in next st, sl st in next st, turn. (9 dc + 1 hdc + 1 sc + 1 sl st = 12 sts over 11 sts of Row 6)
Row 6 now has 11 sts used at the back, 5 at the front, and 13 unworked in the middle (11 + 5 + 13 = 29).
Row 9: Sk sl st and sc, sl st in hdc, sc in next dc, hdc in next dc, dc in next 5 dc, dc in next dc, 2 dc in top of turning ch-3, turn. (1 sc + 1 hdc + 8 dc = 10 working sts, plus 1 sl st)
Row 10 (rounded top): Ch 1, 2 sc in first st, hdc in next st, dc in next 4 sts, hdc in next st, sc in next st, sl st in next st. Leave the last sc of Row 9 unworked. Fasten off. (3 sc + 2 hdc + 4 dc + 1 sl st = 10 sts)
The 2 sc at the outer corner and the shorter stitches at each end round the top. The Row 8 increase makes the back lean slightly outward.
Checkpoint: The back is 2.6 in (6.6 cm) tall, and the body is 4.3 in (10.9 cm) at its widest point. Weave in the red ends on the WS.
Posts (Cream)
The posts join the body to the runner. Each post is a short column of 3 ch with 3 sc worked back along them.
Lay the runner flat with the curls pointing up. Center the body about 0.4 in (1.0 cm) above it, with the foundation chain edge facing down. The body’s 25 bottom stitches line up over runner sc 3–27.
On the body’s foundation chain, count from either end and mark chains 3, 13, and 23. These are 10 sts apart, the same spacing as the runner markers (5, 15, 25).
Each post: Join cream with a sl st in a marked runner sc. Ch 3, then sl st in the matching marked body chain. Turn, sc in each of the 3 ch, then sl st in the same runner sc. Fasten off. (3 sc per post)
Repeat for all three posts. Weave the tails into the posts so the cream doesn’t show through the red.
Checkpoint: Each post is 0.4 in (1.0 cm) tall. The runner stays straight and the body sits level.
Border (Gold Edging)
The gold border runs all the way around the red body, including the bottom edge above the posts. It adds about 0.1 in (0.3 cm) on every edge.
Border gauge: About 7 sc per 1 in (2.5 cm) along straight edges, matching the body gauge.
Row-end rule: Work 1 sc into the end of each sc row and 2 sc into the end of each taller row (dc, tr, or fan rows).
Use the side where the front lip points right as your RS.
Round 1: With RS facing, join gold at the bottom front corner. Work into the free loops of the foundation chain and over the post joins:
- Bottom edge: 2 sc in first ch, sc in next 23 ch, 2 sc in last ch. (27 sc)
- Back edge: Row ends 1 + 2 + 2 + 2 + 2 + 1 for Rows 1–6, then 2 + 2 + 2 for Rows 8–10. (16 sc)
- Back top: Sc in each st of Row 10, ending in the sl st. (10 sc)
- Inner back edge: Work 6 sc evenly down the stepped edge to Row 6. (6 sc)
- Middle dip: Sc in each of the 13 unworked Row 6 sts. (13 sc)
- Front lip: Sc in sl st, sc in next 2 sc, sc in next 2 hdc, 3 sc in ch-2 tip sp, sc in last hdc. (9 sc)
- Front edge: Row ends 1 + 2 + 2 + 2 + 2 + 1 for Rows 6 down to 1. (10 sc)
Join with a sl st to the first sc. (27 + 16 + 10 + 6 + 13 + 9 + 10 = 91 sc)
Round 2: Ch 1, rev sc in each sc around. Join with a sl st to the first rev sc. Fasten off. (91 rev sc)
Why the math works:
- Bottom: 25 foundation sts plus 1 extra at each corner let the edging turn cleanly without pulling.
- Sides: The row-end rule gives about 6–7 sts per 1 in (2.5 cm) of height. That is close to the 7-st gauge, so the edge lies flat, and the slightly lower count keeps the curved back from rippling.
- Front tip: The 3 sc in the tip space keep the point sharp.
- Round 2: It works exactly 1 rev sc into each of the 91 sc, so the count can’t change.
Checkpoint: With its border, the body is 4.5 in (11.4 cm) wide.
Hanging Loop (Gold)
Join gold with a sl st in the center rev sc of the middle dip (the 7th of the 13 there). Ch 25 and sl st in the same st. Turn, sl st in each ch around the loop (25 sl st), then sl st into the base again. Fasten off and weave in the ends.
Checkpoint: The loop stands about 1.5 in (3.8 cm) above the edge.
Final Blocking
- Weave in all remaining ends. Hide gold tails inside the gold rounds and cream tails inside the posts.
- Pin the ornament RS up on a blocking mat to 5 in (12.7 cm) x 3.5 in (8.9 cm).
- Pin the body’s bottom edge straight, then pin the runner parallel to it.
- Pin the back top into a smooth curve and the front tip into a sharp point.
- Open each fan with a pin at its center and straighten the mesh columns.
- Shape each runner curl into a neat spiral.
- Spray lightly until damp, not soaked.
- Let it dry completely, at least 6 hours, before removing the pins.
Final Quality-Control Checklist
- Runner has 65 sc, with a straight section of 4.1 in (10.4 cm)
- Both curls roll up and inward and are tacked flat
- Body Rows 1–4 have 25 sts each; Rows 5–6 have 29
- Three fans are evenly spaced and open
- Front lip has a clear point; back is rounded and taller
- Three posts are evenly spaced, vertical, and 0.4 in (1.0 cm) tall
- Gold Round 1 has 91 sc; Round 2 has 91 rev sc
- Loop is in the middle dip and 1.5 in (3.8 cm) tall
- Finished size is 5 in (12.7 cm) x 3.5 in (8.9 cm)
- All ends are secure and hidden
Troubleshooting
Curls won’t lie flat. The sc are too loose. Redo them with tighter tension, or tack them more firmly before blocking.
Runner bends into a curve. The straight section is tighter than the curls. Block it straight under pins.
Fans look cramped. Check that you skipped exactly 3 sts on each side of every Fan in Row 3.
Posts lean. The markers don’t line up. Recount so body ch 3, 13, and 23 match runner sc 5, 15, and 25.
Gold edge ruffles. You’re adding stitches on the row ends. Follow the row-end rule exactly and recount the 91.
Gold edge pulls inward. Your rev sc is too tight. Loosen your tension, or use a hook 0.25 mm larger for Round 2 only.
Care
Hand wash in cool water with mild soap, press out the water in a towel, and dry flat, reshaping as you go. Store flat in tissue so the curls and loop keep their shape.
Final Notes
Each stage builds on the one before it:
- The 7-sc gauge gives a 4.1 in (10.4 cm) runner straight section and a 3.6 in (9.1 cm) body base.
- The body grows to 4.1 in (10.4 cm) at Row 6 and to 4.3 in (10.9 cm) with the back flare. It stands 2.6 in (6.6 cm) tall at the back.
- Stacked up, the 0.3 in (0.8 cm) runner, 0.4 in (1.0 cm) posts, and 0.1 in (0.3 cm) border on the top and bottom edges bring the ornament to 3.5 in (8.9 cm) tall. Width with the curls is 5 in (12.7 cm).
- The loop adds 1.5 in (3.8 cm) on top.
Check each measurement as you go, and your sleigh will come out right.
Happy crocheting!