

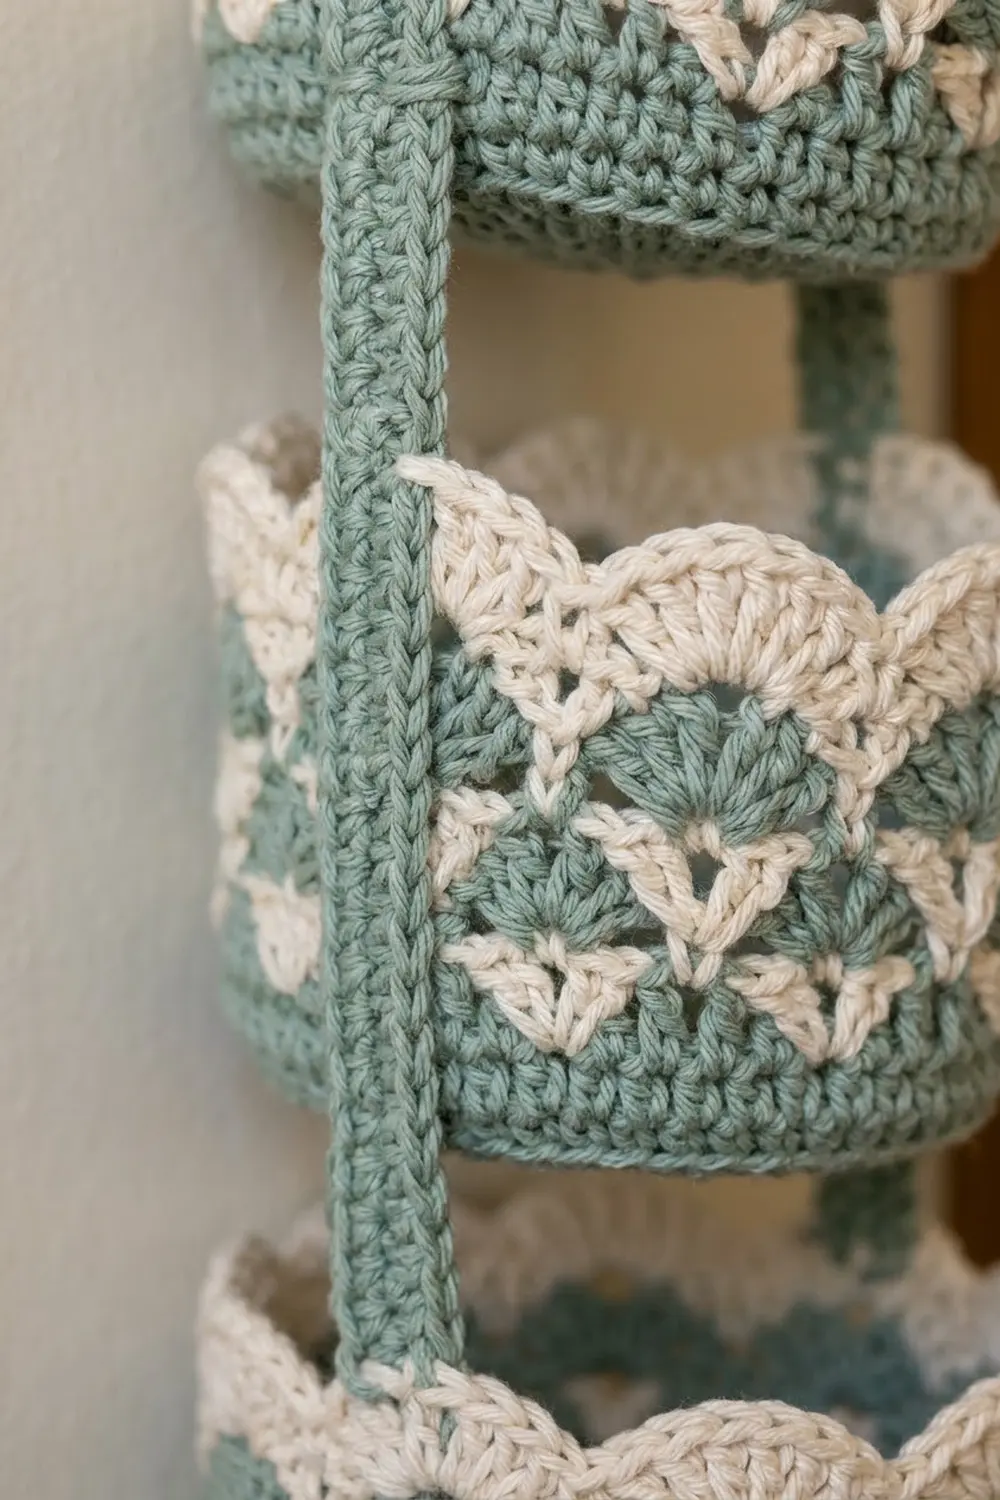
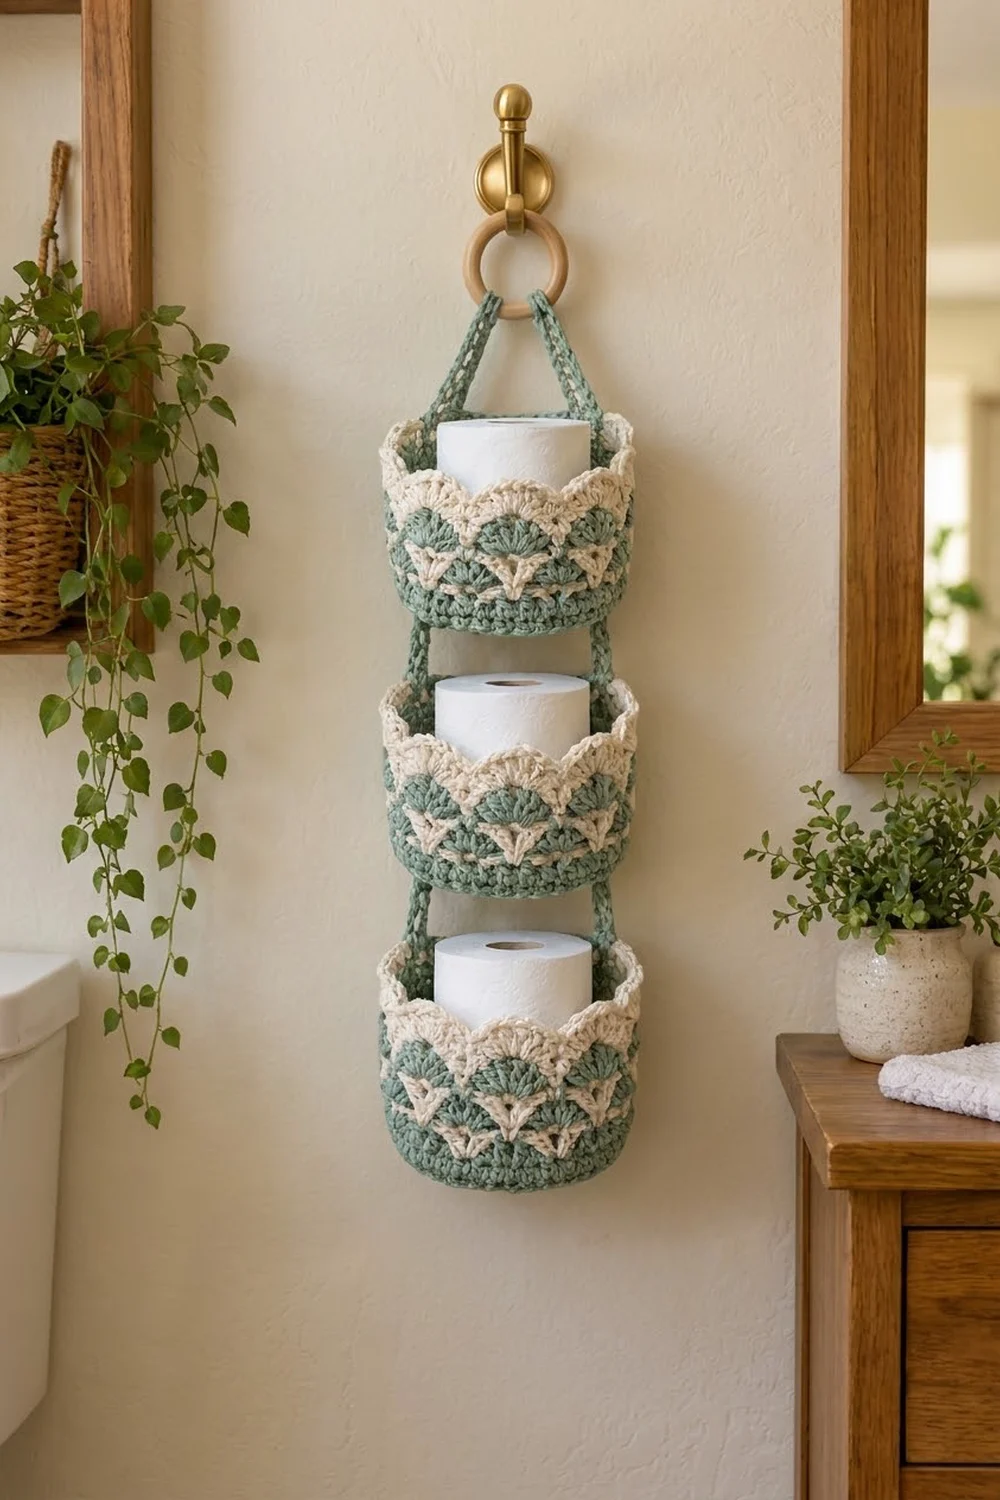
This three-tier hanging holder stacks three oval baskets on one sage-green strap, and each basket holds a standard toilet roll. The strap loops over a wooden ring that hangs from a wall hook. Each basket has a solid sage base and a textured wall: two tiers of sage shells, two tiers of cream V-stitches, and a scalloped cream rim.
The palette is soft and spa-like. Sage green and cream cotton go with natural wood, white towels and green plants. The design looks farmhouse-cottage and is sturdy enough for daily use.
This pattern uses US crochet terms. Each basket measures about 6.6 in (16.8 cm) long, 5.7 in (14.5 cm) wide and 3.9 in (9.9 cm) tall. Assembled, the holder hangs about 19 in (48.3 cm) from the top of the ring to the bottom of the lowest basket.
Construction is simple. Work each oval base in the round from a short chain, turn the wall up with a back-loop round, and then work the shell, V-stitch and scallop rounds. Next, make one long strap, fold it over the ring and sew it to both ends of all three baskets.
Finished Size and Construction
- Finished size: about 6.6 in (16.8 cm) wide x 19 in (48.3 cm) long, ring included
- Skill level: Intermediate (color changes, shells, V-stitches, seaming)
- Terminology: US
- Yarn weight: worsted (#4) cotton
- Hook: 5.0 mm (H-8)
- Number of pieces: 4 crocheted pieces (3 baskets + 1 strap), plus 1 wooden ring
- Layout: 3 baskets stacked vertically on a strap folded over the ring
- Piece size: each basket is 6.6 in (16.8 cm) x 5.7 in (14.5 cm) x 3.9 in (9.9 cm); the strap is 36 in (91.4 cm) x 0.75 in (1.9 cm)
- Size before border: basket wall is about 3.0 in (7.6 cm) tall after Round 10
- Border depth: the scalloped rim (Rounds 11–12) adds about 0.9 in (2.3 cm)
Materials
Use a smooth mercerized or combed cotton in worsted weight. Cotton keeps its shape, holds up to bathroom humidity and makes clear shell stitches. Acrylic can work too, but the baskets will be softer and may sag.
- Sage green (Color A): 150 g, about 255 m (279 yd)
- Cream (Color B): 90 g, about 153 m (167 yd)
These amounts assume about 170 m (186 yd) per 100 g. Both amounts include a margin of roughly 25% for gauge swatches and differences in tension.
Tools:
- 5.0 mm (H-8) crochet hook
- Wooden ring, 2.75 in (7.0 cm) diameter
- Yarn needle
- 6 locking stitch markers
- Scissors
- Measuring tape
- Spray bottle and pins for blocking
Abbreviations (US Terms)
- ch – chain
- sl st – slip stitch
- sc – single crochet
- dc – double crochet
- tr – treble crochet
- BLO – back loop only
- sk – skip
- sp – space
- st(s) – stitch(es)
- rep – repeat
Special stitches:
- Shell: 5 dc in the same stitch.
- V-st: (tr, ch 2, tr) in the same stitch.
- Scallop: 7 dc in the same ch-2 space.
Gauge and Checkpoints
Gauge: 14 dc x 7 rows = 4 in (10.2 cm). In sc, 14 sts x 16 rows = 4 in (10.2 cm).
Make one complete basket first and check every measurement before you start the other two. Small gauge errors add up over three tiers.
Checkpoints:
- After Round 3: the base measures 4.3 in (10.9 cm) x 3.4 in (8.6 cm).
- After Round 5: the base measures 6.6 in (16.8 cm) x 5.7 in (14.5 cm) and lies flat.
- After Round 6: the wall circumference is about 18.9 in (48.0 cm).
- After Round 10: the wall is 3.0 in (7.6 cm) tall.
- After Round 12: the basket is 3.9 in (9.9 cm) tall.
If your base is too big or ruffles, go down one hook size (4.5 mm). If it is too small or cups upward before Round 6, go up one hook size (5.5 mm). Test one standard roll inside before moving on. The roll should drop in with about 0.5 in (1.3 cm) of room on each side.
Basket (Make 3)
Oval Base
Use Color A. The beginning ch 2 does not count as a stitch in Rounds 1–5. Join each round with a sl st to the first dc.
Ch 7.
Round 1: Dc in 3rd ch from hook, dc in next 3 ch, 6 dc in last ch. Rotate and work along the opposite side of the foundation: dc in next 3 ch, 5 dc in the last ch (the same ch that holds the first dc). Join. (18 sts: 6 at each end, 3 along each side)
Round 2: Ch 2, 2 dc in first st, dc in next 3 sts, 2 dc in each of next 6 sts, dc in next 3 sts, 2 dc in each of next 5 sts. Join. (30 sts)
Round 3: Ch 2, dc in first st, 2 dc in next st, dc in next 3 sts, [dc in next st, 2 dc in next st] 6 times, dc in next 3 sts, [dc in next st, 2 dc in next st] 5 times. Join. (42 sts)
Round 4: Ch 2, dc in first 2 sts, 2 dc in next st, dc in next 3 sts, [dc in next 2 sts, 2 dc in next st] 6 times, dc in next 3 sts, [dc in next 2 sts, 2 dc in next st] 5 times. Join. (54 sts)
Round 5: Ch 2, dc in first 3 sts, 2 dc in next st, dc in next 3 sts, [dc in next 3 sts, 2 dc in next st] 6 times, dc in next 3 sts, [dc in next 3 sts, 2 dc in next st] 5 times. Join. (66 sts)
Each round adds 12 stitches, 6 at each curved end. The 3 stitches along each straight side never increase, which keeps the oval shape.
Wall
Round 6: Ch 1, sc in BLO of each st around. Join to first sc. (66 sc)
The unused front loops form a neat ridge, and the wall turns upward.
Round 7 (Color A, shells): Ch 1, sc in first st, sk 2 sts, shell in next st, sk 2 sts, sc in next st, sk 2 sts, shell in next st, sk 2 sts; rep from * 9 more times. Join to first sc. (11 shells + 11 sc = 66 sts)*
Each repeat uses 6 stitches from Round 6, and 66 ÷ 6 = 11 repeats, so no stitches are left over. Fasten off Color A.
Round 8 (Color B, V-sts): Join Color B with a sl st in any sc. Ch 4 (counts as tr), ch 2, tr in same sc (first V-st made), ch 1, sk 2 dc, sc in center dc of shell, ch 1, V-st in next sc, ch 1, sk 2 dc, sc in center dc of next shell, ch 1; rep from * 9 more times. Join to top of beginning ch-4. (11 V-sts, 11 sc, 22 ch-1 sps)*
The V-sts open upward between the sage shells and form the cream inverted triangles. Fasten off Color B.
Round 9 (Color A, shells): Join Color A with a sl st in any V-st ch-2 sp. Ch 1, sc in same sp, sk next tr and ch-1, shell in next sc, sk ch-1 and tr, sc in next ch-2 sp, sk tr and ch-1, shell in next sc, sk ch-1 and tr; rep from * 9 more times. Join to first sc. (11 shells + 11 sc = 66 sts)*
Fasten off Color A.
Round 10 (Color B, V-sts): Join Color B with a sl st in any sc. Work as Round 8. (11 V-sts, 11 sc, 22 ch-1 sps)
Do not fasten off.
Checkpoint: the wall is about 3.0 in (7.6 cm) tall from the base edge.
Make All Pieces
Quantities per color:
- Each basket: about 35 g of Color A (base, Rounds 6, 7 and 9) and 22 g of Color B (Rounds 8, 10, 11 and 12)
- Strap: about 12 g of Color A
- Totals: about 117 g of Color A and 66 g of Color B
Strap (Make 1)
Use Color A.
Ch 127.
Row 1: Sc in 2nd ch from hook and in each ch across. (126 sc)
Rows 2–3: Ch 1, turn, sc in each st across. (126 sc)
Fasten off, leaving a 24 in (61.0 cm) tail. The strap measures 36 in (91.4 cm) x 0.75 in (1.9 cm).
Layout grid:
          ( RING )
          /      \
     strap        strap
        /            \
 [  BASKET 1 – TOP     ]
   |                  |
 [  BASKET 2 – MIDDLE  ]
   |                  |
 [  BASKET 3 – BOTTOM  ]
Joining
Each half of the strap has 63 stitches. Count outward from the center of the strap and mark these sections on both halves:
- Sts 1–4: wrap around the ring, 1.1 in (2.8 cm)
- Sts 5–13: diagonal drop to the top basket, 2.6 in (6.6 cm)
- Sts 14–27: top basket wall, 4.0 in (10.2 cm)
- Sts 28–31: gap, 1.1 in (2.8 cm)
- Sts 32–45: middle basket wall, 4.0 in (10.2 cm)
- Sts 46–49: gap, 1.1 in (2.8 cm)
- Sts 50–63: bottom basket wall, 4.0 in (10.2 cm)
That gives 4 + 9 + 14 + 4 + 14 + 4 + 14 = 63 stitches per half, and 2 x 63 = 126 stitches in total.
Attach the ring: Fold the strap at its center over the ring. With a length of Color A, sew 3 tight stitches through both layers at st 4 on each side, just below the ring, so the ring cannot slide.
Mark the baskets: Flatten each basket so the long sides meet. Place a marker at the center of each curved end on Round 12. The two markers should be exactly 55 stitches apart on each side.
Stitch-to-stitch logic: Each wall section of the strap has 14 sts, and each basket wall has 7 rounds (Rounds 6–12). Sew 2 strap stitches to each wall round. Align the top of the section with Round 12 and the bottom with the Round 6 ridge.
Method: Mattress stitch or whipstitch along both long edges of the strap, so it lies flat on the outside of the wall. Pull each stitch snug but not tight, because tight seams pucker the wall and overly loose seams let the basket tilt.
Checkpoint: each gap measures 1.1 in (2.8 cm). The whole holder hangs about 19 in (48.3 cm) from the top of the ring.
Border: Scalloped Rim
The rim is worked on each basket after Round 10, before assembly.
Border gauge: One scallop repeat covers 6 stitches of the wall, which is about 1.7 in (4.3 cm). Eleven repeats go around the 18.9 in (48.0 cm) wall.
Round 11 (Color B, scallops): Sl st into next ch-2 sp. Ch 3 (counts as dc), 6 dc in same sp, sk tr and ch-1, sc in next sc, sk ch-1 and tr, scallop in next ch-2 sp, sk tr and ch-1, sc in next sc, sk ch-1 and tr; rep from * 9 more times. Join to top of ch-3. (11 scallops x 7 dc + 11 sc = 88 sts)*
Round 12 (Color B, trim): Ch 1, sc in next 3 dc, 3 sc in center dc, sc in next 3 dc, sl st in next sc; rep from * 10 more times. Join to first sc. (88 sts worked 1-per-stitch + 22 extra sts = 110 sts)*
Per side: with the basket flattened, the front and back halves each carry 55 stitches of Round 12.
Why the math works: All the pattern rounds are built on 66 stitches, and 66 ÷ 6 = 11 even repeats. Shells sit above shells, V-sts sit above V-sts, and each scallop sits over a V-st. The 2 extra stitches at each scallop tip round the curve without cupping the rim.
Weave in all ends on the inside of the wall.
Final Blocking
- Weave in any remaining ends before blocking.
- Mist each basket until it is damp but not dripping.
- Put a toilet roll wrapped in a plastic bag inside each basket to set the oval shape.
- Ease each scallop to an even curve and pin the tips if needed.
- Mist the strap lightly and lay it straight, without stretching it.
- Let everything dry completely, which usually takes 12–24 hours.
- Remove the rolls and check all checkpoint measurements again.
Final Quality-Control Checklist
- Each base lies flat and measures 6.6 in (16.8 cm) x 5.7 in (14.5 cm).
- Each wall has 11 sage shells and 11 cream V-sts per tier.
- All three baskets measure 3.9 in (9.9 cm) tall.
- The scallops are even, with no gaps at the joins.
- The strap is sewn at the exact center of each oval end.
- The gaps between baskets are equal, 1.1 in (2.8 cm) each.
- The ring is secured, and the holder hangs level when loaded.
- All ends are hidden on the inside.
Troubleshooting
- Base cups: use a larger hook or loosen your dc.
- Base ruffles: use a smaller hook or tighten your dc.
- Shells lean: check that each shell sits in the 4th stitch of its 6-stitch repeat.
- Stitches left over in Round 7: recount Round 6. It must have exactly 66 stitches.
- V-sts look short: use tr, not dc, to reach the top of the shells.
- Rim flares: work Round 12 with 2 sc instead of 3 at each scallop tip.
- Basket tilts: re-sew the strap so its center lines up with the marker on each end.
- Holder hangs crooked: make sure both strap halves have their markers at the same stitch numbers.
Care
Hand wash in cool water with mild soap, press out the water in a towel, and dry flat. Reshape around a roll while damp.
Final Notes
The measurement chain is short and easy to check. Your 14-stitch gauge gives a 66-stitch oval base, 6.6 in (16.8 cm) x 5.7 in (14.5 cm). That base gives an 18.9 in (48.0 cm) wall with 11 even pattern repeats. The wall reaches 3.0 in (7.6 cm) before the rim and finishes at 3.9 in (9.9 cm) tall. The 126-stitch strap, 36 in (91.4 cm) long, divides into exact sections that hang the three baskets 1.1 in (2.8 cm) apart, for a total drop of about 19 in (48.3 cm). Check each step, and all three tiers will match.
Happy crocheting!