

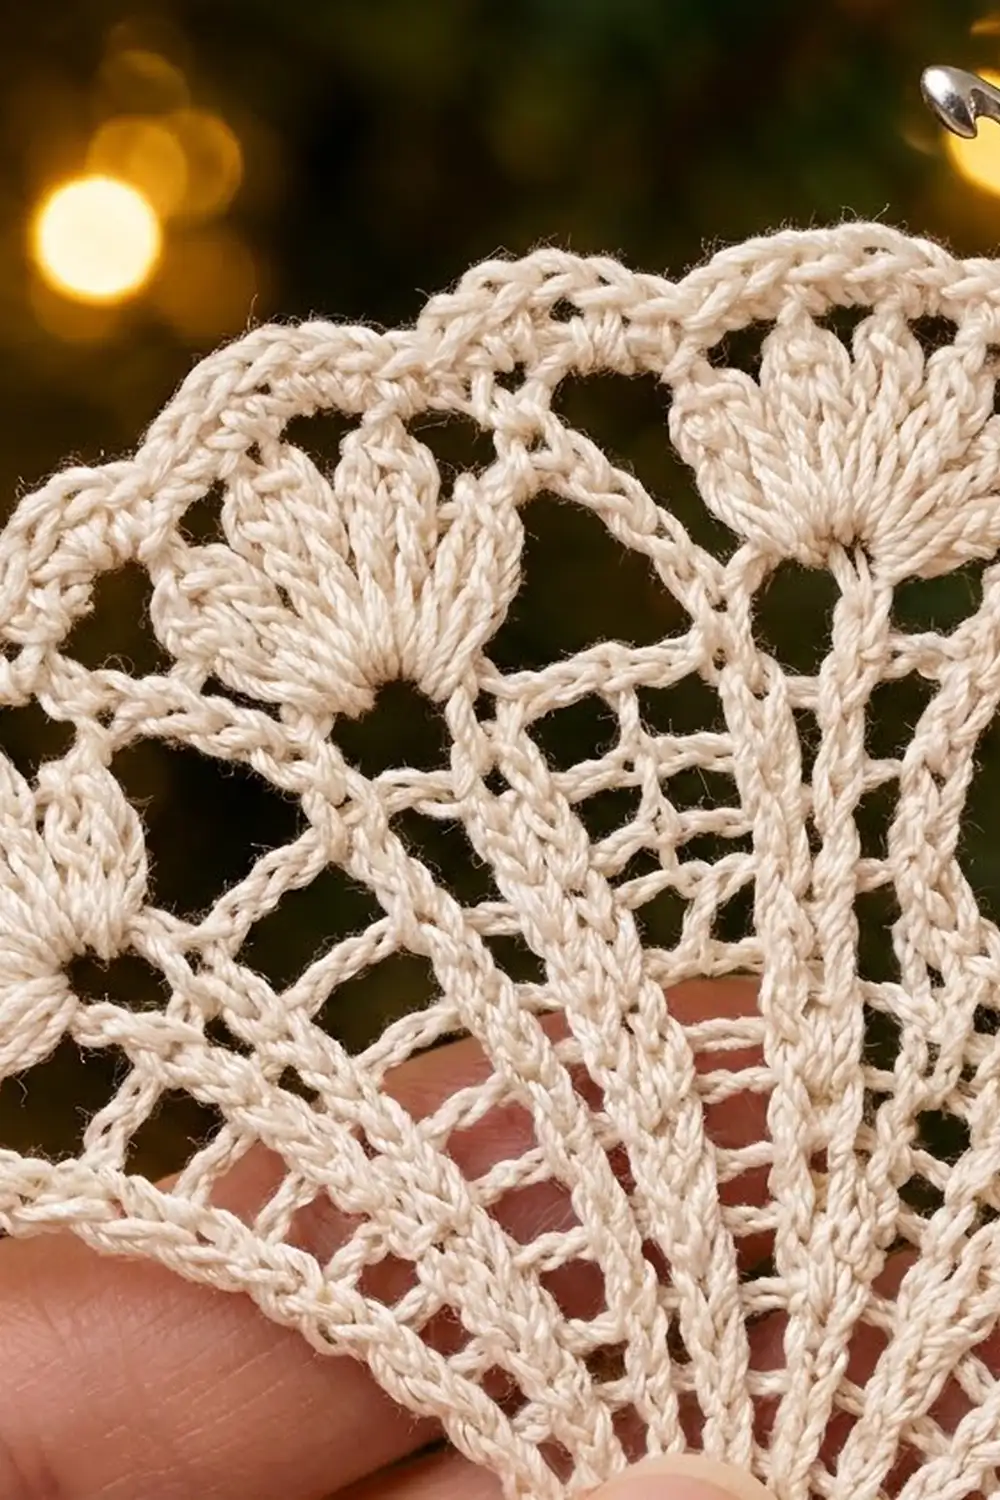
The Winter Ginkgo Lace Ornament is a delicate, fan-shaped leaf crocheted in fine cream cotton thread. Straight ribs spread out from a slim stem, a notch splits the top edge into two rounded lobes, and three small shell fans sit inside each lobe under soft chain arches. A row of tiny picots finishes the whole outline.
It is made in one color, so it reads as heirloom lace. It looks right on a green tree with warm lights, tied to a gift, or hung in a window. All instructions use US crochet terms.
The finished ornament measures 4.5 in (11.4 cm) wide and 4.5 in (11.4 cm) tall without the loop. The loop adds about 1.25 in (3.2 cm).
Construction overview: You start with a solid stem worked around a foundation chain. Then the fan is worked in back-and-forth rows from the top of the stem. After the solid crossbar row, each lobe is finished separately, which forms the center notch. One border round then goes around the entire outline, adds the picots, and makes the hanging loop.
Finished Size and Construction
- Finished size: 4.5 in (11.4 cm) wide × 4.5 in (11.4 cm) tall, without the loop
- Skill level: Intermediate (thread lace, working into chain spaces)
- Terminology: US crochet terms
- Yarn weight: Size 10 crochet cotton (Lace / 0)
- Hook: 1.5 mm (US steel size 8)
- Number of pieces: 1
- Layout: Single ornament with no joining
- Piece size: Fan 3 in (7.6 cm) tall from the top of the stem; stem 1.5 in (3.8 cm)
- Size before border: 4.25 in (10.8 cm) wide × 4.375 in (11.1 cm) tall
- Border depth: 0.125 in (0.3 cm) per edge
Materials
Thread: Use mercerized size 10 cotton. It holds crisp stitches, takes starch well, and has a gentle sheen that suits a lace leaf. Avoid fuzzy or very soft thread, because the open spaces will close up.
- Cream / ivory: 6 g (about 32 m)
These amounts include a margin for a test swatch and weaving in ends.
Tools:
- 1.5 mm (US steel size 8) crochet hook
- Fine tapestry needle or a sewing needle with a large eye
- Small sharp scissors
- Rustproof pins and a foam blocking board
- Spray starch or a 1:1 mix of school glue and water (optional, for stiffening)
- Ruler or tape measure
Abbreviations (US Terms)
- ch – chain
- sl st – slip stitch
- sc – single crochet
- dc – double crochet
- tr – treble crochet
- sp(s) – space(s)
- st(s) – stitch(es)
Special stitches:
- Picot: Ch 3, sl st in the 3rd ch from the hook.
- Shell: 7 dc worked into the same space.
Gauge and Checkpoints
Gauge: 10 sc = 1 in (2.5 cm). One dc row is about 0.25 in (0.6 cm) tall.
Gauge matters here because the ornament is a single piece. If you’re unsure, make the stem first and measure it before going on.
Checkpoints:
- After the stem: 1.5 in (3.8 cm) long, including the knob.
- After Row 5: The fan reaches 1.25 in (3.2 cm) above the top of the stem.
- After Row 8: The fan reaches 2 in (5.1 cm) above the top of the stem.
- After Row 10 (both lobes): The fan reaches 2.75 in (7.0 cm). The full width is 4.25 in (10.8 cm).
- After the border: 4.5 in (11.4 cm) wide × 4.5 in (11.4 cm) tall.
If your piece is too big: Switch to a 1.4 mm or 1.3 mm hook, or tighten your chains, which are usually where the extra size comes from.
If your piece is too small: Switch to a 1.65 mm (US steel 7) hook.
Small differences can be fixed during blocking. A difference of more than 0.25 in (0.6 cm) at Checkpoint 2 needs a hook change.
Stem
Ch 16.
Stem round: Sc in the 2nd ch from the hook and in the next 13 ch (14 sc). Work 5 sc in the last ch to make the knob. Rotate the work and sc in the unused loop of each of the next 14 ch (14 sc). (33 sc total)
You are now back at the top of the stem, beside the ch you skipped at the start. Do not fasten off.
Check: the stem is about 1.5 in (3.8 cm) long, solid and slightly rounded.
Fan
Turn at the end of every row.
Row 1: Ch 3 (counts as dc). Work 10 dc into the skipped ch at the top of the stem. (11 dc)
Row 2: Ch 4 (counts as dc + ch 1). Dc in next dc, ch 1. Repeat from * across, ending with dc in the top of the turning ch. (11 dc, 10 ch-1 sps)
Row 3: Ch 5 (counts as dc + ch 2). Dc in next dc, ch 2. Repeat from * across, ending with dc in the 3rd ch of the turning ch. (11 dc, 10 ch-2 sps)
Row 4 (rib-doubling row): Ch 4 (counts as dc + ch 1). Dc in next ch-2 sp, ch 1, dc in next dc. Ch 1, dc in next ch-2 sp, ch 1, dc in next dc. Repeat from * across. The last dc goes in the 3rd ch of the turning ch.
Count: 11 dc (one in each existing dc) + 10 dc (one in each space) = 21 dc, with 20 ch-1 sps.
Row 5: Ch 5 (counts as dc + ch 2). Dc in next dc, ch 2. Repeat from * across, ending with dc in the 3rd ch of the turning ch. (21 dc, 20 ch-2 sps)
Row 6: Ch 7 (counts as tr + ch 3). Tr in next dc, ch 3. Repeat from * across, ending with tr in the 3rd ch of the turning ch. (21 tr, 20 ch-3 sps)
The tr ribs are now numbered 1 to 21, starting from the edge where you are about to begin Row 7. Rib 11 is the center rib.
Row 7 (crossbar row): Ch 1. Sc in the first tr. 3 sc in next ch-3 sp, sc in next tr. Repeat from * across, with the last sc in the 4th ch of the turning ch.
Count: 21 sc (one above each rib) + 60 sc (3 in each space) = 81 sc.
This solid row is the crossbar seen across the middle of the leaf.
Check: the fan should reach about 1.7 in (4.3 cm) and lie flat. If it cups, your chains are too tight. If it ruffles, they are too loose.
First Lobe
In Row 7, the sc above rib 1 is st 1 and the sc above rib 10 is st 37. Sts 38–44 stay unworked to form the notch, with st 41 sitting above the center rib.
Row 8: Ch 4 (counts as tr). Ch 4, skip 3 sc, tr in next sc. Repeat from * 8 more times, ending in st 37. (10 tr, 9 ch-4 sps)
Row 9 (shell row): Ch 1. Sc in first tr. Then work this sequence 3 times:
ch 4, skip the next sp, sc in next tr; shell in next sp; sc in next tr; ch 4, skip the next sp, sc in next tr.
The final sc goes in the top of the turning ch.
(10 sc, 6 ch-4 sps, 3 shells)
Each repeat uses 3 spaces, so 3 repeats use all 9. The shells land in the 2nd, 5th, and 8th spaces.
Row 10 (arch row): Ch 1. Sc in first sc. Then work this sequence 3 times:
ch 4, sc in next sc; ch 5, sc in the 4th dc of the shell; ch 5, sc in next sc; ch 4, sc in next sc.
(13 sc, 12 arches: 6 ch-4 and 6 ch-5)
You end at the inner (notch) side of the lobe. Fasten off.
Second Lobe
Join the thread with a sl st in st 81 of Row 7 (the sc above rib 21). This is the outer edge on the other side.
Row 8: Ch 4 (counts as tr). Ch 4, skip 3 sc, tr in next sc. Repeat from * 8 more times, ending in st 45. (10 tr, 9 ch-4 sps)
Rows 9–10: Work these the same as for the first lobe.
(Row 9: 10 sc, 6 ch-4 sps, 3 shells. Row 10: 13 sc, 12 arches.)
Do not fasten off. You are at the inner top corner of the second lobe, next to the notch.
Check: the leaf is 4.25 in (10.8 cm) wide and 4.375 in (11.1 cm) tall, with a U-shaped notch about 0.6 in (1.5 cm) deep.
Border
Border gauge: One sc per row-end of an sc row, 2 sc per dc row-end, and 3 sc per tr row-end. Chain arches get as many sc as they have chains (ch-4 arches), or one extra (ch-5 arches) to ease the outer curve.
Border round (do not turn): Ch 1, then work around the leaf as follows:
- Second lobe, inner side (going down): 1 sc in the Row 9 end and 3 sc in the Row 8 end. (4 sc)
- Notch bottom: Sc in each of the next 3 unworked Row 7 sts. Sc in st 41, then ch 30 and sl st in the top of that same sc to make the hanging loop. Sc in each of the next 3 sts. (7 sc + loop)
- First lobe, inner side (going up): 3 sc in the Row 8 end and 1 sc in the Row 9 end. (4 sc)
- First lobe arc: Sc in the first Row 10 sc. Then work this sequence 3 times:
(2 sc, picot, 2 sc) in ch-4 arch, sc in next sc; (3 sc, picot, 3 sc) in ch-5 arch, sc in next sc; (3 sc, picot, 3 sc) in ch-5 arch, sc in next sc; (2 sc, picot, 2 sc) in ch-4 arch, sc in next sc.
(1 + 3 × 24 = 73 sc, 12 picots) - First side edge (going down): Work along the row-ends: Row 9 gets 1 sc, Row 8 gets 3, Row 7 gets 1, Row 6 gets 3, and Rows 5 to 1 get 2 each (10 sc).
That is 18 sc total. Work them as (sc in next 6 row-end positions, picot) 3 times. (18 sc, 3 picots) - Stem: Sl st in each of the 14 sc down the first side of the stem, the 5 sc around the knob, and the 14 sc up the other side. (33 sl st)
- Second side edge (going up): Work as for step 5, from Row 1 to Row 9. (18 sc, 3 picots)
- Second lobe arc: Work as for step 4. The last sc goes in the Row 10 sc where you started. (73 sc, 12 picots)
Sl st in the first sc of the round to join. Fasten off.
Round totals: 4 + 7 + 4 + 73 + 18 + 18 + 73 = 197 sc, plus 33 sl st, 30 picots, and 1 hanging loop.
Why the math works: Each side of the leaf is a mirror of the other, so the counts must match on both sides: 4 = 4 sc on the inner edges, 73 = 73 on the arcs, and 18 = 18 on the sides. Row-end sc follow stitch height, so the edges neither pull in nor flare. Each ch-4 arch gets 4 sc, which matches its length. Each ch-5 arch gets 6 sc, and that extra sc lets the outermost scallops curve smoothly. Every arch gets one picot centered on it. That spaces the picots evenly, and the 6 picots on the side edges continue the same rhythm down to the stem. The stem is edged with slip stitches only, so it stays slim and stiff.
Final Blocking
- Weave in all ends along solid areas such as the stem and the crossbar row. Avoid the open chain spaces.
- Soak the ornament in cool water for 5 minutes, then press it gently in a towel.
- Optional: dip it in starch solution or the 1:1 glue mix and squeeze out the excess.
- Lay it face up on the blocking board. Pin the stem straight first, at 1.5 in (3.8 cm).
- Spread the fan to 4.5 in (11.4 cm) wide and pin the outer edge of each lobe.
- Pin the ribs so they run straight out from the top of the stem.
- Pin each picot outward, plus the bottom of the notch.
- Pin the hanging loop into a neat teardrop about 1.25 in (3.2 cm) tall.
- Let it dry completely, at least 6 hours, before you remove the pins.
Final Quality-Control Checklist
- Size is 4.5 in (11.4 cm) wide × 4.5 in (11.4 cm) tall without the loop
- Stem is straight, 1.5 in (3.8 cm) long, with a rounded knob
- 21 ribs radiate evenly, and the crossbar row lies flat
- The notch is centered over rib 11
- Each lobe has 3 shells under 12 arches
- 30 picots in total, with 12 on each lobe and 3 on each side
- Both halves mirror each other
- The hanging loop is secure and centered
- No visible ends and no stiff residue
Troubleshooting
- Fan cups upward: Your chains are too tight. Loosen them, or add 1 ch to each Row 6 space.
- Fan ruffles: Your chains are too loose. Tighten them, or go down a hook size for Rows 5–8.
- Lobes are uneven: Recount Row 8 on each lobe. Each one needs exactly 10 tr and 9 spaces.
- Wrong number of shells: Each repeat in Row 9 must use exactly 3 spaces.
- Notch is off-center: In Row 7, check that sts 38–44 were left unworked.
- Border waves: You may have added extra sc to the arches. Check against the border gauge.
- Loop twists: Make sure the chain isn’t twisted before you sl st, then pin it flat while blocking.
Care
Hand wash in cool water with mild soap, press dry in a towel, and re-block if needed. Store the ornament flat in tissue paper so the picots and stem don’t bend.

Final Notes
The size depends on each stage measuring correctly in turn:
- The stem is 1.5 in (3.8 cm).
- The fan reaches 1.25 in (3.2 cm) after Row 5 and 2 in (5.1 cm) after Row 8.
- The two lobes bring it to 4.25 in (10.8 cm) wide.
- The 0.125 in (0.3 cm) border brings the finished leaf to 4.5 in (11.4 cm) square.
If each checkpoint matches, the finished leaf will match too. Make one, block it, and then make a few more for the tree.
Happy crocheting!