

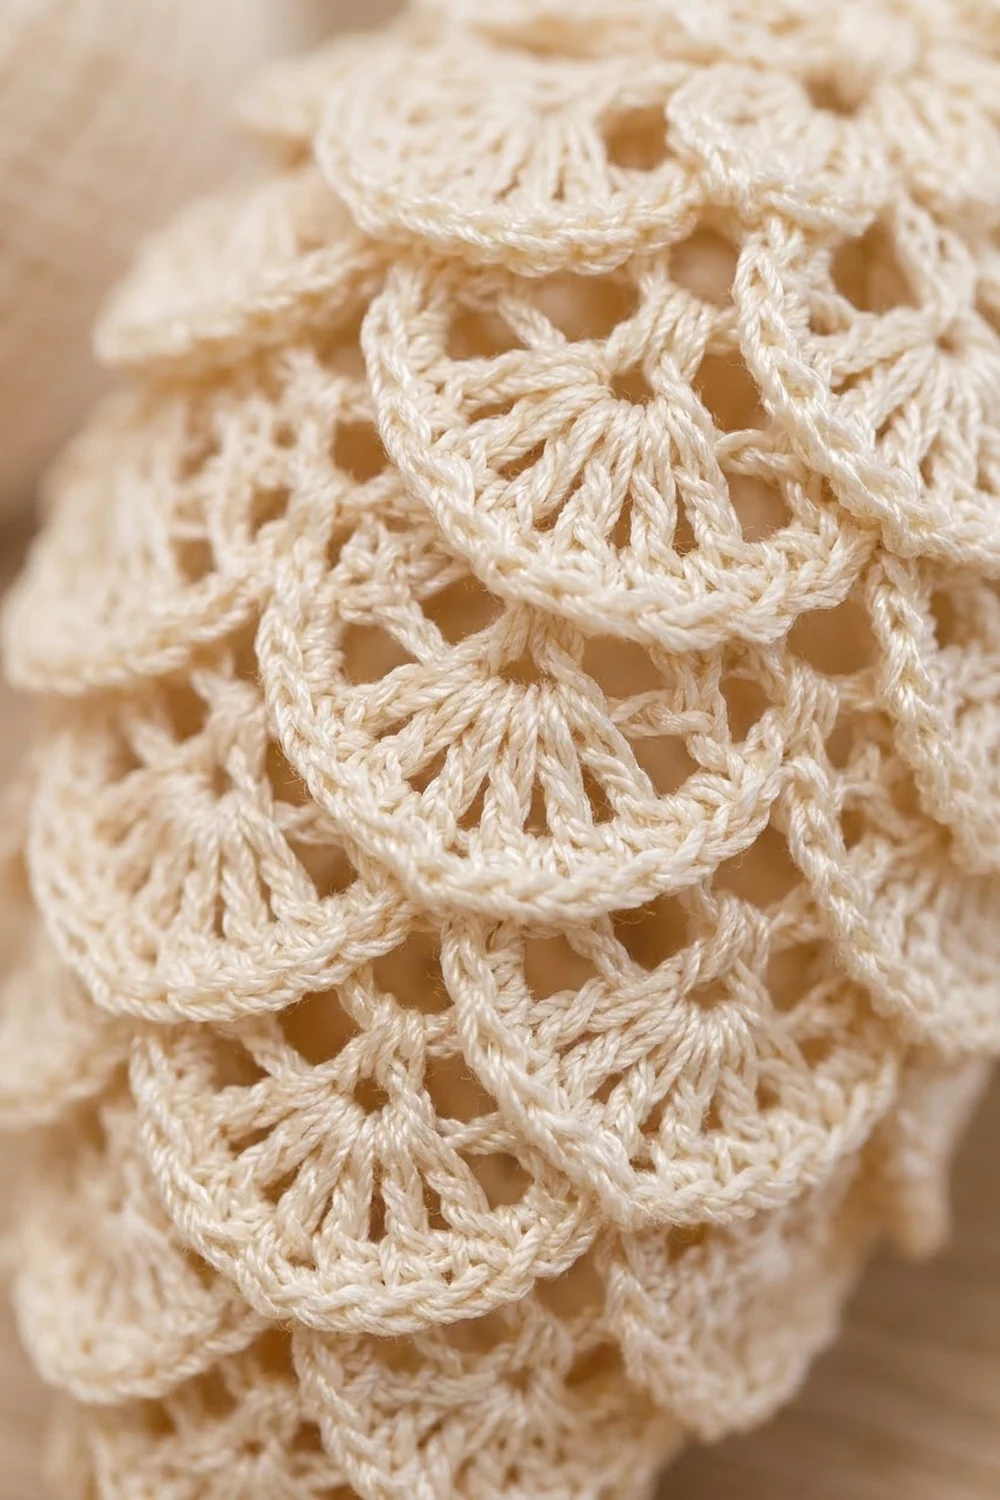
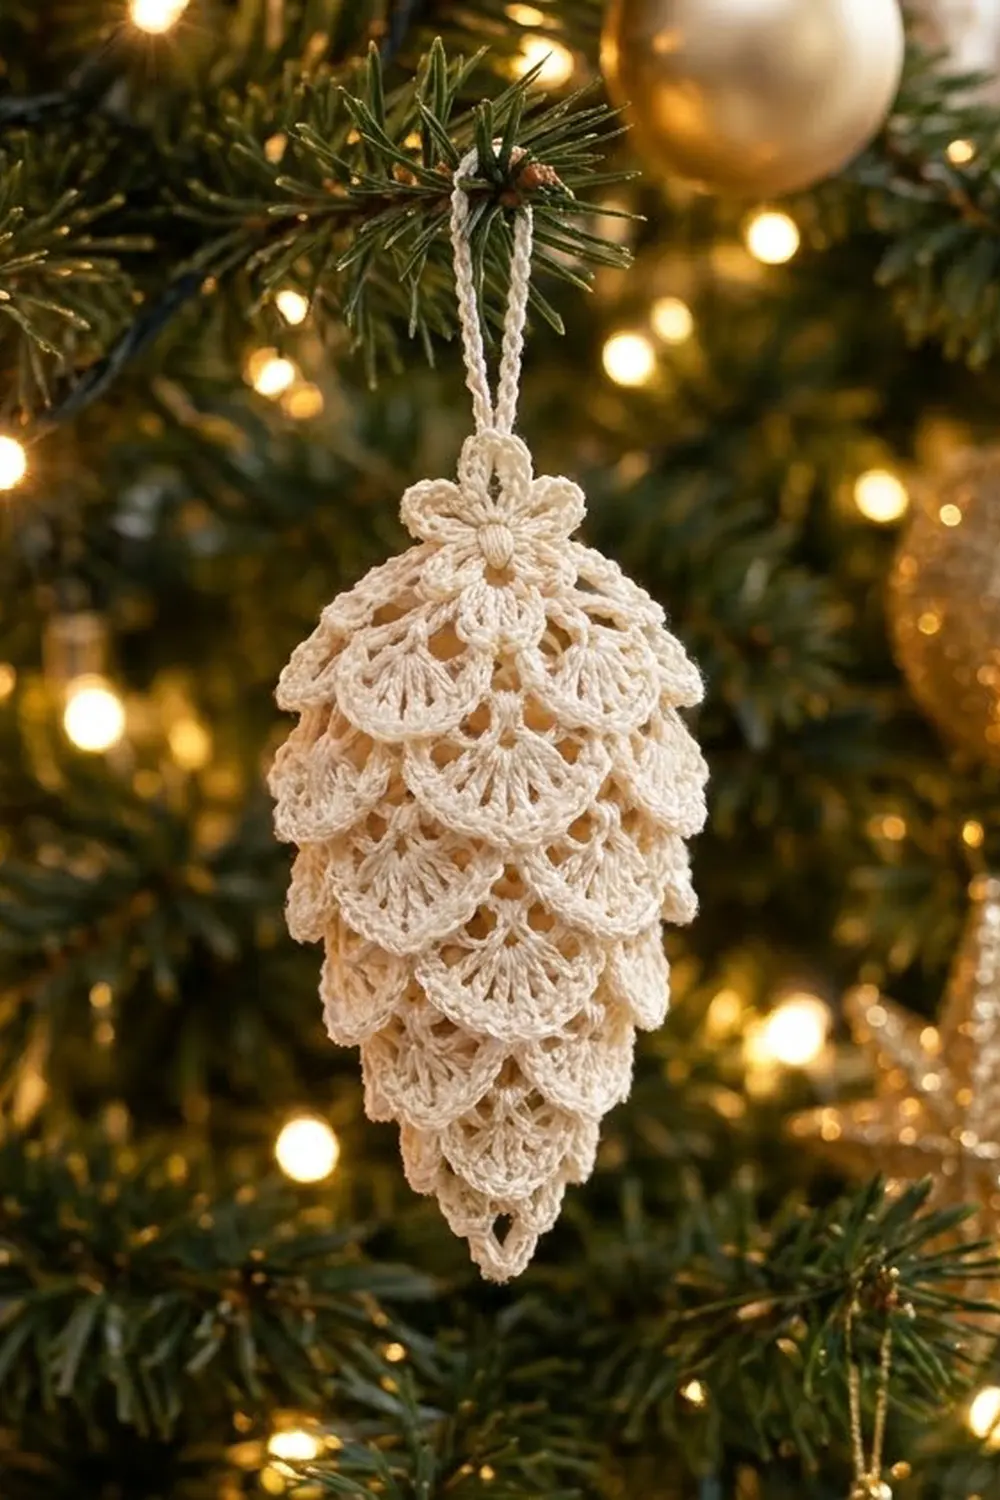
This lacy pinecone ornament is covered in small fan-shaped scales that overlap tier over tier, just like a real cone. A little six-petal flower sits on top, and a firm thread loop rises from its center so the pinecone hangs straight on a branch.
It is worked in one cream cotton thread for a classic, heirloom look that shines under tree lights. Ivory, white, or soft gold would all suit it. The pattern uses US crochet terms throughout.
The finished pinecone is 4 in (10.2 cm) tall and 2 in (5.1 cm) wide at its widest point. The hanging loop adds 1.5 in (3.8 cm), so the full hanging length is 5.5 in (14.0 cm).
It is made in one piece, top down, in joined rounds. You start with a small disk, add the flower to the front loops, and then alternate two kinds of rounds: a hidden mesh round of double crochet posts, and a fan round that hangs the scales from those posts. The body is lightly stuffed, closed at the tip, and finished with the hanging loop.
Finished Size and Construction
- Finished size: 4 in (10.2 cm) tall x 2 in (5.1 cm) wide; 5.5 in (14.0 cm) with loop
- Skill level: Intermediate
- Terminology: US crochet terms
- Yarn weight: Size 3 cotton crochet thread
- Hook: 2.25 mm (B-1)
- Number of pieces: 1 (worked in one piece)
- Layout: Single ornament; 9 tiers of 6 fans each
- Piece size: 4 in (10.2 cm) x 2 in (5.1 cm)
- Size before edge finish: 4 in (10.2 cm) body
- Border depth: No fabric border; the hanging loop adds 1.5 in (3.8 cm)
Materials
Thread: Choose a mercerized size 3 cotton crochet thread. Mercerized cotton gives crisp stitch definition and holds the fan shapes after blocking. Avoid fuzzy or acrylic blends; the scales will look soft and blurry.
- Cream/ivory: about 15 g, approx. 65 m (71 yd)
- Fiberfill: about 3 g, white or cream
The thread amount includes a margin of about 30 percent for your gauge check and the loop.
Tools:
- 2.25 mm (B-1) crochet hook
- Tapestry needle
- Locking stitch marker
- Scissors
- Spray starch or diluted fabric stiffener
- Ruler or tape measure
- Rust-proof pins and a foam block
Abbreviations (US Terms)
- ch – chain
- sl st – slip stitch
- sc – single crochet
- dc – double crochet
- tr – treble crochet
- st(s) – stitch(es)
- sp(s) – space(s)
- sk – skip
- beg – beginning
- rnd – round
- FLO / BLO – front loop only / back loop only
Special stitches:
- Fan3: (tr, [ch 1, tr] 2 times) in the same st. Makes 3 tr and 2 ch-1 sps.
- Fan5: (tr, [ch 1, tr] 4 times) in the same st. Makes 5 tr and 4 ch-1 sps.
- Fan7: (tr, [ch 1, tr] 6 times) in the same st. Makes 7 tr and 6 ch-1 sps.
All tr in a fan go into one stitch, so the fan radiates from a point at the top and opens into a rounded edge below. That is what creates the scale shape.
Gauge and Checkpoints
Gauge is not critical for an ornament, but it controls the final height and how well the scales overlap.
- 8 sc = 1 in (2.5 cm)
- 1 dc = about 0.375 in (1.0 cm) tall
- 1 Fan5 or Fan7 hangs about 0.45 in (1.1 cm) long
Test by working Rnds 1–2. The disk should measure 1 in (2.5 cm) across. Since the whole pinecone is one piece, these two rounds are your test piece.
Checkpoints (measured from the top disk down to the lowest fan tips):
- After Rnd 4: 0.8 in (2.0 cm)
- After Rnd 12: 2.3 in (5.8 cm), and about 2 in (5.1 cm) wide
- After Rnd 20: 4 in (10.2 cm)
If your work is too big: Go down to a 2 mm hook, or tighten your tr by pulling the first loop up less.
If your work is too small: Go up to a 2.5 mm hook. If the scales do not reach the tier below, lengthen your tr slightly rather than adding stitches.
Pattern
Top Disk and Flower
Ch 4, sl st in first ch to form a ring.
Rnd 1: Ch 1, 12 sc in ring, sl st in first sc. (12 sc)
Flower (worked in the FLO of Rnd 1): *Ch 2, 2 dc in FLO of next st, ch 2, sl st in same FLO, sl st in FLO of next st; rep from * 5 more times. (6 petals)
Each petal uses 2 front loops, and 6 petals x 2 = 12, so the flower ends exactly where it began. It measures about 0.75 in (1.9 cm) across.
Rnd 2 (worked in the BLO of Rnd 1, behind the flower): Fold the petals toward you. Ch 1, 2 sc in BLO of each st around, sl st in first sc. (24 sc)
The disk now measures 1 in (2.5 cm) across. Check your gauge here.
Body: Mesh and Fan Rounds
From here, the body alternates between a mesh round and a fan round.
- Mesh rounds are 6 dc posts with chain spaces between them. They form the hidden core.
- Fan rounds place one fan on top of each dc post and one sc in each chain space. The sc become the anchors for the next mesh round.
Each mesh round puts its posts into the sc that sit between fans, so every new tier of scales is offset by half a fan. That gives the brick-like layout.
Rnd 3 (mesh): Ch 3 (counts as dc), *ch 3, sk 3 sts, dc in next st; rep from * 4 more times, ch 3, sk 3 sts, sl st in 3rd ch of beg ch-3. (6 dc, 6 ch-3 sps)
Check: 6 repeats x 4 sts used = 24 sts, matching Rnd 2.
Rnd 4 (fan, Tier 1): Ch 1, sc in next ch-3 sp, *Fan5 in next dc, sc in next ch-sp; rep from * 4 more times, Fan5 in 3rd ch of beg ch-3, sl st in first sc. (6 fans, 30 tr, 24 ch-1 sps, 6 sc)
You now sit on the first sc. Every mesh round below begins from this sc.
General mesh round (Rnds 5, 7, 9, 11, 13, 15, 17, 19): Ch 3 (counts as dc), *ch X, push the next fan toward you so the chain passes behind it, dc in next sc; rep from * 4 more times, ch X, sl st in 3rd ch of beg ch-3. (6 dc, 6 ch-X sps)
General fan round (Rnds 6, 8, 10, 12, 14, 16, 18, 20): Ch 1, sc in next ch-sp, *fan in next dc, sc in next ch-sp; rep from * 4 more times, fan in 3rd ch of beg ch-3, sl st in first sc. (6 fans, 6 sc)
Work the rounds using this table. Each fan round’s stitch count is its own complete total.
| Rnd | Type | Instruction | Count |
|---|---|---|---|
| 5 | Mesh | X = 4 | 6 dc, 24 ch |
| 6 | Fan, Tier 2 | Fan5 | 30 tr, 24 ch-1 sps, 6 sc |
| 7 | Mesh | X = 5 | 6 dc, 30 ch |
| 8 | Fan, Tier 3 | Fan7 | 42 tr, 36 ch-1 sps, 6 sc |
| 9 | Mesh | X = 6 | 6 dc, 36 ch |
| 10 | Fan, Tier 4 | Fan7 | 42 tr, 36 ch-1 sps, 6 sc |
| 11 | Mesh | X = 6 | 6 dc, 36 ch |
| 12 | Fan, Tier 5 | Fan7 | 42 tr, 36 ch-1 sps, 6 sc |
| 13 | Mesh | X = 5 | 6 dc, 30 ch |
| 14 | Fan, Tier 6 | Fan7 | 42 tr, 36 ch-1 sps, 6 sc |
| 15 | Mesh | X = 4 | 6 dc, 24 ch |
| 16 | Fan, Tier 7 | Fan5 | 30 tr, 24 ch-1 sps, 6 sc |
| 17 | Mesh | X = 3 | 6 dc, 18 ch |
| 18 | Fan, Tier 8 | Fan5 | 30 tr, 24 ch-1 sps, 6 sc |
| 19 | Mesh | X = 2 | 6 dc, 12 ch |
| 20 | Fan, Tier 9 | Fan3 | 18 tr, 12 ch-1 sps, 6 sc |
How the shape forms: The chain length X controls the width of the core. It grows from 3 to 6 and back to 2, so the pinecone widens to its middle (Rnds 9–12) and then tapers to the tip. The fans grow from Fan5 to Fan7 and shrink to Fan3 to match, so each tier covers the gaps of the tier above.
Height logic: There are 9 mesh rounds (Rnds 3–19). At 0.375 in (1.0 cm) per dc, that is about 3.4 in (8.6 cm). The last fans hang about 0.45 in (1.1 cm), and the top disk adds a little more, for 4 in (10.2 cm) in total.
After Rnd 12, measure: 2.3 in (5.8 cm) long and about 2 in (5.1 cm) wide across the Tier 5 fans.
Edge Finish: Tip Closure and Hanging Loop
There is no fabric border on this ornament. The Tier 9 fans form the bottom edge, and the finish consists of the tip closure and the hanging loop.
Edge gauge: sc at 8 sc = 1 in (2.5 cm), same as the disk.
Stuffing
Before closing, push about 3 g of fiberfill through the bottom opening. Fill the core loosely so it rounds out without stretching the mesh. Cream fiberfill blends in behind the open fans.
Rnd 21 (Tip Closure)
Ch 1, sc in same sc as join, *push the next fan toward you, sc in next sc; rep from * 4 more times, sl st in first sc. (6 sc)
This is 1 sc into each of the 6 anchor sc of Rnd 20, with no stitches added. Six sc pull the core closed.
Fasten off, leaving an 8 in (20.3 cm) tail. Weave the tail through the front loops of all 6 sc, pull tight, and secure inside. The tip hole should close to under 0.25 in (0.6 cm), hidden by the Tier 9 fans.
Hanging Loop
Join thread with a sl st through the center ring of Rnd 1, in the middle of the flower.
Loop Rnd 1: Ch 25, sl st in the center ring again. (25 ch)
Loop Rnd 2: Ch 1, work 32 sc over the ch-25 loop, sl st in first sc. (32 sc)
Fasten off, leaving a 6 in (15.2 cm) tail. Weave it down into the disk.
Why the math works: sc worked over a chain sit wider than the chain itself. About 1.3 sc per ch (32 sc / 25 ch = 1.28) packs the loop firmly without ruffling. The 25 ch make a loop about 3 in (7.6 cm) around, which folds to 1.5 in (3.8 cm) tall.
Final Blocking
- Lightly mist the whole pinecone with water so the cotton is just damp.
- With your fingers, roll each tier of fans forward and down so the scales overlap the tier below.
- Spread each fan so its tr sit evenly and its lower edge is a smooth curve.
- Pin the flower petals flat on top of the disk.
- Pin the hanging loop straight up into the foam block.
- Spray with starch or brush on diluted stiffener, keeping it off the loop if you want the loop to stay soft.
- Reshape the fans once more, then let dry completely for 12–24 hours.
- Remove pins and check: 4 in (10.2 cm) tall and 2 in (5.1 cm) wide.
Final Quality-Control Checklist
- 9 tiers of scales, each tier with 6 fans
- Each tier offset by half a fan from the one above
- No mesh chains visible in front of any fan
- Fan5 in Tiers 1, 2, 7, 8; Fan7 in Tiers 3–6; Fan3 in Tier 9
- Six-petal flower centered on top
- Hanging loop rising from the flower center, 1.5 in (3.8 cm) tall
- Tip closed firmly, no stuffing showing
- Finished size 4 in (10.2 cm) x 2 in (5.1 cm)
- All tails woven in and trimmed
Troubleshooting
Mesh chains show in front of the scales. You did not push the fan forward before working the chain. Undo the mesh round and work the chains behind each fan.
Scales stand out stiffly instead of lying down. Your fans may be too tight. Use a looser tension on the tr, and roll them forward during blocking.
Tiers do not overlap. Your dc are too tall compared to your tr. Shorten the dc slightly, or try a hook 0.25 mm smaller for mesh rounds only.
Pinecone is lopsided. Check that every mesh round has exactly 6 dc and every fan round has exactly 6 sc.
Flower petals curl. Pin them flat and add a little extra stiffener to the petals.
Tip looks pointed and lumpy. Too much stuffing. Remove some before cinching.
Care
Spot clean only with a damp cloth. If needed, hand wash gently in cool water, then reshape and re-starch.
Final Notes
The measurement chain is simple. The Rnd 2 disk sets the start at 1 in (2.5 cm). Each mesh round adds about 0.375 in (1.0 cm) of length, the chain lengths widen the body to 2 in (5.1 cm) at the middle, and the final fans bring it to 4 in (10.2 cm). The loop then adds 1.5 in (3.8 cm), for a hanging length of 5.5 in (14.0 cm).
Check the disk, check after Rnd 12, and keep every fan in front of its mesh chain. Make a few in the same cream thread for a matching set on your tree.
Happy crocheting!