

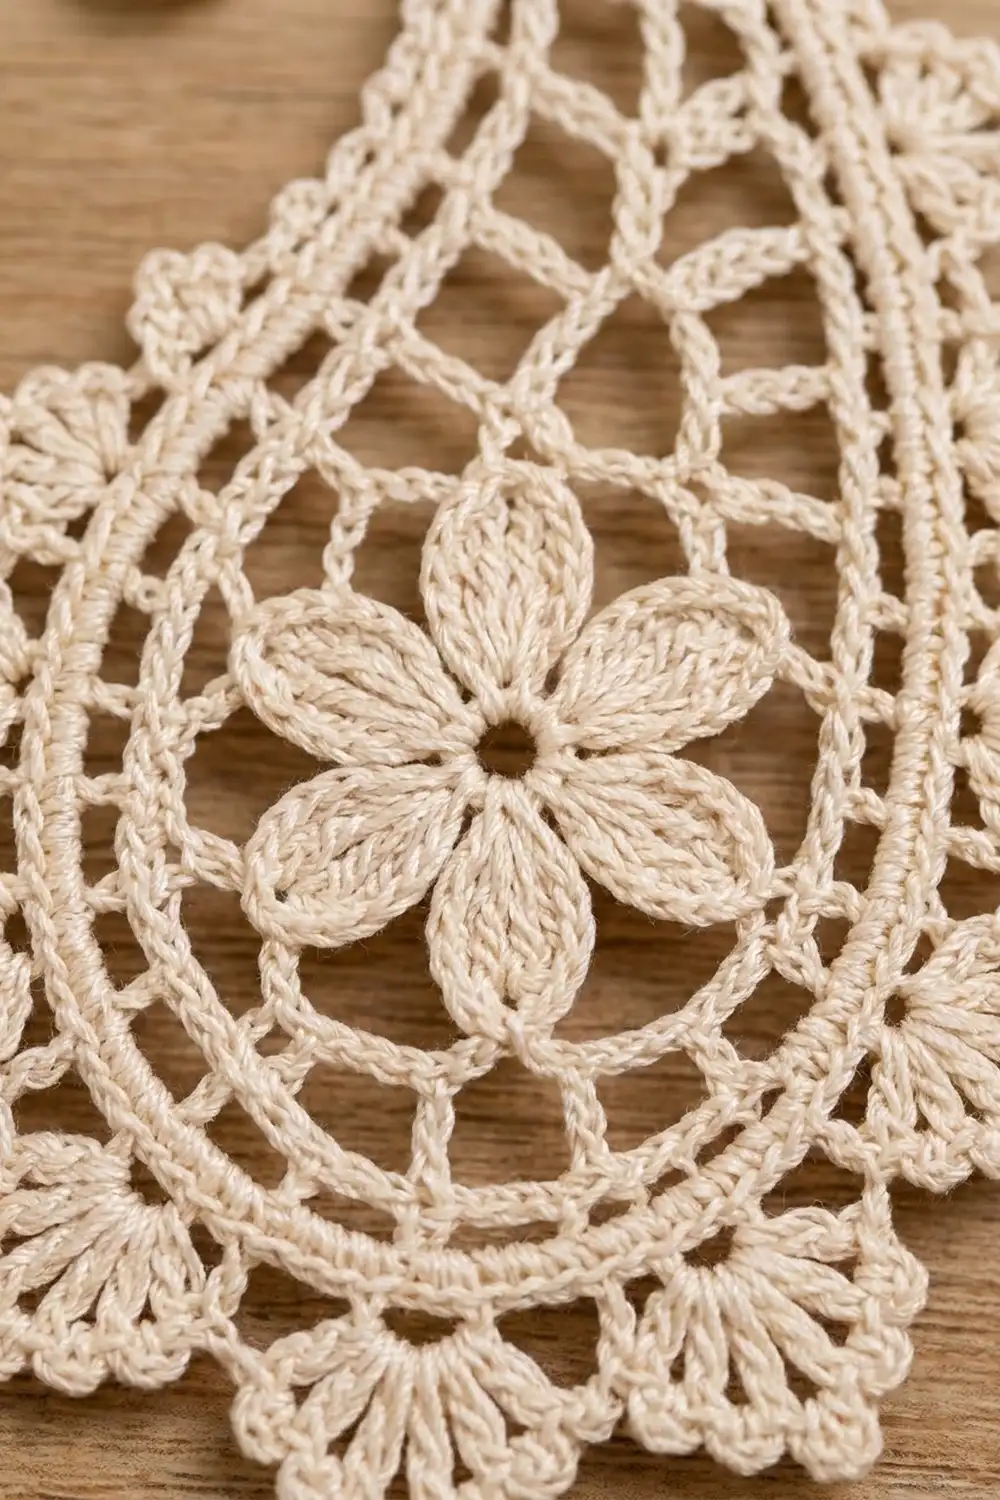
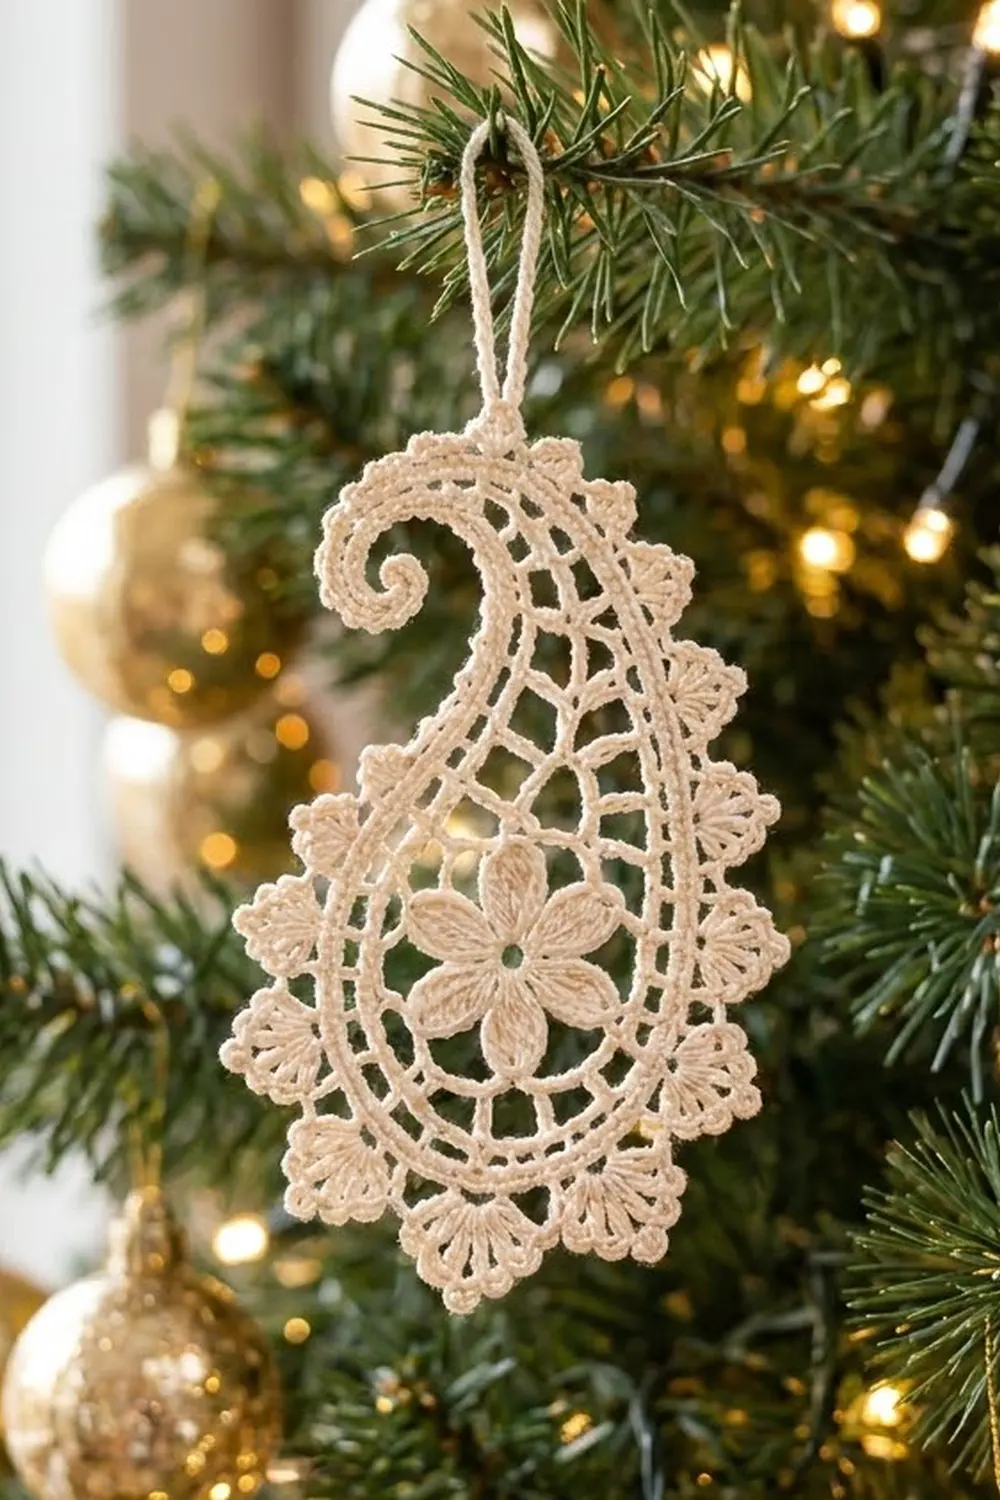
This paisley ornament is a small piece of thread lace. A six-petal flower sits in a round frame at the center, open chain mesh spreads out around it, and a solid double crochet band forms the teardrop outline. Picot shells run along the outer curve and the rounded bottom, and a narrow cord curls over at the top in the classic paisley swirl.
The sample is worked in one color, a warm ivory cotton thread. Against pine branches and warm lights it looks like antique lace, and it would also suit a gift tag or a window hanging. The style is traditional and delicate, but every round is short and easy to count.
The pattern uses US crochet terms. The finished ornament measures about 2.75 in (7.0 cm) wide and 4.5 in (11.4 cm) tall, including the curl. The hanging loop adds 1 in (2.5 cm), so the total hanging length is 5.5 in (14.0 cm).
Construction is simple. You crochet the flower in the round and close it into a ring, then work mesh rounds with uneven chain lengths so the circle stretches into a teardrop with an off-center tip. Next come a single crochet frame and a double crochet band, then the picot shell edging. The curl is a chain worked straight out from the tip, and the hanging loop goes on last.
Finished Size and Construction
- Finished size: 2.75 in (7.0 cm) wide x 4.5 in (11.4 cm) tall, excluding the loop
- Hanging length: 5.5 in (14.0 cm), including the 1 in (2.5 cm) loop
- Skill level: Intermediate (fine thread, simple stitches)
- Terminology: US
- Yarn weight: Size 10 crochet cotton thread (lace, weight 0)
- Hook: 1.5 mm steel hook (US steel size 8 in most brands)
- Number of pieces: 1 (a single ornament, worked in one piece)
- Layout: Single motif, no joining
- Piece size: 2.75 in x 3.75 in (7.0 cm x 9.5 cm) for the body, with a 0.75 in (1.9 cm) curl above it
- Size before border: 2.25 in x 3.25 in (5.7 cm x 8.3 cm) after Round 9
- Border depth: 0.25 in (0.6 cm) on each side
Materials
Yarn: Use mercerized cotton thread in size 10. It holds starch well, shows stitch definition, and won’t fuzz on the tree. A soft ivory or cream matches the sample. Pure white or pale gold metallic blends work too.
- Ivory (one color): 8 g, about 50 m (55 yd) per ornament
Quantities include a margin of about 30% for the gauge swatch, joining tails, and weaving in ends. A standard 50 g ball will make five or six ornaments.
Tools:
– 1.5 mm steel crochet hook
– Fine tapestry needle or beading needle with a large eye
– 2 stitch markers
– Scissors
– Fabric stiffener or liquid starch
– Blocking foam board and rustproof pins
– Plastic wrap to cover the board
– Ruler or tape measure
Abbreviations (US Terms)
- ch – chain
- sl st – slip stitch
- sc – single crochet
- hdc – half double crochet
- dc – double crochet
- tr – treble crochet
- sk – skip
- sp – space
- st(s) – stitch(es)
- MR – magic ring
Special stitches:
– Picot: Ch 3, sl st in 3rd ch from hook.
– Picot shell: In the same stitch, work (dc, picot) 4 times, then dc. That is 5 dc and 4 picots.
Gauge and Checkpoints
Gauge: 10 sc = 1 in (2.5 cm) using size 10 thread and a 1.5 mm hook.
Thread lace is very sensitive to tension, so work Rounds 1–5 first and treat them as your gauge test. Measure each piece flat and unblocked, pressed gently with your fingers.
- After Round 3 (flower): 1.25 in (3.2 cm) across, petal tip to petal tip
- After Round 5 (ring): 1.9 in (4.8 cm) across
- After Round 9 (band): 2.25 in (5.7 cm) wide x 3.25 in (8.3 cm) tall
- After Round 10 (edging): 2.75 in (7.0 cm) wide x 3.75 in (9.5 cm) tall
- After the curl: 4.5 in (11.4 cm) tall in total
If your ring is larger than 1.9 in (4.8 cm): go down to a 1.4 mm or 1.3 mm hook. If it’s smaller: go up to a 1.65 mm hook. A difference of 0.1 in (0.3 cm) at Round 5 grows to roughly 0.25 in (0.6 cm) in the finished height, so fix it here, before you start the mesh.
Pattern
Part 1: Flower Center
Round 1: MR, ch 1, 12 sc in ring. Pull the ring tight and sl st to the first sc. (12 sc)
Round 2: Ch 1, sc in the same st, ch 5, sk 1, sc in next st, ch 5, sk 1; repeat from * 4 more times. Sl st to the first sc. (6 sc, 6 ch-5 loops)
Round 3 (petals): In each ch-5 loop work (sc, hdc, 2 dc, tr, 2 dc, hdc, sc). Sl st to the first sc. (6 petals, 9 sts each = 54 sts)
Each petal comes to a point at the tr, which gives the slim, pointed flower in the sample. The open center of the magic ring stays as a small eyelet.
Part 2: Ring Frame
Round 4: Sl st in the next 4 sts (hdc, dc, dc, tr) to reach the tr of the first petal. Ch 1, sc in the same tr, ch 7, sc in the tr of the next petal, ch 7; repeat from * 4 more times. Sl st to the first sc. (6 sc, 6 ch-7 spaces)
Round 5: Ch 1, sc in the same st, 9 sc in the next ch-7 sp, sc in the next sc, 9 sc in the next ch-7 sp; repeat from * 4 more times. Sl st to the first sc. (6 + 54 = 60 sc)
Check the 1.9 in (4.8 cm) checkpoint now. The ring should lie flat around the flower and should not cup.
Part 3: Mesh and Teardrop Shaping
Round 6: Ch 1, sc in the same st, ch 5, sk 4, sc in next st; repeat from * 10 more times, ch 5, sk 4, sl st to the first sc. (12 sc, 12 ch-5 loops)
Number the loops 1 to 12 in the order you’ll work them. Loop 1 is the loop just after the join. Hold the piece with the Round 6 join at the bottom (6 o’clock).
Round 7 (shaping): Sl st in the first 3 ch of loop 1. Ch 1, sc in loop 1. Then, with each chain ending in a sc in the next loop, work:
– ch 5, sc in loop 2
– ch 5, sc in loop 3
– ch 5, sc in loop 4
– ch 6, sc in loop 5
– ch 7, sc in loop 6
– ch 9, sc in loop 7
– ch 12, sc in loop 8 (this ch-12 is the tip space)
– ch 7, sc in loop 9
– ch 6, sc in loop 10
– ch 5, sc in loop 11
– ch 5, sc in loop 12
– ch 5, sl st to the first sc
(12 sc and 12 ch-spaces; 77 ch in total)
Because the chains get longer toward the ch-12 space, the outline stretches upward into a point that sits off center. Place a marker in the ch-12 space.
Round 8 (frame): Ch 1. Work 1 sc in each sc. In each ch-space work as many sc as it has chains, so 5 sc in a ch-5, 6 sc in a ch-6, 7 sc in a ch-7 and 9 sc in a ch-9. In the marked ch-12 tip space work 6 sc, ch 2, 6 sc. Sl st to the first sc. (12 + 77 = 89 sc, plus the ch-2 tip)
Move the marker to the ch-2 tip. Before the tip there are 50 sc, and after it there are 39 sc.
Round 9 (band): Ch 3 (counts as dc), then dc in the same st. This is the first increase, because the first sc sits on top of a Round 7 sc. Continue around with 1 dc in each sc. Where a sc sits on top of a Round 7 sc, work 2 dc in it instead; there are 12 of these in total. In the ch-2 tip work (dc, ch 2, dc). Sl st to the top of the ch-3. (89 + 12 increases + 2 tip dc = 103 dc, plus the ch-2 tip)
Before the tip: 50 + 7 increases = 57 dc. Tip: 2 dc. After the tip: 39 + 5 increases = 44 dc. 57 + 2 + 44 = 103. The 12 increases give the band the extra length it needs on the outside of the curve, so the band lies flat. Fasten off.
Check the 2.25 in x 3.25 in (5.7 cm x 8.3 cm) checkpoint now.
Part 4: Picot Shell Edging
Round 10: Join the thread with a sl st in the ch-2 tip and ch 1. Sc in the same sp. Working in the same direction as Round 9:
– Plain edge: sc in each of the next 31 dc (starting with the second tip dc). This is the smooth inner edge beneath the curl.
– Shell edge: sk 2, picot shell in next dc, sk 2, sc in next dc; repeat from * 11 more times. (12 shells)
Sl st to the first sc. (31 plain sc + 12 shell repeats of 6 sts = 103 sts used)
Why the math works: each shell repeat uses exactly 6 sts (2 skipped + 1 shell + 2 skipped + 1 sc). 12 x 6 = 72, and 72 + 31 = 103, which is every dc from Round 9. The last sc of the final repeat lands on the dc just before the tip, so the edging closes cleanly at the tip with no gap.
The shells cover the long outer curve, the rounded bottom and the lower part of the inner side. The upper inner edge stays smooth, the same as in the sample.
Part 5: Paisley Curl
Do not fasten off.
Curl: Ch 22. Work 2 sc in the 2nd ch from hook and in each of the next 7 ch (16 sc). Work 1 sc in each of the remaining 13 ch (13 sc). Sl st to the tip sc. (29 sc over 21 ch)
The 8 increased chains at the free end make it coil tightly, while the plain section makes a gentle arc. Roll the coil toward the plain inner edge to make a spiral of about 1.5 turns. Use the tail to tack the end of the coil to the inside of the arc with 2 small stitches. Fasten off.
Part 6: Hanging Loop
Find the highest point of the curl’s outer arc, around the 10th sc counted back from the tip. Join with a sl st, ch 16, and sl st in the same st. Ch 1 and work 22 sc into the loop. Sl st to the base and fasten off. (22 sc; loop about 1 in / 2.5 cm long)
Weave in all ends along the solid band or the backs of the sc, never through the mesh, where they would show.
Final Blocking
- Soak the ornament in fabric stiffener (diluted as the label directs) or liquid starch for 2 minutes.
- Squeeze out the excess and blot it in a towel. Do not wring.
- Cover the foam board with plastic wrap and lay the ornament on it right side up.
- Pin the bottom center, the tip, and the widest point of each side first. Measure 2.75 in (7.0 cm) across and 3.75 in (9.5 cm) from the bottom to the tip.
- Pin each picot shell into an even fan. Put one pin in the center picot of each shell.
- Open each mesh space into a clean, even arch with a pin or skewer.
- Shape the curl into its spiral and pin it so the total height is 4.5 in (11.4 cm).
- Lay the hanging loop straight and dry it flat.
- Leave it to dry for at least 12 hours before removing the pins.
Final Quality-Control Checklist
- Flower has 6 even, pointed petals and a small center eyelet
- Ring has 60 sc and lies flat
- Round 7 has 12 sc and 12 chain spaces of the correct lengths
- Round 9 has 103 dc plus the ch-2 tip
- Edging has 31 plain sc and 12 picot shells
- Curl has 29 sc and is tacked into a spiral
- Body measures 2.75 in x 3.75 in (7.0 cm x 9.5 cm)
- Total height with curl is 4.5 in (11.4 cm), and 5.5 in (14.0 cm) with the loop
- No visible ends, and the piece is fully dry and stiff
Troubleshooting
The ring ruffles. Your tension is loose in the 9-sc groups. Go down a hook size and rework Rounds 1–5. Keep the count at 60 sc, because every later round depends on it.
The teardrop looks round instead of pointed. Check the Round 7 chain lengths, especially the ch-9 and ch-12. Firm blocking at the tip also helps a lot.
The band cups. You probably missed some of the 12 increases. Count 103 dc before you start the edging.
The shells don’t end at the tip. Count the 31 plain sc again. Each extra or missing sc shifts the last shell by one stitch.
The curl won’t stay coiled. Starch it a second time and pin it tightly in a spiral, or add a third tacking stitch.
The loop twists. Pack the 22 sc snugly, then dampen the loop and dry it flat.
Care
Hand wash in cool water with a mild soap. Then re-starch and re-block, using the pinning steps above. Store flat between sheets of tissue paper, away from humidity.
Final Notes
Each stage builds on the previous one. The 12-sc flower center becomes a 60-sc ring of 1.9 in (4.8 cm). Uneven Round 7 chains pull that ring into a teardrop, which the 89-sc frame and 103-dc band set at 2.25 in x 3.25 in (5.7 cm x 8.3 cm). The 0.25 in (0.6 cm) edging takes it to 2.75 in x 3.75 in (7.0 cm x 9.5 cm), the curl brings the height to 4.5 in (11.4 cm), and the loop finishes it at 5.5 in (14.0 cm). If you hit the measurement at each checkpoint, the ornament will come out on size.
Happy crocheting!