

The Noel Herald Horn is a lace thread ornament shaped like a French horn. It has a wide scalloped bell, a slim ribbed pipe, a round loop with a flower in the center, and a small flared mouthpiece. It is worked in one creamy ivory thread, then lightly starched, so it hangs on the tree like a piece of vintage lace.
The pattern uses US crochet terms throughout. The finished ornament measures about 5 in (12.7 cm) wide and 3.25 in (8.3 cm) tall. The hanging loop adds about 1.25 in (3.2 cm).
The ornament is made as one piece in five connected sections. You start with the round loop medallion. Next you work the bell in rows from the narrow neck outward. You then work the lead pipe off the bell neck and join it to the medallion as you go. The mouthpiece and the top fan are worked directly off the medallion. Last, you add the scalloped edge to the bell and block the ornament.
There is no sewing of separate pieces. The only finishing is weaving in ends and stiffening.
Finished Size and Construction
- Finished size: 5 in (12.7 cm) wide × 3.25 in (8.3 cm) tall, plus a 1.25 in (3.2 cm) hanger
- Skill level: Intermediate (thread crochet, working in rows and rounds, joining as you go)
- Terminology: US
- Yarn weight: Size 10 cotton crochet thread (lace weight)
- Hook: 1.9 mm (US steel 5)
- Number of pieces: 1
- Layout: Single ornament with no assembly
- Medallion size: 1.75 in (4.4 cm) across
- Bell length before border: 1.2 in (3.0 cm)
- Ornament width before border: 4.7 in (11.9 cm)
- Border depth (bell scallops): 0.3 in (0.8 cm)
Materials
Thread: Use mercerized size 10 cotton crochet thread. Mercerized cotton gives crisp stitches and holds its shape well after starching. Pick a warm ivory or cream. Bright white also works, but it looks less like antique lace.
- Ivory: 8 g, about 25 m (27 yd)
That amount includes a margin for your gauge swatch, joining tails and weaving in ends. One ornament uses roughly 6 g.
Tools:
- 1.9 mm (US steel 5) crochet hook
- Fine tapestry needle
- 2 locking stitch markers
- Small sharp scissors
- Foam blocking board and rustproof pins
- Fabric stiffener or a heavy spray starch
- Plastic wrap to protect the board
Abbreviations (US Terms)
- ch: chain
- sl st: slip stitch
- sc: single crochet
- hdc: half double crochet
- dc: double crochet
- dc2tog: double crochet 2 together
- BLO: back loop only
- sp: space
- st(s): stitch(es)
- RS: right side
Special stitches
- Picot: Ch 3, then sl st in the 3rd ch from the hook.
- Ladder row: Ch 3 (counts as dc), ch 2, skip the next 2 sts (or the ch-2 sp), dc in the last st (the top of the turning ch). This counts as 4 sts: dc, 2 ch, dc.
Gauge and Checkpoints
Gauge: 10 dc and 5 dc rows = 1 in (2.5 cm).
Make the medallion first. It works as your test piece, and you will use it in the ornament. Check these measurements as you go:
- After Round 3 (flower): 0.8 in (2.0 cm) across
- After Round 5: 1.35 in (3.4 cm) across
- After Round 7: 1.75 in (4.4 cm) across
- Bell after Row 3: ribbed neck 0.6 in (1.5 cm) tall
- Bell after Row 6: 1.2 in (3.0 cm) long from neck to mesh edge
- Lead pipe and mouthpiece: 1.3 in (3.3 cm) each
If your medallion is too big, change to a 1.65 mm hook. If it is too small, change to a 2.0 mm hook. All sections share the same gauge, so a small difference only scales the ornament slightly. What matters is that the medallion lies flat.
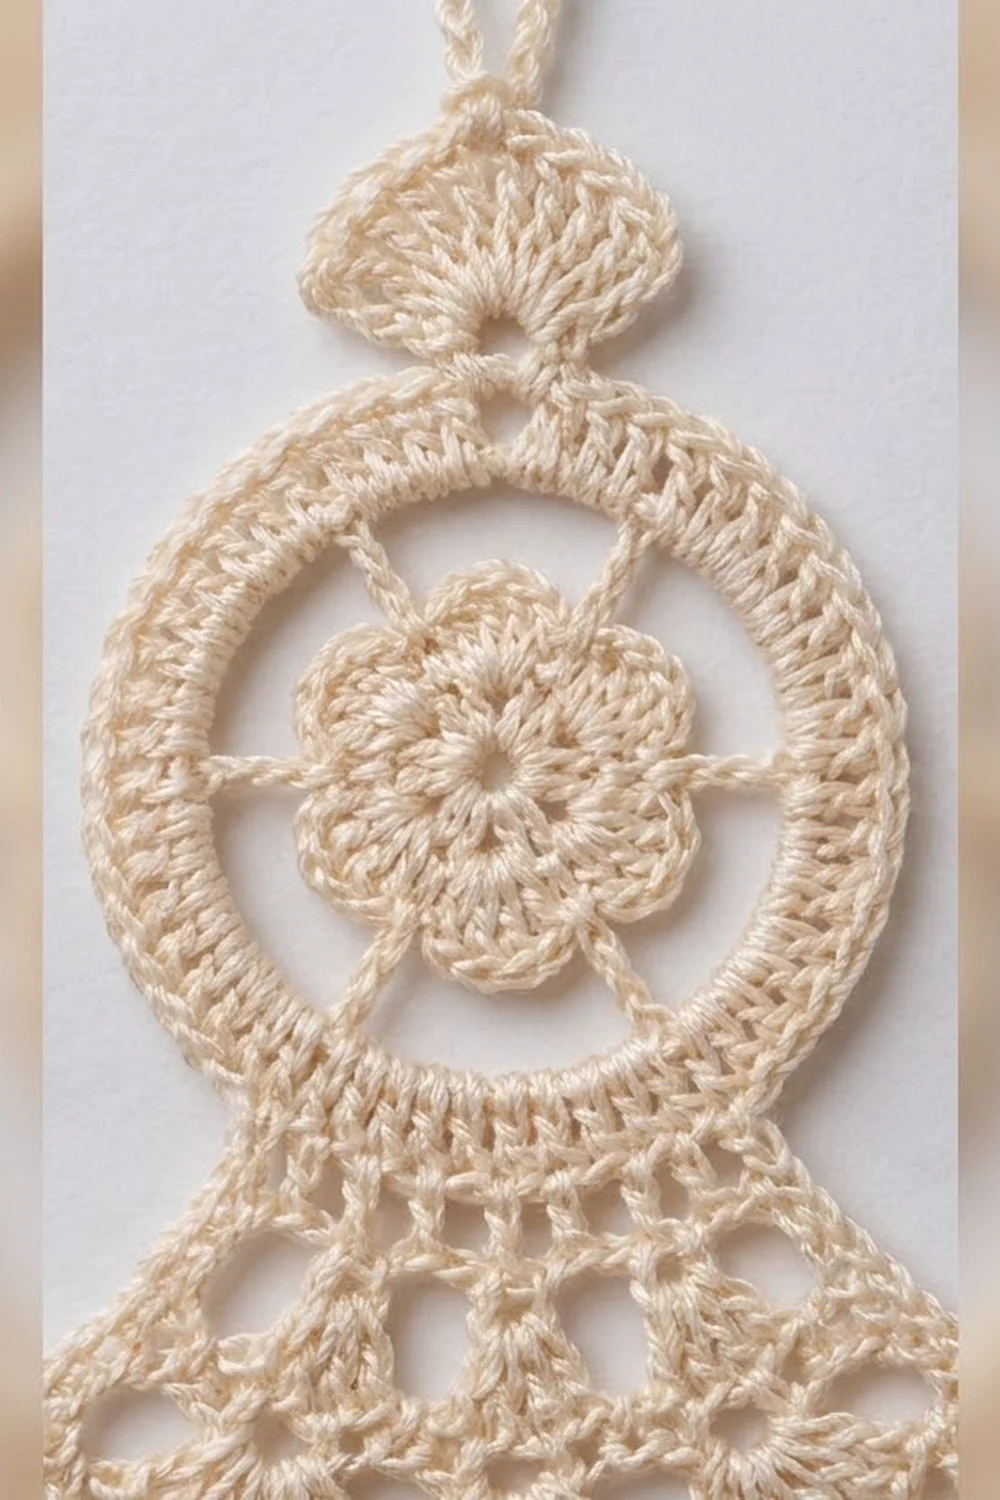
Section 1: Loop Medallion
Work in joined rounds with the RS facing. Do not turn.
Round 1: Make a magic ring. Ch 1, work 12 sc in the ring, then sl st to the first sc. (12 sc)
Round 2: Ch 1. Sc in the next sc, ch 3, skip 1 sc. Repeat from * 6 times in total, then sl st to the first sc. (6 sc, 6 ch-3 sps)
Round 3 (petals): In each ch-3 sp work (sc, hdc, 3 dc, hdc, sc). Sl st to the first sc. (6 petals, 42 sts)
Check: the flower should measure 0.8 in (2.0 cm) across.
Round 4 (spokes): Sl st in the next 4 sts so you land in the center dc of the first petal. Ch 1 and sc in the same st. Ch 5, sc in the center dc of the next petal. Repeat from * 5 times. Ch 5 and sl st to the first sc. (6 sc, 6 ch-5 loops)
Round 5 (inner ring line): Ch 1. Sc in the sc, work 6 sc in the ch-5 loop. Repeat from * 6 times, then sl st to the first sc. (42 sc)
Check: the medallion should measure 1.35 in (3.4 cm) across.
Round 6 (ladder ring): Ch 4 (counts as dc + ch 1), skip the next sc. Dc in the next sc, ch 1, skip 1 sc. Repeat from * 20 times. Sl st to the 3rd ch of the starting ch-4. (21 dc, 21 ch-1 sps)
Round 7 (outer ring line, conversion round): Ch 1. Sc in the dc, 2 sc in the ch-1 sp, sc in the dc, 2 sc in the ch-1 sp, sc in the dc, sc in the ch-1 sp. Repeat from * 7 times, then sl st to the first sc.
Count: 42 sts worked 1 per existing st or sp, plus 14 added = 56 sc.
Fasten off and weave in the end. Check: the medallion should measure 1.75 in (4.4 cm) across.
Number the Round 7 stitches. Lay the medallion RS up with the join at the 9 o’clock position. The first sc after the join is st 1. Count clockwise from there. Mark st 1 and st 36. If your round naturally runs the other way, count in that direction instead. The horn will simply face the other way, and both versions look correct.
Section 2: Bell
Work in rows and turn at the end of each row.
Row 1: Ch 8. Dc in the 4th ch from the hook and in the next 4 ch. (6 dc; the skipped ch count as 1 dc)
Row 2: Ch 3 (counts as dc, here and throughout). Work dc in the BLO of each st across. (6 dc)
Row 3: Ch 3 and dc in the same st, working in the BLO. Then work 2 dc in the BLO of each remaining st. (12 dc)
Check: the ribbed neck should be 0.6 in (1.5 cm) tall.
Row 4 (spokes): Ch 4 (counts as dc + ch 1). Dc in the next st. Ch 1, dc in the next st. Repeat from * across. (12 dc, 11 ch-1 sps)
Row 5 (shells): Ch 1 and sc in the first dc. Work 5 dc in the next ch-1 sp, then sc in the next ch-1 sp. Repeat from * 4 times. Work 5 dc in the last ch-1 sp, then sc in the last dc. (6 shells of 5 dc, 7 sc = 37 sts)
Row 6 (mesh): Ch 5 (counts as dc + ch 2). Sc in the 3rd dc of the first shell. Ch 2, dc in the next sc, ch 2, sc in the 3rd dc of the next shell. Repeat from * 5 times. Ch 2 and dc in the last sc. (7 dc, 6 sc, 12 ch-2 sps)
Do not fasten off. Put the live loop on a stitch marker, because the border is worked from here later.
Check: the bell should measure 1.2 in (3.0 cm) from the neck to the mesh edge.
Section 3: Lead Pipe (joined to the medallion)
Turn the bell so the foundation chain is at the top.
Row T1: Join new thread in the first foundation loop. Ch 3, then dc in each of the next 5 foundation loops (one under each Row 1 dc). (6 dc)
Row T2: Ch 3. Work dc in the BLO of each st across. (6 dc)
Row T3: Ch 3. Work dc2tog in the BLO over the next 2 sts, then again over the next 2 sts. Dc in the BLO of the last st. (4 sts)
Rows T4–T6: Work 3 ladder rows. (4 sts each: dc, 2 ch, dc)
Row T7 (join): Hold the medallion behind the pipe. In each st below, insert the hook through the pipe st and then through the matching medallion st, and work sc through both:
- Ch 1. Join-sc in the first dc and medallion st 1.
- Join-sc in the next ch and medallion st 2.
- Join-sc in the following ch and medallion st 3.
- Join-sc in the top of the turning ch and medallion st 4.
(4 joining sc) Fasten off.
Check: the pipe should be 1.3 in (3.3 cm) long, from the bell neck to the medallion.
Section 4: Mouthpiece
Row M1: With the RS facing, join thread in medallion st 36. Ch 3, then dc in sts 37, 38 and 39. (4 dc)
Rows M2–M3: Work 2 ladder rows. (4 sts each)
Row M4: Ch 3 and dc in the same st. Work 4 dc in the ch-2 sp, then 2 dc in the top of the turning ch. (8 dc)
Row M5: Ch 3. Work dc in the BLO of each st across. (8 dc)
Row M6: Ch 3 and dc in the same st, then work 2 dc in each remaining st. (16 dc)
Row M7 (frill): Ch 1 and sc in the first st. Ch 3, sc in the next st. Repeat from * 15 times. (16 sc, 15 ch-3 loops)
Fasten off. Check: the mouthpiece should be 1.3 in (3.3 cm) long and about 0.8 in (2.0 cm) wide at the rim.
Section 5: Top Fan and Hanger
Row F1: With the RS facing, join thread in medallion st 13. Ch 1 and sc in the same st. Skip sts 14–15 and work 9 dc in st 16. Skip sts 17–18 and sc in st 19. (9 dc, 2 sc)
Row F2: Turn and ch 1. Sc in each of the first 4 dc. In the 5th dc work (sc, ch 30, sc). Sc in each of the last 4 dc, then sl st in the sc at st 13. (10 sc plus a ch-30 hanger)
Fasten off. The ch-30 loop folds to about 1.25 in (3.2 cm) tall.
Border: Scalloped Bell Edge
Border gauge: each scallop measures 0.45 in (1.1 cm) wide and 0.3 in (0.8 cm) deep. The bell edge is the only bordered side, and it has 6 scallops, so it measures 2.7 in (6.9 cm) along the curve.
Put the live loop from Row 6 back on the hook and turn.
Row 7 (scallops): Ch 1 and sc in the first dc. Work 7 dc in the next sc, then sc in the next dc. Repeat from * 6 times. (6 × 7 = 42 dc, plus 7 sc = 49 sts)
Row 8 (picot edge): Turn, ch 1 and sc in the first sc. Sc in the next 4 dc, picot, sc in the next 3 dc, sc in the next sc. Repeat from * 6 times. (1 + 6 × 8 = 49 sc, 6 picots)
Fasten off.
Why the math works: Row 6 ends with exactly 6 sc, one on top of each shell, and 7 dc between and outside them. Each sc becomes the base of one scallop, and each dc becomes an sc anchor point. That gives 42 + 7 = 49 sts. Row 8 works 1 sc into each of those 49 sts. Each picot sits after the 4th dc, which is the center of the 7-dc scallop, so the picots are centered. No stitches are added at the side edges of the bell. Those edges stay as the clean row ends seen in the photo.
The border adds 0.3 in (0.8 cm) to the bell’s length. That brings the ornament from 4.7 in (11.9 cm) to 5 in (12.7 cm) wide.
Final Blocking
- Weave in all ends along stitch posts. Do not run them through open spaces.
- Soak the ornament in fabric stiffener, or in a mix of 1 part white glue to 1 part water. Gently squeeze out the extra.
- Lay it RS up on a board covered with plastic wrap.
- Pin the medallion into a true circle 1.75 in (4.4 cm) across, with a pin through every ch-5 spoke.
- Pin the lead pipe straight at 9 o’clock and the mouthpiece angled down to the lower right.
- Fan the bell open to 2.7 in (6.9 cm) along its curve. Put one pin in each picot so the scallops come out round.
- Pin the fan upright and lay the hanger straight up.
- Pin out each of the 15 ch-3 loops on the mouthpiece frill.
- Leave it to dry completely for 12–24 hours before unpinning.
Final Quality-Control Checklist
- The medallion is flat and round, measures 1.75 in (4.4 cm), and has 6 evenly spaced petals.
- Round 7 has 56 sc and the ladder ring has 21 bars.
- The bell has 6 scallops with centered picots, and Row 8 has 49 sc.
- The lead pipe and mouthpiece are each 1.3 in (3.3 cm) long, with clear BLO ribs.
- The mouthpiece frill has 15 ch-3 loops.
- The fan has 9 dc and the hanger is firmly anchored.
- The ornament measures 5 in × 3.25 in (12.7 cm × 8.3 cm).
- No ends are visible and no stiffener is clogging the holes.
Troubleshooting
The medallion ruffles. Your Round 7 stitches are too loose, or you added extra sc. Recount to 56 and tighten your tension.
The medallion cups. Round 6 is tight. Work the ch-1 spaces a little more loosely.
The bell won’t fan out. Check that Row 3 has 12 dc and Row 5 has 6 shells. Blocking will do most of the fanning.
The pipe twists. Ladder rows tend to lean. Pin the pipe straight while blocking and it will stay put.
The ornament droops on the tree. It needs more stiffener. Re-soak it and block it again.
There are holes at the joins. Close them with a single stitch of the tail when you weave in ends.
Care
Dust the ornament gently. If it gets dirty, hand-rinse it in cool water, then re-stiffen and re-block it. Store it flat in tissue paper.

Final Notes
Here is the full measurement chain:
- The flower measures 0.8 in (2.0 cm).
- The medallion grows to 1.35 in (3.4 cm), then to 1.75 in (4.4 cm).
- The bell reaches 1.2 in (3.0 cm) before the border and 1.5 in (3.8 cm) after it.
- The lead pipe and mouthpiece are each 1.3 in (3.3 cm).
- The finished ornament is 5 in × 3.25 in (12.7 cm × 8.3 cm), with a 1.25 in (3.2 cm) hanger.
If each checkpoint matches, the finished ornament will too. Make a few, and you’ll have a whole chorus of lace horns for your tree.
Happy crocheting!