

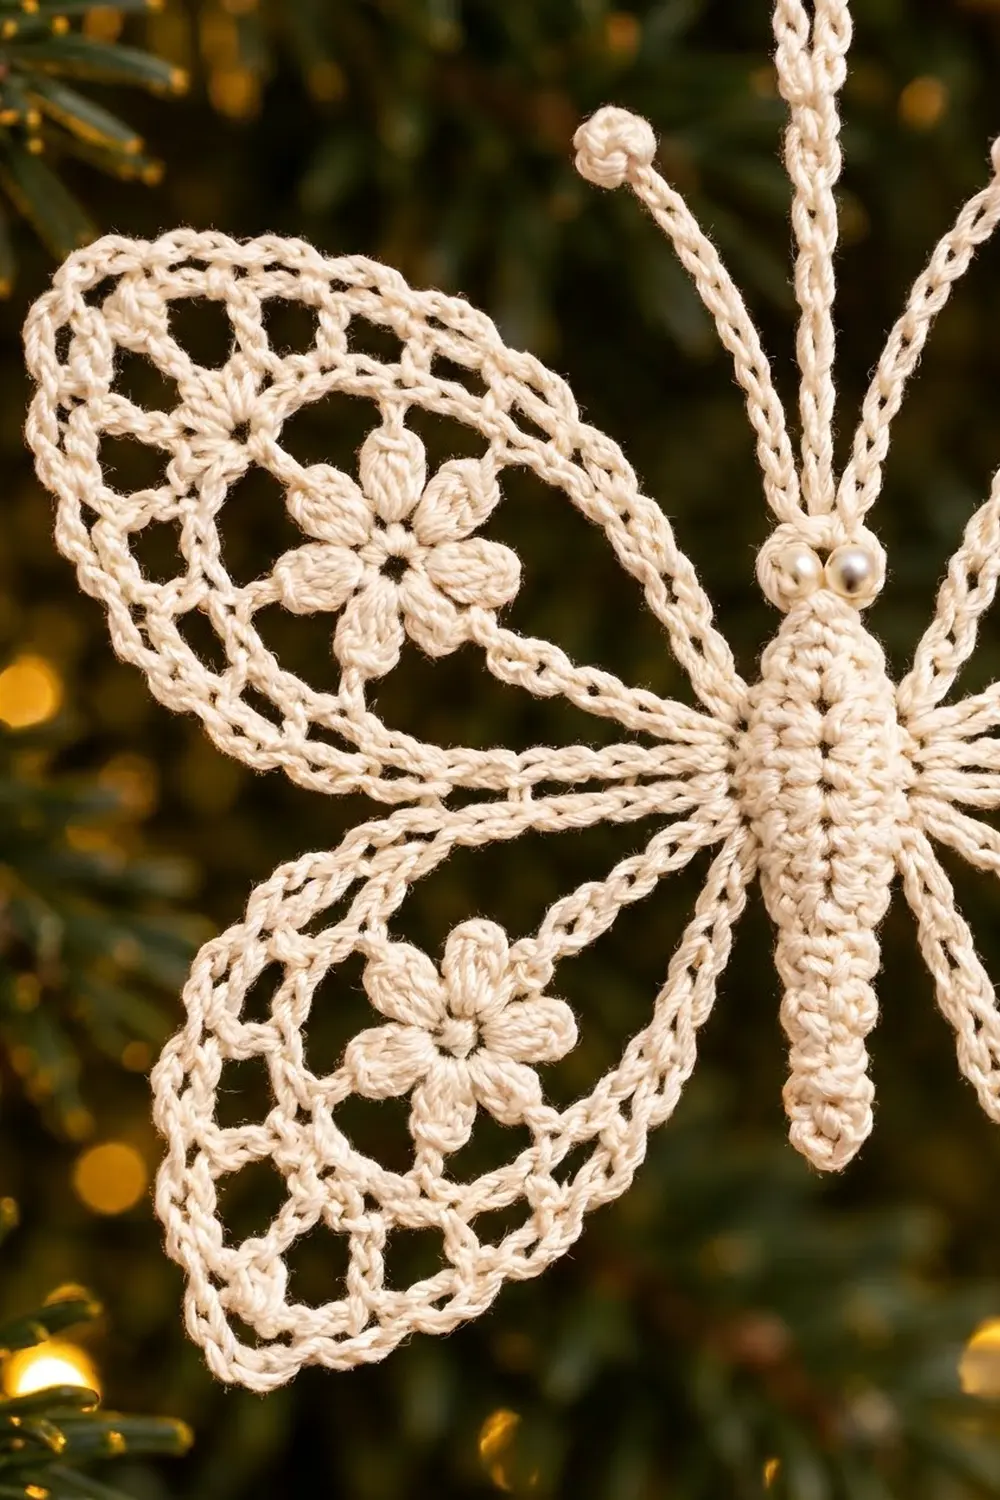
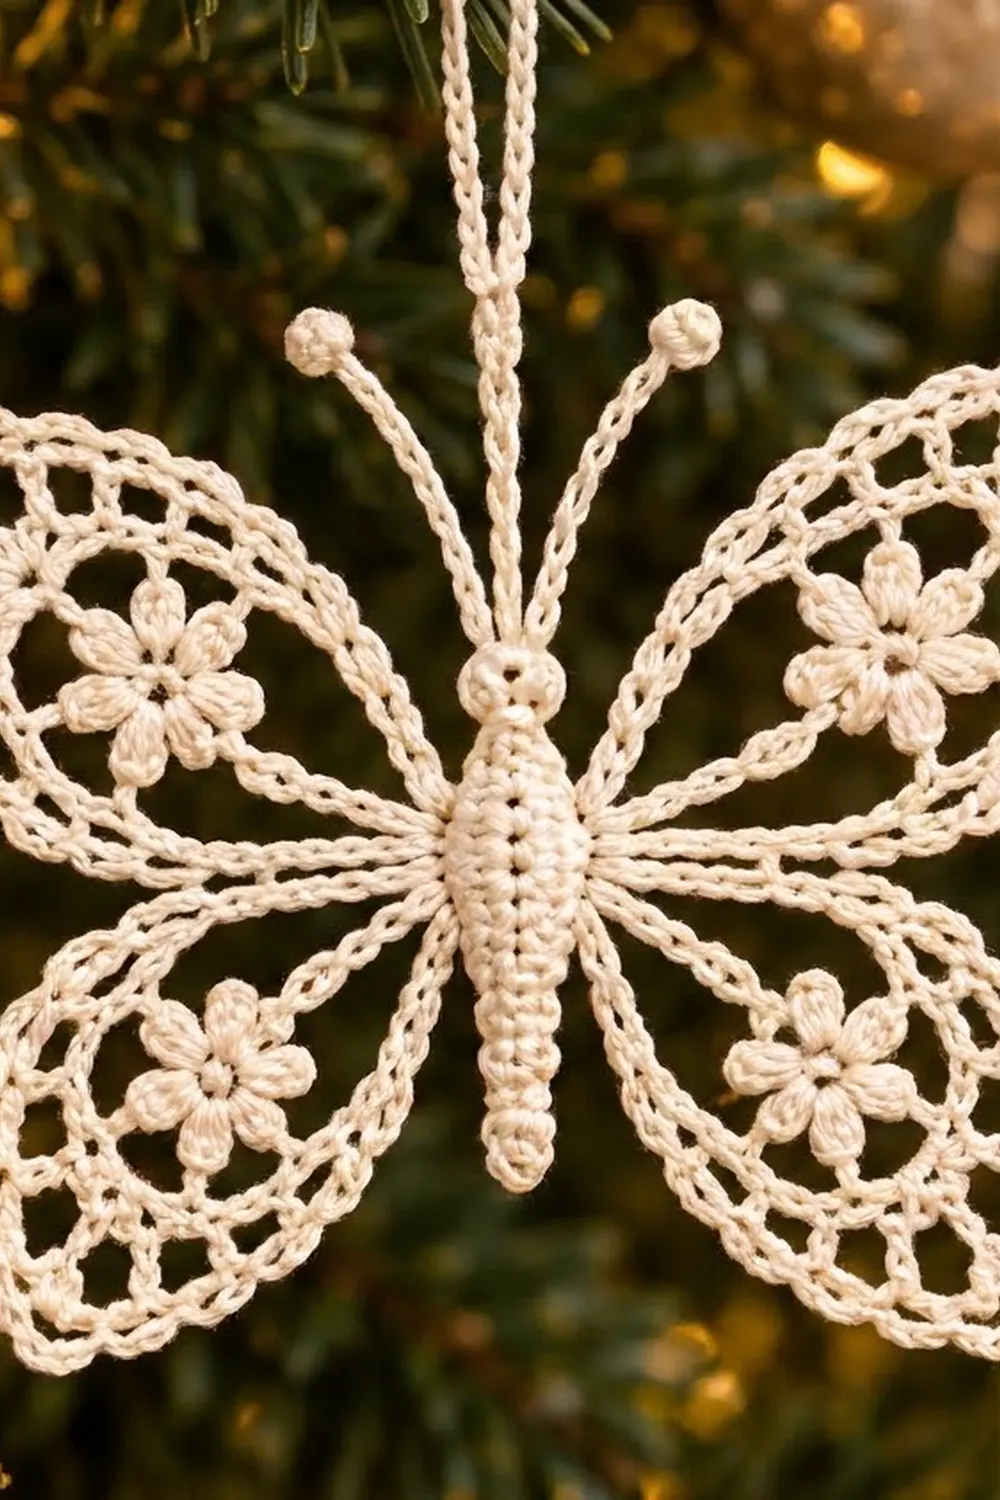
This delicate butterfly ornament is worked in cream cotton thread. It has open chain-loop wings, a puffy six-petal flower at the center of each wing and a ridged body with knobbed antennae. It looks like vintage lace and is a lovely piece for a Christmas tree, a gift tag or a window.
The ornament uses one color, a soft cream or ecru. The lace texture does the decorating. A firm single-crochet outline frames each wing so that the open mesh keeps its shape once blocked.
This pattern uses US crochet terms. The finished butterfly measures 4.5 in (11.4 cm) across the wings and 3.8 in (9.7 cm) tall across the wings. The hanging loop adds 2.75 in (7.0 cm) above the head.
Construction overview: You make a ridged body in rows, add a popcorn head, two antennae and a hanging cord, and then make four wings from the center outward. Each wing starts with a flower, grows into a teardrop of chain loops, is sewn to the body and is then outlined with a border round.
Finished Size and Construction
- Finished size: 4.5 in (11.4 cm) wide × 3.8 in (9.7 cm) tall, not counting the antennae and loop
- Skill level: Intermediate (thread crochet)
- Terminology: US
- Yarn weight: Size 10 cotton crochet thread
- Hook: 1.75 mm steel hook
- Number of pieces: 5 (1 body, 2 upper wings, 2 lower wings), joined into one ornament
- Layout: Body in the center, one upper wing and one lower wing on each side
- Piece sizes before border: upper wing 1.9 × 1.5 in (4.8 × 3.8 cm); lower wing 1.6 × 1.25 in (4.1 × 3.2 cm); body 2 × 0.4 in (5.1 × 1.0 cm)
- Size before border (joined): 4.3 in (10.9 cm) wide × 3.6 in (9.1 cm) tall
- Border depth: 0.1 in (0.3 cm) per edge
Materials
Thread: Use a mercerized size 10 cotton thread. Mercerized cotton has a slight sheen, holds starch well and shows each chain loop clearly. Avoid fuzzy or acrylic thread, because the mesh will blur and won’t hold a crisp shape.
- Cream / ecru: 6 g, about 50 m
This amount includes a margin of about 30% for your test wing, joining tails and the hanging cord.
Tools:
– 1.75 mm steel crochet hook
– Fine tapestry needle or sewing needle with a large eye
– Small sharp scissors
– Rustproof pins and a foam blocking board
– Fabric stiffener or starch (spray or liquid)
– Plastic wrap to cover your board
– Ruler marked in inches and cm
Abbreviations (US Terms)
- ch – chain
- sl st – slip stitch
- sc – single crochet
- dc – double crochet
- sc2tog – single crochet 2 together
- BLO – back loop only
- sp – space
- st(s) – stitch(es)
- rep – repeat
Special stitches:
- 3-dc cluster (3-dc cl): Yarn over, insert hook in the stitch, pull up a loop, yarn over and draw through 2 loops. Rep from * 2 more times in the same stitch (4 loops on hook). Yarn over and draw through all 4 loops.
- Petal: (Sl st, ch 3, 3-dc cl, ch 3, sl st) all in the same stitch.
- Popcorn: Work 4 dc in the same stitch. Remove the hook, insert it front to back in the first dc, pick up the dropped loop and pull it through.
Gauge and Checkpoints
Thread gauge varies a lot from person to person, so make one upper wing first and measure it before making the rest.
- Flower, Rounds 1–2: 0.75 in (1.9 cm) across
- After Round 3: 1.1 in (2.8 cm) across
- Upper wing after Round 5: 1.9 × 1.5 in (4.8 × 3.8 cm)
- Lower wing after Round 5: 1.6 × 1.25 in (4.1 × 3.2 cm)
- Body: 2 in (5.1 cm) long, 0.4 in (1.0 cm) wide
If your test wing is too big: try a 1.5 mm hook, or tighten your chains. Loose chain loops are the most common cause of a floppy wing.
If it is too small: try a 2.0 mm hook. Stitch counts stay the same, so only the overall size changes.
Measure gently and flat, without stretching. The final starch will tighten the shape slightly.
Body
The body is worked flat in rows. Working in the back loops makes horizontal ridges that look like a segmented abdomen.
Ch 3.
Row 1: Sc in 2nd ch from hook and in next ch, turn. (2 sc)
Row 2: Ch 1, 2 sc in first st, sc in next st, turn. (3 sc)
Row 3: Ch 1, sc in first st, 2 sc in next st, sc in last st, turn. (4 sc)
Rows 4–15: Ch 1, sc BLO in each st across, turn. (4 sc per row; 12 rows)
Row 16: Ch 1, sc2tog twice, turn. (2 sc)
Row 17: Ch 1, sc2tog, do not turn. (1 sc)
Checkpoint: The body should measure 2 in (5.1 cm) long and 0.4 in (1.0 cm) wide at Rows 4–15. Row 1 is the narrow tail and Row 17 is the top.
Head
Ch 2, then work a popcorn into the single stitch of Row 17. Ch 1 to lock it. This makes the round head bead.
Antennae
Antenna 1: Sl st into the top of the popcorn. Ch 17, then work a 3-dc cl in the 4th ch from the hook to make the tip knob. Sl st in each of the remaining 13 ch, then sl st into the top of the popcorn. (13 sl st along the stem)
Antenna 2: Work the same as Antenna 1, starting from the next loop at the top of the popcorn so that the two antennae spread into a V.
Each antenna stands about 1 in (2.5 cm) above the head.
Hanging Loop
Sl st into the top of the popcorn between the antennae. Ch 60 and sl st into the same spot to close the loop. Then sl st into each of the 60 ch, all the way around the loop. Fasten off and weave in the end through the body.
The sl st pass turns the plain chain into a firm, cord-like loop that hangs 2.75 in (7.0 cm) above the head.
Wings
All four wings start with the same flower and mesh, Rounds 1–3. They become upper or lower wings in Rounds 4–5.
Flower (all wings)
Round 1: Make a magic ring. Ch 1 and work 12 sc in the ring, then join with a sl st to the first sc. Pull the ring tight. (12 sc)
Round 2: Work a Petal in the next sc, sl st in the next sc. Rep from * 5 more times. (6 petals)
Checkpoint: The flower measures 0.75 in (1.9 cm) across, and the petals stand up slightly and look puffy.
Round 3: Sl st up the ch-3 of the first petal and into the top of its cluster. Ch 1 and sc in the top of the cluster. Ch 5, sc in the top of the next petal cluster. Rep from * 3 more times, then ch 5, sl st in the top of the last cluster, ch 5 and join to the first sc. (6 sc, 6 ch-5 sps)
To keep it simple: you finish Round 3 with one sc on each petal tip and 6 ch-5 spaces between them.
Checkpoint: The piece measures 1.1 in (2.8 cm) across.
Number the spaces 1 to 6, going around in your working direction from the join. Spaces 1–3 become the wide outer side of the wing. Spaces 4–6 become the narrow inner side that faces the body.
Upper Wing (make 2)
Round 4: Sl st into Sp 1 and ch 1.
– In each of Sp 1–3: (sc, ch 6, sc, ch 6). That makes 2 loops per space.
– In each of Sp 4–6: (sc, ch 6). That makes 1 loop per space.
– Join to the first sc.
Count: (3 spaces × 2 loops) + (3 spaces × 1 loop) = 9 ch-6 loops, 9 sc.
Round 5: Sl st into the first ch-6 loop and ch 1. (Sc, ch 7) in the next loop. Rep from * 8 more times, then join to the first sc. (9 sc, 9 ch-7 loops)
Loop 9 is the last loop, ending at the join, and it sits at the narrow inner tip. The sc at the start of Loop 9 and the joining sc on either side of it are the attachment points.
Checkpoint: 1.9 in (4.8 cm) long × 1.5 in (3.8 cm) wide, with a teardrop shape. Fasten off and leave a 6 in (15.2 cm) tail for sewing.
Lower Wing (make 2)
Round 4: Sl st into Sp 1 and ch 1.
– In each of Sp 1–2: (sc, ch 5, sc, ch 5). That makes 2 loops per space.
– In each of Sp 3–6: (sc, ch 5). That makes 1 loop per space.
– Join.
Count: (2 × 2) + (4 × 1) = 8 ch-5 loops, 8 sc.
Round 5: Sl st into the first loop and ch 1. (Sc, ch 6) in the next loop. Rep from * 7 more times, then join. (8 sc, 8 ch-6 loops)
Loop 8 is the inner tip, with an attachment point on each side, just as on the upper wing.
Checkpoint: 1.6 in (4.1 cm) long × 1.25 in (3.2 cm) wide. Fasten off and leave a 6 in (15.2 cm) tail.
Make All Pieces
All pieces are in cream.
- Body with head, antennae and loop: 1
- Upper wings: 2
- Lower wings: 2
Layout (front view):
            o     o        <- antenna knobs
             \   /
              (H)          <- head + hanging loop
  [UPPER L]   |B|   [UPPER R]
  [LOWER L]   |B|   [LOWER R]
              |B|
               v           <- tail (Row 1)
Upper wings attach beside body Rows 9–12. Lower wings attach beside body Rows 5–8.
Joining
Method: Whipstitch, using the wing tails.
Place the body face up with the head at the top. Lay one upper wing beside it so that the inner tip, Loop 9, points toward the body and the wing angles slightly upward and outward.
Stitch-to-stitch logic:
– Sew the two attachment sc of the wing to the edge of body Rows 9 and 12, one attachment point to each row edge.
– Then take 2 small stitches through the base of Loop 9 into Rows 10 and 11.
– Loop 9 now lies flat against the side of the body, and it stays hidden.
Repeat on the other side for the second upper wing, mirroring the angle. Join the lower wings in the same way: attachment points to body Rows 5 and 8, and Loop 8 tacked to Rows 6 and 7. Angle the lower wings slightly downward.
Tension: Pull each stitch just snug. If the thread is too tight, the body puckers. If it is too loose, the wings flop forward. Weave in the tails along the body, not through the wing mesh, where they would show.
Checkpoint: The joined butterfly measures 4.3 in (10.9 cm) wide × 3.6 in (9.1 cm) tall. Check that the left and right sides mirror each other before you add the border.
Border
The border is one round of sc worked around the outer edge of each wing, after joining. It turns the airy chain loops into the solid, rope-like outline seen on the finished ornament.
Border gauge: 8 sc fill one ch-7 loop and 7 sc fill one ch-6 loop, lying flat with no ruffling or cupping.
Upper Wing Border (each)
Join the thread with a sl st in Loop 1, next to the body. Ch 1.
Work 8 sc in each of Loops 1–8. Skip Loop 9, because it is sewn to the body. Sl st to the body edge and fasten off.
Count: 8 loops × 8 sc = 64 sc
Lower Wing Border (each)
Join in Loop 1 and ch 1. Work 7 sc in each of Loops 1–7, skipping Loop 8. Sl st to the body edge and fasten off.
Count: 7 loops × 7 sc = 49 sc
Why the math works: Each loop gets exactly 1 sc more than its chain count (ch 7 + 1 = 8 sc; ch 6 + 1 = 7 sc). The extra stitch makes up for the curve of the outer edge, so the outline lies flat. Fewer stitches pull the wing into a cup, and more make it ruffle. The border adds 0.1 in (0.3 cm) to each outer edge, which brings the butterfly to 4.5 in (11.4 cm) × 3.8 in (9.7 cm).
Final Blocking
- Weave in all remaining ends and trim them close.
- Soak the ornament in fabric stiffener or a strong starch solution until it is fully wet.
- Gently squeeze it, without wringing, and blot it in a towel.
- Cover the blocking board with plastic wrap and lay the butterfly face up.
- Pin the body straight first, then pin the outer point of each wing. Check the size: 4.5 in (11.4 cm) wide and 3.8 in (9.7 cm) tall.
- Pin the center of every border scallop so that each mesh opening stays round and open.
- Shape each flower with your fingertip so that the petals stand up slightly.
- Straighten the antennae into a V and pinch the knobs round.
- Hang the loop straight upward and lay it flat.
- Let it dry completely, for at least 12 hours, before removing the pins.
Final Quality-Control Checklist
- Body has 17 rows with visible horizontal ridges
- Head popcorn is round and sits centered
- Both antennae are the same length, about 1 in (2.5 cm), with tight knobs
- Hanging loop is firm and 2.75 in (7.0 cm) long
- Each flower has 6 even petals
- Upper wings have 9 loops and lower wings have 8
- Upper borders have 64 sc and lower borders have 49 sc
- Left and right wings mirror each other
- Finished size is 4.5 × 3.8 in (11.4 × 9.7 cm)
- No visible knots or tails in the mesh
Troubleshooting
Wing cups or curls inward: The border is too tight or has too few sc per loop. Rework it with the full count, or use a slightly larger hook for the border only.
Wing edge ruffles: You probably added extra sc in some loops. Recount and rework those loops.
Petals lie flat: The ch-3 on each side of the cluster is too loose. Tighten the chains or re-shape the petals during blocking.
Mesh loops look uneven: Your chain tension is drifting. Try counting the chains aloud and keeping the working thread steady over one finger.
Antennae droop: Starch them heavily and dry them pinned upright.
Body twists: Make sure every row in Rows 4–15 is worked BLO, and block the body pinned straight.
Wings sit at uneven heights: Check that each pair is sewn to the matching body rows (9–12 and 5–8).
Care
Dust it gently, or hand-wash it in cool water with mild soap. Re-starch and re-block it after washing to restore the crisp lace shape.
Final Notes
The measurement chain is simple to follow:
- The flower measures 0.75 in (1.9 cm), and the mesh round brings it to 1.1 in (2.8 cm).
- The upper wing grows to 1.9 × 1.5 in (4.8 × 3.8 cm), and the lower wing to 1.6 × 1.25 in (4.1 × 3.2 cm).
- Joined to the 2 in (5.1 cm) body, the butterfly measures 4.3 × 3.6 in (10.9 × 9.1 cm).
- The 0.1 in (0.3 cm) border brings it to the finished 4.5 × 3.8 in (11.4 × 9.7 cm).
If your test wing matches its checkpoint, everything after it will fall into place. Make one for the tree, one for a gift box and one to keep.
Happy crocheting!