

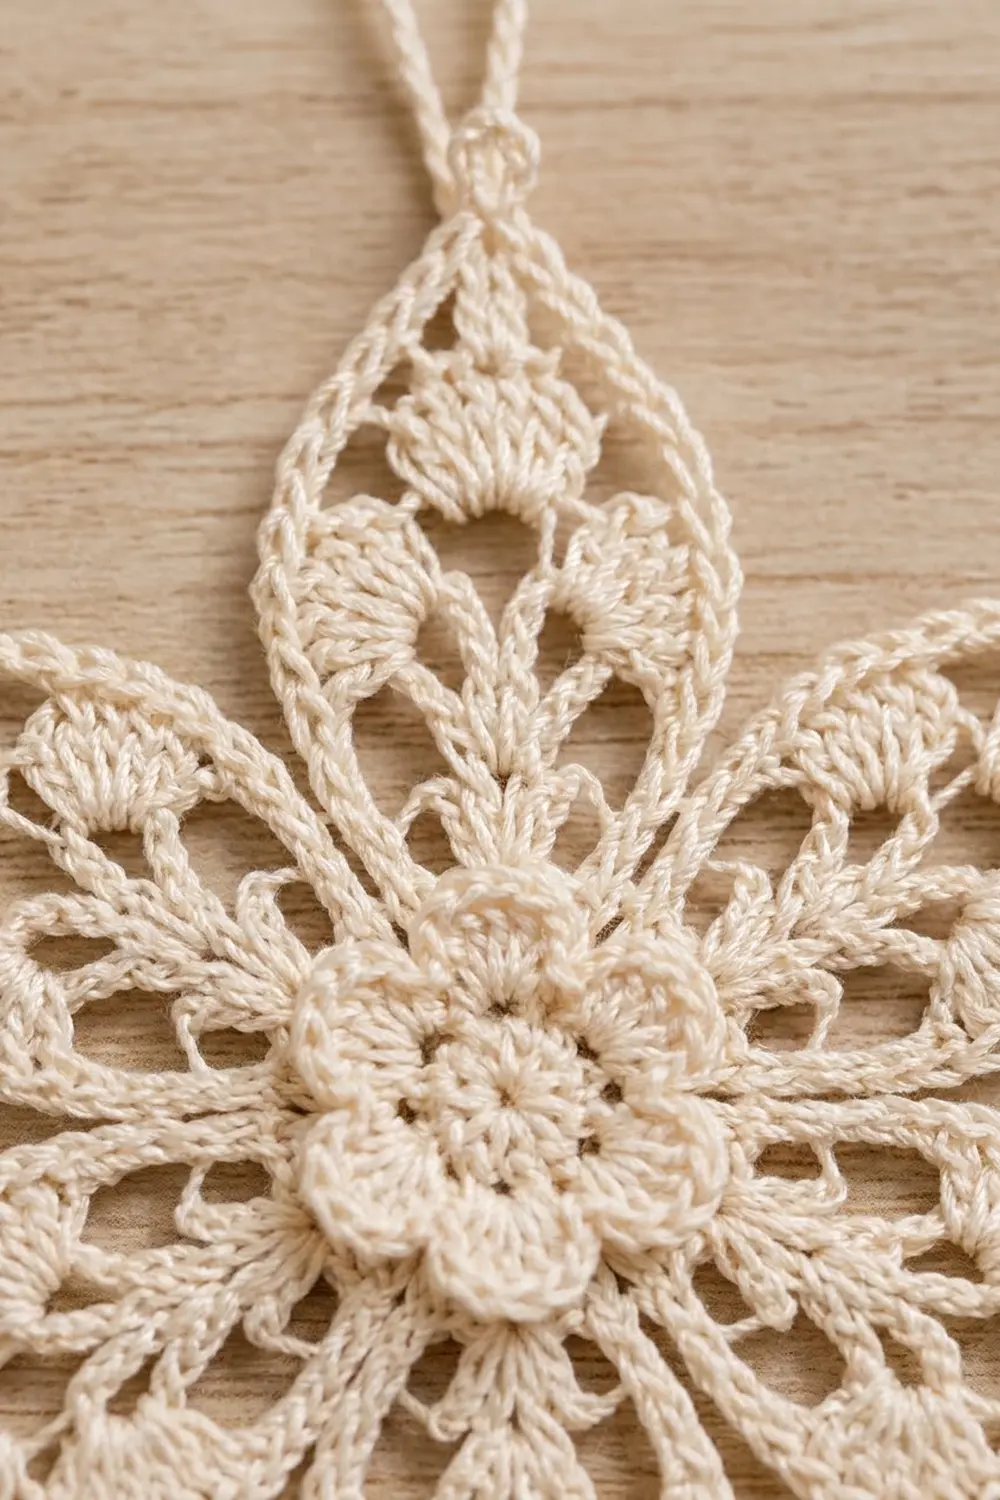
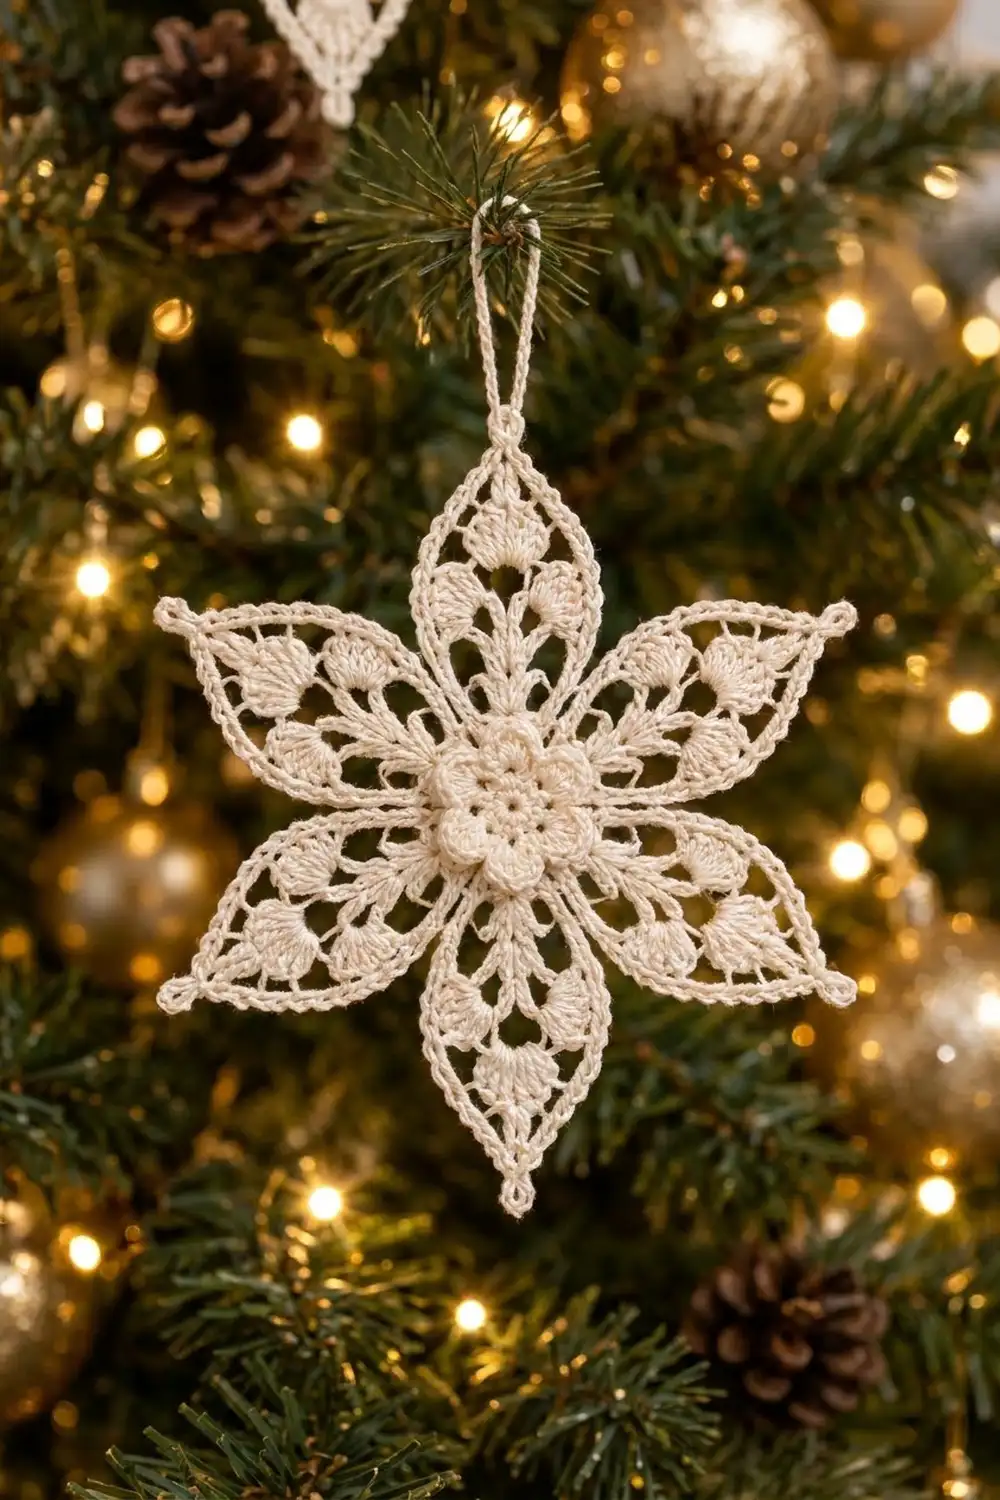
The Winter Lily Star is a lacy six-point snowflake ornament with a small raised flower at its center. Each point is a long, pointed leaf shape with a smooth outline of single crochet, an open lace interior and a fan of double crochet at the base. A tiny picot finishes every tip, and a slim chain loop at the top lets it hang from a branch.
It is worked in one color, a soft cream or ivory cotton thread, which gives it a classic heirloom look against green branches and gold baubles. The style is traditional thread lace: airy, symmetrical and crisp once it is blocked.
This pattern uses US crochet terms. The finished ornament measures about 5 in (12.7 cm) from point to point, not counting the hanging loop.
The whole ornament is one piece, worked in the round from the center out. You start with a flat six-petal flower base. Next you build six star points behind the base and finish them with an outline edging round. Then you add a raised flower through the front loops of the first round. The chain hanging loop goes on last. There is no sewing or joining.
Finished Size and Construction
- Finished size: about 5 in (12.7 cm) point to point
- Skill level: Intermediate (thread lace, working behind petals, front-loop surface stitches)
- Terminology: US crochet terms
- Yarn weight: Size 10 cotton crochet thread (Lace, weight 0)
- Hook: 1.75 mm steel hook
- Number of pieces: 1
- Layout: Single six-point star, worked in rounds
- Piece size: 5 in (12.7 cm) point to point
- Size before border: about 4.75 in (12.1 cm) after Round 10
- Border depth: about 1/8 in (0.3 cm), added by the outline edging in Round 11
Materials
Choose a mercerized cotton thread in size 10. Mercerized thread has a slight sheen and holds a crisp shape after blocking, which is what makes the points look sharp. Avoid fuzzy or acrylic thread. It blurs the lace and does not take stiffening well.
- Cream / ivory (main color): about 8 g, about 23 m (25 yd) per ornament
The quantity includes a margin of roughly 50 percent for gauge differences, a test of the center, and the hanging loop. One standard ball of size 10 thread will make many ornaments.
Tools:
- 1.75 mm steel crochet hook
- Fine tapestry needle or thread needle
- Small sharp scissors
- Blocking mat or folded towel covered with plastic wrap
- Rustproof pins (about 20)
- Fabric stiffener, or starch and water
- Ruler or tape measure
Abbreviations (US Terms)
- ch – chain
- sl st – slip stitch
- sc – single crochet
- hdc – half double crochet
- dc – double crochet
- tr – treble crochet (yarn over twice)
- BLO – back loop only
- FL – front loop
- BPsc – back post single crochet: insert the hook from back to front to back around the post of the stitch, then complete a sc
- sk – skip
- sp(s) – space(s)
- st(s) – stitch(es)
Special stitch – Picot: ch 4, sl st in the 4th ch from the hook.
Gauge and Checkpoints
Gauge is not critical for an ornament, but it controls the final size. Work Rounds 1–4 first as a test and measure before you continue.
- After Round 2: the circle measures about 0.75 in (1.9 cm) across.
- After Round 4: the flat flower base measures about 1.5 in (3.8 cm) across, petal tip to petal tip.
- After Round 7: about 2.25 in (5.7 cm) across, shell tip to shell tip.
- After Round 9: about 3.5 in (8.9 cm) across, fan tip to fan tip.
- After Round 10: about 4.75 in (12.1 cm) across, loop tip to loop tip.
- After Round 11 and blocking: about 5 in (12.7 cm) point to point.
If your Round 4 base is larger than 1.6 in (4.1 cm), change to a 1.5 mm hook. If it is smaller than 1.4 in (3.6 cm), change to a 2 mm hook. Start again from Round 1, because the center sets the scale for every point.
Pattern
Center and Flower Base
Round 1: Make a magic ring. Ch 3 (counts as dc), work 17 dc in the ring. Pull the ring closed and sl st to the top of the ch-3. (18 dc)
Round 2: Working in BLO only, ch 1, sc in the same st and in each st around. Sl st to the first sc. (18 sc)
The 18 front loops of Round 1 stay free. You will use them later for the raised flower.
Round 3: Ch 1, sc in the same st, ch 4, sk 2 sts, sc in the next st, ch 4, sk 2 sts; repeat from * 4 more times. Sl st to the first sc. (6 sc, 6 ch-4 sps)*
Check: 6 repeats × 3 sts used = 18 sts, so the round ends exactly where it started.
Round 4: Sl st into the first ch-4 sp. In each ch-4 sp work (sc, hdc, 5 dc, hdc, sc). Sl st to the first sc. (6 petals, 9 sts each, 54 sts)
This is the flat six-petal flower base. Measure it now: 1.5 in (3.8 cm).
Behind the Petals
Round 5: Fold the petals of Round 4 toward you so you can see the sc of Round 3 from the back. Ch 1, BPsc around the first sc of Round 3, ch 6, BPsc around the next sc of Round 3, ch 6; repeat from * 4 more times. Sl st to the first BPsc. (6 BPsc, 6 ch-6 sps)*
These ch-6 sps sit behind the petals, one behind each petal. They are the foundation for the six star points.
Building the Star Points
Round 6: Sl st into the first ch-6 sp. Ch 3 (counts as dc), work (2 dc, ch 2, 3 dc) in the same sp, ch 1, (3 dc, ch 2, 3 dc) in the next ch-6 sp, ch 1; repeat from * 4 more times. Sl st to the top of the ch-3. (6 shells, 36 dc, 6 ch-2 sps, 6 ch-1 sps)*
Round 7: Sl st in the next 2 dc and into the ch-2 sp. Ch 3 (counts as dc), work (2 dc, ch 5, 3 dc) in the same sp, ch 2, sc in the next ch-1 sp, ch 2, (3 dc, ch 5, 3 dc) in the next ch-2 sp, ch 2, sc in the next ch-1 sp, ch 2; repeat from * 4 more times. Sl st to the top of the ch-3. (36 dc, 6 ch-5 tip sps, 6 valley sc, 12 ch-2 sps)*
The sc between each pair of points is the “valley sc.” Each point now has a ch-5 tip.
Round 8: Sl st in the next 2 dc and into the ch-5 tip sp. Ch 3 (counts as dc), work 10 dc in the same sp, ch 3, sc in the valley sc, ch 3, 11 dc in the next ch-5 tip sp, ch 3, sc in the valley sc, ch 3; repeat from * 4 more times. Sl st to the top of the ch-3. (6 fans of 11 dc = 66 dc, 6 valley sc)*
These fans are the solid shell clusters at the base of each point.
Round 9: Ch 1, sc in the same st (first dc of the fan), [ch 3, sk 1 dc, sc in the next dc] 5 times, ch 4, tr in the valley sc, ch 4, sc in the first dc of the next fan; repeat from * around, ending the last repeat with ch 4, tr in the valley sc, ch 4, sl st to the first sc. (36 sc, 30 ch-3 sps, 6 tr)*
Each fan now has 6 sc (on dc 1, 3, 5, 7, 9 and 11) and 5 ch-3 sps. Call these sps 1 to 5. Sp 3 is the center of the fan and becomes the tip of the point.
Lace Frame (Round 10)
Round 10: Sl st into the first ch-3 sp (sp 1). Ch 1, sc in the same sp, ch 7, sc in sp 2, ch 9, (sc, ch 10, sc) in sp 3, ch 9, sc in sp 4, ch 7, sc in sp 5, ch 6, sc in the valley tr, ch 6, sc in sp 1 of the next fan; repeat from * around, ending the last repeat with ch 6, sl st to the first sc. (42 sc, 42 ch-loops: per point 1 ch-10, 2 ch-9, 2 ch-7, 2 ch-6)*
The loops get longer toward the tip, so the open frame stretches into a long leaf shape. The ch-10 loop is the tip. Measure now: about 4.75 in (12.1 cm) loop tip to loop tip.
Border: Outline Edging (Round 11)
Border gauge: the edging is 1 round of sc packed into the chain loops, with 1 sc more than the number of chains in each side loop. This covers each chain fully without ruffling and adds about 1/8 in (0.3 cm) all around.
Round 11: Sl st into the first ch-7 loop. Ch 1, *8 sc in the ch-7 loop, 10 sc in the ch-9 loop, (6 sc, picot, 6 sc) in the ch-10 tip loop, 10 sc in the next ch-9 loop, 8 sc in the next ch-7 loop, 7 sc in the ch-6 loop, sl st in the valley sc, 7 sc in the next ch-6 loop; repeat from * 5 more times. Sl st to the first sc. Fasten off and weave in the end.
Counts per point:
- Left side: 7 + 8 + 10 + 6 = 31 sc (from the valley to the picot)
- Right side: 6 + 10 + 8 + 7 = 31 sc (from the picot to the valley)
- Per point: 62 sc, 1 picot, 1 valley sl st
- Round total: 372 sc, 6 picots, 6 sl sts
Why the math works: each point has the same loop lengths on both sides (ch 6, ch 7, ch 9 and half of the ch-10 tip), so each side gets the same 31 sc and the picot sits exactly on the centerline. Skip all the sc of Round 10 as you work this round. The sl st in each valley sc keeps a clean, deep notch between points. 6 points × 62 sc = 372 sc.
Raised Center Flower
Turn the ornament to the front. Join the thread with a sl st in any free front loop of Round 1.
Flower round: Ch 1, sc in the same FL, (hdc, 3 dc, hdc) in the next FL, sc in the next FL; repeat from * 5 more times, working into each following FL. Sl st to the first sc. Fasten off and weave in the end. (6 petals, 7 sts each, 42 sts)*
Check: 6 repeats × 3 front loops = 18 front loops. This small flower, about 1 in (2.5 cm) across, stands up over the larger flat flower of Round 4, so the center looks layered.
Hanging Loop
Join the thread in the picot of any point. Ch 30, then sl st in the same picot. Fasten off, leaving a 6 in (15.2 cm) tail, and weave it back through the sc along the edge of that point. The loop rises about 1.5 in (3.8 cm) above the tip.
Final Blocking
- Weave in all ends, but do not trim them yet.
- Soak the ornament in fabric stiffener, or a mix of starch and water. Press out the extra liquid in a towel. Do not wring it.
- Draw a 5 in (12.7 cm) circle on paper. Mark 6 points evenly around it, 60 degrees apart. Put the paper under plastic wrap on your mat.
- Pin the center first, then pin each picot on one of the marks.
- Pin each valley sl st inward, about 1 in (2.5 cm) from the center.
- Open the lace frame of each point: pin the middle of each ch-9 side outward so the point becomes a slim leaf shape.
- Puff the raised center flower with a fingertip so the petals stand up.
- Let it dry completely, at least 12 hours. Remove the pins and trim the ends close.
Final Quality-Control Checklist
- 6 points of the same length
- Opposite picots about 5 in (12.7 cm) apart, on all 3 axes
- Each point has 31 sc on each side and a centered picot tip
- An 11-dc fan visible at the base of every point
- A clean, deep notch between points
- A flat flower base with 6 even petals
- A raised flower with 6 petals sitting over the base
- The hanging loop is secure and attached to one picot
- No visible ends, and the piece is stiff enough to keep its shape
Troubleshooting
Points curl or cup. Your Round 11 sc are too tight. Work them more loosely, or go up a hook size for that round only.
Edge ruffles. You have added too many sc. Count each loop again: 7, 8, 10, 6 + picot + 6, 10, 8, 7.
Center doesn’t lie flat. Round 5 chains may be too short for your tension. Try ch 7 instead of ch 6, and keep everything else the same.
Fans look crowded. Make sure the Round 7 tip space has 5 chains, not 3, and work the 11 dc loosely.
Picot is not at the tip. Count the sc on each side of the ch-10 loop. There must be exactly 6 before the picot and 6 after it.
Raised flower pulls the center. You may have worked through both loops. Use only the free front loops of Round 1.
Points are uneven after blocking. Wet the ornament again and re-pin it to the paper template.
Care
Dust it gently, or hand wash it in cool water with mild soap, then stiffen it again and dry it flat and pinned. Store it flat in tissue paper between seasons.
Final Notes
The measurement chain is simple. Start with a 1.5 in (3.8 cm) flower base after Round 4. It grows to 2.25 in (5.7 cm) at Round 7, 3.5 in (8.9 cm) at Round 9 and 4.75 in (12.1 cm) at Round 10. The 1/8 in (0.3 cm) edging and blocking bring it to a 5 in (12.7 cm) six-point star. If you check the center early and count 62 sc per point in the edging, every ornament will match.
Happy crocheting!