

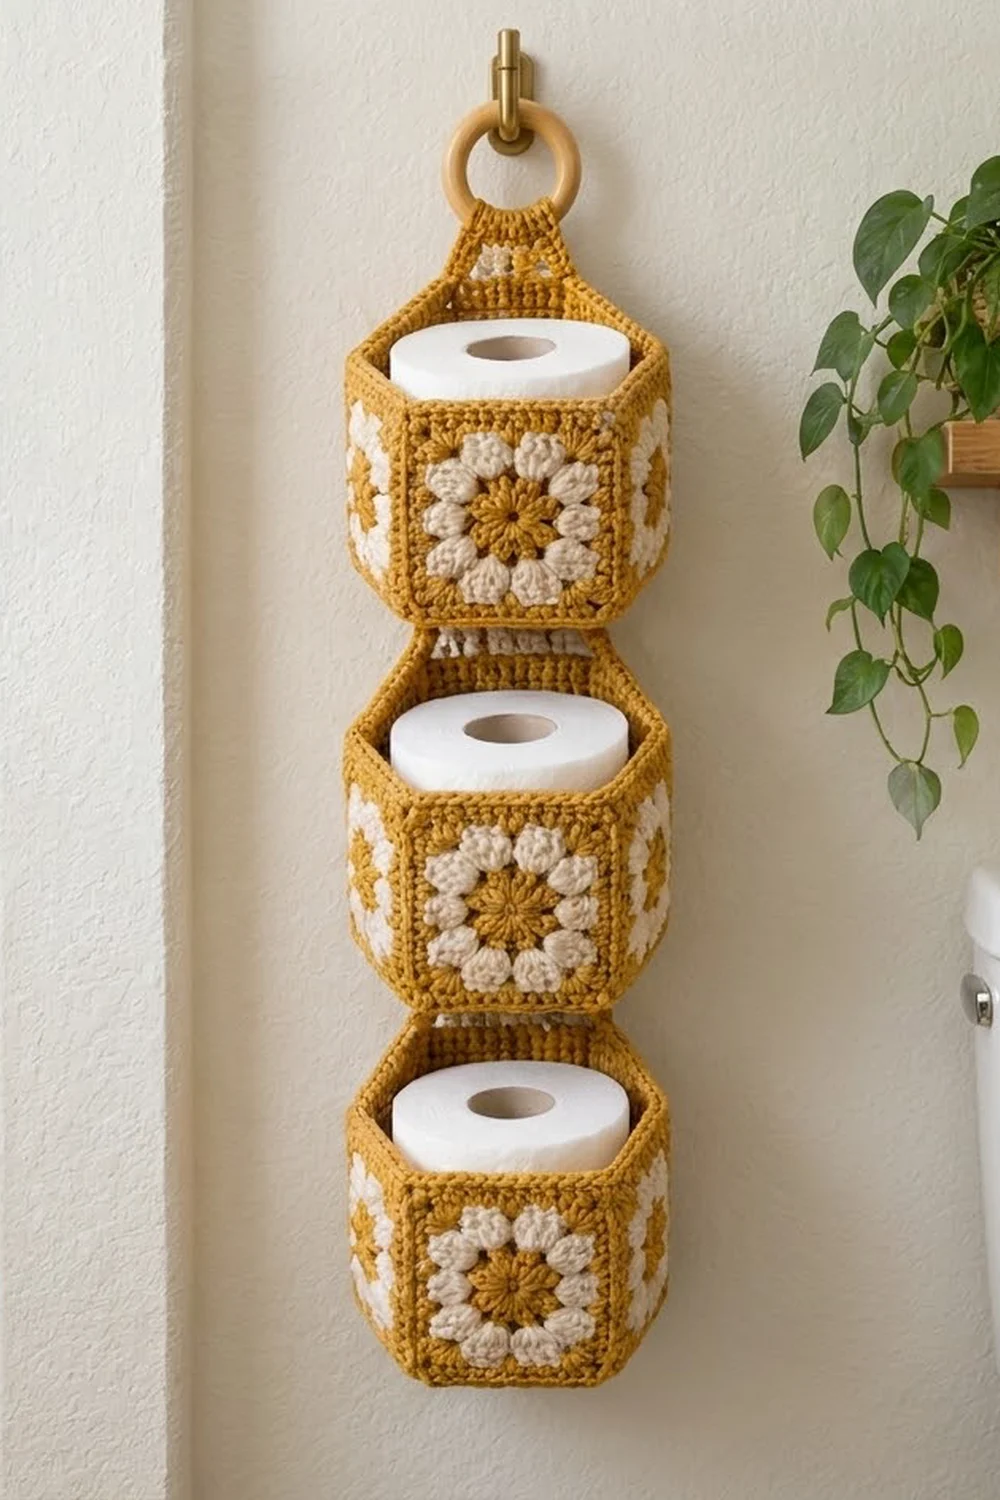
This hanging holder stores three spare toilet rolls in a column of hexagonal pockets. Each pocket is built from small granny-style squares that look like little sunflowers: a mustard center, a ring of chunky cream puff petals, and a firm mustard frame. A matching flower hexagon forms each base.
The palette is just two colors, warm mustard and soft cream. Together they give a cozy, vintage look that works well against white or wood. Raised mustard seams outline every edge of each pocket, so each pocket keeps its hexagon shape and the seams also act as decoration.
The pattern uses US crochet terms. Each pocket measures 6.1 in (15.5 cm) across flats and 4.25 in (10.8 cm) tall. The full holder hangs about 19.5 in (49.5 cm) long, including the ring.
To make it, you crochet 18 squares and 3 hexagons. You join six squares around each hexagon with single crochet seams, then add a three-round rim. Short straps connect the pockets, and a tapered tab attaches the top pocket to a wooden ring.
Finished Size and Construction
- Finished size: 6.1 in (15.5 cm) across flats per pocket; 7 in (17.8 cm) corner to corner; total length about 19.5 in (49.5 cm)
- Skill level: Intermediate
- Terminology: US
- Yarn weight: Worsted (#4), cotton or cotton blend
- Hook: 4.5 mm (US 7)
- Number of pieces: 21 motifs (18 squares, 3 hexagons), plus 2 connector strips and 1 hanging tab worked directly onto the pockets
- Layout: 3 pockets stacked vertically; each pocket has 6 squares around 1 hexagon base
- Piece size: squares 3.5 in (8.9 cm); hexagon sides 3.5 in (8.9 cm)
- Pocket height before border: 3.5 in (8.9 cm)
- Border depth: 0.75 in (1.9 cm)
Materials
Use a smooth, mercerized or combed cotton. It shows the puff stitches clearly and holds a firm basket shape. Acrylic will work too, but the pockets will be softer.
- Mustard (MC): 200 g / about 340 m
- Cream (CC): 50 g / about 85 m
- 4.5 mm (US 7) crochet hook
- Wooden ring, 2.75 in (7.0 cm) diameter
- Tapestry needle
- 6 stitch markers
- Scissors and a measuring tape
- Blocking mat and pins
Quantities include a margin of about 25% for gauge swatches and seams.
Abbreviations (US Terms)
- ch – chain
- sl st – slip stitch
- sc – single crochet
- hdc – half double crochet
- dc – double crochet
- sc2tog – single crochet 2 together
- sp – space
- st(s) – stitch(es)
- MC / CC – main color (mustard) / contrast color (cream)
Puff stitch (puff): (Yarn over, insert hook in the space, pull up a loop) 3 times, yarn over, pull through all 7 loops on the hook.
Beginning puff (beg puff): Ch 2, (yarn over, insert hook in the same space, pull up a loop) twice, yarn over, pull through all 5 loops on the hook.
Gauge and Checkpoints
Gauge is 16 sc × 18 rows = 4 in (10.2 cm) with MC and a 4.5 mm hook.
Make one square and one hexagon before you start the rest. The two must match because each square’s bottom edge is seamed stitch for stitch to one hexagon side.
Square checkpoints:
– After Rnd 1: 1.25 in (3.2 cm) across
– After Rnd 2: 2.25 in (5.7 cm)
– After Rnd 3: 3 in (7.6 cm) square
– After Rnd 4: 3.5 in (8.9 cm) square
Hexagon checkpoints (across flats):
– After Rnd 3: 3 in (7.6 cm)
– After Rnd 4: 3.9 in (9.9 cm)
– After Rnd 5: 4.8 in (12.2 cm)
– After Rnd 6: 5.6 in (14.2 cm)
– After Rnd 7: 6.1 in (15.5 cm), with each side 3.5 in (8.9 cm)
If the pieces are bigger than this, go down to a 4.0 mm hook. If they are smaller, go up to 5.0 mm. A difference of up to 1/4 in (0.6 cm) can be fixed when blocking. If the hexagon side and the square edge differ by more than that, the seams will pucker, so change hooks.
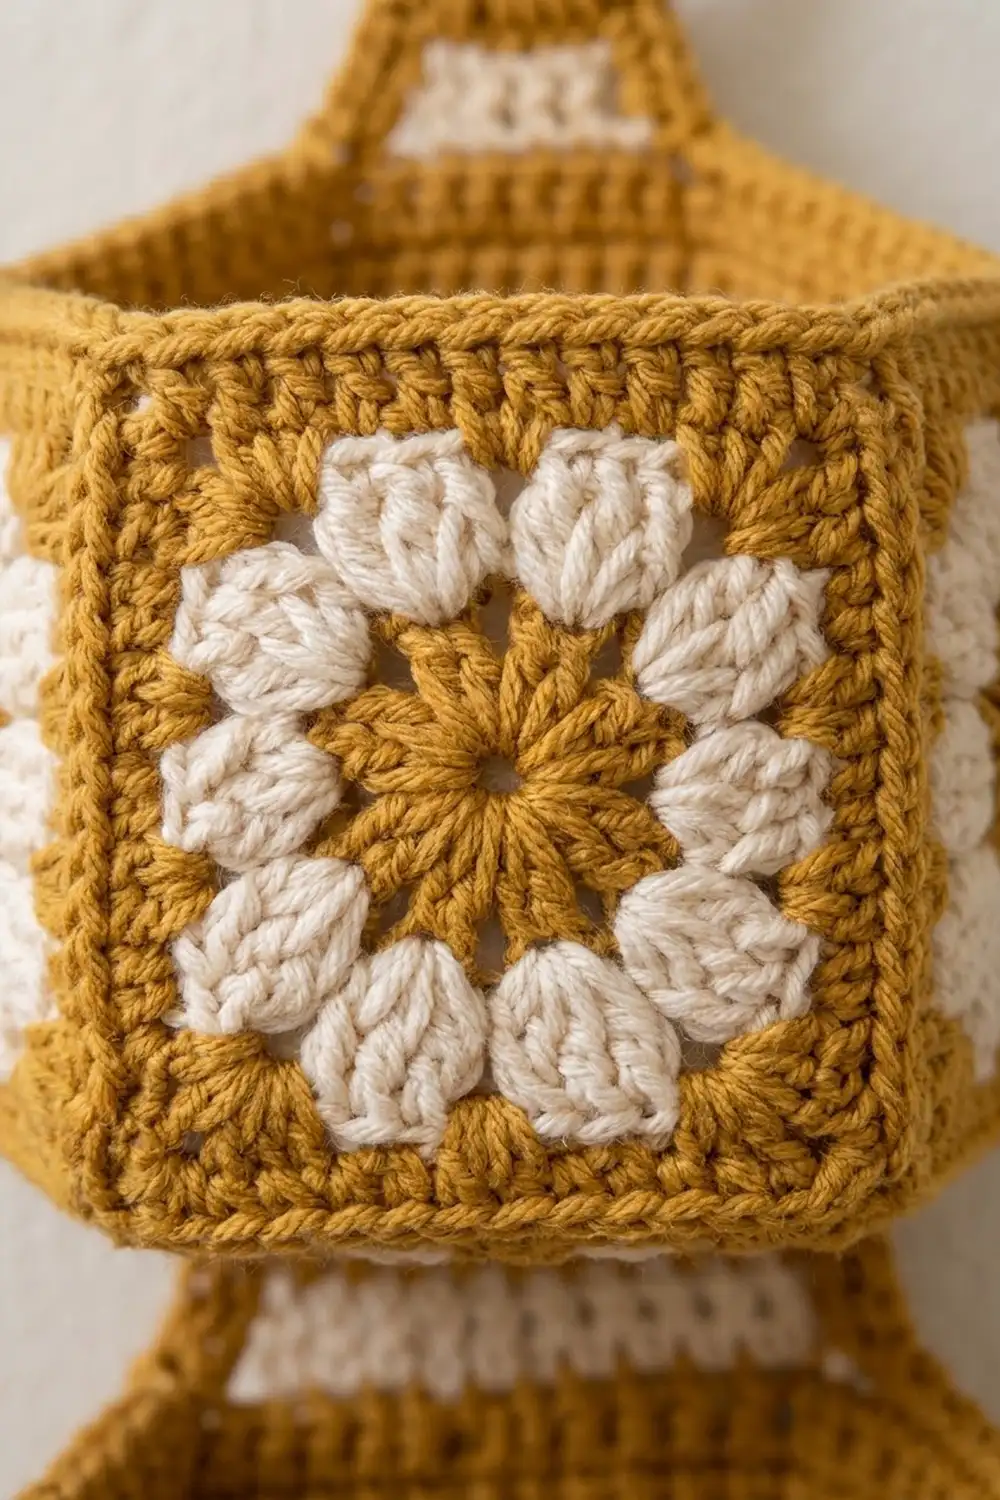
Sunflower Square (Make 18)
Rnd 1 (MC): Make a magic ring. Ch 3 (counts as dc), 11 dc in the ring, then sl st to the top of the ch-3. (12 dc) Fasten off.
Rnd 2 (CC): Join CC in any space between two dc. Beg puff, ch 1, puff in the next space between dc, ch 1; repeat from * 10 more times, then sl st to the top of the beg puff. (12 puffs, 12 ch-1 sps) Fasten off.
Rnd 3 (MC): Join MC in any ch-1 sp. Ch 3 (counts as dc), (2 dc, ch 2, 3 dc) in the same sp for the first corner. 3 dc in the next ch-1 sp, 3 dc in the next ch-1 sp, (3 dc, ch 2, 3 dc) in the next ch-1 sp; repeat from * 2 more times. Then work 3 dc in each of the last 2 sps and sl st to the top of the ch-3. (48 dc: 12 dc per side, 4 ch-2 corner sps)
Rnd 4 (MC): Sl st into the next 2 dc and the corner sp. Ch 1, (sc, ch 1, sc) in the corner sp. Sc in each of the next 12 dc, (sc, ch 1, sc) in the corner sp; repeat from * 2 more times. Sc in each of the last 12 dc, then sl st to the first sc. (56 sc: 14 sc per side, 4 ch-1 corner sps)
Fasten off, leaving a 6 in (15.2 cm) tail. Weave in the CC ends.
Side count definition: Each side has 14 sc. Count from the sc just after one corner ch-1 sp to the sc just before the next. The two end sc on each side are that side’s corner stitches. The ch-1 sps are not stitches.
Flower Hexagon Base (Make 3)
Rnds 1–2: Work as for the square. (12 dc, then 12 puffs with 12 ch-1 sps)
Rnd 3 (MC): Join MC in any ch-1 sp. Ch 3 (counts as dc), (dc, ch 2, 2 dc) in the same sp, then 2 dc in the next sp. (2 dc, ch 2, 2 dc) in the next sp, 2 dc in the next sp; repeat from * 4 more times. Sl st to the top of the ch-3. (36 dc: 6 dc per side, 6 ch-2 corner sps)
Rnd 4 (MC): Sl st into the next dc and the corner sp. Ch 3, (ch 2, dc) in the same sp. Dc in each dc to the next corner, (dc, ch 2, dc) in the corner sp; repeat around and finish with dc in each remaining dc. Sl st to the 3rd ch of the beginning ch-3. (48 dc: 8 dc per side)
Rnd 5: Repeat Rnd 4. (60 dc: 10 dc per side)
Rnd 6: Repeat Rnd 4. (72 dc: 12 dc per side)
Rnd 7: Ch 1. Work sc in each dc and (sc, ch 1, sc) in each corner sp. Sl st to the first sc. (84 sc: 14 sc per side, 6 ch-1 corner sps)
Each round adds one stitch on each side of every corner, which is 2 per side. That keeps the hexagon flat. Each hexagon side now has 14 sc, the same as each square edge.
Make All Pieces
- Squares: 18 (6 per pocket). Rnd 1 MC, Rnd 2 CC, Rnds 3–4 MC.
- Hexagons: 3 (1 per pocket). Rnd 1 MC, Rnd 2 CC, Rnds 3–7 MC.
Layout of one pocket, with the hexagon base in the center and the squares around it:
        [S1]
   [S6]      [S2]
        (HEX)
   [S5]      [S3]
        [S4]
Holder layout, top to bottom:
      ( ring )
      [ tab  ]
     [Pocket A]
     [connector]
     [Pocket B]
     [connector]
     [Pocket C]
Each pocket’s back is square S1.
Joining
All seams are worked in MC with single crochet. Hold the pieces wrong sides together so the ridge sits on the outside, matching the raised seams in the finished holder.
Step 1 – Base seams. Hold square S1 against one side of the hexagon. Join MC in the matching corner ch-1 sps. Work 1 sc through both layers in each of the 14 stitch pairs, then sl st through the next pair of corner sps. (14 sc per seam) Without fastening off, ch 1 and continue the same way with S2 on the next hexagon side. Join all 6 squares. (84 sc in total, 14 per side)
Step 2 – Wall seams. Fold up the squares. Hold S1 and S2 wrong sides together along their touching edges. Join MC at the base corner and work 1 sc through each of the 14 stitch pairs, finishing in the top corner sps. (14 sc) Fasten off. Repeat for all 6 vertical seams.
Every seam matches stitch to stitch, 14 to 14, with no skipped or added stitches. Keep your tension even and slightly loose so the ridges don’t pull the walls in.
Checkpoint: The open pocket should measure 6.1 in (15.5 cm) across flats and 3.5 in (8.9 cm) tall.
Border (Top Rim)
Border gauge: 4 sc per inch, which is 14 sc per 3.5 in (8.9 cm) square edge.
Rnd 1: Join MC in the first sc of any square’s top edge. Work sc in each of the 14 sts along each square’s top edge, skipping the corner ch-1 sps and the tops of the seams. Sl st to the first sc. (84 sc: 14 per side)
Rnd 2: Ch 1, hdc in each st around, then sl st to the first hdc. (84 hdc: 14 per side)
Rnd 3: Ch 1, sc in each st around, then sl st to the first sc. (84 sc: 14 per side) Fasten off.
Why the math works: The rim starts with 6 sides × 14 sts = 84 sts. The seams add nothing, because the corner spaces are skipped. The rim is a straight wall, not a flat piece, so it needs no corner increases. Keeping 84 stitches holds the rim at 21 in (53.3 cm) around and stops it from flaring or puckering.
Add the rim to all 3 pockets. Each pocket is now 4.25 in (10.8 cm) tall.
Connector Strips (Make 2)
On Pocket B and Pocket C, join MC in the first rim st above S1.
- Row 1: Ch 1, sc in each of the next 14 sts, turn. (14 sc)
- Rows 2–5: Ch 1, sc in each st, turn. (14 sc)
The strip should measure about 1 in (2.5 cm). Leave a 12 in (30.5 cm) tail. Whipstitch Row 5 to the 14 seam sc between S1 and the hexagon of the pocket above it: Pocket A over B, then B over C.
Hanging Tab
On Pocket A, join MC in the first rim st above S1.
- Row 1: Ch 1, sc in each of the next 14 sts, turn. (14 sc)
- Row 2: Ch 1, sc2tog, sc in the next 10 sts, sc2tog, turn. (12 sc)
- Row 3: Ch 1, sc2tog, sc in the next 8 sts, sc2tog, turn. (10 sc)
- Row 4: Ch 1, sc2tog, sc in the next 6 sts, sc2tog, turn. (8 sc)
- Row 5: Ch 1, sc2tog, sc in the next 4 sts, sc2tog, turn. (6 sc)
- Rows 6–16: Ch 1, sc in each st, turn. (6 sc)
The strap is 1.5 in (3.8 cm) wide. Pass it through the wooden ring from front to back, fold it down, and sew Row 16 to the back of Row 5.
Final Blocking
- Dampen the whole holder with a spray bottle until it is evenly moist but not soaked.
- Stuff each pocket firmly with a towel or a toilet roll wrapped in plastic.
- Pinch each vertical seam ridge so the corners stand sharp.
- Pull each rim gently up and outward so the opening is an even hexagon, 6.1 in (15.5 cm) across flats.
- Lay the holder flat on its back and pin the connectors and the tab straight.
- Let it dry completely, about 24 hours, before you remove the stuffing.
Final Quality-Control Checklist
- [ ] All 18 squares measure 3.5 in (8.9 cm) and have 14 sc per side.
- [ ] All 3 hexagons have 14 sc per side.
- [ ] Every base and wall seam has 14 sc.
- [ ] Each rim round has 84 stitches.
- [ ] The pockets are 4.25 in (10.8 cm) tall and 6.1 in (15.5 cm) across flats.
- [ ] The connectors are centered on the back squares.
- [ ] The tab is sewn securely around the ring.
- [ ] All ends are woven in at least 2 in (5.1 cm).
Troubleshooting
- Hexagon cups or ruffles: Check that Rnds 4–6 add exactly 2 stitches per side. A cupping hexagon needs a larger hook; a ruffled one needs a smaller hook.
- Puffs look flat: Pull each loop up to the height of the Rnd 1 dc before closing the puff.
- Seams pucker: Recount 14 sts on each edge. Loosen your joining tension or join with a hook one size larger.
- Rim flares: You probably worked into a corner sp. Pull back and skip it.
- Pockets tilt forward: Tack the two back corner seam ridges of the upper pocket to the rim below.
Care
Hand wash in cool water with mild soap, press out the water in a towel, and reshape. Dry flat with the pockets stuffed.
Final Notes
The whole holder rests on one number: 14 stitches per edge. Each square has 14 sc per side, and each hexagon has 14 sc per side. Every seam joins 14 stitch pairs, and each rim round is 6 × 14 = 84 stitches. Each connector and the start of the tab are also 14 stitches wide.
If your test square measures 3.5 in (8.9 cm), the measurements follow from it: each pocket will be 6.1 in (15.5 cm) across and 4.25 in (10.8 cm) tall, and the holder will be about 19.5 in (49.5 cm) long.
Happy crocheting!