

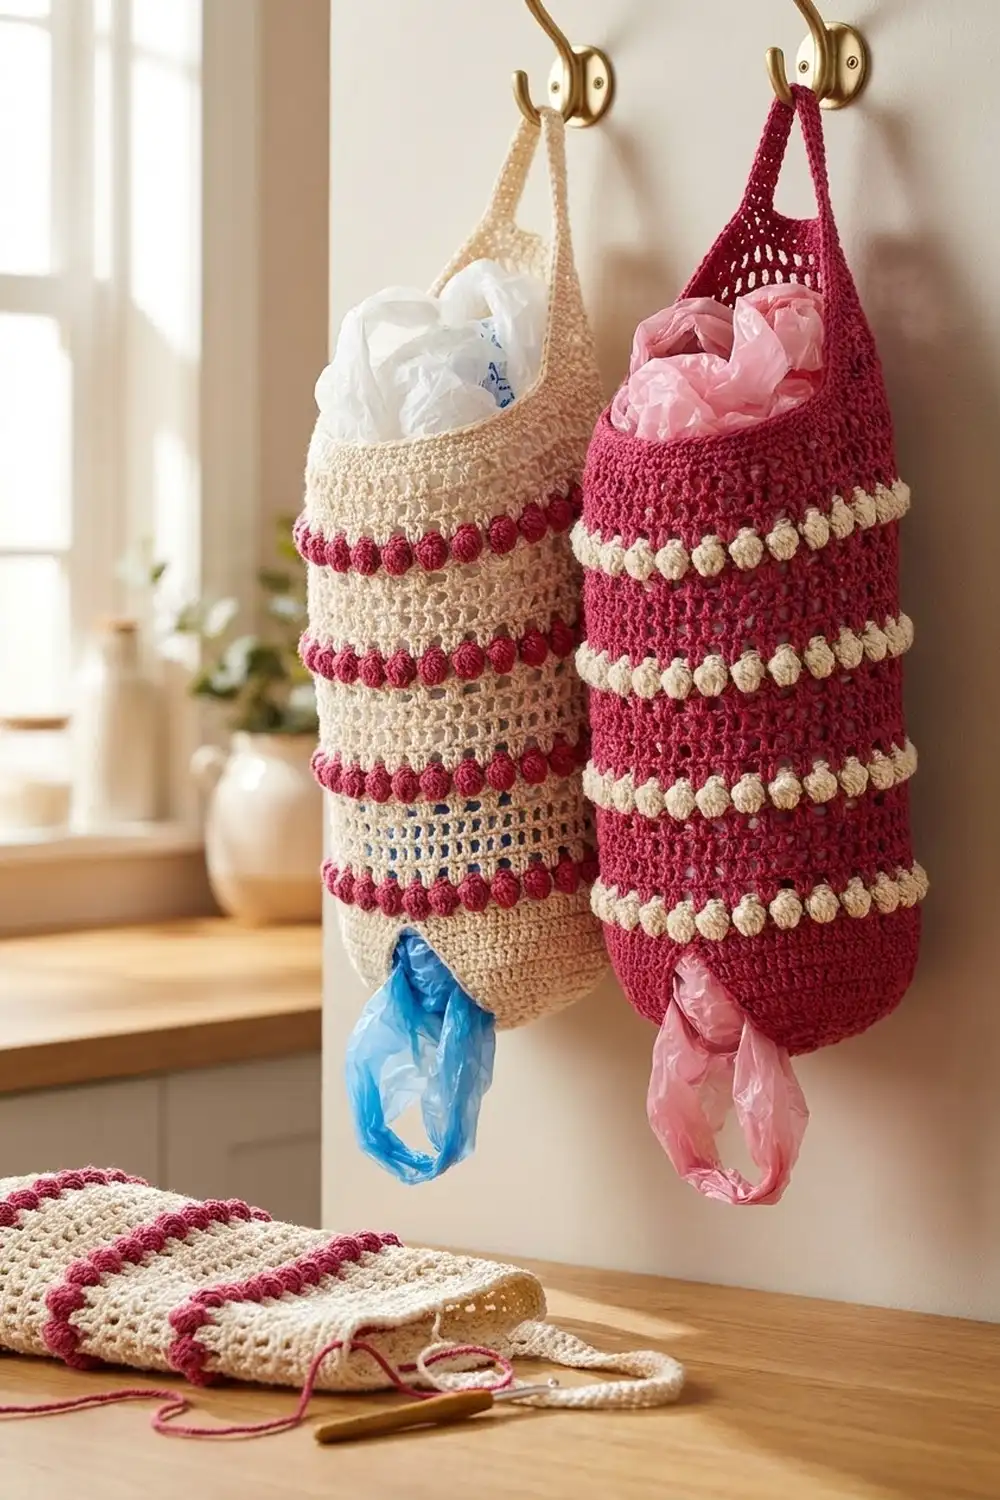
This bag holder keeps plastic grocery bags out of sight and easy to reach. You push bags in through the open top and pull them out one at a time through the narrow band at the bottom.
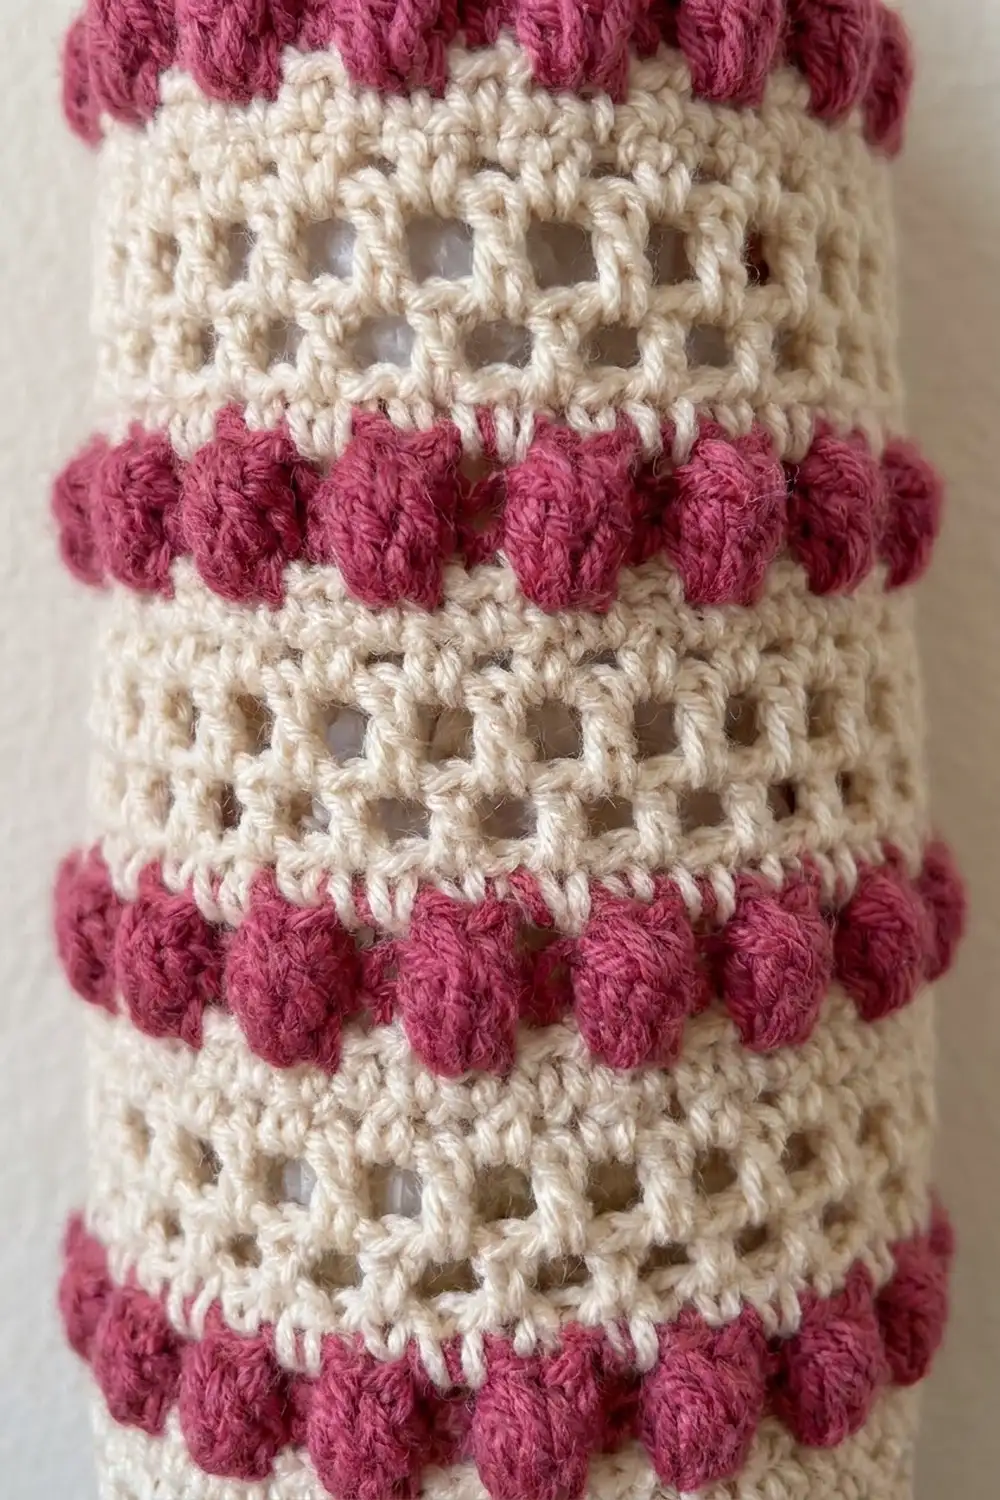
The main version uses a creamy ivory base with four raspberry bobble stripes. The second version simply swaps the two colors, so you get a raspberry body with cream bobbles. The offset mesh lets you see how full the holder is, and the bobble stripes add texture and help the tube keep its shape.
The pattern uses US crochet terms. The finished holder is about 7 in (17.8 cm) wide when flat and about 14 in (35.6 cm) tall, not counting the hanging strap. With the strap looped over a hook, it hangs about 18 in (45.7 cm) long.
You work the whole holder as one seamless piece from the bottom up. You start with a small single crochet band, increase out to the full width, and then work four repeats of mesh and bobble stripes. After the top mesh section comes a solid rim, and the strap is worked straight off the rim and joined to the opposite side.
Finished Size and Construction
- Finished size: 7 in (17.8 cm) wide flat x 14 in (35.6 cm) tall; circumference 14 in (35.6 cm)
- Skill level: Easy-intermediate
- Terminology: US terms
- Yarn weight: Worsted (#4), cotton or cotton blend
- Hook: 5.0 mm (H-8)
- Number of pieces: 1 (the strap is worked onto the body)
- Layout: One tube worked in joined rounds, bottom up
- Bottom opening: 8 in (20.3 cm) circumference, about 2.5 in (6.4 cm) across
- Size before border: 7 in (17.8 cm) wide x 13 in (33.0 cm) tall (after Rnd 34)
- Border depth: 4 single crochet rounds, about 0.9 in (2.3 cm), plus a 10 in (25.4 cm) strap
Materials
Choose a smooth worsted-weight cotton or cotton blend. Cotton holds its shape when the holder is full and handles frequent pulling well. Avoid fuzzy acrylic, because it catches on plastic bags.
- Color A (cream/ivory), main: 85 g, about 131 m (143 yd)
- Color B (raspberry pink), contrast: 30 g, about 46 m (50 yd)
For the reversed colorway, use raspberry as Color A and cream as Color B, with the same amounts.
Tools:
– 5.0 mm (H-8) crochet hook
– 2 locking stitch markers
– Yarn needle
– Scissors
– Measuring tape
– Spray bottle and pins for blocking
Both quantities include about a 15% margin for your gauge swatch and weaving in ends.
Abbreviations (US Terms)
- ch – chain
- sl st – slip stitch
- sc – single crochet
- dc – double crochet
- sk – skip
- sp – space
- st(s) – stitch(es)
- rnd(s) – round(s)
- RS / WS – right side / wrong side
Special stitch: Bobble. Work the following 4 times, all in the same stitch: yarn over, insert hook, yarn over and pull up a loop, yarn over and draw through 2 loops. You now have 5 loops on the hook. Yarn over and draw through all 5 loops.
Bobbles pop out on the side of the fabric that faces away from you. That is why every bobble round in this pattern is worked with the WS facing you.
Gauge and Checkpoints
Gauge:
– Mesh pattern: 16 sts (8 dc + 8 ch-1 sps) and 8 rnds = 4 in (10.2 cm)
– Single crochet: 16 sts and 18 rnds = 4 in (10.2 cm)
Because this is a single piece, the beginning of the holder is your test. Work through Rnd 13 and measure before you continue.
Checkpoints:
– After Rnd 4: The band measures 8 in (20.3 cm) around, or 4 in (10.2 cm) flat.
– After Rnd 7: The holder lies 7 in (17.8 cm) wide flat and is about 1.5 in (3.8 cm) tall.
– After Rnd 13 (first stripe): The total height is about 4 in (10.2 cm).
– After Rnd 31: The total height is about 11.5 in (29.2 cm).
– After Rnd 34: The total height is about 13 in (33.0 cm).
If your piece is too wide, for example 7.5 in (19.1 cm) flat or more, go down one hook size. If it is too narrow, for example 6.5 in (16.5 cm) or less, go up one hook size. Don’t change the stitch counts: the mesh and bobble repeats both rely on 56 stitches.
Bottom Band and Shaping
Start with Color A.
Foundation: Ch 32 and join with a sl st to the first ch to form a ring. Don’t twist the chain.
Rnd 1: Ch 1, then work 1 sc in each ch around. Join with a sl st to the first sc. (32 sts)
Rnds 2–4: Ch 1, then work 1 sc in each st around. Join. (32 sts)
Checkpoint: The band is 8 in (20.3 cm) around and about 0.9 in (2.3 cm) tall. This is the opening the bags come out of.
Rnd 5: Ch 1, then work sc in the next 3 sts, 2 sc in the next st 8 times. Join. (32 + 8 = 40 sts)
Rnd 6: Ch 1, then work sc in the next 4 sts, 2 sc in the next st 8 times. Join. (40 + 8 = 48 sts)
Rnd 7: Ch 1, then work sc in the next 5 sts, 2 sc in the next st 8 times. Join. (48 + 8 = 56 sts)
Checkpoint: The piece is 7 in (17.8 cm) wide flat, and these three rounds have formed the tapered bottom.
Body: Mesh and Bobble Stripes
Each stripe repeat has 6 rounds and adds about 2.5 in (6.4 cm) to the height.
Rnd 8 (mesh, Color A): Ch 4 (counts as dc + ch 1), sk the next st, then work dc in the next st, ch 1, sk the next st 27 times. Join with a sl st to the 3rd ch of the beginning ch-4. (28 dc + 28 ch-1 sps = 56 sts)
Rnd 9 (mesh): Sl st into the first ch-1 sp, ch 4, then work dc in the next ch-1 sp, ch 1 27 times. Join to the 3rd ch of the ch-4. (28 dc + 28 ch-1 sps = 56 sts)
Because each dc sits in a space from the round below, the holes are offset into a honeycomb pattern.
Rnd 10 (mesh): Repeat Rnd 9. (56 sts)
Rnd 11 (sc, Color A): Ch 1, then work sc in the same st, sc in the next ch-1 sp, and sc in the next dc, sc in the next ch-1 sp 27 times. Join. (28 sc into dc + 28 sc into sps = 56 sts)
Rnd 12 (bobble, Color B): Drop A at the back without cutting it. Pull up a loop of B at the join, ch 1 and turn so the WS faces you. Work sc in the first st, then a bobble in the next st, and sc in the next st, bobble in the next st 27 times. Join to the first sc. (28 sc + 28 bobbles = 56 sts)
Rnd 13 (sc, Color B): Ch 1 and turn so the RS faces you. Work 1 sc in each st around, with every bobble pushing out to the front. Join. Cut B and leave a 4 in (10.2 cm) tail. (56 sts)
Checkpoint: You should now see one row of 28 bobbles, 14 on each flat side. The total height is about 4 in (10.2 cm).
Rnds 14–31: Pick up A. Repeat Rnds 8–13 three more times, for a total of 4 bobble stripes. (56 sts every round)
Rnds 32–34 (top mesh, Color A): Repeat Rnds 8, 9 and 10. (56 sts)
Checkpoint: The body is about 13 in (33.0 cm) tall and 7 in (17.8 cm) wide flat.
If you’re making the reversed colorway, just swap colors and follow the same rounds.
Border: Top Rim, Strap and Edging
Border gauge: 16 sc and 18 rnds = 4 in (10.2 cm), the same as the bottom band. The rim must match the body’s 56-stitch circumference so the top doesn’t flare or pucker.
Rnd 35 (Color A): Ch 1, then work sc in the same st, sc in the next ch-1 sp, and sc in the next dc, sc in the next ch-1 sp 27 times. Join. (28 + 28 = 56 sts; 28 per flat side)
Rnds 36–38: Ch 1, then work 1 sc in each st around. Join. (56 sts; 28 per flat side)
Flatten the holder with the round join at one fold. Mark st 1 (the first st of Rnd 38) and st 29 (the first st on the opposite fold). The two strap ends attach at these points, directly across from each other.
Strap
Continue with A without cutting the yarn.
Row 1: Ch 1, then sc in sts 1–6 of Rnd 38. Turn. (6 sts)
Rows 2–45: Ch 1, sc in each st across, turn. (6 sts)
Checkpoint: The strap is about 10 in (25.4 cm) long and 1.5 in (3.8 cm) wide.
Attach the strap: Bring the strap across the opening without twisting it. Place Row 45 against rim sts 29–34 on the outside of the holder. Sl st through both layers across all 6 sts, then fasten off.
Edging
Joining the strap leaves two open edges. Each one runs from the rim, along the strap and back to the rim.
Edging A: Join A in rim st 7. Sl st in sts 7–28 (22 sts), then sl st in each of the 45 strap row ends along the nearest strap edge. Join to the first sl st and fasten off. (22 + 45 = 67 sl sts)
Edging B: Join A in rim st 35. Sl st in sts 35–56 (22 sts), then sl st in each of the 45 row ends along the other strap edge. Join and fasten off. (22 + 45 = 67 sl sts)
Why the math works: The rim has 6 strap sts + 22 open sts + 6 strap sts + 22 open sts = 56, so every rim stitch is used exactly once. One sc row is about 0.22 in tall and one sc stitch is 0.25 in (0.6 cm) wide, so working 1 sl st per row end lies flat without stretching. The strap ends are 28 stitches apart, exactly half of 56, so the holder hangs straight and evenly balanced.
Final Blocking
- Weave in all ends on the WS. Run each B tail along the matching B stripe so it stays hidden.
- Lightly spray the holder until it’s damp but not soaked.
- Roll up a towel and slide it inside to fill the tube.
- Shape the tube so it measures 7 in (17.8 cm) flat and 14 in (35.6 cm) tall. Line up each bobble stripe so it runs horizontally.
- Pinch each bobble from the inside to push it fully to the front.
- Pin the strap flat at 10 in (25.4 cm) long and 1.5 in (3.8 cm) wide.
- Let it dry completely before you hang it up.
Final Quality-Control Checklist
- Every body round has 56 sts, and the bottom band has 32 sts.
- There are 4 bobble stripes, each with 28 bobbles all facing out.
- There are 5 mesh sections (Rnds 8–10, 14–16, 20–22, 26–28 and 32–34).
- The bottom opening is 8 in (20.3 cm) around.
- The flat width is 7 in (17.8 cm) and the height is about 14 in (35.6 cm).
- The strap is attached at sts 1–6 and 29–34 without a twist.
- Both edgings have 67 sl sts.
- All ends are woven in securely.
Troubleshooting
Bobbles point inward: You worked the bobble round with the RS facing you. Rip it back, turn, and work it with the WS facing.
The round seam drifts sideways: Always join into the top of the beginning ch or the first sc, not into the next stitch.
The mesh holes line up instead of staggering: In Rnds 9 and 10, work each dc into the ch-1 sp, not into the dc below.
The bottom opening is too tight for bags: Remake the band with ch 36, then on Rnd 5 work sc 3, 2 sc in next 9 times to get 45 sts. Increase by 9 per round for 54, then work 1 increase in the next round to reach 56.
The strap stretches when the holder is full: Use a smaller hook for the strap rows, or work the edging in sc instead of sl st.
The top flares: Rnd 35 must have exactly 56 sts. Recount, and if needed go down half a hook size for Rnds 36–38.
Care
Hand wash or machine wash on a gentle cold cycle, then reshape and lay flat to dry. Don’t tumble dry, because heat can shrink the cotton and pull the bobble stripes out of line.
Final Notes
This holder relies on one unbroken measurement chain. A 32-stitch band measures 8 in (20.3 cm) around and increases to 56 stitches, or 7 in (17.8 cm) flat. Four stripe repeats of about 2.5 in (6.4 cm) each, plus the top mesh, bring the body to 13 in (33.0 cm). A four-round rim finishes it at about 14 in (35.6 cm), and a 10 in (25.4 cm) strap joined 28 stitches across lets it hang straight. If the checkpoint after Rnd 7 is right, the rest of the holder will come out right too.
Happy crocheting!