

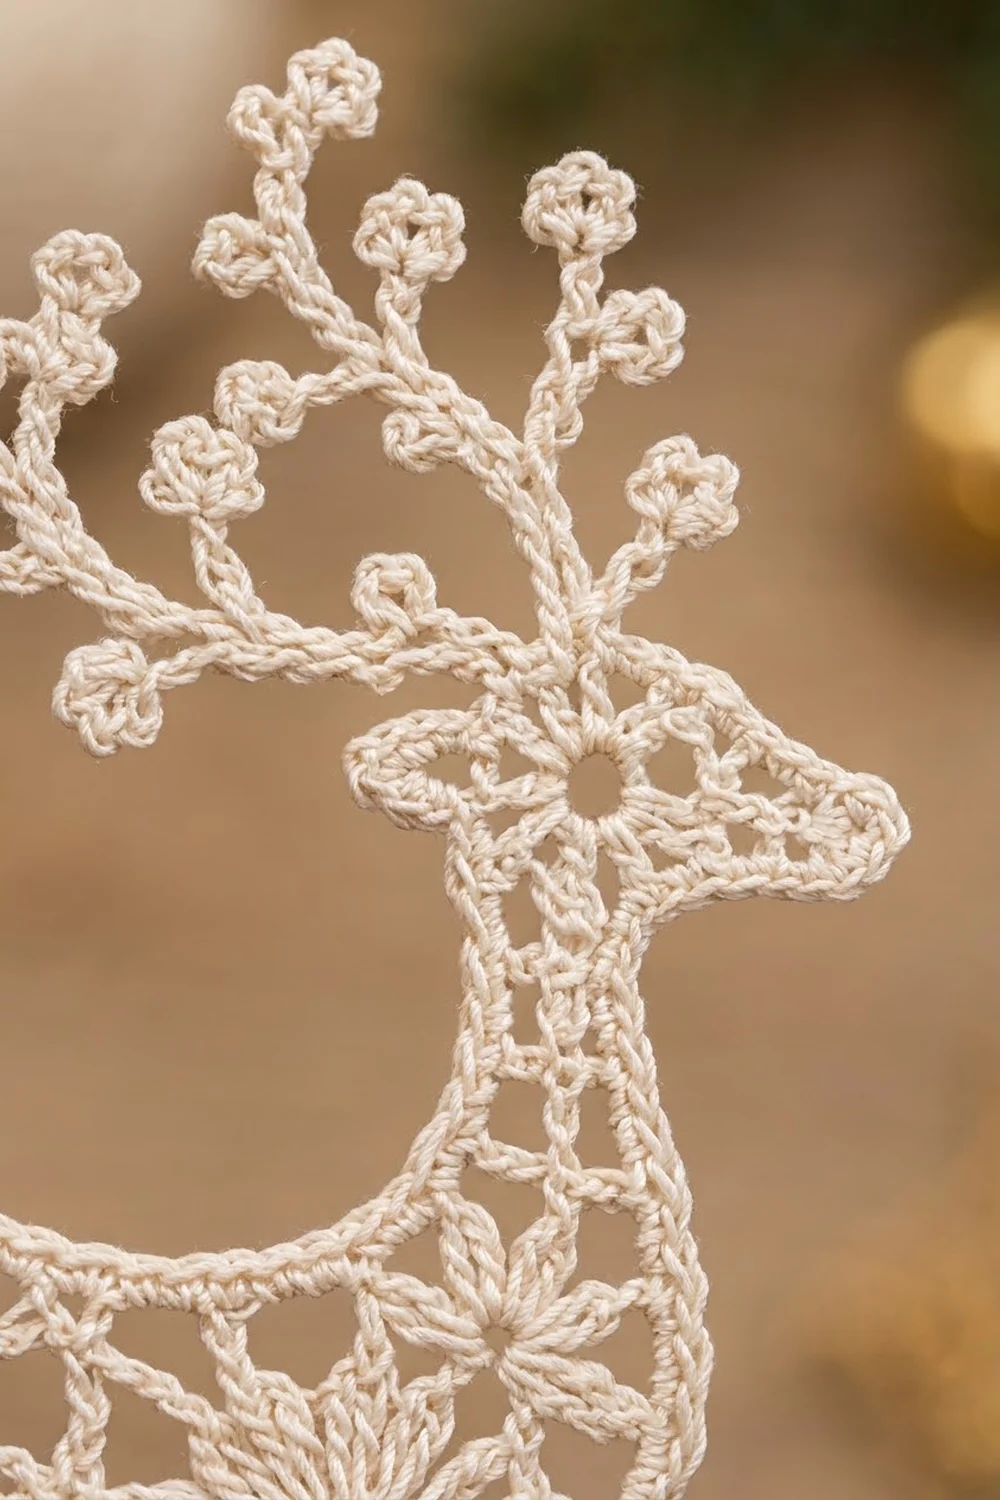
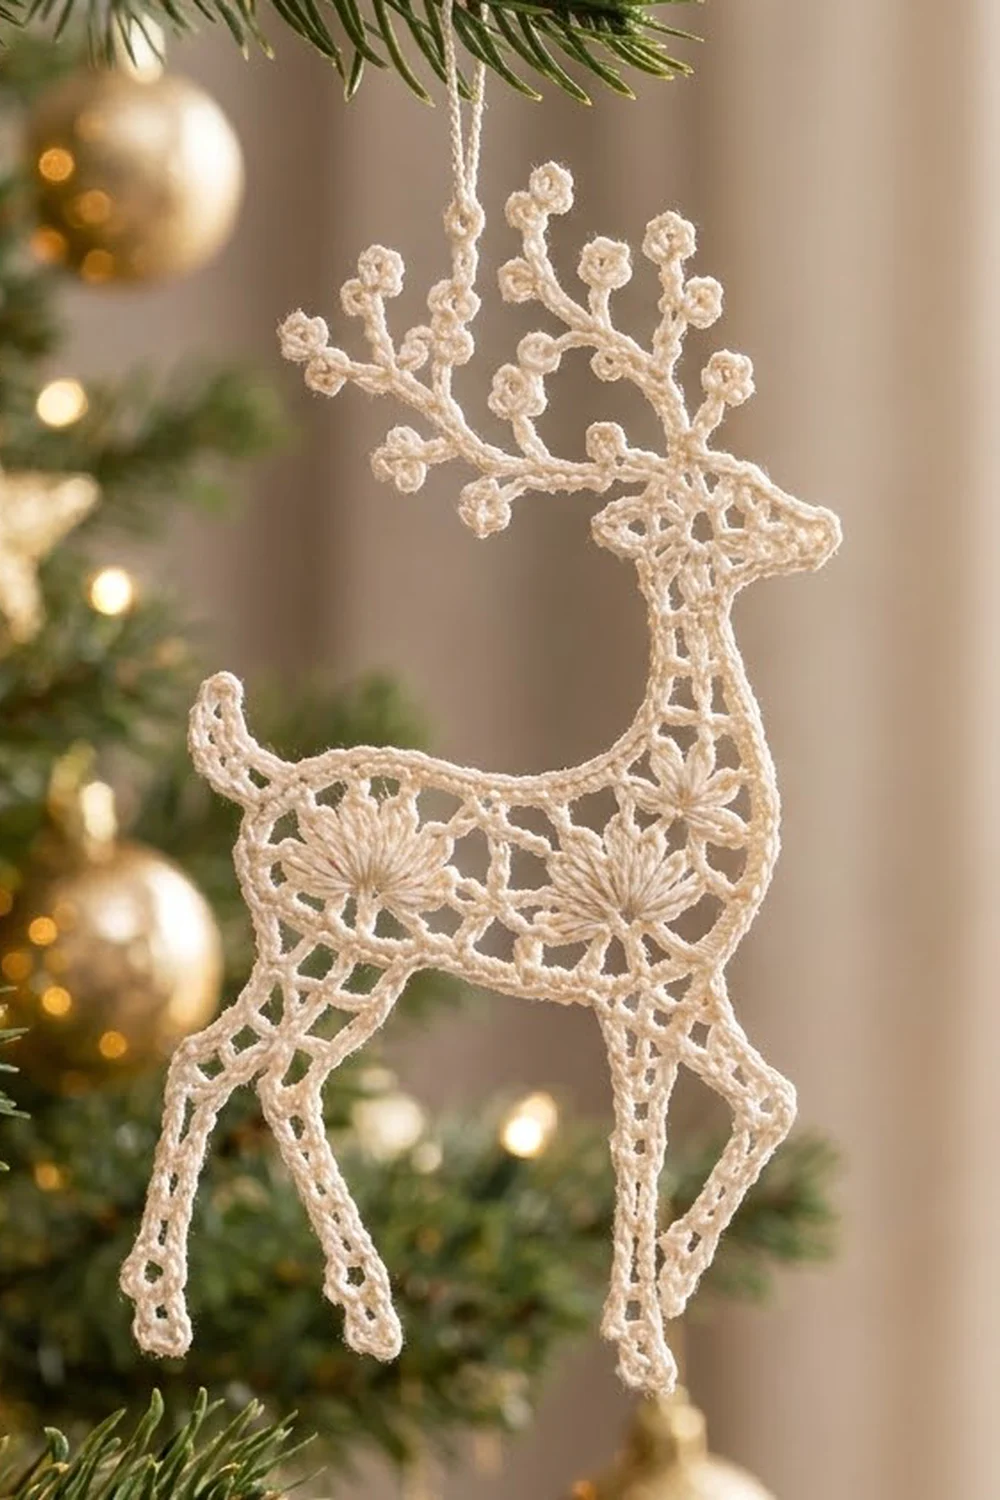
This little reindeer is pure winter lace. It’s a standing deer in profile, worked in fine cream cotton thread. It has a corded outline, an open mesh body, two fan motifs across the belly, and ladder-style legs, with one front leg lifted at the knee. The antlers branch out and end in tiny three-petal buds.
The ornament uses a single color: a soft cream or ivory. The single color is what makes it look like old-fashioned lace, so it shows up well against dark green branches and gold lights.
The pattern is written in US crochet terms. The finished ornament measures about 6.25 in (15.9 cm) tall from hoof to antler tip, not counting the hanging loop, and about 4 in (10.2 cm) wide from tail to nose.
The whole reindeer is crocheted in one piece. You work a small rectangular body panel in rows, add four ladder legs along the bottom edge, then a neck and a short head along the top edge, then two chain-and-bud antlers. An outline border of single crochet and reverse single crochet goes around the whole silhouette and adds the tail and ear as you go. Starching sets the final shape.
Finished Size and Construction
- Finished size: 6.25 in (15.9 cm) tall x 4 in (10.2 cm) wide
- Skill level: Intermediate (thread work, shaping by blocking)
- Terminology: US crochet terms
- Yarn weight: Size 10 crochet cotton thread (lace weight)
- Hook: 1.75 mm (US steel 4)
- Number of pieces: 1 (single-piece ornament, no joining)
- Layout: Standing reindeer in profile, facing right
- Body panel: 2.8 in x 1.4 in (7.1 cm x 3.6 cm)
- Size before border: about 4.9 in (12.4 cm) tall without the antlers, and 3.4 in (8.6 cm) wide
- Border depth: 2 rounds, about 1/8 in (0.3 cm)
Materials
Use a mercerized size 10 cotton thread. It’s smooth and crisp, and it holds starch well. Pick cream, ivory, or ecru. Bright white works too, but it looks colder.
- Cream size 10 cotton thread: 6 g, about 30 m (33 yd)
Tools:
- 1.75 mm (US steel 4) crochet hook
- Fine tapestry needle
- Sharp scissors
- Rust-proof pins and a foam blocking board
- Plastic wrap to cover the board
- Fabric stiffener, white glue mixed 1:1 with water, or spray starch
- Small spray bottle of water
The quantities include a margin of about 30 percent for the gauge swatch, tails, and a frogged row or two.
Abbreviations (US Terms)
- ch – chain
- sl st – slip stitch
- sc – single crochet
- hdc – half double crochet
- dc – double crochet
- tr – treble crochet
- sk – skip
- sp – space
- st(s) – stitch(es)
- tch – turning chain
- rev sc – reverse single crochet (crab stitch): working left to right, insert hook in the next st to the right, yo, pull up a loop, yo, pull through both loops.
Special stitches:
- Fan: 9 tr in the same st.
- Ladder row: Ch 4 (counts as dc + ch 1), turn, sk ch-1 sp, dc in 3rd ch of tch. This makes 3 sts: dc, ch-1 sp, dc.
- Bud: [Ch 3, sl st in 3rd ch from hook] 3 times, then sl st in the base of the first picot. This makes a three-petal cluster.
Gauge and Checkpoints
Gauge: 10 dc and 3 dc rows = 1 in (2.5 cm), worked with size 10 thread and a 1.75 mm hook.
Make the body panel first and use it as your swatch. Every other part of the reindeer is sized from it.
- Checkpoint 1, after body Row 1: 28 dc should measure 2.8 in (7.1 cm) across.
- Checkpoint 2, after body Row 4: The panel should measure 2.8 in x 1.4 in (7.1 cm x 3.6 cm) when lightly pressed flat.
- Checkpoint 3, each leg: 2.1 in (5.3 cm) long.
- Checkpoint 4, neck: 1 in (2.5 cm) tall.
- Checkpoint 5, head: about 1.1 in (2.8 cm) long and 0.4 in (1.0 cm) tall.
If your panel is too big, go down to a 1.5 mm hook. If it’s too small, go up to a 2.0 mm hook. A difference of about 1/8 in (0.3 cm) is fine, because blocking evens it out. If the width is right but your rows are too tall, wrap the thread a little more snugly on each yarn over instead of changing hooks.
Body Panel
The body is worked in rows. The fans sit on the belly and open upward, and a final dc row closes the top to form the back.
Foundation: Ch 30.
Row 1: Dc in 4th ch from hook and in each ch across. The skipped 3 ch count as the first dc. (28 sts)
Row 2 (fan row): Ch 1, turn. Sc in first st, ch 3, sk 3 sts, sc in next st (st 5). Sk 3 sts, fan in next st (st 9), sk 3 sts, sc in next st (st 13). Ch 3, sk 2 sts, sc in next st (st 16). Sk 3 sts, fan in next st (st 20), sk 3 sts, sc in next st (st 24). Ch 3, sk 3 sts, sc in last st (st 28).
(6 sc + 18 tr = 24 sts, plus 3 ch-3 sps)
Row 3 (tie-in row): Ch 5 (counts as tr + ch 1), turn. Sk ch-3 sp, sc in 2nd tr of fan. [Ch 3, sk 1 tr, sc in next tr] 3 times; the last sc goes in the 8th tr. Ch 2, tr in center ch-3 sp, ch 2. Sc in 2nd tr of next fan, [ch 3, sk 1 tr, sc in next tr] 3 times. Ch 1, tr in last sc.
(3 tr + 8 sc = 11 sts, plus 2 ch-1 sps, 2 ch-2 sps, 6 ch-3 sps)
Row 4 (back row): Ch 3 (counts as dc), turn. Dc in ch-1 sp, dc in next sc. [2 dc in ch-3 sp, dc in next sc] 3 times. Work 2 dc in ch-2 sp, sk center tr, 2 dc in next ch-2 sp. Dc in next sc, then repeat from * to * once. Dc in ch-1 sp, dc in 4th ch of tch.
(3 + 9 + 4 + 10 + 2 = 28 sts)
Row 4 has the same count as Row 1, so the panel stays rectangular. Fasten off.
Orientation: Lay the panel with Row 4 on top. The fan rows are symmetrical, so choose either short end as the chest. Number the Row 4 sts 1–28, starting at the rump end. Number the 28 stitch bases along the foundation edge the same way, rump to chest. The tch counts as one base.
Legs (make 4)
Each leg is a ladder strip worked down from the foundation edge.
| Leg | Bases | Position |
|---|---|---|
| A (hind) | 1–3 | Flush with rump |
| B (hind) | 5–7 | Inner hind leg |
| C (front) | 21–23 | Standing front leg |
| D (front, lifted) | 26–28 | Flush with chest |
Row 1: Join with sl st in the first base of the leg. Ch 4 (counts as dc + ch 1), sk next base, dc in next base. (3 sts)
Rows 2–6: Work a ladder row. (3 sts each row)
Row 7 (hoof): Ch 1, turn. Sc in dc, sc in ch-1 sp, sc in 3rd ch of tch. (3 sc) Fasten off.
Leg D knee: Work Leg D the same way, but replace Row 3 with a wedge row. Row 3 begins at the rump side.
Row 3 (wedge): Ch 3 (counts as hdc + ch 1), turn. Sk ch-1 sp, tr in top of tch. (3 sts)
On Row 4, work the last dc into the 2nd ch of the beginning ch-3. The short hdc rail on the rump side bends the lower leg backward, so the leg looks lifted.
Checkpoint 3: Each leg is 2.1 in (5.3 cm) long from the belly to the hoof.
Neck and Head
Neck Row 1: With Row 4 facing, join with sl st in st 24. Ch 4 (counts as dc + ch 1), sk st 25, dc in st 26, ch 1, sk st 27, dc in st 28. (5 sts)
Neck Rows 2–3: Ch 4 (counts as dc + ch 1), turn. Sk sp, dc in next dc, ch 1, sk sp, dc in 3rd ch of tch. (5 sts each row) Row 3 ends on the chest side.
Checkpoint 4: The neck is 1 in (2.5 cm) tall.
Head Row 1: Ch 8 for the muzzle. Sc in 2nd ch from hook and in the next 6 ch, which gives 7 sc. Sc in each of the 5 sts across neck Row 3. (12 sc) You end at the back of the head.
Head Row 2: Ch 3 (counts as dc), turn. Dc in next 4 sts, hdc in next 4 sts, sc in next 3 sts. (12 sts) The row starts tall at the crown and tapers down to the nose. Fasten off.
Checkpoint 5: The head is about 1.1 in (2.8 cm) long and 0.4 in (1.0 cm) tall.
Antlers
Count the head Row 2 sts from the back of the head. The tch is st 1.
Back antler: Join with sl st in st 3. Ch 18 for the beam. Make a bud at the tip.
- Sl st in next 4 beam ch, working back toward the head. Ch 6, make a bud, then sl st in each of the 6 ch back to the beam.
- Sl st in next 4 beam ch. Ch 7, make a bud, then sl st in each of the 7 ch back to the beam.
- Sl st in next 4 beam ch. Ch 5, make a bud, then sl st in each of the 5 ch back to the beam.
- Sl st in the remaining 5 beam ch, then sl st in st 3 of the head. Fasten off.
Check: the beam has 18 ch. The tip bud sits on ch 18, and the 4 + 4 + 4 + 5 = 17 sl sts take you back down to ch 1.
Front antler: Join with sl st in st 5. Ch 14 for the beam. Make a bud at the tip.
- Sl st in next 4 beam ch. Ch 5, make a bud, then sl st back down the 5 ch.
- Sl st in next 4 beam ch. Ch 6, make a bud, then sl st back down the 6 ch.
- Sl st in the remaining 5 beam ch, then sl st in st 5. Fasten off.
Check: the tip bud sits on ch 14, and the 4 + 4 + 5 = 13 sl sts take you back down to ch 1.
Each branch is backed with sl sts, which makes a doubled, slightly beaded line. Each one ends in a three-petal bud.
Border
Border gauge: Work 2 sc per dc row-end, 3 sc per tr row-end, and 1 sc per sc or hdc row-end. Along stitch tops and foundation bases, work 1 sc per st.
Round 1: Join with sl st in Row 4 st 1, the top corner of the rump.
Tail: Ch 6. Work 2 sc in 2nd ch from hook, 2 sc in next ch, and sc in next 3 ch. Sl st in the same st 1. The extra stitches on one side make the tail curl. The tail stitches are not counted in the round total.
Ch 1, then work sc around the outline clockwise as follows:
| Segment | Count |
|---|---|
| Back, Row 4 sts 1–23 | 23 sc |
| Back of neck, 3 dc row-ends x 2 | 6 sc |
| Back of head, 1 sc row-end + 1 dc row-end (1 + 2) | 3 sc |
| Top of head, sc in 11 sts, 3 sc in nose st | 14 sc |
| Under jaw, free loops of muzzle ch | 7 sc |
| Front of neck, 3 dc row-ends x 2 | 6 sc |
| Chest, body row-ends: dc 2 + tr 3 + sc 1 + dc 2 | 8 sc |
| Leg D: 13 down + 5 hoof + 13 up | 31 sc |
| Gap, bases 24–25 | 2 sc |
| Leg C | 31 sc |
| Belly, bases 8–20 | 13 sc |
| Leg B | 31 sc |
| Gap, base 4 | 1 sc |
| Leg A | 31 sc |
| Rump, body row-ends | 8 sc |
Work the ear after the 1st sc of the back-of-head segment. Ch 5, sl st in 2nd ch from hook, sc in next ch, hdc in next ch, dc in last ch, then sl st in the same st. The ear isn’t counted in the round total.
Leg sides: On a standard leg, each side has 6 dc row-ends x 2 sc, plus 1 sc for the hoof row-end, for 13 sc. On Leg D, the hdc side has 10 + 1 + 1 = 12 sc and the tr side has 10 + 3 + 1 = 14 sc. Both sides together still make 26 sc, the same as a standard leg.
Hoof: Sc in first sc, 3 sc in center sc, sc in last sc. (5 sc)
Sl st to the first sc. (215 sc)
Total: 23 + 6 + 3 + 14 + 7 + 6 + 8 + 31 + 2 + 31 + 13 + 31 + 1 + 31 + 8 = 215.
Round 2: Ch 1, do not turn. Work rev sc in each sc around, passing behind the tail. Sl st to the first st. (215 rev sc) Fasten off.
Hanging loop: Join with sl st at the base of the back antler’s tip bud. Ch 25, sl st in the same place. Fasten off. The loop hangs about 1 in (2.5 cm).
Why the math works:
- A dc row is about as tall as 2 sc and a tr row is about as tall as 3 sc, so these ratios keep the row-end edges flat.
- Every leg totals 31 sc, whether it’s straight or wedged.
- The three belly segments (13 + 2 + 1 = 16 sc) plus the 12 bases under the legs use all 28 foundation bases.
- The 3-sc corners at the nose and hooves give those points the extra stitches they need.
- Round 2 is worked 1 rev sc per sc, so it adds a corded edge of about 1/8 in (0.3 cm) without changing the shape.
Final Blocking
- Weave in all ends along the border and trim them close.
- Soak the reindeer in stiffener, then squeeze out the excess. Don’t wring it.
- Lay it on the plastic-covered board, facing right.
- Pin the body panel to 2.8 in x 1.4 in (7.1 cm x 3.6 cm). Round the rump and chest corners slightly.
- Pin each leg straight to 2.1 in (5.3 cm). Angle the hind legs back slightly at mid-leg, and pin Leg D bent at the knee.
- Tilt the neck slightly forward and pin the head level.
- Spread the antler branches so they alternate up and back, and pin each bud open.
- Open each fan and each mesh space with a pin.
- Check the overall size: 6.25 in x 4 in (15.9 cm x 10.2 cm).
- Let it dry completely, about 24 hours, before you unpin it.
Final Quality-Control Checklist
- Body Rows 1 and 4 each have 28 sts.
- Both fans have 9 tr and open evenly.
- All four legs are 2.1 in (5.3 cm) and end in pointed hooves.
- Leg D bends cleanly at the wedge row.
- The head is 12 sts long and tapers to the nose.
- Border Round 1 has 215 sc, and Round 2 has 215 rev sc.
- The tail curls and the ear points back.
- Every antler branch ends in a full three-petal bud.
- The ornament is stiff and flat, and it hangs straight from the loop.
Troubleshooting
- Fans ruffle or cup: Your Row 3 tension is too tight. Loosen the ch-3 sps, or make them ch 4.
- Back edge pulls in narrower than the belly: Check that Row 4 has 28 sts. Don’t skip the 2 dc in each ch-2 sp.
- Legs twist: Always skip the ch-1 sp and work into the tch. Starch fixes a mild twist.
- Border waves: Work 1 fewer sc per tr row-end.
- Border pulls in: Go up a hook size for Round 1 only.
- Antler branches droop: Stiffen them again and re-pin the buds.
- Leg D doesn’t bend: Make sure the hdc rail is on the rump side.
Care
Dust it gently, or spot clean with cool water, then re-starch and re-pin it to shape. Store it flat between sheets of tissue paper.
Final Notes
Each measurement builds on the one before it:
- A gauge of 10 dc per 1 in (2.5 cm) gives a body of 2.8 in x 1.4 in (7.1 cm x 3.6 cm).
- Legs of 2.1 in (5.3 cm), a neck of 1 in (2.5 cm), and a head of 0.4 in (1.0 cm) bring the reindeer to 4.9 in (12.4 cm) before the antlers.
- The antlers and the 215-stitch border bring it to 6.25 in x 4 in (15.9 cm x 10.2 cm).
Check each step as you go, and the finished reindeer will match.
Happy crocheting!