

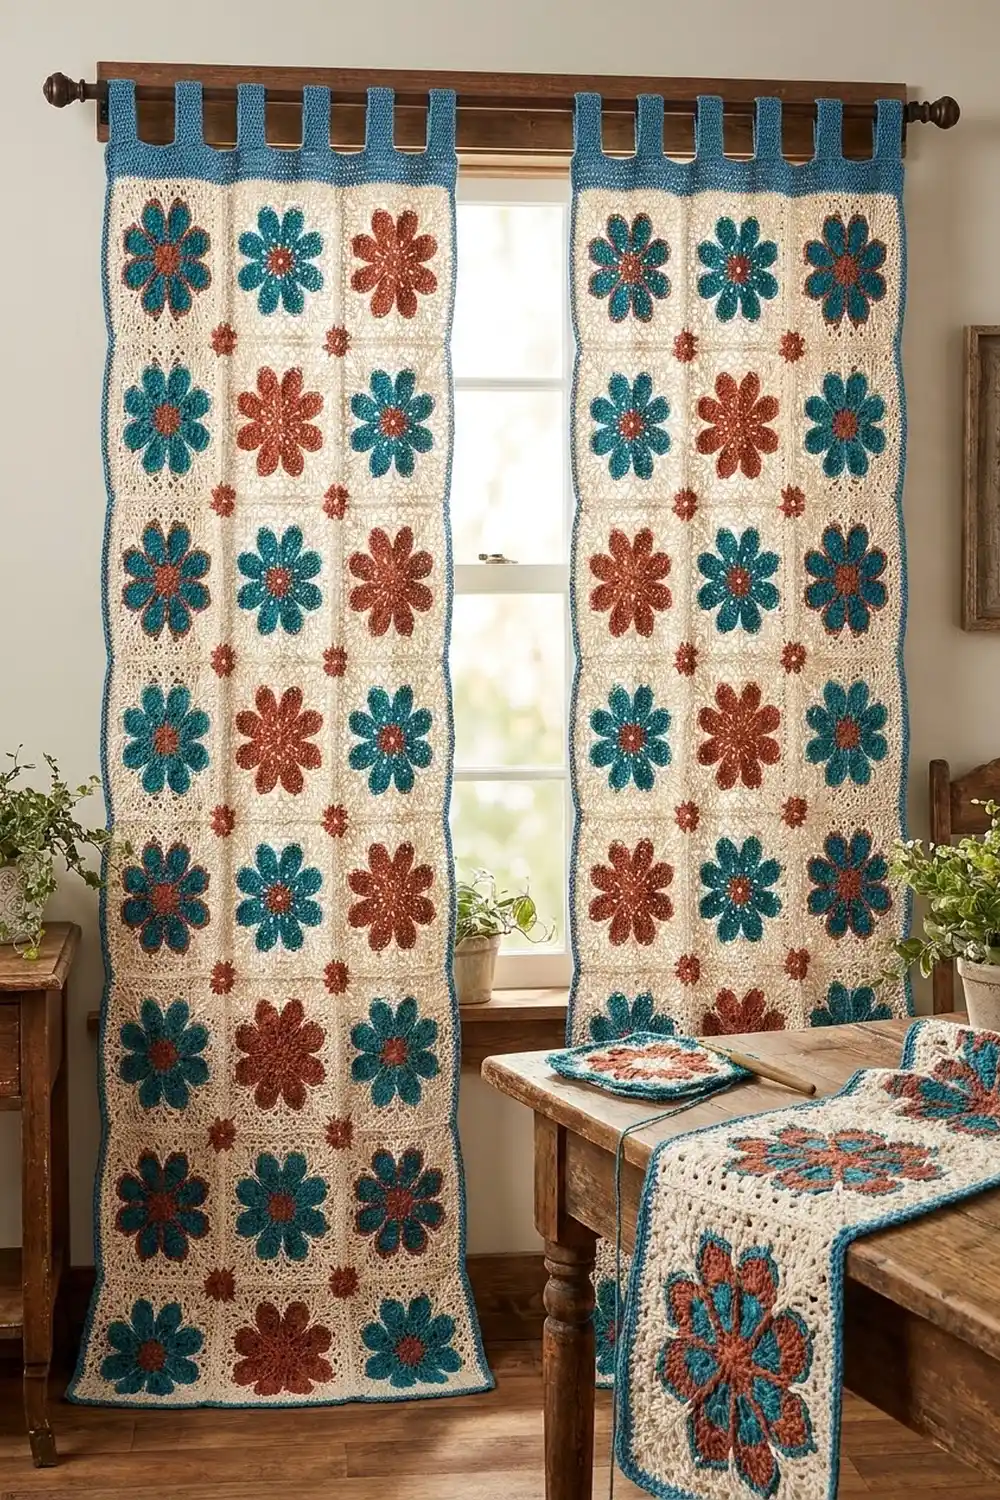
This curtain panel is built from 36 identical flower squares joined into a grid of 3 squares across and 12 squares down. Each square has an eight-petal flower with rust petal centers inside thick blue outlines, set in a lacy cream frame. Small rust star flowers sit over each place where four squares meet, and the panel hangs from six blue tabs.
The palette is deep teal-blue, warm rust, and natural cream. The result looks like a classic boho or farmhouse piece. Because the cream frames are open, daylight comes through the lace while the flowers still show up clearly against the window.
This pattern uses US crochet terms. One finished panel measures 22.2 in (56.4 cm) wide and 86.2 in (218.9 cm) long from the bottom edge to the top of the band. The tab loops add 3 in (7.6 cm) above the band. For a pair like the one in the photo, make two panels.
Construction is simple. You crochet the squares in the round and join them as you go on the last round. Then you sew on the 22 small rust stars, work a three-round cream border, and finish with a blue top band and tabs worked in rows.
Finished Size and Construction
- Finished panel: 22.2 in x 86.2 in (56.4 cm x 218.9 cm), plus 3 in (7.6 cm) tab loops
- Skill level: Intermediate
- Terminology: US crochet terms
- Yarn weight: Worsted (#4) cotton or cotton blend
- Hook: 5.0 mm (US H-8)
- Number of pieces: 36 flower squares + 22 star fillers per panel
- Layout: 3 squares wide x 12 squares long
- Square size: 7 in (17.8 cm) after Rnd 8
- Size before border: 21 in x 84 in (53.3 cm x 213.4 cm)
- Border depth: 0.6 in (1.5 cm) per edge, plus a 1 in (2.5 cm) blue top band
Materials
Use a smooth, mercerized or matte worsted cotton. Cotton holds its shape when it hangs and won’t stretch much over time, which matters for a long curtain. Avoid fuzzy yarn because it hides the openwork.
Quantities for one panel, assuming about 190 m per 100 g:
- Color A – Rust: 250 g / 475 m (flower centers and star fillers)
- Color B – Teal Blue: 400 g / 760 m (petal outlines, top band, tabs)
- Color C – Cream: 500 g / 950 m (square frames, joins, border)
Double these amounts for a pair. All quantities include a margin of about 15% for gauge differences and swatching.
Tools:
- 5.0 mm (US H-8) crochet hook
- Tapestry needle
- Stitch markers (at least 4)
- Scissors
- Measuring tape
- Blocking mats and rustproof pins
- Spray bottle
Abbreviations (US Terms)
- ch – chain
- sl st – slip stitch
- sc – single crochet
- hdc – half double crochet
- dc – double crochet
- tr – treble crochet
- sp(s) – space(s)
- MR – magic ring
- RS / WS – right side / wrong side
Special stitch – Picot: Ch 3, sl st in the first ch.
Special technique – Joined loop (JAYG): Instead of ch 3, work ch 1, sl st into the matching loop of the finished neighbor square, ch 1.
Gauge and Checkpoints
Make one complete square before anything else, then wash and block it. This is your gauge swatch. Gauge matters here because of the length: an error of 0.25 in (0.6 cm) per square adds up to 3 in (7.6 cm) over the 12 rows of squares.
Checkpoints for one square, measured flat:
- After Rnd 3: flower measures 3.5 in (8.9 cm) across, tip to tip
- After Rnd 5: flower measures 5 in (12.7 cm) across, tip to tip
- After Rnd 7: square measures 6.25 in (15.9 cm) side to side
- After Rnd 8: square measures 7 in (17.8 cm) side to side
Border gauge: 38 sc = 7 in (17.8 cm) along the joined edge.
If your square is too big, go down half a hook size. If it’s too small, go up half a size. If only the flower is off and the frame matches, adjust your tension on the tall stitches in Rnds 3 and 6 rather than changing hooks.
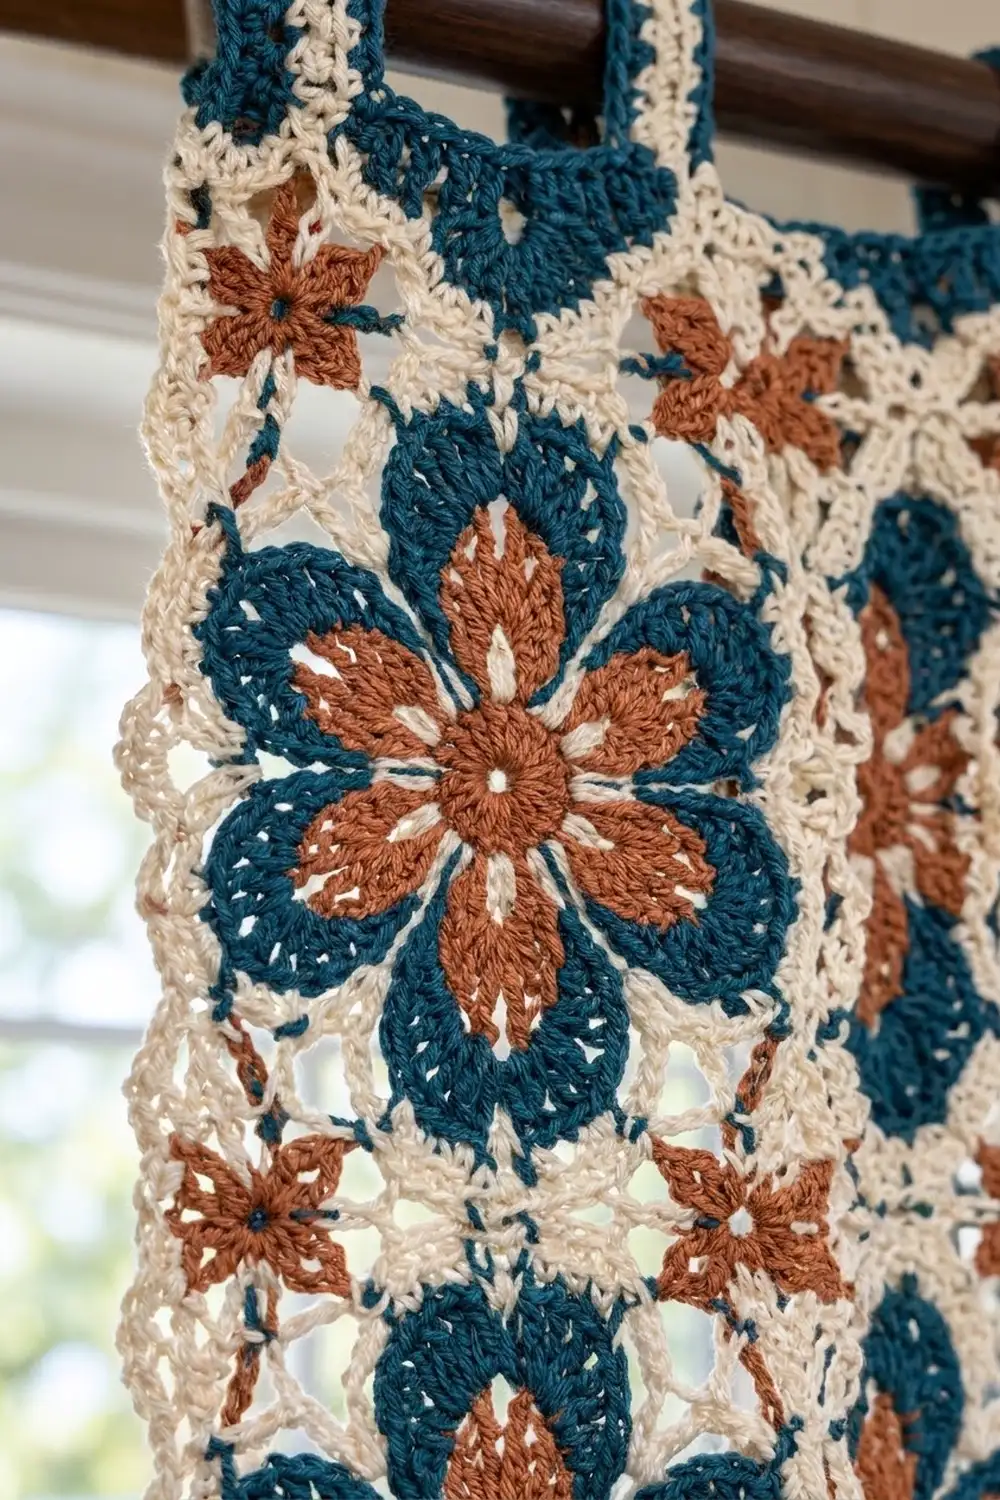
Flower Square (Make 36)
Flower Center (Color A – Rust)
Rnd 1: MR, ch 3 (counts as dc), 15 dc in ring, join with sl st to top of ch-3. (16 dc)
Rnd 2: Ch 3 (counts as dc), dc in same st, 2 dc in each st around, join. (32 dc)
Rnd 3 (petals): Ch 1, sc in next st, skip 1 st, (dc, tr, ch 1, tr, dc) in next st, skip 1 st; repeat from * 7 more times, join to first sc. (8 petals: 8 sc + 32 petal sts = 40 sts, plus 8 ch-1 tip sps)*
Each repeat uses 4 stitches of Rnd 2, so 8 repeats use all 32. Fasten off. Check that the flower measures 3.5 in (8.9 cm).
Petal Outline (Color B – Teal Blue)
Rnd 4: Join B with sc in any sc of Rnd 3. Hdc in dc, 2 dc in tr, (dc, ch 2, dc) in ch-1 sp, 2 dc in tr, hdc in dc, sc in next sc; repeat from * around, ending the last repeat at hdc. Join to first sc. (9 sts per petal = 72 sts, plus 8 ch-2 sps)*
Rnd 5: Ch 1. Sc in sc, hdc in hdc, dc in next dc, 2 dc in next dc, dc in next dc, (2 dc, ch 2, 2 dc) in ch-2 sp, dc in next dc, 2 dc in next dc, dc in next dc, hdc in hdc; repeat from * around, join. (15 sts per petal = 120 sts, plus 8 ch-2 sps)*
This is a growth round. Each petal side goes from 4 to 5 stitches, and the tip goes from 2 to 4, which makes the bold blue outline. Fasten off. The flower should measure 5 in (12.7 cm).
Square Frame (Color C – Cream)
Label the petal tips in order: tips 1, 3, 5 and 7 are corner tips, and tips 2, 4, 6 and 8 are side tips. The sc between two petals is a valley.
Rnd 6 (conversion round): Join C with sl st in a corner-tip ch-2 sp. Ch 4 (counts as tr), ch 3, tr in same sp. Ch 3, tr in next valley sc, ch 3, sc in next side-tip ch-2 sp, ch 3, tr in next valley sc, ch 3, (tr, ch 3, tr) in next corner-tip sp; repeat from * around, omitting the last corner. Join to top of ch-4. (16 tr + 4 sc = 20 sts, plus 20 ch-3 sps)*
The tall tr in the valleys and at the corners pull the round flower into a square, while the short sc at the side tips keeps the middle of each side flat.
Rnd 7 (conversion round): Sl st into corner ch-3 sp. Ch 3 (counts as dc), (2 dc, ch 3, 3 dc) in same sp. *Dc in next tr, [3 dc in next ch-3 sp, dc in next st] 4 times, (3 dc, ch 3, 3 dc) in corner sp; repeat from * around, omitting the last corner. Join.
Count per side: 3 (corner half) + 5 (1 per existing stitch) + 12 (3 in each of 4 sps) + 3 (corner half) = 23 dc between corner ch-3 sps, so 92 dc total plus 4 corner ch-3 sps. The square should measure 6.25 in (15.9 cm).
Rnd 8 (loop edge): Sl st into corner sp. Ch 1, (sc, ch 5, sc) in corner sp. *Ch 2, skip 1 dc, sc in next dc, [ch 3, skip 1 dc, sc in next dc] 10 times, ch 2, skip last dc, (sc, ch 5, sc) in corner sp; repeat from * around, omitting the last corner. Join.
Per side: 11 sc, 10 ch-3 loops, 2 ch-2 sps, and a ch-5 corner loop at each end. The square now measures 7 in (17.8 cm).
For the first square, work Rnd 8 as written. For every other square, work Rnd 8 with joins (see Joining below).
Star Filler (Make 22, Color A – Rust)
Rnd 1: MR, ch 1, 8 sc in ring, join. (8 sc)
Rnd 2: Ch 4, sc in 2nd ch from hook, hdc in next ch, dc in next ch, sl st in next sc of Rnd 1; repeat from * 7 more times. (8 points)*
Fasten off and leave a 10 in (25.4 cm) tail. Each star measures 1.75 in (4.4 cm) across.
Make All Pieces
For one panel:
- 36 flower squares (A, B and C in every square)
- 22 star fillers (A only)
Layout grid (S = square, * = star at an inner corner):
S   S   S
  *   *
S   S   S
  *   *
S   S   S
 ... 12 rows of squares total ...
  *   *
S   S   S
There are 2 inner intersections between each pair of rows and 11 gaps between rows, so 2 x 11 = 22 stars.
Joining
Join as you go on Rnd 8 using joined loops.
Side join: When you reach a side that touches a finished square, work the corner as (sc, ch 2, sl st into neighbor’s ch-5 corner loop, ch 2, sc). Then work ch 2, skip 1, sc, and replace each of the 10 ch-3 loops with a joined loop: ch 1, sl st into the matching ch-3 loop of the neighbor, ch 1. Finish with ch 2, skip 1, and the next joined corner.
Stitch-to-stitch logic: The 10 loops on one side match the 10 loops on the neighbor’s side exactly, and the ch-2 end spaces sit opposite each other without joining. Nothing is added or skipped along the seam.
Four-way corners: When three corners are already joined, sl st into the existing joining sl st rather than into a loop. This keeps the center flat.
Tension: Keep the joining sl st loose, about the height of a ch. A tight sl st will make the seams pucker and the panel will come out short.
Size checkpoint: After the first row of 3 squares, the strip should measure 21 in (53.3 cm). After 4 rows of squares, the length should be 28 in (71.1 cm). The full grid is 21 in x 84 in (53.3 cm x 213.4 cm).
When the grid is done, center one star RS up over each inner four-way intersection. Using the tail, whipstitch the center ring and the tip of each point onto the cream joins.
Border
Border gauge: 38 sc = 7 in (17.8 cm).
Rnd 1 (Color C): Join C in the ch-5 corner loop at the top-right of the panel. Work into the chain loops only, skipping the Rnd 8 sc stitches. For each square side along the edge, work: 2 sc in corner ch-5 loop, 2 sc in ch-2 sp, 3 sc in each of 10 ch-3 loops, 2 sc in ch-2 sp, 2 sc in the next corner ch-5 loop. (38 sc per square side) At the 4 panel corners, work (2 sc, ch 2, 2 sc) in the single corner loop. The first 2 sc belong to one side and the last 2 belong to the next. Join.
- Short sides: 3 x 38 = 114 sc
- Long sides: 12 x 38 = 456 sc
Why the math works: Each 38-st square side already includes its own 2 sc for each of its corner loops. At a seam between two squares, there are two corner loops, one from each square, so the 4 sc there are already counted. Nothing extra is added per seam. 114 sc at 38 sc per 7 in comes to exactly 21 in (53.3 cm).
Rnd 2 (Color C): Ch 1, sc in each sc, (sc, ch 2, sc) in each corner ch-2 sp. Join. (Short sides 116 sc, long sides 458 sc between corner sps: 114 + 2 and 456 + 2)
Rnd 3 (Color C, picot): Ch 1. Along the top edge, sc in each sc. Along the other three sides, *sc in next 2 sc, picot; repeat from * to corner. In each corner, (sc, ch 2, sc). Join and fasten off.
- Top: 118 sc, no picots
- Bottom: 118 sc + 59 picots
- Long sides: 460 sc + 230 picots each
The border adds 0.6 in (1.5 cm) on each edge, so the panel is now 22.2 in (56.4 cm) wide.
Top Band and Tabs (Color B)
Row 1: With RS facing, join B in the first corner sc of the top edge. Ch 1, sc in each of 118 sc. Turn. (118 sc)
Rows 2–4: Ch 1, sc in each sc. Turn. (118 sc) The band measures 1 in (2.5 cm).
Tab placement (118 sts): 5 sts at the edge + 6 tabs of 8 sts + 5 gaps of 12 sts + 5 sts at the edge = 5 + 48 + 60 + 5 = 118.
Tabs: Join B in the first stitch of the tab. Ch 1, sc in 8 sts, turn. Work 25 more rows of 8 sc. (26 rows, 6 in / 15.2 cm) Fasten off and leave a long tail. Fold the tab to the WS and whipstitch the last row to Row 1 of the band. This makes a loop 3 in (7.6 cm) tall that fits a rod up to 1.5 in (3.8 cm) across.
Final Blocking
- Weave in all ends along cream joins or inside matching colors.
- Soak the panel in cool water for 15 minutes. Press out the water; don’t wring.
- Roll it in towels to remove more water.
- Lay it flat on mats. Pin the outer corners to 22.2 in x 86.2 in (56.4 cm x 218.9 cm).
- Pin along each seam line so every square sits at 7 in (17.8 cm).
- Pin out the picots and the corner loops of each square.
- Let it dry completely before you unpin, usually 24–48 hours.
- Hang the panel for a day so the weight can settle the tabs.
Final Quality-Control Checklist
- Every square has 8 petals, with the rust center fully outlined in blue
- Every square measures 7 in (17.8 cm)
- Each seam has 10 joined loops plus joined corners
- All 22 stars are centered and stitched at every point
- Border Rnd 1: 114 / 456 sc
- Border Rnd 3: 118 / 460 sc, with picots on three sides
- The 6 tabs are evenly spaced and the same length
- The panel hangs straight, and its side edges don’t flare
Troubleshooting
Flower cups or ruffles: Your Rnd 4–5 tension is off. Ruffling means the stitches are too loose, so go down a hook size for the blue rounds. Cupping means they’re too tight.
Square isn’t square: Check that you put the (tr, ch 3, tr) on alternating petal tips in Rnd 6.
Seams pucker: The joining sl st is too tight. Redo it with a looser stitch.
Holes at four-way corners: Join into the existing sl st, not into a loop. The star will cover small gaps.
Border waves: Count to 38 sc per square side. Extra stitches cause ruffling.
Panel too long after hanging: Cotton can drop a little. Block it again and let it dry flat.
Care
Hand wash or machine wash on a cold delicate cycle inside a large mesh bag. Lay it flat to dry and reshape it while damp.
Final Notes
The measurements build on each other step by step. A 3.5 in (8.9 cm) center grows to a 5 in (12.7 cm) flower, then to a 6.25 in (15.9 cm) frame and a 7 in (17.8 cm) square. Twelve rows of 3 squares make a 21 in x 84 in (53.3 cm x 213.4 cm) grid. The 0.6 in (1.5 cm) border and 1 in (2.5 cm) band bring the panel to 22.2 in x 86.2 in (56.4 cm x 218.9 cm). If your squares match at each checkpoint, the finished panel will too.
Happy crocheting!