

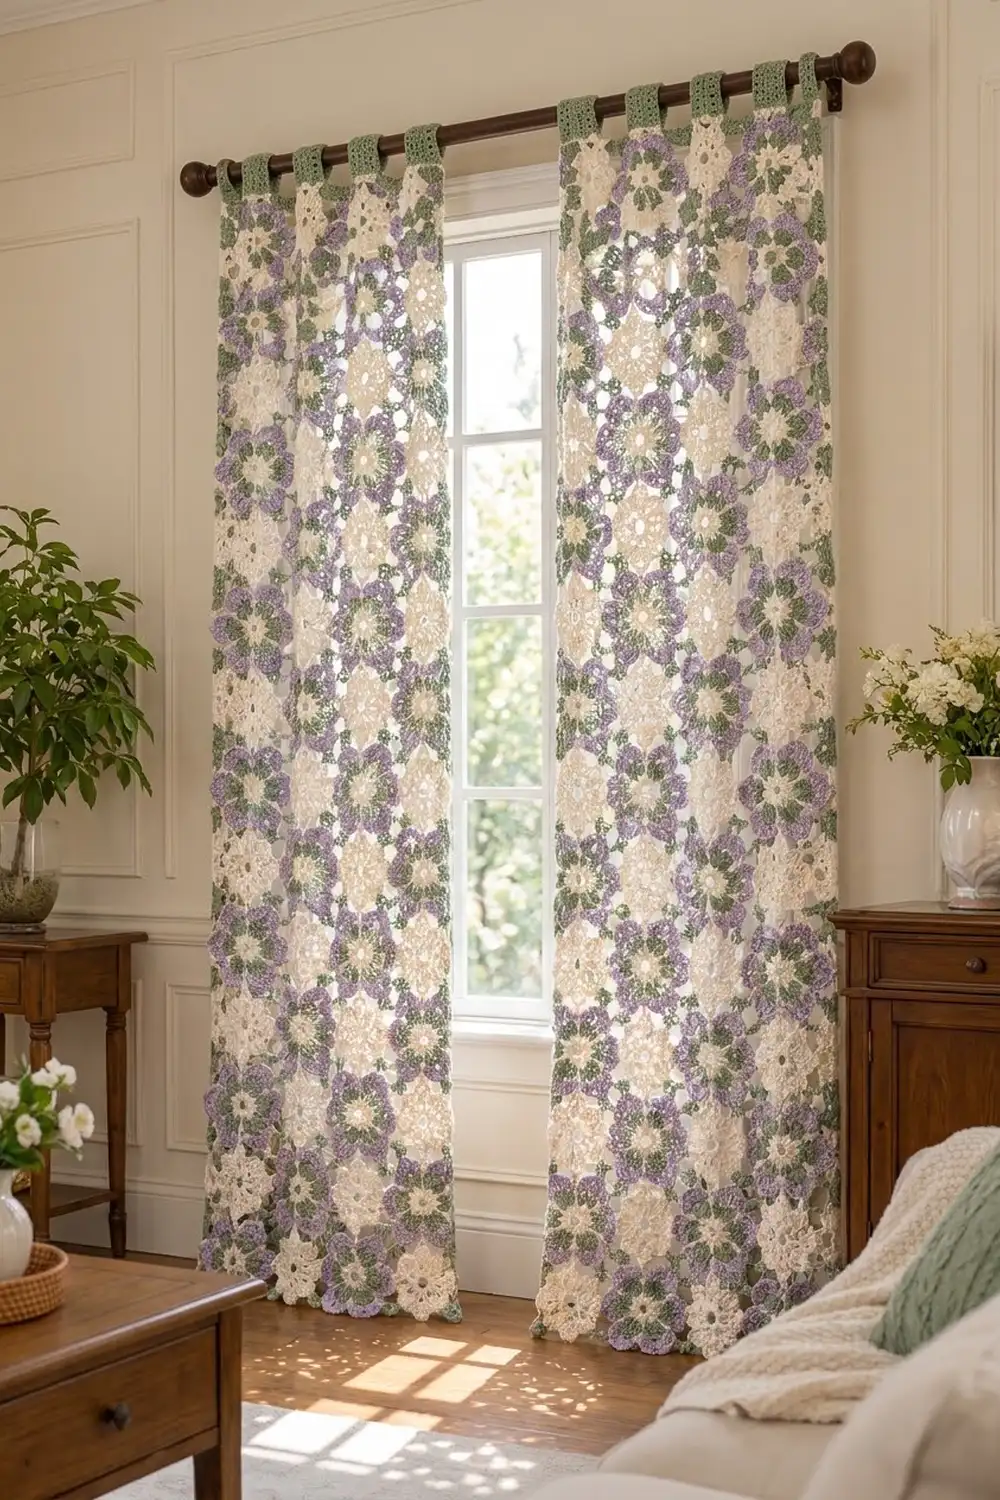
Lavender Garden is a pair of airy tab-top curtains made from six-petal flower motifs. Each flower sits inside a sage-green openwork frame. When you join the frames, they form a soft lattice that lets daylight through and holds the flowers in a neat grid.
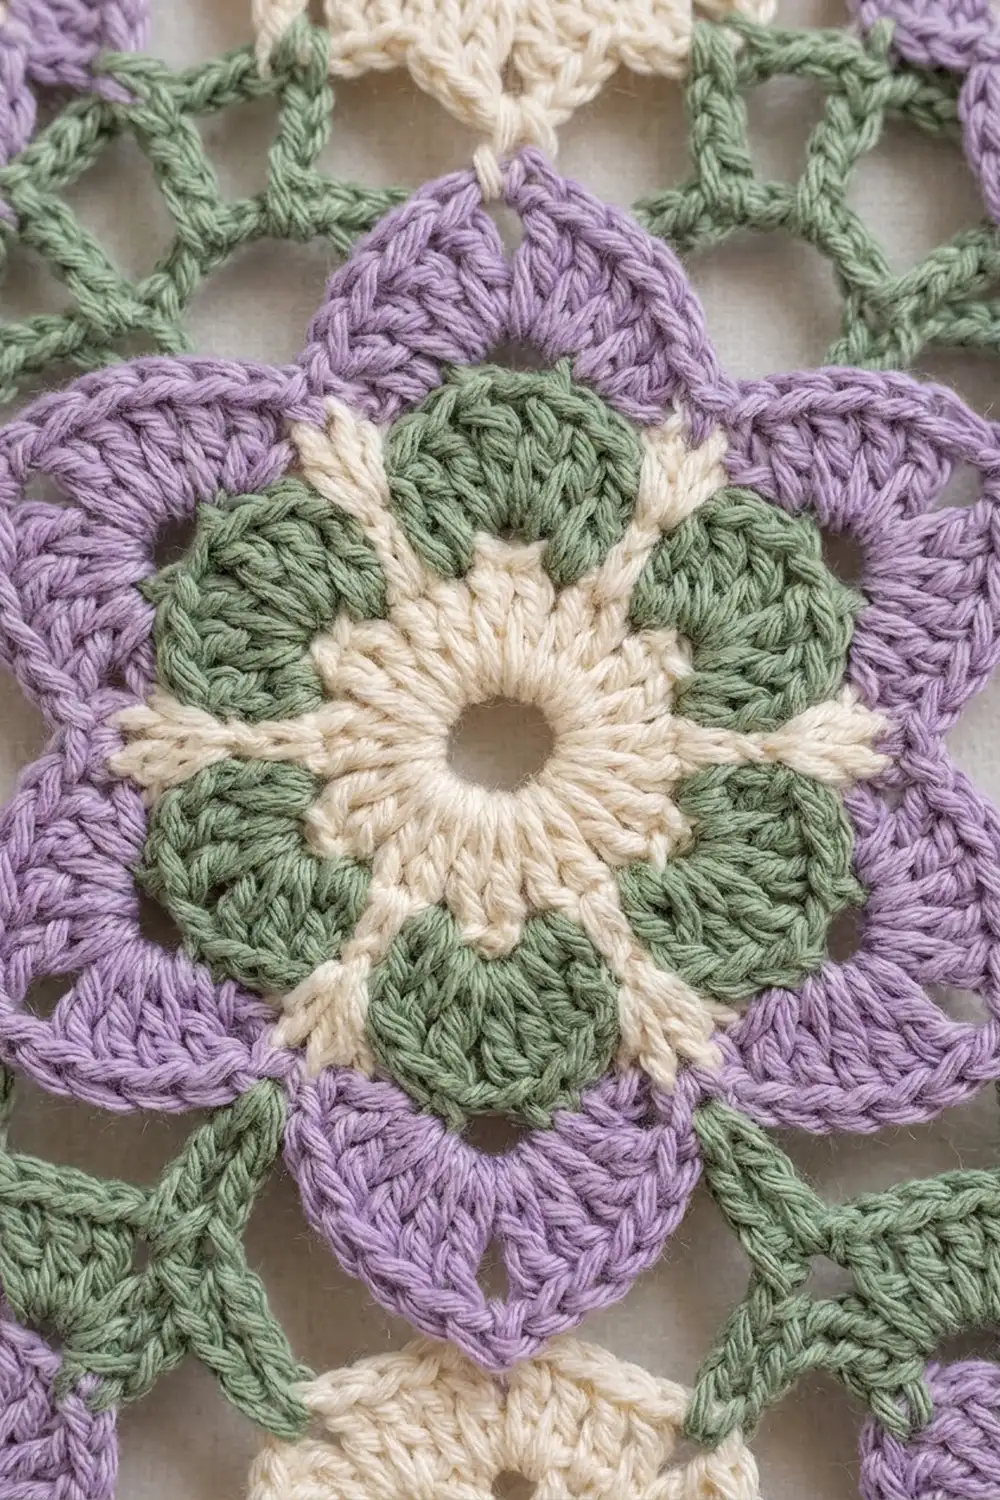
Two flower colorways alternate in a checkerboard. Flower A has a cream center, sage-green inner petals and lavender outer petals with pointed tips. Flower B is the same flower worked entirely in cream. The palette is calm and cottage-style, and it suits a bedroom or a sunny kitchen window.
This pattern uses US crochet terms. Each finished panel measures 32 x 86 in (81.3 x 218.4 cm), plus tabs that drop 3 in (7.6 cm) when folded. The instructions cover one panel. Make two panels for a pair.
To build each panel, you make 70 square-framed motifs, join them into a grid 5 motifs wide and 14 motifs tall, add a three-round border, and work six tabs into the top edge.
Finished Size and Construction
- Finished panel size: 32 x 86 in (81.3 x 218.4 cm), not including the tabs
- Skill level: Intermediate
- Terminology: US
- Yarn weight: DK (weight 3) cotton or cotton blend
- Hook: 4.0 mm (G-6)
- Pieces: 70 motifs per panel (35 Flower A, 35 Flower B); 140 for the pair
- Layout: 5 motifs wide x 14 motifs tall
- Motif size: 6 x 6 in (15.2 x 15.2 cm)
- Size before border: 30 x 84 in (76.2 x 213.4 cm)
- Border depth: 1 in (2.5 cm) on each side
- Tabs: 6 per panel, each 1.9 in (4.8 cm) wide
Materials
Choose a smooth mercerized or matte cotton in DK weight. Cotton holds its shape when it hangs and gives clear stitch definition. Avoid fuzzy yarns, because they blur the lace.
The amounts below are for a pair of panels at about 100 m per 50 g:
- Cream: 950 g / 1,900 m (2,078 yd)
- Sage green: 1,150 g / 2,300 m (2,515 yd)
- Lavender: 300 g / 600 m (656 yd)
These quantities include a margin of about 10% for gauge differences and swatching. For one panel only, halve them.
Tools:
- 4.0 mm (G-6) crochet hook
- Tapestry needle
- Stitch markers
- Rustproof pins and blocking mats
- Spray bottle
- Measuring tape
Abbreviations (US Terms)
- ch – chain
- sl st – slip stitch
- sc – single crochet
- hdc – half double crochet
- dc – double crochet
- sp – space
- st(s) – stitch(es)
- RS / WS – right side / wrong side
- BLO – back loop only
Petal group (special stitch): (sc, hdc, 3 dc, ch 3, 3 dc, hdc, sc) worked into one chain space. This makes one pointed outer petal: 10 stitches plus a ch-3 tip.
Gauge and Checkpoints
Make one complete Flower A before you start production. Block it lightly, then measure:
- After Round 1: 1.75 in (4.4 cm) across
- After Round 3: 3.25 in (8.3 cm) across the green petals
- After Round 5: 4.75 in (12.1 cm) from tip to opposite tip
- After Round 8: 6 in (15.2 cm) per side, with 19 sts per side = 6 in (15.2 cm)
A tolerance of 0.25 in (0.6 cm) is fine. If the motif is larger than that, go down to a 3.75 mm hook. If it is smaller, go up to a 4.5 mm hook. Recheck after Round 5, because the frame rounds magnify small differences.
Motif Pattern
Use these color changes:
- Flower A: Rounds 1–2 cream, Round 3 green, Round 4 cream, Round 5 lavender, Rounds 6–8 green
- Flower B: Rounds 1–5 cream, Rounds 6–8 green
To change color, fasten off and join the new color where the round says. Work over the tails as you go so there is less weaving in later.
Round 1 (center): Ch 6 and sl st to the first ch to form a ring. Ch 3 (this counts as a dc), then work 23 dc into the ring. Sl st to the top of the ch-3. (24 dc) Do not pull the ring closed. The open center hole is part of the design.
Round 2: Ch 1, then sc in the same st. Ch 5, skip 3 sts, sc in the next st. Repeat from * 4 more times. Ch 5, skip 3 sts, then sl st to the first sc. (6 sc, 6 ch-5 sps)
Round 3 (inner petals): Join green (Flower A) or continue in cream (Flower B) in any ch-5 sp. Work (sc, hdc, 5 dc, hdc, sc) in each ch-5 sp around, then sl st to the first sc. (54 sts: 6 petals of 9 sts)
Round 4 (spokes): Join cream behind the petals with sc around the post of any Round 2 sc. Ch 6, holding the chain behind the next petal, then sc around the post of the next Round 2 sc. Repeat around, ending with ch 6 and a sl st to the first sc. (6 sc, 6 ch-6 sps) The post stitches sit between the petals and form the cream spokes.
Round 5 (outer petals): Join lavender (Flower A) or continue in cream (Flower B) in any ch-6 sp. Work 1 petal group in each ch-6 sp around, then sl st to the first sc. (60 sts + 6 ch-3 tips)
Round 6 (lattice): Join green with sc in any ch-3 tip. Ch 5, sc in the gap between the last sc of this petal and the first sc of the next petal, ch 5, sc in the next ch-3 tip. Repeat around, replacing the final sc with a sl st to the first sc. (12 sc, 12 ch-5 loops)
Round 7 (squaring): Sl st into the next ch-5 loop. Ch 3 (counts as dc) and work (2 dc, ch 3, 3 dc) in the same loop for the first corner. [Ch 1, 3 dc in the next loop] twice, ch 1, then (3 dc, ch 3, 3 dc) in the next loop for the next corner. Repeat from * 2 more times. [Ch 1, 3 dc in the next loop] twice, ch 1, then sl st to the top of the ch-3.
(48 dc, 12 ch-1 sps, 4 ch-3 corner sps) Each side has 15 sts between the corner spaces: 4 groups of 3 dc plus 3 ch-1 spaces.
Round 8 (frame): Ch 1. Work 1 sc in each dc and each ch-1 sp, and 3 sc in each corner ch-3 sp. Sl st to the first sc and fasten off. (72 sc)
The middle sc of each corner group is the corner stitch. Counting from corner stitch to corner stitch, each side has 1 + 1 + 15 + 1 + 1 = 19 sts, including both corners. Check: 4 sides x 17 non-corner sts + 4 corners = 72.
Make All Pieces
For one panel, make 35 Flower A and 35 Flower B. Double this for a pair: 70 A and 70 B.
Weave in all ends and give each motif a light steam block to 6 in (15.2 cm) square before joining. Lay out each panel like this:
Row 1:  A B A B A
Row 2:  B A B A B
Row 3:  A B A B A
Row 4:  B A B A B
...continue alternating...
Row 13: A B A B A
Row 14: B A B A B
Joining
Join with green, using a slip-stitch seam through the back loops only.
Step 1, horizontal rows: Hold two motifs RS together with the edges matched. Starting at a corner stitch, sl st through the BLO of both layers, stitch for stitch, ending at the opposite corner stitch. That is 19 sl sts per seam. Join each row of 5 motifs with 4 seams. Each finished row strip has 5 x 19 = 95 sts along its long edges.
Step 2, long seams: Join the 14 strips together with 13 long seams of 95 sl sts each, matching corners at every motif junction.
Keep the seam stitches as loose as the motif stitches. A tight seam puckers the lattice and pulls the panel narrow. Work a test seam first: it should lie flat and stretch as much as the motif edge does.
Checkpoint: The joined panel should measure 30 x 84 in (76.2 x 213.4 cm), give or take 0.5 in (1.3 cm).
Border
The border uses the same stitch density as the motif frames, 19 sts = 6 in (15.2 cm). Before the border, the top and bottom edges each have 5 x 19 = 95 sts and the side edges each have 14 x 19 = 266 sts. Both counts include the panel’s own corners, and nothing is added at the seams. Around the whole panel, that is 2 x 95 + 2 x 266 − 4 shared corners = 718 sts.
Round 1 (green): Join in the top-right corner stitch. Work 1 sc in each st around, with 3 sc in each of the 4 panel corner stitches. Sl st to join.
- Per side: top and bottom 97 sts each, sides 268 sts each
- Total: 718 + 8 extra = 726 sts
Round 2 (cream): Ch 3 (counts as dc). Dc in each st around, with 3 dc in each corner stitch. Sl st to join.
- Per side: top and bottom 99 sts each, sides 270 sts each
- Total: 726 + 8 extra = 734 sts
Round 3 (lavender): Ch 1. Sc in each st around, with 3 sc in each corner stitch. Sl st to join and fasten off.
- Per side: top and bottom 101 sts each, sides 272 sts each
- Total: 734 + 8 extra = 742 sts
Why the math works: Each round adds exactly 2 stitches per side, one from each 3-stitch corner. That is the extra length a corner needs to turn flat at this gauge. The sides gain no other stitches, so the border keeps the same density as the frames and does not ruffle or cup. The three rounds add 0.25 in (0.6 cm) + 0.5 in (1.3 cm) + 0.25 in (0.6 cm) = 1 in (2.5 cm) on each side. That brings the panel to 32 x 86 in (81.3 x 218.4 cm).
Tabs (green): The top edge has 101 sts. Working with the RS facing, place 6 tabs of 6 sts each with 13-st gaps between them: 6 x 6 + 5 x 13 = 101. The first and last tabs sit right at the corners.
For each tab:
- Join green and work 6 sc across. Turn.
- Ch 1, sc in each st, turn. Repeat this row until the tab measures 6 in (15.2 cm).
- Fold the tab to the WS and whipstitch the last row to the back of Border Round 1.
Each folded tab is 1.9 in (4.8 cm) wide and drops 3 in (7.6 cm). The gaps between tabs are 4.1 in (10.4 cm).
Final Blocking
- Weave in any remaining ends along the green seams, where they hide best.
- Lay the panel flat on mats or a clean floor covered with towels.
- Pin each motif corner into a straight grid line every 6 in (15.2 cm).
- Pin the border edges straight to 32 x 86 in (81.3 x 218.4 cm).
- Spritz the panel until it is damp, then gently open each flower’s petal tips with your fingers.
- Leave it to dry completely, then unpin.
- Hang the panel and let it settle for a day before judging the length.
Final Quality-Control Checklist
- [ ] 70 motifs per panel, in a checkerboard of A and B
- [ ] Every motif has a 6 in (15.2 cm) side with 19 sts per side
- [ ] Every seam has 19 sl sts per motif edge, with corners matched
- [ ] The panel measured 30 x 84 in (76.2 x 213.4 cm) before the border
- [ ] Border counts are 101 / 272 per side after Round 3
- [ ] Six tabs are evenly spaced and folded to the WS
- [ ] All ends are secure and no seams pucker
Troubleshooting
- The center hole closes up: Do not tighten the ch-6 ring. Work the dc loosely over the ring.
- The outer petals curl: Your Round 5 tension is too tight. Go up 0.25 mm for that round only.
- The motifs are not square: Check that Round 7 corners land in every third loop, with 3 dc groups in the two loops between them.
- The lattice puckers: The seams are too tight. Unpick them and rejoin with a hook one size larger.
- The border ruffles: You added stitches along the sides. Recount to 97 / 268 after Round 1.
- The panel sags longer when hung: This is normal for cotton. Block again and hang it for a day before hemming the tabs shorter.
Care
Hand wash cold or machine wash on a gentle cycle in a mesh bag, and lay flat to dry. Reblock lightly to restore the petal tips.
Final Notes
The measurement chain is simple. A motif with 19 sts per side measures 6 in (15.2 cm). Five motifs across and fourteen down give 30 x 84 in (76.2 x 213.4 cm). Three border rounds add 1 in (2.5 cm) per side for a finished size of 32 x 86 in (81.3 x 218.4 cm). If your first motif hits gauge, every later number follows from it.
Happy crocheting!