

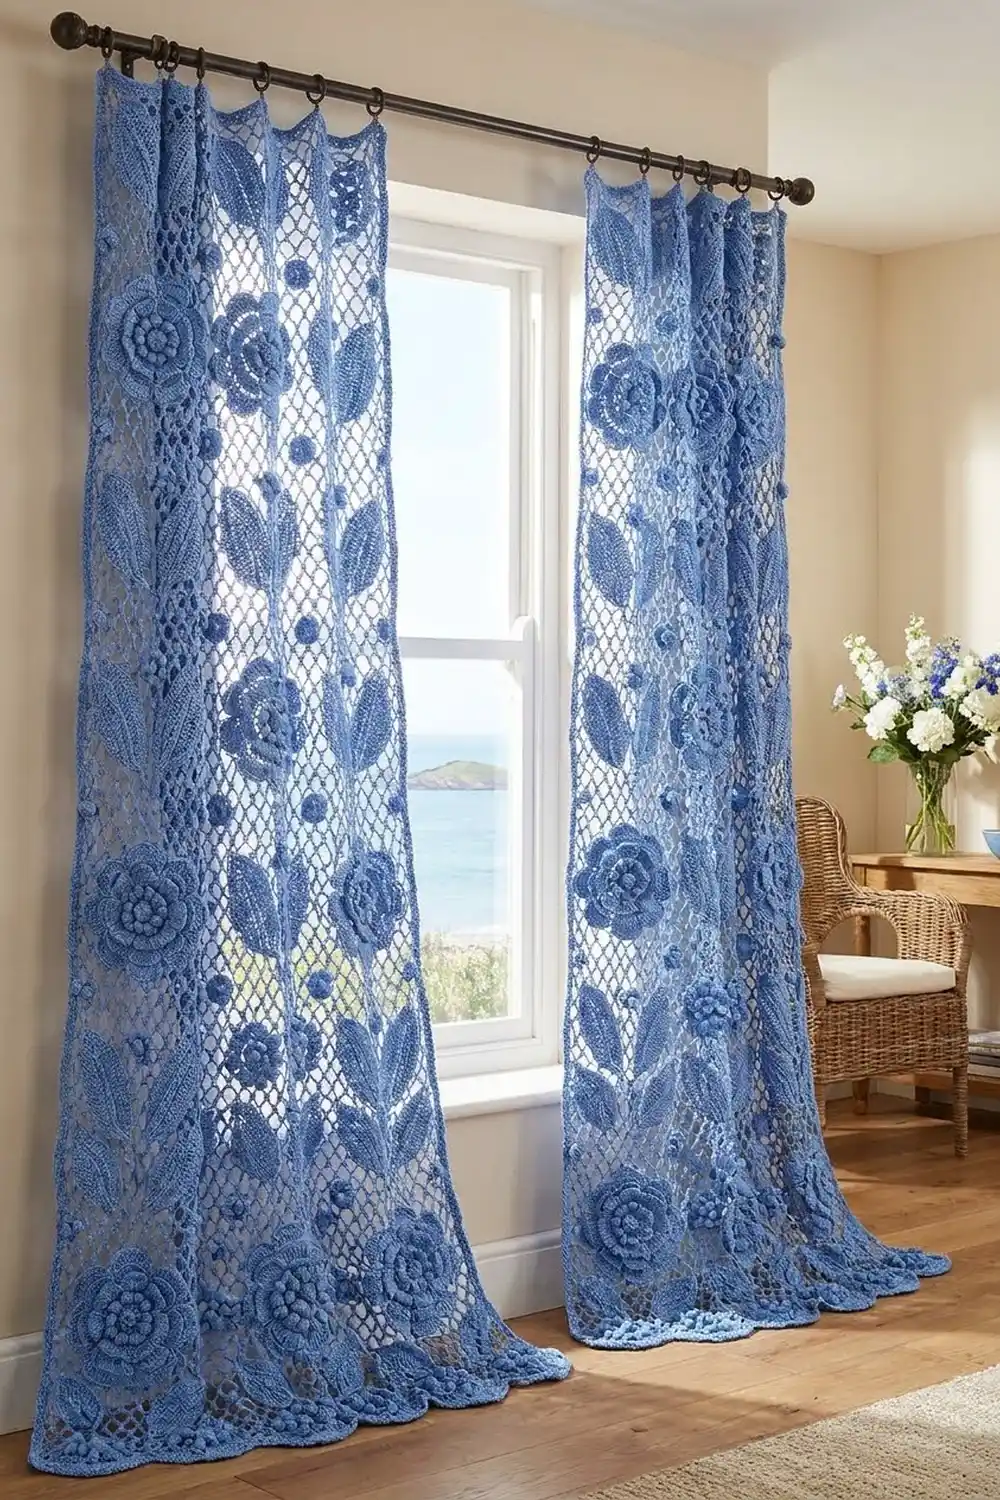
These Seaside Bloom curtains bring the look of Irish crochet lace to a sunny window. Layered flowers with raised bobble centers sit next to ribbed, pointed leaves. Everything is held together by open chain mesh dotted with small bobble “berries,” so light comes through the whole panel.
The project uses one color, a soft cornflower blue cotton. It looks relaxed and coastal, and it goes well with white walls, natural wood, and blue-and-white ceramics. Mercerized cotton gives the stitches a clean look and helps the lace hang straight.
This pattern uses US crochet terms. Each finished panel measures 50 in × 86 in (127.0 cm × 218.4 cm), border included, and the pattern makes a pair.
Freeform Irish lace is hard to repeat accurately, so this pattern uses square blocks instead. Each panel is made of two 6-in (15.2-cm) blocks that alternate. Block A has a layered flower. Block B has a small bobble flower with two leaves sewn on top. Both blocks end with the same mesh frame, so they join edge to edge, stitch for stitch. A three-round border finishes each panel.
Finished Size and Construction
- Finished size (each panel): 50 in × 86 in (127.0 cm × 218.4 cm)
- Skill level: Intermediate
- Terminology: US crochet terms
- Yarn weight: Sport (#2) mercerized cotton
- Hook: 3.5 mm (E-4)
- Number of pieces: 112 blocks per panel (56 Block A + 56 Block B), so 224 for the pair, plus 112 leaves per panel (224 for the pair)
- Layout: 8 blocks wide × 14 blocks tall per panel, in a checkerboard
- Block size: 6 in × 6 in (15.2 cm × 15.2 cm), 31 sc per side
- Size before border: 48 in × 84 in (121.9 cm × 213.4 cm)
- Border depth: 1 in (2.5 cm)
Materials
Yarn: Use a smooth, mercerized sport-weight cotton, about 155 m (170 yd) per 50 g. Mercerized cotton holds the bobbles’ shape and keeps the mesh from stretching out of shape while the curtains hang. Buy all your yarn from a single dye lot. Even a small color change shows clearly when light comes through the panels.
- Cornflower Blue: 2,800 g, about 8,680 m (9,493 yd), which is 56 balls of 50 g. That covers both panels.
- Per panel, about 1,400 g / 4,340 m.
The yarn amounts include a margin of about 10% for gauge swatches, tension differences, and weaving in ends.
Tools:
– 3.5 mm (E-4) crochet hook
– Tapestry needle
– Stitch markers (at least 8)
– Rustproof pins
– Blocking mats or a large padded surface
– Spray bottle
– Measuring tape
– 24 clip rings for hanging (12 per panel)
Abbreviations (US Terms)
- ch – chain
- sl st – slip stitch
- sc – single crochet
- hdc – half double crochet
- dc – double crochet
- tr – treble crochet
- sp – space
- sk – skip
- st(s) – stitch(es)
- FLO / BLO – front loop only / back loop only
- MR – magic ring
- RS / WS – right side / wrong side
Special stitches:
– Bobble: [Yarn over, insert hook in the stitch, pull up a loop, yarn over, pull through 2 loops] 3 times in the same stitch (4 loops on hook). Yarn over and pull through all 4 loops.
– Node: Ch 3, then work a bobble into the 3rd ch from the hook. This makes a small round berry at the end of the chain.
Gauge and Checkpoints
Base gauge: 31 sc = 6 in (15.2 cm) along the last round of a block.
Make one Block A and one Block B before anything else, and block them lightly. Measure at each checkpoint:
- Block A after Round 3: 1.5 in (3.8 cm) across
- Block A after Round 7: 3.25 in (8.3 cm) across the petal tips
- Block A after Round 8 / Block B after Round 4: 3.75 in (9.5 cm) across
- After Frame Round F1: 4.75 in (12.1 cm) across
- Finished block: 6 in (15.2 cm) square
If your test block is bigger than 6.25 in (15.9 cm), go down half a hook size. If it is smaller than 5.75 in (14.6 cm), go up half a size. Blocks A and B must match each other within 0.125 in (0.3 cm). If only Block B is off, change the chain length in its Round 4 by one ch.
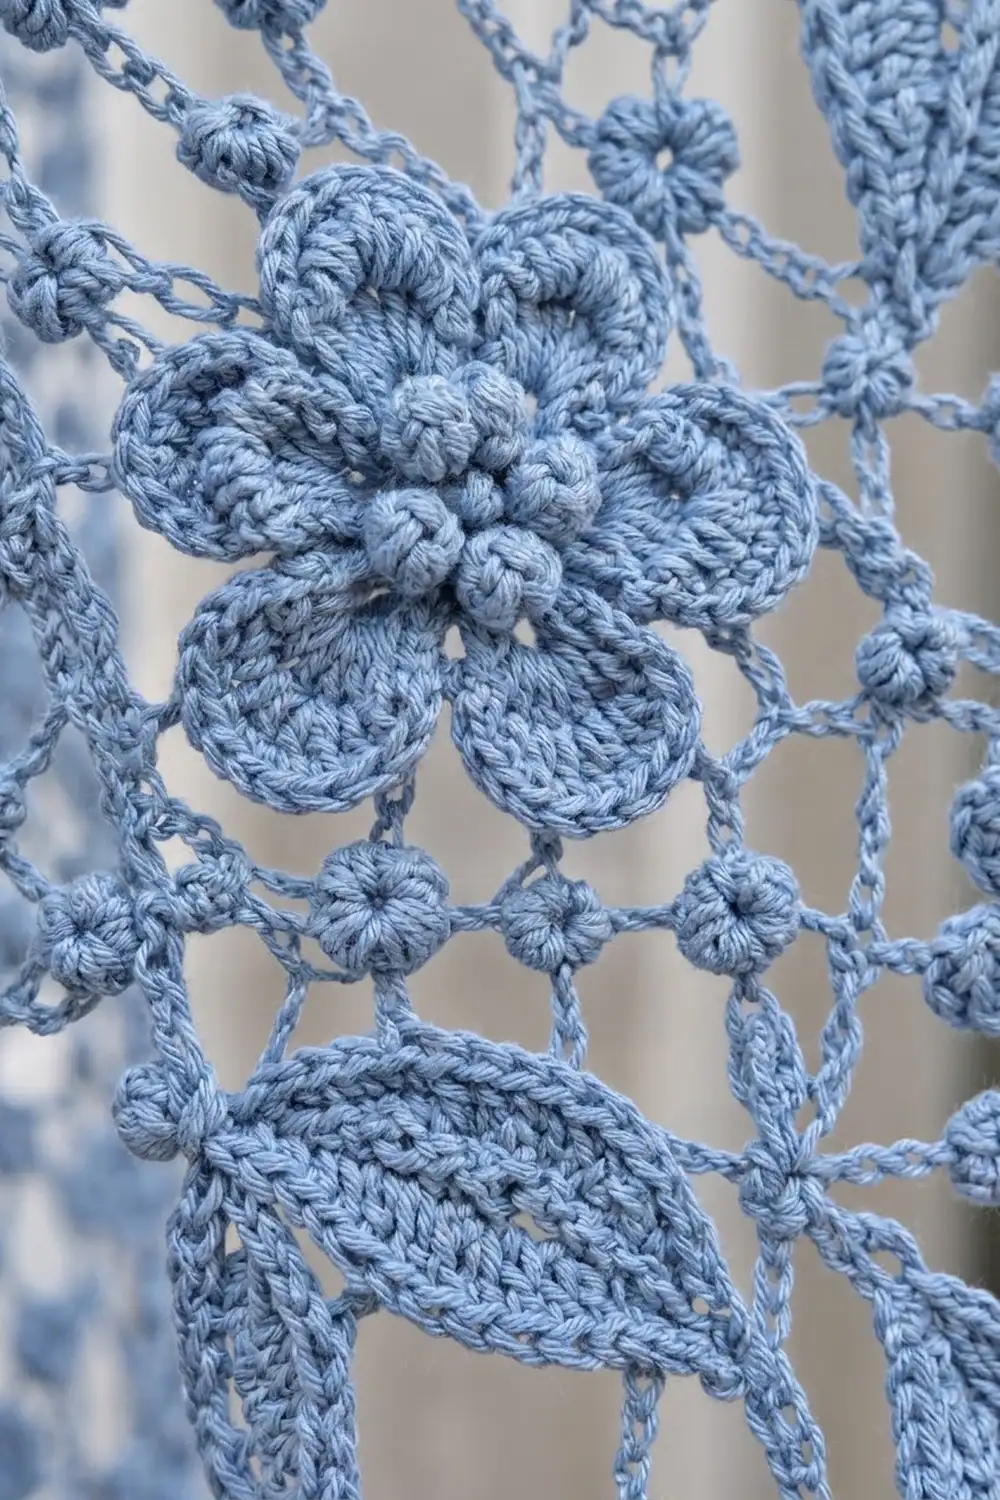
Block A: Layered Flower
Round 1: MR, ch 1, 12 sc in the ring. Join with a sl st to the first sc. (12 sc)
Round 2: Ch 1, bobble in next st, sc in next st; repeat from * 5 more times. Join. (6 bobbles + 6 sc = 12 sts)
The bobbles push toward the back of the work. Turn the piece over so they pop forward: that side is now the RS. This makes the raised bobble center.
Round 3: Ch 1, 2 sc in each st around. Join. (24 sc)
Round 4 (front petal base): Working in FLO, ch 1, sc in next st, ch 3, sk next 3 sts; repeat from * 5 more times. Join. (6 sc + 6 ch-3 sps)
Round 5 (front petals): In each ch-3 sp, work (sc, hdc, 3 dc, hdc, sc), then sl st in the next sc. Repeat around. (6 petals, 7 sts each = 42 sts)
Round 6 (back petal base): Fold the front petals forward. Join the yarn with a sl st in the unused back loop of the 3rd st of Round 3. Working in BLO of Round 3, ch 1, sc in next st, ch 5, sk next 3 sts; repeat from * 5 more times. Join. (6 sc + 6 ch-5 sps)
These sc sit halfway between the front petals, so each back petal shows between two front petals.
Round 7 (back petals): In each ch-5 sp, work (sc, hdc, 2 dc, 3 tr, 2 dc, hdc, sc). Repeat around and join. (6 petals, 11 sts each = 66 sts)
Round 8 (mesh): Sl st across to the first tr of the first back petal. Ch 1, sc in the 1st tr of the petal, ch 5, sc in the 3rd tr of the same petal, ch 5; repeat from * 5 more times. Join. (12 sc + 12 ch-5 sps)
Go on to the Frame Rounds.
Block B: Bobble Flower with Leaves
Round 1: MR, ch 1, 12 sc. Join. (12 sc)
Round 2: Ch 1, sc in next st, ch 2, bobble in next st, ch 2; repeat from * 5 more times. Join. (6 sc + 6 bobbles + 12 ch-2 sps)
Round 3: Sl st to the top of the first bobble. Ch 1, sc in the bobble, ch 5, sc in the next sc, ch 5; repeat from * 5 more times. Join. (12 sc + 12 ch-5 sps)
Round 4 (mesh): Sl st into the first ch-5 sp. Ch 1, sc in the ch-5 sp, ch 5; repeat from * 11 more times. Join. (12 sc + 12 ch-5 sps)
Block B now has the same 12 loops as Block A after Round 8. Go on to the Frame Rounds.
Frame Rounds (Both Blocks)
F1 (node mesh): Sl st into the first ch-5 sp. Ch 1, sc in the ch-5 sp, ch 3, node, ch 3; repeat from * 11 more times. Join. (12 sc + 12 nodes)
F2 (squaring): Sl st up to the tip of the first node. Ch 1, sc in the node tip, ch 6, sc in the next node tip, ch 6, sc in the next node tip, ch 11; repeat from * 3 more times. Join. (12 sc + 8 ch-6 sps + 4 ch-11 corner sps)
The longer ch-11 loops pull outward and form the corners.
F3 (edge): Ch 1, sc in the sc, 7 sc in the ch-6 sp, sc in the sc, 7 sc in the ch-6 sp, sc in the sc, (7 sc, ch 2, 7 sc) in the ch-11 sp; repeat from * 3 more times. Join and fasten off. Leave an 18-in (45.7-cm) tail on every block. You’ll use it for joining.
Stitch count for F3:
– Each side, counted from one corner ch-2 to the next: 7 + 1 + 7 + 1 + 7 + 1 + 7 = 31 sc. This includes the 2 corner sc of that side.
– Whole round: 4 × 31 = 124 sc + 4 corner ch-2 sps.
Leaves (Make 2 per Block B)
Foundation: Ch 14.
Row 1: Sc in the 2nd ch from the hook, hdc in the next 2 ch, dc in the next 6 ch, hdc in the next 2 ch, sc in the next ch, 3 sc in the last ch (this is the tip). Work along the other side of the foundation chain: sc in the next ch, hdc in the next 2 ch, dc in the next 6 ch, hdc in the next 2 ch, sc in the next ch. (12 + 3 + 12 = 27 sts)
Row 2: Ch 1, turn. Working in BLO, sc in the next 13 sts, 3 sc in the center tip st, sc in the next 13 sts. (29 sts)
Row 3: Ch 1, turn. Working in BLO, sc in the next 14 sts, 3 sc in the center tip st, sc in the next 14 sts. (31 sts)
Stem: Ch 8. Sc in the 2nd ch from the hook and in the next 6 ch, then sl st to the leaf base. Fasten off and leave a tail for sewing.
Working in the back loops leaves raised ridges that look like the veins in the photo. The foundation chain forms the center vein. The finished leaf measures about 2.75 in (7.0 cm) long and 1.6 in (4.1 cm) wide.
Attaching the leaves: Place the leaves on the RS of Block B along the diagonal from the upper-left corner to the lower-right corner. Put their bases against the bobble flower and point the tips toward the opposite corners. Sew down the center vein only, so the edges of the leaf stay loose over the mesh. Use the same diagonal on every Block B.
Make All Pieces
For each panel:
– Block A: 56
– Block B: 56, with 112 leaves sewn on
For the pair: 112 Block A, 112 Block B, and 224 leaves.
Layout (8 wide × 14 tall):
Row 1:  A B A B A B A B
Row 2:  B A B A B A B A
Row 3:  A B A B A B A B
Row 4:  B A B A B A B A
...repeat Rows 1–2 through Row 14...
Row 14: B A B A B A B A
Odd rows start with A and even rows start with B. Each row has 4 A blocks and 4 B blocks.
Joining
Method: Slip stitch join, worked on the WS.
- Hold two blocks with WS together and the edges lined up. Insert the hook through the back loop of each facing sc, one from each block.
- Start in the corner ch-2 sps. Sl st through both of them, then join stitch to stitch: 31 sc to 31 sc. Finish in the matching corner ch-2 sps.
- Join blocks into horizontal strips of 8 first. Then join the strips together the long way.
- Where 4 blocks meet, work one sl st through all 4 corner ch-2 sps together so the intersection lies flat.
Tension: Keep the sl sts loose, a little looser than your sc. A tight join makes the seams pucker and the panel narrow. If the seam is shorter than an unjoined block edge, go up one hook size for joining only.
Size checkpoint: A strip of 8 should measure 48 in (121.9 cm). The joined panel should measure 48 in × 84 in (121.9 cm × 213.4 cm). Fix any problem now, before you start the border.
Border
Border gauge: The same as the block gauge, 31 sc per 6 in (15.2 cm).
Starting count:
– Top and bottom edges: 8 blocks × 31 sc = 248 sc
– Left and right edges: 14 blocks × 31 sc = 434 sc
The corner ch-2 sps at the seams are already joined, so skip them. Work only into the sc.
Border Round 1 (sc): With the RS facing, join in any sc. Ch 1, sc in each sc. Work (sc, ch 2, sc) in each of the 4 outer corner ch-2 sps. Join.
– Top and bottom: 248 worked 1 per st + 2 added = 250 sc
– Left and right: 434 + 2 = 436 sc
Border Round 2 (hdc): Ch 1, hdc in each st, and work (hdc, ch 2, hdc) in each corner ch-2 sp. Join.
– Top and bottom: 250 + 2 = 252 hdc
– Left and right: 436 + 2 = 438 hdc
Border Round 3 (node scallop): Ch 1. Starting with the first hdc after a corner, sc in the next st, ch 2, node, ch 2, sk the next 2 sts. Repeat across the side. In each corner ch-2 sp, work (sc, ch 2, node, ch 2, sc). Join and fasten off.
– Top and bottom: 252 ÷ 3 = 84 repeats
– Left and right: 438 ÷ 3 = 146 repeats
Why the math works: Each repeat in Round 3 uses exactly 3 stitches. Rounds 1 and 2 each add 1 stitch at both ends of every side, which takes 248 to 252 and 434 to 438. Both of those numbers divide evenly by 3, so every side ends with a full scallop right at the corner. The border adds 1 in (2.5 cm) on each side: 48 + 2 = 50 in (127.0 cm), and 84 + 2 = 86 in (218.4 cm).
Final Blocking
- Soak the panel in cool water for 15 minutes. Press out the water gently. Don’t wring it.
- Roll it in towels to soak up more water.
- Lay it flat with the RS up on mats. Work on one section at a time if you need to.
- Pin the outer edge to 50 in × 86 in (127.0 cm × 218.4 cm). Put a pin every 6 in (15.2 cm) at each block seam.
- Open each mesh loop with your fingertips. Shape the flower petals and the leaf tips.
- Pin each border node so it points outward.
- Let the panel dry completely, then unpin it. Repeat for the second panel.
Final Quality-Control Checklist
- Both panels measure 50 in × 86 in (127.0 cm × 218.4 cm), within 0.5 in (1.3 cm)
- Every block has 31 sc per side and corners that are square
- The A and B blocks alternate correctly, and no two identical blocks sit side by side
- All leaves point along the same diagonal
- The bobble centers pop to the RS on every flower
- The seams lie flat, with no puckering
- The border scallop counts are 84 / 84 / 146 / 146
- All ends are woven in securely, at least 2 in (5.1 cm) through solid stitches
Troubleshooting
- The block cups: F2 is too tight. Chain more loosely, or add 1 ch to each ch-11 corner.
- The block ruffles: Your F3 sc are too loose. Go down half a hook size for F3.
- The bobbles look flat: Pull the closing loop firmly, and make sure the bobbles face the RS.
- The front and back petals line up instead of alternating: Start Round 6 in the 3rd st of Round 3, as written.
- The leaves curl: Steam-block the leaves before you sew them on.
- A border scallop is short at a corner: Recount Border Round 2. Each side must be 252 or 438.
Care
Hand wash in cool water with a mild detergent, then dry flat and reshape. Hang the curtains only after they are completely dry.
Final Notes
The measurement chain runs like this: a 1.5-in (3.8-cm) flower center grows to a 6-in (15.2-cm) block with 31 sc per side. Eight blocks across make 48 in (121.9 cm), and fourteen blocks down make 84 in (213.4 cm). The 1-in (2.5-cm) border brings each panel to 50 in × 86 in (127.0 cm × 218.4 cm). If you check your size at each step, the panels will hang straight.
Happy crocheting!