

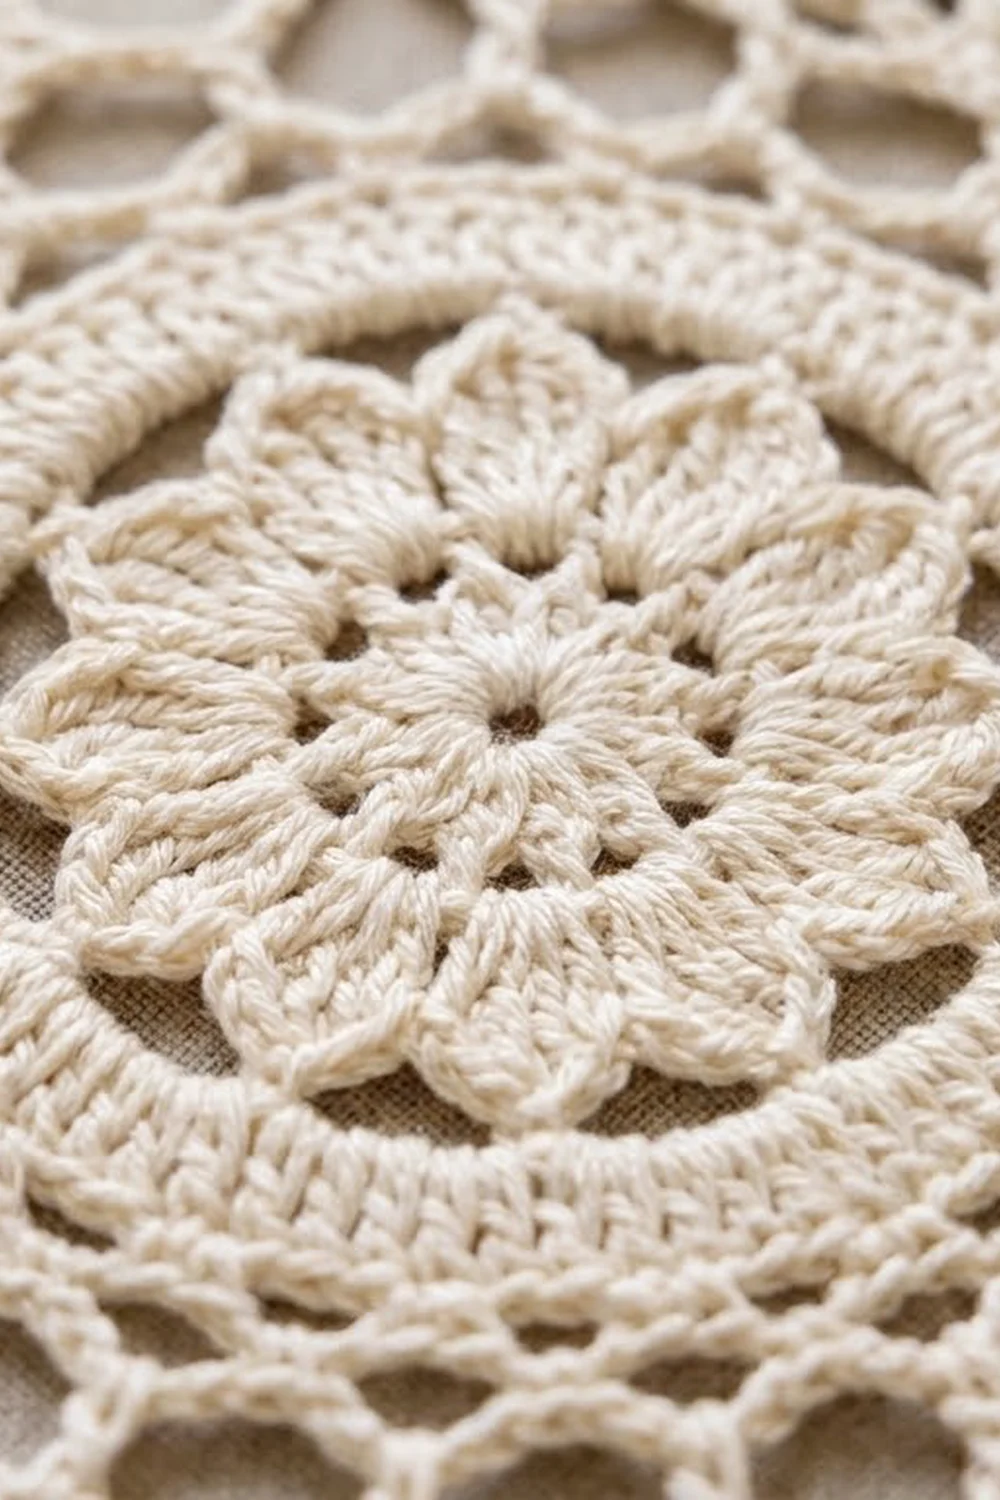
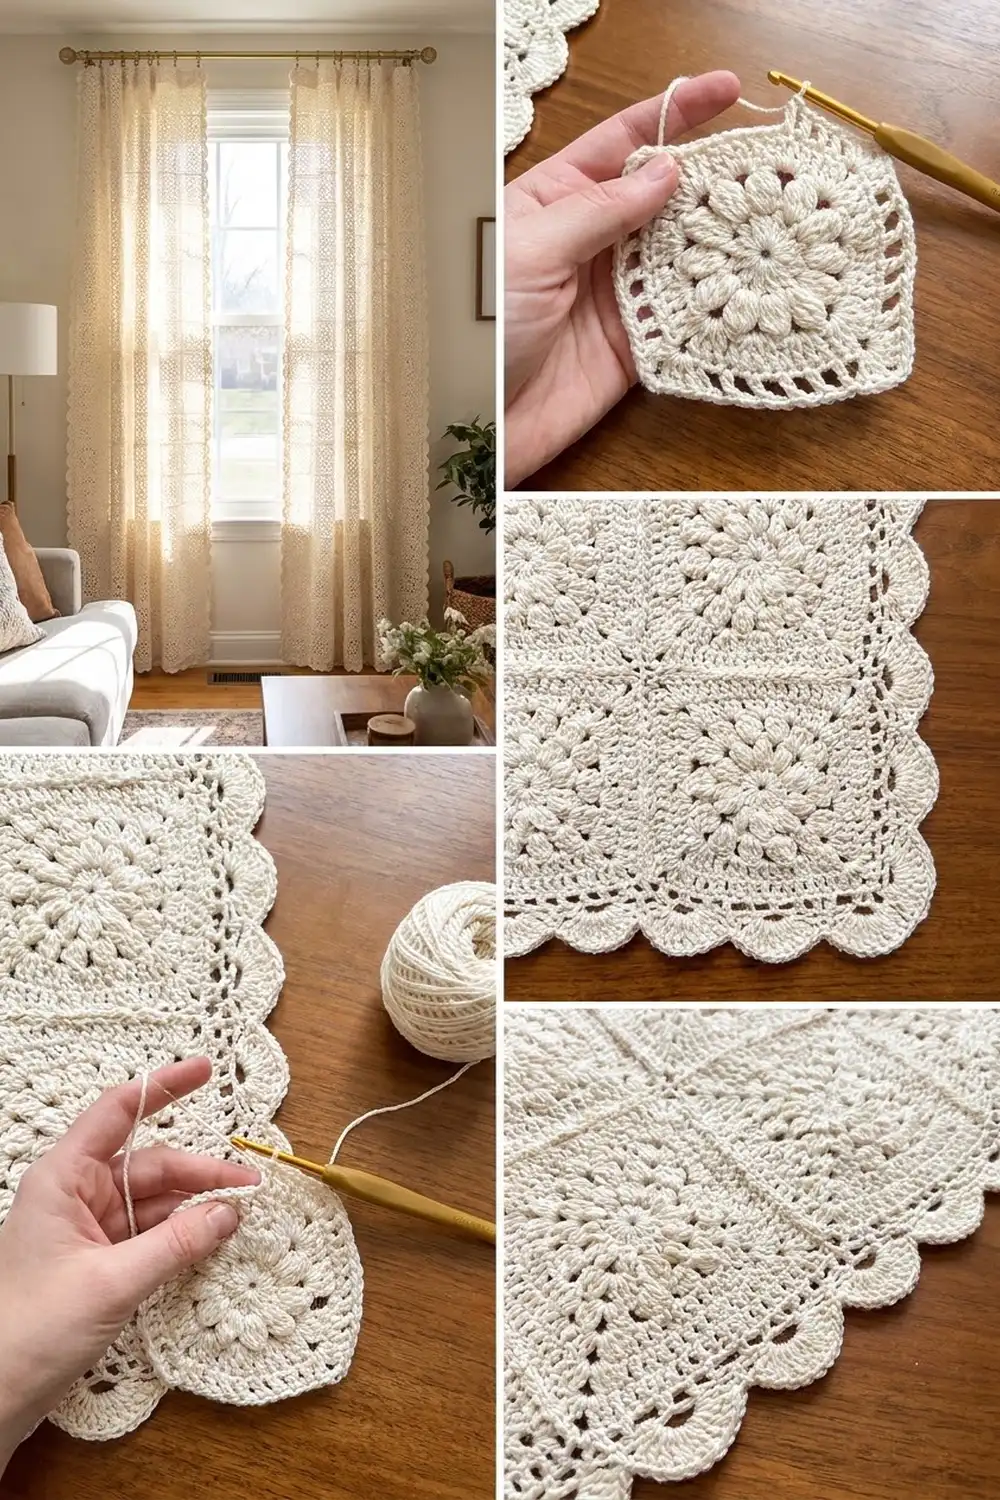
The Ivory Bloom curtains are a pair of airy lace panels made from flower medallions in a chain-mesh frame. Each motif starts as a round flower with twelve tall cluster petals. A solid double crochet ring goes around the flower, and a chain-loop frame turns the circle into a square. Joined edge to edge, the motifs make a lattice of circles that lets soft light through.
The whole project uses one ivory or cream cotton, which gives a classic farmhouse and cottage look. The panels hang from simple clip rings, so you don’t need a rod pocket. All instructions use US crochet terms.
Each finished panel measures 34.5 in x 86.5 in (87.6 cm x 219.7 cm) after blocking. Each panel has 65 motifs in a grid 5 motifs wide by 13 motifs tall, and one pair of curtains uses 130 motifs.
You’ll make the motifs one at a time, join them with slip stitches in straight seams, then add a three-round border that ends in a row of scallop shells.
Finished Size and Construction
- Finished panel size: 34.5 in x 86.5 in (87.6 cm x 219.7 cm)
- Skill level: Intermediate
- Terminology: US crochet terms
- Yarn weight: DK / light worsted (#3) cotton
- Hook: 4 mm (G-6)
- Number of pieces: 65 motifs per panel, 130 for the pair
- Layout: 5 motifs wide x 13 motifs tall per panel
- Motif size: 6.5 in (16.5 cm) square, 33 stitches per side
- Panel size before border: 32.5 in x 84.5 in (82.6 cm x 214.6 cm)
- Border depth: 1 in (2.5 cm) on every side
Materials
Yarn: Use a smooth, mercerized or combed DK cotton. Cotton holds the petal clusters crisply, keeps its shape when it hangs, and doesn’t fuzz in sunlight. Avoid acrylic: it can stretch out of shape over a long drop. Buy every ball from the same dye lot, because changes in shade show clearly against window light.
- Ivory / Cream: 1,750 g (about 3,675 m) for the pair, which is 35 balls of 50 g / 105 m. Each panel needs about 875 g (1,838 m).
These amounts include a margin of roughly 10% over the measured use for motifs, seams, and border.
Tools:
- 4 mm (G-6) crochet hook
- Tapestry needle
- 4 locking stitch markers
- Scissors
- Blocking mats or a clean carpet covered with a sheet
- Rust-proof pins
- Spray bottle
- Measuring tape
- 22 curtain clip rings (11 per panel)
Abbreviations (US Terms)
- ch – chain
- sl st – slip stitch
- sc – single crochet
- dc – double crochet
- tr – treble crochet
- sk – skip
- sp – space
- st(s) – stitch(es)
- rep – repeat
- RS / WS – right side / wrong side
Special stitches
- Beginning tr cluster (beg tr-cl): Ch 3, then yarn over twice, insert hook in same st, pull up a loop, [yarn over, pull through 2 loops] twice. Repeat once more from * to * (3 loops on hook). Yarn over and pull through all 3 loops.
- Tr cluster (tr-cl): Yarn over twice, insert hook in the indicated st, pull up a loop, [yarn over, pull through 2 loops] twice. Repeat from * to * 2 more times in the same st (4 loops on hook). Yarn over and pull through all 4 loops.
- Shell: 5 dc in the same st.
- Corner shell: 7 dc in the same st.
Gauge and Checkpoints
Make one complete motif before you buy all your yarn, and block it. Gauge matters here: a small error repeats 13 times down the length of the curtain.
Motif gauge: One motif measures 6.5 in (16.5 cm) square after blocking, with 33 sc along each side. That works out to about 20 sc = 4 in (10.2 cm) on the last round.
Checkpoints while you work the test motif:
- After Round 2: the flower measures about 2.75 in (7.0 cm) across, from petal tip to petal tip.
- After Round 4: the round frame measures about 4.25 in (10.8 cm) across and lies flat.
- After Round 6: the square measures about 6 in (15.2 cm) from side to side.
- After Round 7: the square measures 6.5 in (16.5 cm) per side after blocking.
If your motif is too big: go down to a 3.75 mm hook. If it is only a little over, tighten the chain loops in Round 5.
If your motif is too small: go up to a 4.5 mm hook.
If Round 4 ruffles or cups: change hooks before you start the mesh. Mesh rounds can’t hide a frame that won’t lie flat.
Medallion Motif (make 130)
Start with a magic ring. Work every round with the RS facing you, and don’t turn.
Round 1: Ch 3 (counts as dc), 11 dc into the ring. Sl st to the top of the beginning ch-3. Pull the ring closed, leaving a small open center. (12 dc)
Round 2 (petals): Beg tr-cl in the same st, ch 4. Tr-cl in the next st, ch 4. Rep from * 10 more times. Sl st to the top of the first cluster. (12 tr clusters, 12 ch-4 sps)
The clusters form the tall, rounded petals. The ch-4 spaces leave a narrow gap between petals, which gives the flower its starburst look.
Round 3 (frame): Sl st into the first ch-4 sp. Ch 3 (counts as dc), 3 dc in the same sp. Work 4 dc in each of the remaining 11 ch-4 sps. Sl st to the top of the beginning ch-3. (48 dc)
Round 4 (frame): Ch 3 (counts as dc), dc in the next 2 sts, 2 dc in the next st. Dc in the next 3 sts, 2 dc in the next st. Rep from * 10 more times. Sl st to the top of the beginning ch-3. (60 dc)
Rounds 3 and 4 together make the solid round band that frames each flower.
Round 5 (mesh): Ch 1, sc in the same st. Ch 5, sk 2 sts. Sc in the next st, ch 5, sk 2 sts. Rep from * 18 more times. Sl st to the first sc. (20 sc, 20 ch-5 loops)
Round 6 (squaring): Sl st in each of the first 3 ch of the next loop to reach its center.
- Corner 1: Ch 4 (counts as tr). In the same loop, work 2 tr, ch 3, 3 tr.
- Side: [Ch 5, sc in the next loop] 4 times, ch 5.
- Next corner: In the next loop, work 3 tr, ch 3, 3 tr.
Rep from * twice more, then work the side once more. Sl st to the top of the beginning ch-4.
(24 tr, 16 sc, 4 corner ch-3 sps, 20 ch-5 loops; each side has 5 ch-5 loops between corner groups)
The tall corner groups push the corners out while the short sc keep the middle of each side in. This is what turns the circle into a square.
Round 7 (joining edge): Ch 1. Sc in the same st and in the next 2 tr.
Work 3 sc in the corner ch-3 sp, then sc in the next 3 tr. Work [4 sc in the next loop, sc in the next sc] twice. Work 3 sc in the next loop (the center loop). Work [sc in the next sc, 4 sc in the next loop] twice. Sc in the next 3 tr.
Rep from * 3 more times, leaving out the last “sc in the next 3 tr” on the final repeat. Sl st to the first sc. Fasten off and weave in the ends.
Place a marker in the center sc of each 3-sc corner group. These are the corner stitches.
Stitch count for Round 7: each side has 29 sts over the tr and loops, plus 1 side st from each corner group, for 31 sts between the corner stitches.
- Per side, including both corners: 31 + 2 = 33 sts
- Total: 4 corner sts + (4 x 31) = 128 sts
Make All Pieces
Each panel needs 65 ivory motifs, so the pair needs 130. Make all the motifs for one panel before you join, and measure 5 of them at random to check they are consistent.
Text layout grid for one panel (M = motif):
Row 1:  M  M  M  M  M
Row 2:  M  M  M  M  M
Row 3:  M  M  M  M  M
  ...    (repeat)
Row 13: M  M  M  M  M
There are 5 columns and 13 rows, with every motif facing RS up.
Joining
Method: Slip stitch seam, stitch for stitch.
- Hold two motifs with RS together and their edges lined up. Insert the hook through the outer loop of the front motif and the outer loop of the back motif, then sl st.
- Start in a marked corner stitch and finish in the matching corner stitch. That joins all 33 stitches of one side to all 33 stitches of the other, one for one, with no extra chains.
- Horizontal seams first: Join Row 1 to Row 2 across all 5 motifs in one continuous seam. Where two motifs meet, sl st their touching corner stitches together and carry straight on to the next pair. Repeat until all 13 rows are joined into 5 long strips across. That makes 12 horizontal seams.
- Vertical seams: Join the columns from top to bottom in the same way. That makes 4 vertical seams, each 13 motifs long.
- Where four corners meet, pass through the corner stitch you already joined so the intersection stays flat.
Tension: Keep your slip stitches as loose as the sc they join. Tight seams make the panel narrower and cause ridges that ripple when the curtain hangs. If a seam puckers, take it out and redo it with a hook one size larger.
Size checkpoint: Lay the joined panel flat. It should measure 32.5 in x 84.5 in (82.6 cm x 214.6 cm). Fix any differences now, before you start the border.
Border
Border gauge: Use the motif gauge of about 20 sc = 4 in (10.2 cm). After blocking, the three rounds together add 1 in (2.5 cm) on each side.
Starting counts:
- Top and bottom edges: 5 motifs x 33 sts = 165 sts, including the 2 panel corner sts. That leaves 163 sts between the corners.
- Long sides: 13 motifs x 33 sts = 429 sts, including the 2 panel corner sts. That leaves 427 sts between the corners.
No stitches are added at the seams. Each motif’s own corner stitch is already counted in its 33.
Round 1 (trim round): With the RS facing you, join the yarn in any panel corner st. Ch 1, then work 3 sc in that corner st. Sc in each st along the edge, and work 3 sc in each panel corner st. Sl st to the first sc.
- Count: 1,184 sts worked one in each existing st, plus 8 extra sts (2 at each of the 4 corners), for 1,192 sts.
- Per side between the corner center sts: top and bottom 165, long sides 429.
- Per side including both corners: 167 and 431.
Mark each corner center st.
Round 2 (trim round): Ch 1. Sc in each st, and work 3 sc in each marked corner st. Sl st to the first sc.
- Count: 1,192 sts worked one in each existing st, plus 8 extra sts, for 1,200 sts.
- Between the corner center sts: top and bottom 167, long sides 431.
Move the markers up to the new corner centers.
Round 3 (shells): Sl st into a marked corner st and work a corner shell in it.
Along the side: sk 1, sc in the next st. Then [sk 1, shell in the next st, sk 1, sc in the next st] across, ending with sk 1, and work a corner shell in the next marked corner st.
Rep from * around, leaving out the last corner shell. Sl st to the top of the first dc. Fasten off.
- Top and bottom: 41 shells between the corners
- Long sides: 107 shells between the corners
- Total: 296 side shells + 4 corner shells
Why the math works: Each side’s stitches between corners follow sk 1, sc, then n repeats of 4 sts, then sk 1, which is 4n + 3. Top and bottom: 4 x 41 + 3 = 167. Long sides: 4 x 10⁷ + 3 = 431. The counts only come out even because each motif has an odd number of stitches per side (33). That keeps every edge symmetric, so each side starts and ends with a matching half-scallop at the corners.
Final Blocking
- Weave in all the remaining ends along the seams, not through the mesh, where they would show against the light.
- Lay the panel RS up on the blocking mats.
- Pin the four corners first, measuring 34.5 in x 86.5 in (87.6 cm x 219.7 cm).
- Pin along each seam line every 6.5 in (16.5 cm) so the grid lines run straight.
- Pin out each border shell at its tip to open the scallops.
- Spray until the panel is evenly damp but not soaked.
- Gently push each flower center flat and open the petals with your fingertips.
- Let it dry completely, which takes about 24 hours, before you unpin.
- Repeat for the second panel. Lay the two dry panels side by side and check that they are the same length.
Final Quality-Control Checklist
- Each motif has 12 petals, a flat ring of 60 dc, and 33 sts per side.
- All 65 motifs on a panel are RS up.
- Seams are flat, with corners lined up at every four-way intersection.
- The panel measures 32.5 in x 84.5 in (82.6 cm x 214.6 cm) before the border.
- Border counts are 1,192 sts for Round 1 and 1,200 sts for Round 2, with 41 and 107 shells per side.
- The blocked panel measures 34.5 in x 86.5 in (87.6 cm x 219.7 cm).
- No ends show against window light.
- Both panels match in length to within 0.5 in (1.3 cm).
Troubleshooting
- Petals twist or lean: Your ch-4 spaces are too tight. Chain more loosely, or check you have exactly 12 clusters.
- Round 4 waves: Your dc gauge is loose. Go down a hook size for Rounds 3 and 4 only.
- The square has rounded corners: Make sure each corner uses tr, not dc, and that the corner group sits in the center of its loop.
- Seams ripple: Your slip stitches are too tight. Redo the seam with a larger hook.
- Shell count is off: Recount Round 2 between the markers. You should have 167 and 431 sts between the corners.
- The panel grows in length when hung: This is normal for cotton. Block it to size, and hang it for a day before you hem or adjust the rod height.
Care
Hand wash or machine wash cold on a gentle cycle in a mesh laundry bag. Lay flat to dry, re-pinning to size if needed. Don’t tumble dry.
Final Notes
The whole curtain depends on one measurement chain. The flower grows to a 4.25 in (10.8 cm) frame, which squares off to a 6.5 in (16.5 cm) motif with 33 sts per side. Five motifs across make 32.5 in (82.6 cm), and thirteen down make 84.5 in (214.6 cm). The border then adds 1 in (2.5 cm) on every side, for 34.5 in x 86.5 in (87.6 cm x 219.7 cm). Check your test motif carefully and everything else follows.
Happy crocheting!