

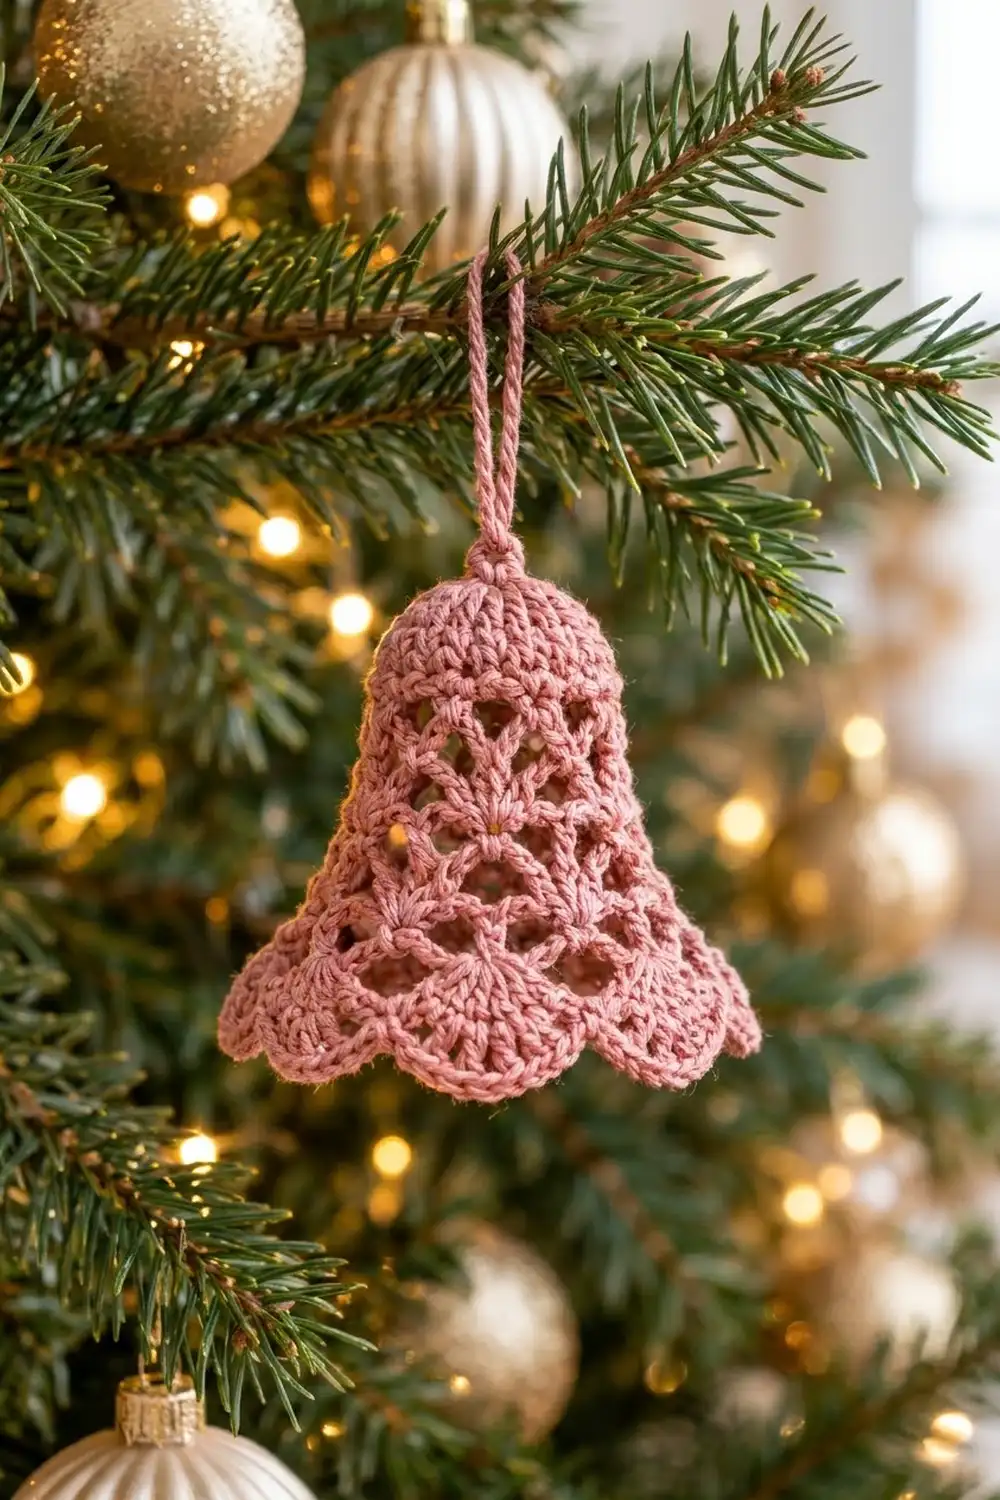
This dainty lace bell is a quick ornament with a vintage feel. It has a small solid crown and an airy lacy skirt. Shells and chain-mesh diamonds make it flare, and six rounded fan scallops finish the hem.
The sample uses one color only: a soft dusty rose cotton thread. Against green branches and warm lights it looks romantic and old-fashioned. It also suits gift toppers or a pastel holiday theme.
This pattern uses US crochet terms. The finished bell measures 2.75 in (7.0 cm) tall and 3 in (7.6 cm) wide at the hem when flattened. The hanging loop adds 1.5 in (3.8 cm).
You work the bell top-down in joined rounds, starting at the crown. A short solid section forms the dome. Lace rounds then widen the body, and a fan border finishes the hem. After that you add a hanging loop, starch the bell, and dry it over a form.
Finished Size and Construction
- Finished size: 2.75 in (7.0 cm) tall × 3 in (7.6 cm) wide at the hem, measured flat
- Skill level: Easy-intermediate
- Terminology: US crochet terms
- Yarn weight: Size 3 cotton crochet thread (fingering, Super Fine #1)
- Hook: 2.25 mm (US B-1)
- Number of pieces: 1 (single seamless bell)
- Layout: Worked in joined rounds from the crown down, with 6 lace repeats around
- Crown size (after Round 4): 1.1 in (2.8 cm) wide flat × 0.75 in (1.9 cm) tall
- Size before border (after Round 10): 2.25 in (5.7 cm) tall × 2.6 in (6.6 cm) wide flat
- Border depth: 0.5 in (1.3 cm)
Materials
Yarn: Use a mercerized cotton thread in size 3. It holds lace definition and takes starch well. Avoid acrylic, because it will not hold a crisp bell shape.
- Dusty rose: 10 g, about 45 m (one bell)
The quantity above includes a safety margin. One bell actually uses about 8 g (35 m). If you plan to make a set of bells, buy one ball of thread for every 6 to 8 bells.
Tools:
– 2.25 mm (US B-1) crochet hook
– Fine tapestry needle
– Scissors
– Stitch marker
– Fabric stiffener or homemade starch
– A small form to dry the bell over, such as a paper cup with a 2 in (5.1 cm) base or a plastic egg
– Plastic wrap and rust-proof pins
Abbreviations (US Terms)
- ch – chain
- sl st – slip stitch
- sc – single crochet
- dc – double crochet
- sp – space
- sk – skip
- st(s) – stitch(es)
Special stitches:
– V-st: (dc, ch 1, dc) in the same stitch.
– Shell: (2 dc, ch 2, 2 dc) in the same stitch or space.
– Fan: the stated number of dc worked into one space.
Note: At the start of a round, ch 3 counts as a dc. Ch 1 does not count as a stitch.
Gauge and Checkpoints
Gauge: 8 sc = 1 in (2.5 cm) in the round.
Make one test bell before starting a set. Lace stretches, so measure each stage flat and without pulling.
- After Round 2: the circle is 0.75 in (1.9 cm) across.
- After Round 4: the crown is 1.1 in (2.8 cm) wide flat and 0.75 in (1.9 cm) tall.
- After Round 8: the bell is 1.5 in (3.8 cm) tall and 2 in (5.1 cm) wide flat.
- After Round 10: the bell is 2.25 in (5.7 cm) tall and 2.6 in (6.6 cm) wide flat.
- After Round 12: the bell is 2.75 in (7.0 cm) tall and 3 in (7.6 cm) wide flat.
If your bell is too big: go down to a 2.0 mm hook, or tighten your chains. Loose chains are the most common cause.
If your bell is too small: go up to a 2.5 mm hook.
A difference of up to 0.1 in (0.3 cm) is fine. Starching will even it out.
Crown
Leave a 6 in (15.2 cm) tail.
Round 1: Make a magic ring. Ch 3 (counts as dc), then work 11 dc into the ring. Pull the ring tight and join with a sl st to the top of the ch-3. (12 dc)
Round 2: Ch 1. Sc in next st, 2 sc in next st 6 times. Join to the first sc. (18 sc)
Round 3: Ch 3 (counts as dc). Dc in each st around and join to the top of the ch-3. (18 dc)
This round has no increases, so the sides start to curve down into a dome.
Round 4: Ch 1. Sc in each st around and join to the first sc. (18 sc)
Checkpoint: the crown should be a firm, solid cap. It is 1.1 in (2.8 cm) wide flat and 0.75 in (1.9 cm) tall.
Lace Body
Every lace round has 6 repeats, and each repeat starts from 3 stitches of Round 4.
Round 5 (V-st round): Ch 1. Sc in next st, ch 2, V-st in next st, ch 2, sk next st 6 times. Join to the first sc.
(6 sc, 6 V-sts, 12 ch-2 sps; all 18 sts used)
Round 6 (shell round): Sl st in the next ch-2 sp, sl st in the next dc, and sl st in the V-st ch-1 sp. Ch 3, then work (dc, ch 2, 2 dc) in the same sp. This is your first shell.
Then work ch 3, sc in next sc, ch 3, shell in next V-st ch-1 sp 5 times. Finish with ch 3, sc in next sc, ch 3, and join to the top of the ch-3.
(6 shells = 24 dc, 6 sc, 12 ch-3 sps)
Round 7 (widening shells): Sl st in the next dc, then sl st in the shell ch-2 sp. Ch 3, then work (dc, ch 2, 2 dc) in the same sp.
Then work ch 4, sk ch-3 sp, sc in next sc, ch 4, sk ch-3 sp, shell in next shell ch-2 sp 5 times. Finish with ch 4, sc in next sc, ch 4, and join.
(6 shells = 24 dc, 6 sc, 12 ch-4 sps)
The longer chains are what make the bell flare.
Round 8 (fan round): Sl st in the next dc, then sl st in the shell ch-2 sp. Ch 3, then work 6 dc in the same sp. This is your first 7-dc fan.
Then work ch 3, sc in next ch-4 sp, ch 3, sc in next ch-4 sp, ch 3, 7 dc in next shell ch-2 sp 5 times. Finish with ch 3, sc in next ch-4 sp, ch 3, sc in next ch-4 sp, ch 3, and join.
(6 fans = 42 dc, 12 sc, 18 ch-3 sps)
In each section between fans, the middle ch-3 sp sits directly over a Round 7 sc. This is where the diamond starts.
Checkpoint: 1.5 in (3.8 cm) tall and 2 in (5.1 cm) wide flat.
Round 9 (mesh round): Sl st in each of the next 3 dc to reach the 4th (center) dc of the fan. Ch 1 and sc in the same st.
Then work ch 5, sc in the middle ch-3 sp, ch 5, sc in the center dc of the next fan 6 times. On the last repeat, skip the final sc and join to the first sc instead.
(12 sc, 12 ch-5 loops)
These loops finish the open diamonds that sit between the fans.
Round 10 (offset shells): Ch 1 and sc in the first sc. Ch 4, shell in next sc, ch 4, sc in next sc 6 times. On the last repeat, skip the final sc and join to the first sc instead.
(6 shells = 24 dc, 6 sc, 12 ch-4 sps)
The shells sit over the diamond centers, offset from the Round 8 fans. This gives the staggered lace look.
Checkpoint: 2.25 in (5.7 cm) tall and 2.6 in (6.6 cm) wide flat.
Border
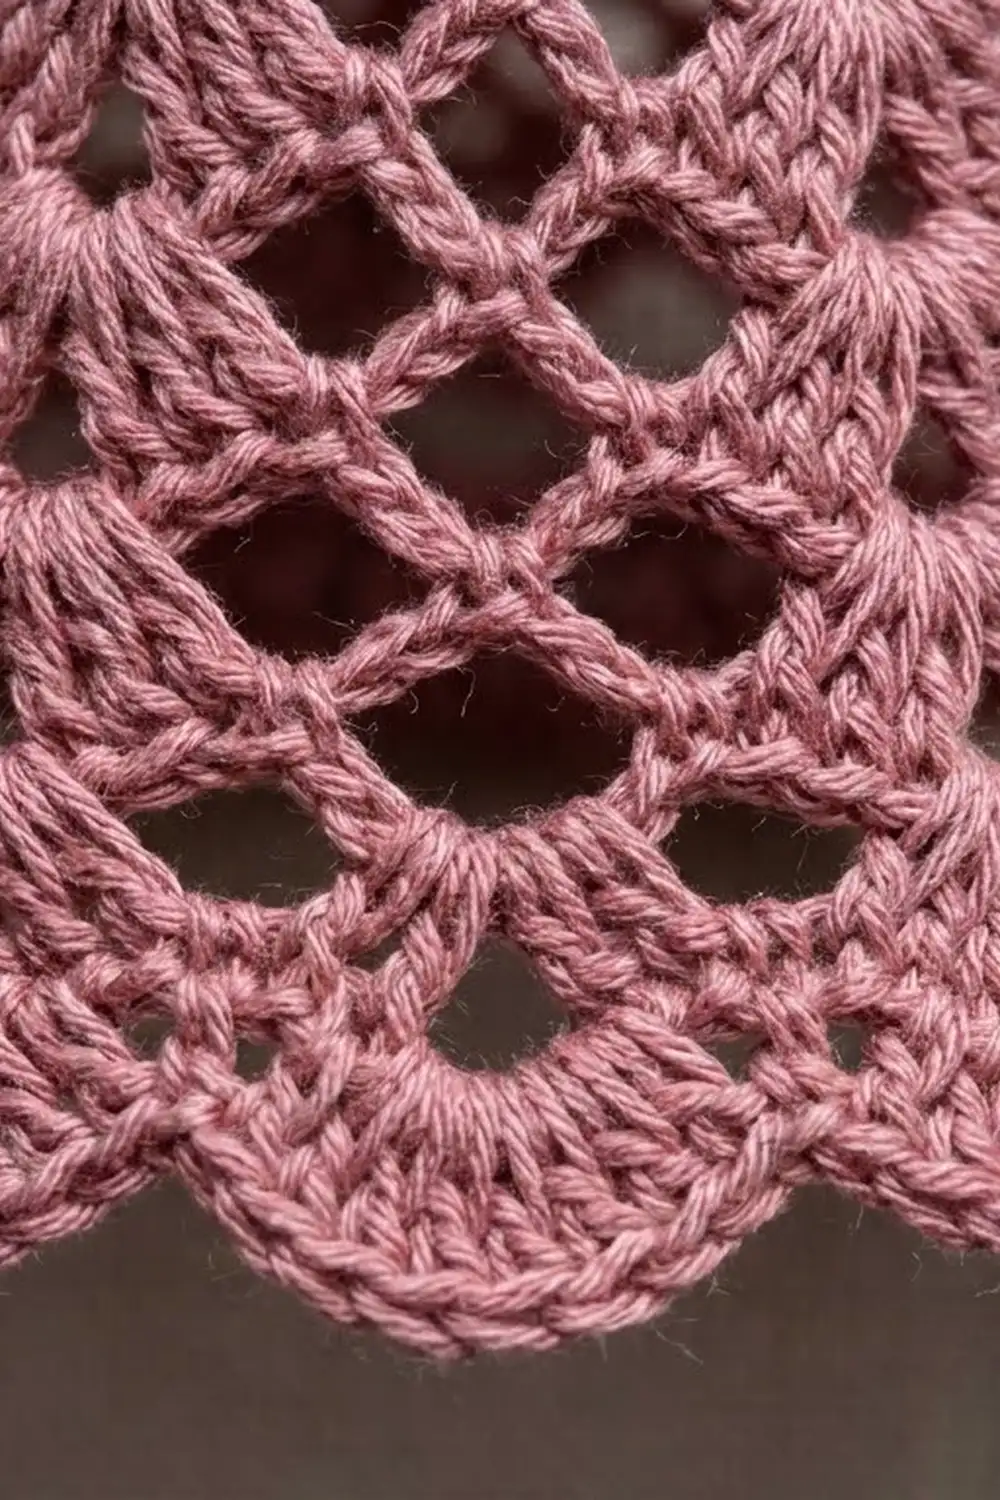
Border gauge: One finished scallop is about 1 in (2.5 cm) wide along the hem and 0.5 in (1.3 cm) deep. There are six scallops around the bell, so three show on each side when it hangs flat.
Round 11 (fan scallops): Ch 1 and sc in the first sc. Ch 3, 9 dc in next shell ch-2 sp, ch 3, sc in next sc 6 times. On the last repeat, skip the final sc and join to the first sc instead.
(6 fans = 54 dc, 6 sc, 12 ch-3 sps)
Per scallop: 1 sc, 2 ch-3 sps, and 9 dc.
Round 12 (edging trim): Do not ch 1. Sl st in next sc, 3 sc in next ch-3 sp, sc in each of the next 4 dc, 3 sc in the next (5th) dc, sc in each of the next 4 dc, 3 sc in next ch-3 sp 6 times. Join to the first sl st and fasten off.
Per scallop: 1 sl st + 3 + 4 + 3 + 4 + 3 = 18 sts.
Why the math works: Round 12 is a trim round. Here is how the stitches break down:
- Worked 1-per-existing-stitch: 6 sl sts + 48 dc = 54 sts.
- Worked into spaces: 12 ch-3 sps × 3 sc = 36 sts.
- Tip of each scallop: the center dc gets 3 sc. One of those counts as its 1-per-stitch sc, and the other 2 are extra. That gives 6 center sc in the 1-per-stitch group (6 sl sts + 48 dc + 6 center dc = 60) and 6 × 2 = 12 extra.
Total: 60 + 36 + 12 = 108 sts (18 per scallop × 6).
The extra stitches at each tip round out the curve. The sl st at each valley pulls the dip in sharply, so each scallop sits as a separate petal.
Hanging loop: Join a new strand at the center top of the crown, between the Round 1 stitches. Ch 20, then sl st into the same place. Fasten off and secure the ends inside the crown. Folded, the loop measures about 1.5 in (3.8 cm).
Weave in all tails on the inside of the bell. Pull the starting tail to close the magic ring completely.
Final Blocking
- Cover your drying form with plastic wrap.
- Dip the bell in fabric stiffener. Gently squeeze out the excess and blot it with a towel.
- Slide the bell over the form so the crown sits snugly on top.
- Ease the lace evenly around the form and open each diamond with a fingertip.
- Pull each scallop down and out so the hem flares evenly. Pin the scallop tips if they curl.
- Keep the hanging loop out of the stiffener, or straighten it upward.
- Let the bell dry completely, for 12 to 24 hours.
- Remove the bell and check it: 2.75 in (7.0 cm) tall and 3 in (7.6 cm) wide flat.
Final Quality-Control Checklist
- The crown is solid, with no gaps at the magic ring.
- There are 6 even repeats all the way around.
- Shells, fans, and diamonds line up in neat columns.
- There are 6 scallops, each with 18 edging stitches.
- The valleys dip sharply and the tips are rounded.
- The bell stands upright without collapsing.
- The hanging loop is centered and secure.
- No tails show on the outside.
Troubleshooting
The crown is flat instead of domed. Check that Round 3 has no increases. Crocheting more tightly in Rounds 3 and 4 also helps.
The skirt ruffles. Your chains are too loose. Make the ch-4 and ch-5 loops more firmly, or go down a hook size.
The skirt flares too little. Your chains are too tight. Loosen them slightly.
The repeats don’t line up. Count your Round 5 repeats again. The bell must have exactly 6.
The scallops look flat. Make sure the center dc of each fan gets 3 sc and the valleys are sl sts.
The bell sags on the tree. Dip it in stiffener again and dry it on the form.
Care
Spot clean only. If needed, wash gently by hand, then starch the bell again and reshape it on its form.
Final Notes
Here is the full measurement chain:
- The 12-dc ring grows to a firm 18-stitch crown, 1.1 in (2.8 cm) wide flat.
- Six lace repeats open the body to 2 in (5.1 cm) by Round 8 and 2.6 in (6.6 cm) by Round 10.
- The fan border adds 0.5 in (1.3 cm), finishing at 108 stitches.
- The final bell is 2.75 in (7.0 cm) tall and 3 in (7.6 cm) wide.
Check your stitch counts and measurements at each checkpoint, and every bell will match.
Happy crocheting!