

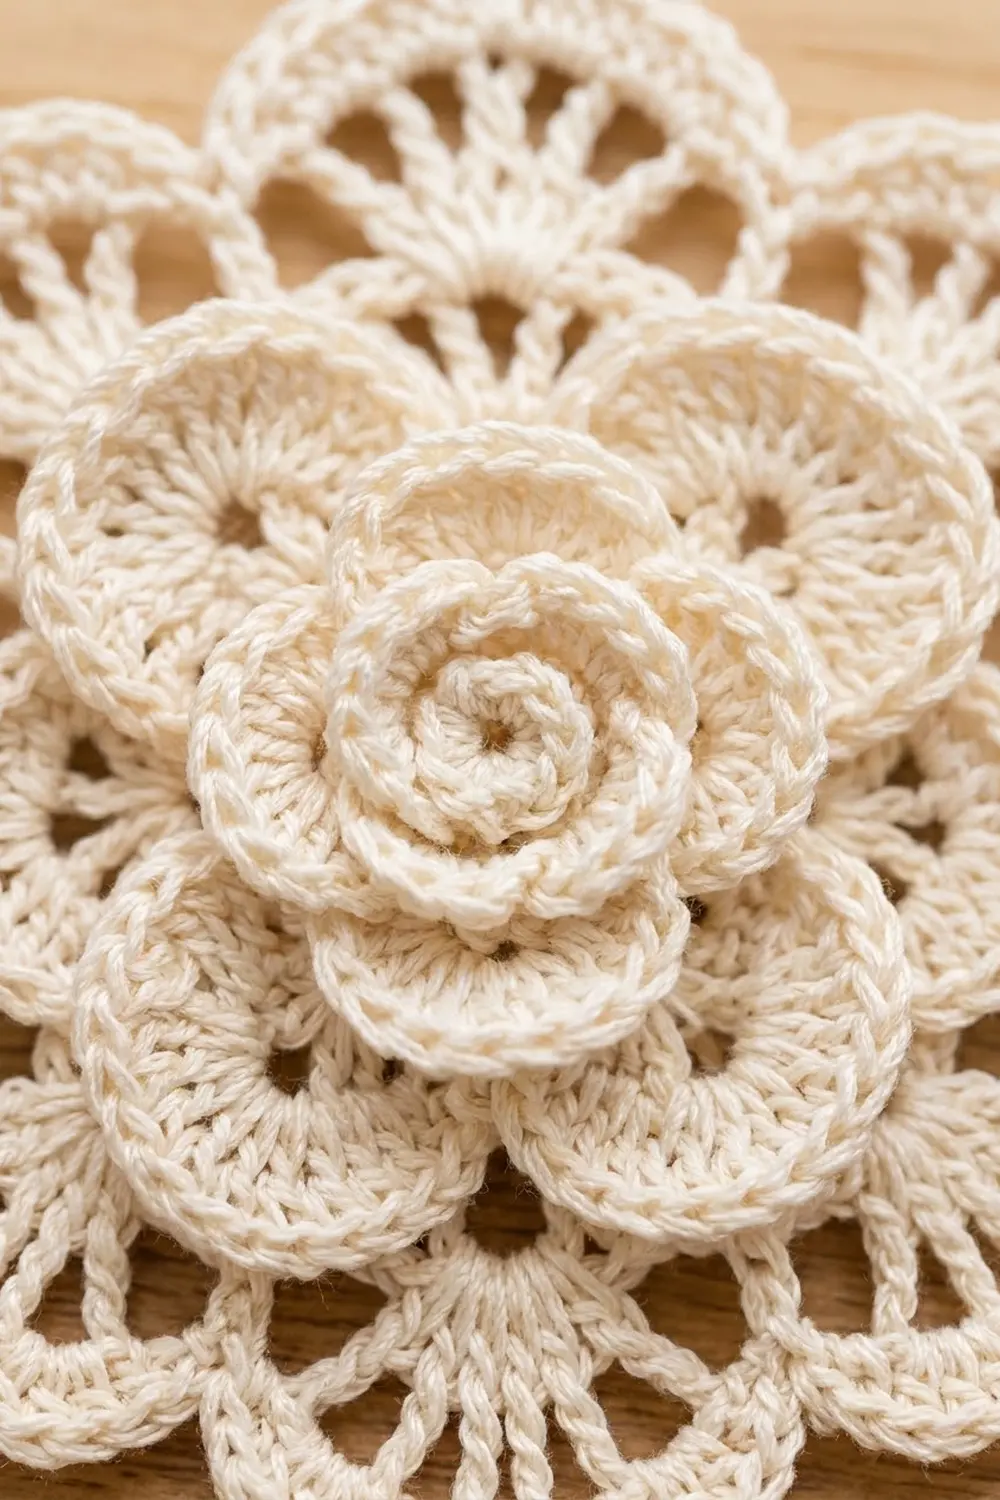
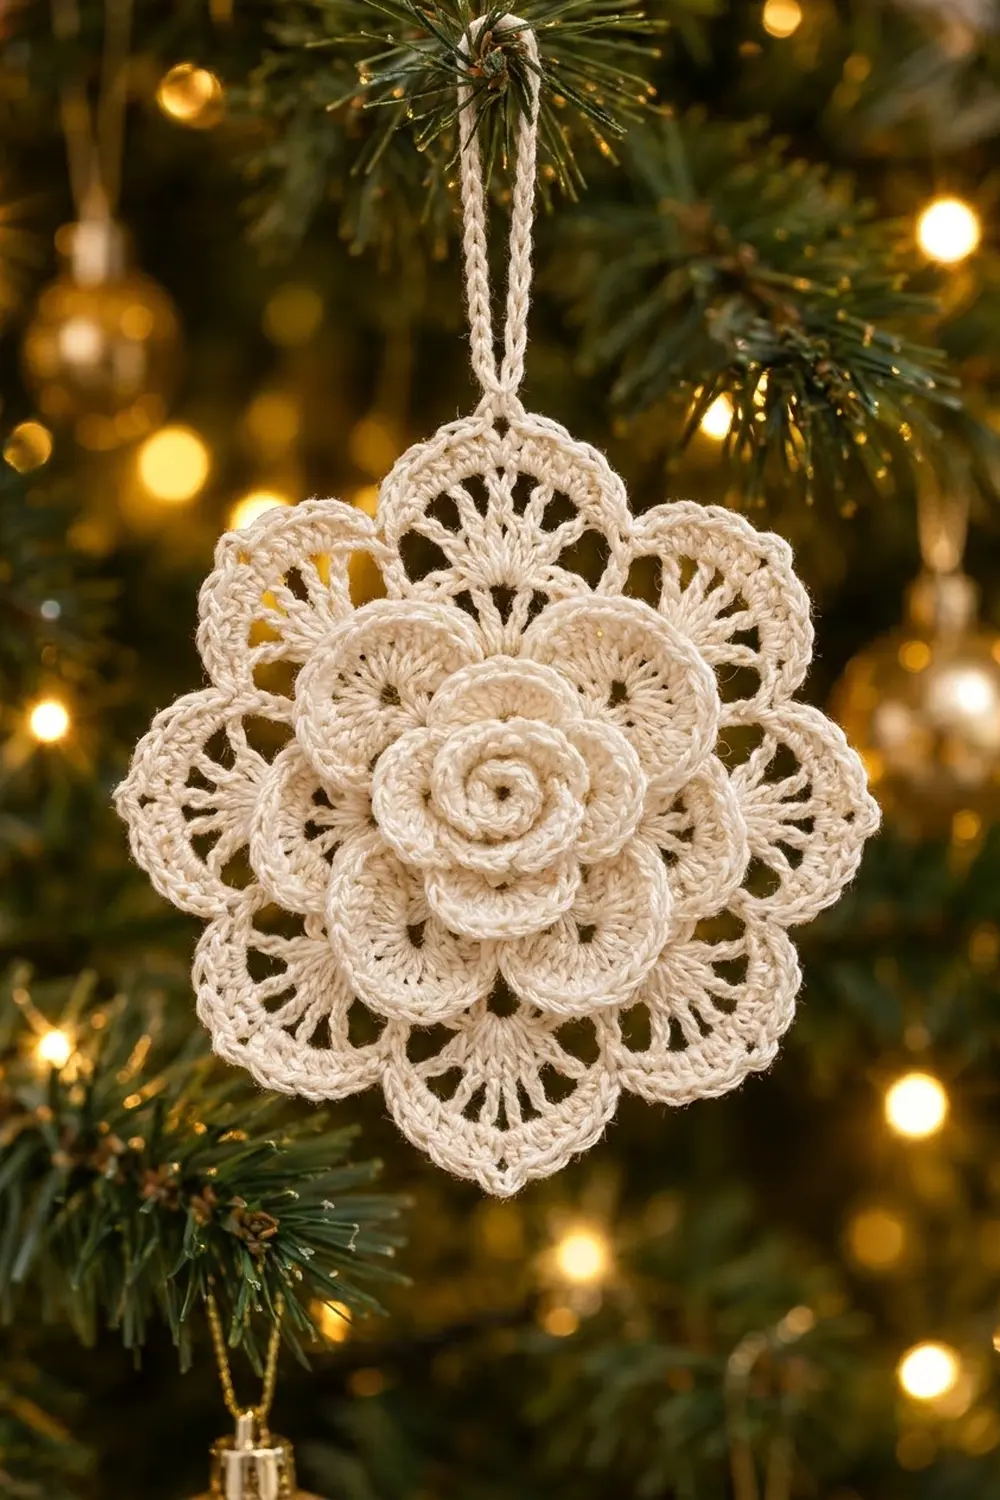
The Winter Rose Lace Ornament is a single round lace motif with a layered rose in the middle. A small, tightly cupped rosette sits in the center, surrounded by a ring of eight larger rounded petals. Behind them, eight open lace scallops with fan-shaped spokes give the piece a soft flower outline. A slim chain loop at the top lets it hang from a branch.
The sample uses one color, a warm cream/ivory cotton thread. With only one shade, the eye goes to the texture: the raised petals cast small shadows on the open lace. The look is vintage and heirloom-style. It works on a natural gold-and-green tree, as a gift tag, or as a window hanging.
This pattern uses US crochet terms. The finished ornament measures about 4 in (10.2 cm) from one scallop tip to the opposite tip, not counting the hanging loop. The loop adds about 1.5 in (3.8 cm) above the top edge.
You work in continuous rounds from the center out. After each petal layer, you work a round of chain loops behind it, anchored around the posts of earlier stitches, so the next layer sits behind the one before. The last rounds build the lace scallops and their edge, which acts as the border. You add the hanging loop at the end.
Finished Size and Construction
- Finished size: 4 in (10.2 cm) diameter, scallop tip to scallop tip
- Skill level: Intermediate
- Terminology: US crochet terms
- Yarn weight: Size 10 cotton crochet thread (lace weight, category 0)
- Hook: 1.75 mm (US steel 6)
- Number of pieces: 1 (single motif, worked in one piece)
- Layout: 1 round motif, 8-fold symmetry
- Piece size: 4 in (10.2 cm) across
- Size before border (after Round 10): 3.5 in (8.9 cm) across
- Border depth (Round 11): 0.25 in (0.6 cm) on each side
- Hanging loop: 1.5 in (3.8 cm) long
Materials
Choose a mercerized cotton thread in size 10. Mercerized thread has a slight sheen, holds starch well, and gives crisp, defined petals like the sample’s. Avoid fuzzy or very soft blends, because the lace spokes lose their definition.
- Cream/ivory: 8 g, about 26 m (28 yd)
One ornament uses about 5 g. The amount above includes extra for a test swatch, the hanging loop, and weaving in ends. A standard ball of size 10 thread is enough for many ornaments.
Tools:
- 1.75 mm (US steel 6) crochet hook
- Fine tapestry needle with a small eye
- Small sharp scissors
- Rustproof pins
- Blocking board or foam mat
- Spray starch or fabric stiffener (optional but recommended)
- Ruler or tape measure
Abbreviations (US Terms)
- ch – chain
- sl st – slip stitch
- sc – single crochet
- hdc – half double crochet
- dc – double crochet
- tr – treble crochet
- sp(s) – space(s)
- st(s) – stitch(es)
- MR – magic ring
- rep – repeat
- RS / WS – right side / wrong side
Special stitches:
- Back post single crochet (bpsc): Working from the back of the piece, insert the hook from back to front to back around the post of the stitch named. Yarn over and pull up a loop, then yarn over and pull through both loops. This stitch anchors the chain loops behind the petals.
- Fan: Work [dc, ch 1] 4 times, then 1 more dc, all in the same space. One fan = 5 dc and 4 ch-1 sps.
Gauge and Checkpoints
Exact gauge doesn’t matter much for an ornament, but it does set the final size and how flat the lace lies. Work Rounds 1–3 first as a test. If they match the checkpoint, keep going on the same piece.
Checkpoints (measured flat, before blocking):
- After Round 3 (first petal layer): 1.25 in (3.2 cm) across
- After Round 5 (second petal layer): 1.75 in (4.4 cm) across
- After Round 7 (large petals): 2.5 in (6.4 cm) across
- After Round 9 (first lace round): 3 in (7.6 cm) across
- After Round 10 (before border): 3.5 in (8.9 cm) across
- After Round 11 (border): 4 in (10.2 cm) across
If your piece is too big: Change to a 1.5 mm hook, or make your chains tighter. Loose chain loops are the most common reason a piece comes out too big.
If your piece is too small: Change to a 2 mm hook. Small pieces often cup, and the petals crowd each other.
Being off by 0.125 in (0.3 cm) is fine; blocking will even it out.
Pattern
Don’t turn at the end of rounds. Keep the RS facing you the whole time. The beginning ch 1 does not count as a stitch.
Rosette Center
Round 1: Make an MR. Ch 1, work 16 sc into the ring, sl st to the first sc. Pull the ring tightly closed. (16 sc)
Round 2: Ch 1, sc in the same st, ch 3, skip next st, sc in next st, ch 3, skip next st; rep from * 6 more times, sl st to the first sc. (8 sc, 8 ch-3 sps)*
Round 3 (petal layer 1): In each ch-3 sp, work (sc, hdc, 3 dc, hdc, sc). Sl st to the first sc. (8 petals, 7 sts each = 56 sts)
Checkpoint: 1.25 in (3.2 cm) across. The petals will cup slightly, which is correct.
Round 4 (loops behind): Fold the Round 3 petals toward you. Ch 1, bpsc around the post of the first sc of Round 2, ch 5, bpsc around the next sc of Round 2, ch 5; rep from * 6 more times, sl st to the first bpsc. (8 bpsc, 8 ch-5 loops)*
Each bpsc sits between two petals, so the loops lie right behind the petals.
Round 5 (petal layer 2): In each ch-5 loop, work (sc, hdc, 5 dc, hdc, sc). Sl st to the first sc. (8 petals, 9 sts each = 72 sts)
Checkpoint: 1.75 in (4.4 cm) across. Rounds 3 and 5 together make the cupped rosette.
Large Petal Ring
Round 6 (loops behind): Fold the Round 5 petals forward. Ch 1, bpsc around the first bpsc of Round 4, ch 7, bpsc around the next bpsc of Round 4, ch 7; rep from * 6 more times, sl st to the first bpsc. (8 bpsc, 8 ch-7 loops)*
Round 7 (large petals): In each ch-7 loop, work (sc, hdc, 2 dc, 3 tr, 2 dc, hdc, sc). Sl st to the first sc. (8 petals, 11 sts each = 88 sts)
The middle tr of each petal (the 6th of its 11 sts) is the petal center. You will anchor the next round there.
Checkpoint: 2.5 in (6.4 cm) across. The large petals should lie fairly flat, with the rosette raised in front of them.
Lace Scallops
Round 8 (lace foundation): Sl st in each of the next 5 sts, so your hook is at the middle tr of the first large petal. Ch 1. Reach behind the petal and work 1 sc into the back bar of that tr. Ch 9, sc into the back bar of the middle tr of the next petal, ch 9; rep from * 6 more times, sl st to the first sc. (8 sc, 8 ch-9 loops)*
The ch-9 loops reach across the gaps between the large petals. This puts each lace scallop between two petals, as in the sample.
Round 9: Ch 1, sc in the same sc, ch 3, fan in next ch-9 loop, ch 3, sc in next sc; rep from * 7 more times, leaving out the final sc, sl st to the first sc. (8 sc, 8 fans = 40 dc and 32 ch-1 sps, 16 ch-3 sps)*
Checkpoint: 3 in (7.6 cm) across.
Round 10: Ch 1, sc in the same sc, ch 3, dc in first dc of fan, [ch 2, dc in next dc] 4 times, ch 3, sc in next sc; rep from * 7 more times, leaving out the final sc, sl st to the first sc. (8 sc, 40 dc, 32 ch-2 sps, 16 ch-3 sps)*
The ch-2 sps spread the fans out into the spokes you see inside each scallop. The sc between fans becomes the valley point between scallops.
Checkpoint: 3.5 in (8.9 cm) across. This is your size before the border.
Border
The border is the scalloped edge: one round that wraps each fan in a dense, bumpy rim.
Border gauge: Round 11 adds 0.25 in (0.6 cm) on each side, so the diameter grows from 3.5 in (8.9 cm) to 4 in (10.2 cm).
Round 11: Ch 1, sc in the valley sc, 2 sc in next ch-3 sp, sc in first dc of fan, [3 dc in next ch-2 sp, sc in next dc] 4 times, 2 sc in next ch-3 sp; rep from * 7 more times, sl st to the first sc. Fasten off. (8 scallops, 22 sts each = 176 sts)*
Per-scallop count: 1 valley sc + 2 sc + 1 sc + (3 dc + 1 sc) x 4 + 2 sc = 1 + 2 + 1 + 16 + 2 = 22 sts. Times 8 scallops = 176 sts.
Why the math works: Round 11 is a conversion round that covers every stitch and space of Round 10. Each of the 48 stitches of Round 10 (8 sc + 40 dc) gets exactly 1 sc, for 48 sts. The spaces add the extra stitches: 32 ch-2 sps x 3 dc = 96, and 16 ch-3 sps x 2 sc = 32. So 48 + 96 + 32 = 176 sts. Three dc in each ch-2 sp give just enough fullness to curve around the fan without ruffling. The single sc in each valley keeps the points sharp between scallops.
Hanging Loop
Rejoin the thread with a sl st in the 3rd sc that was worked on a dc in any scallop (the top center of that scallop). Ch 30, sl st in the same st. Don’t turn. Work 36 sc into the ch-30 loop, then sl st to the base. Fasten off.
Covering the chain with sc makes a firm cord about 1.5 in (3.8 cm) long that holds its shape. Weave in all ends behind the petal layers, where they stay hidden.
Final Blocking
- Weave in all ends securely before blocking, then trim them close.
- Soak the ornament in cool water for a few minutes. Gently squeeze out the water; don’t wring it.
- Lay it RS up on a blocking mat. Put a paper template of a 4 in (10.2 cm) circle under plastic wrap, or use the grid on your mat.
- Pin the valley sc of each scallop first: 8 pins spaced evenly around the circle, 45 degrees apart.
- Pin the center of each scallop to the 4 in (10.2 cm) line. Open each fan so the spokes spread out evenly.
- Don’t pin the petals flat. Shape them with your fingers so the large petals curve gently forward and the rosette stands up.
- Spray with starch or brush on diluted fabric stiffener, focusing on the lace. Pinch the rosette petals into shape.
- Let it dry completely, at least 12 hours, before you remove the pins. Pin the hanging loop straight while it dries.
Final Quality-Control Checklist
- Diameter is 4 in (10.2 cm), within 0.125 in (0.3 cm)
- 8 rosette petals in Round 3 and 8 in Round 5
- 8 large petals, each with 3 tr at the center
- 8 lace scallops, each centered between two large petals
- Each scallop has 5 visible spokes and 4 three-dc bumps on its rim
- Valley points are sharp and evenly spaced
- Total border count is 176 sts
- Hanging loop is centered on top of a scallop and feels firm
- No ends visible from the front
- The lace lies flat and the petals stand up
Troubleshooting
Petals look flat or crowded: The loops behind them are too short or too tight. Work the ch-5 and ch-7 loops at a relaxed tension so each petal has room.
Lace ruffles: Your chains are too long or your hook is too big. Go down one hook size for Rounds 8–11.
Lace cups or pulls in at the center: Your chains are too tight. Loosen up, especially on the ch-9 loops in Round 8.
Scallops are not centered between petals: Check Round 8. Each sc must sit at the middle tr of a large petal.
Wrong border count: Count one scallop at a time. Each one should have exactly 22 sts.
Hanging loop twists: Block it straight with a pin at each end, and starch it.
Magic ring loosens: Weave the starting tail around through Round 1 and pull it snug before weaving it in.
Care
Hand wash in cool water with mild soap, then reshape and dry flat. Re-starch if the petals go soft, and store flat in a box with tissue paper between layers.
Final Notes
Here is the full measurement chain. Rounds 1–3 reach 1.25 in (3.2 cm), Round 5 reaches 1.75 in (4.4 cm), and Round 7 brings the large petals to 2.5 in (6.4 cm). The lace grows to 3 in (7.6 cm) at Round 9 and 3.5 in (8.9 cm) at Round 10. The border adds 0.25 in (0.6 cm) per side, for a finished 4 in (10.2 cm) ornament plus a 1.5 in (3.8 cm) hanging loop.
Check each stage as you go, and the finished piece will come together without surprises. Make one for your tree, a few to give as gifts, or one to tie onto a special package.
Happy crocheting!