

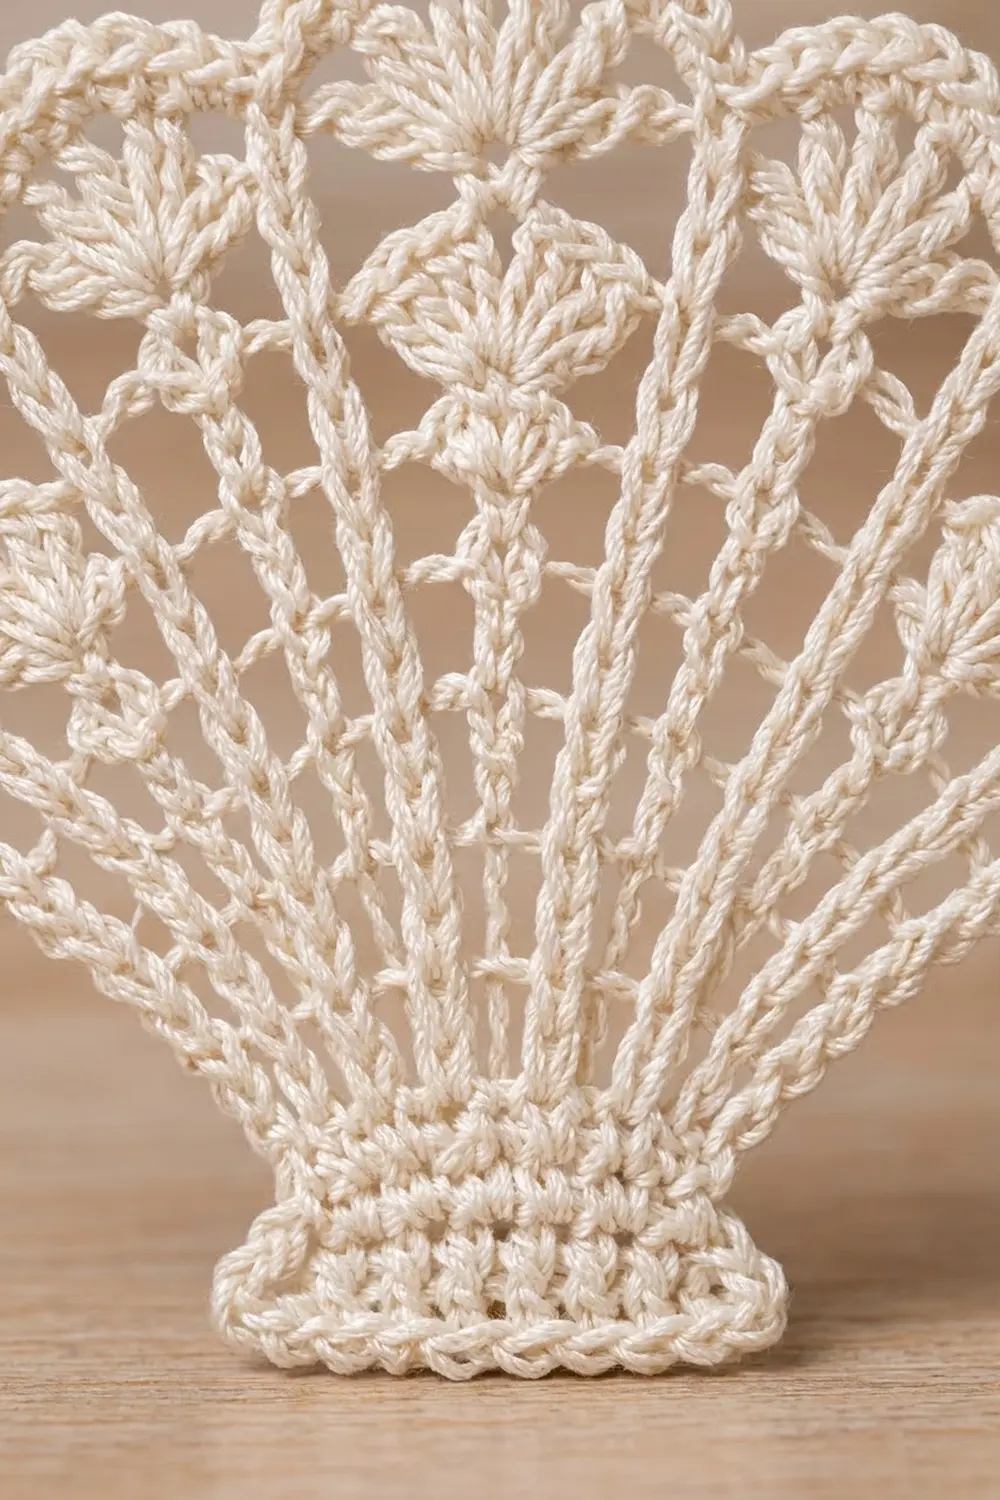
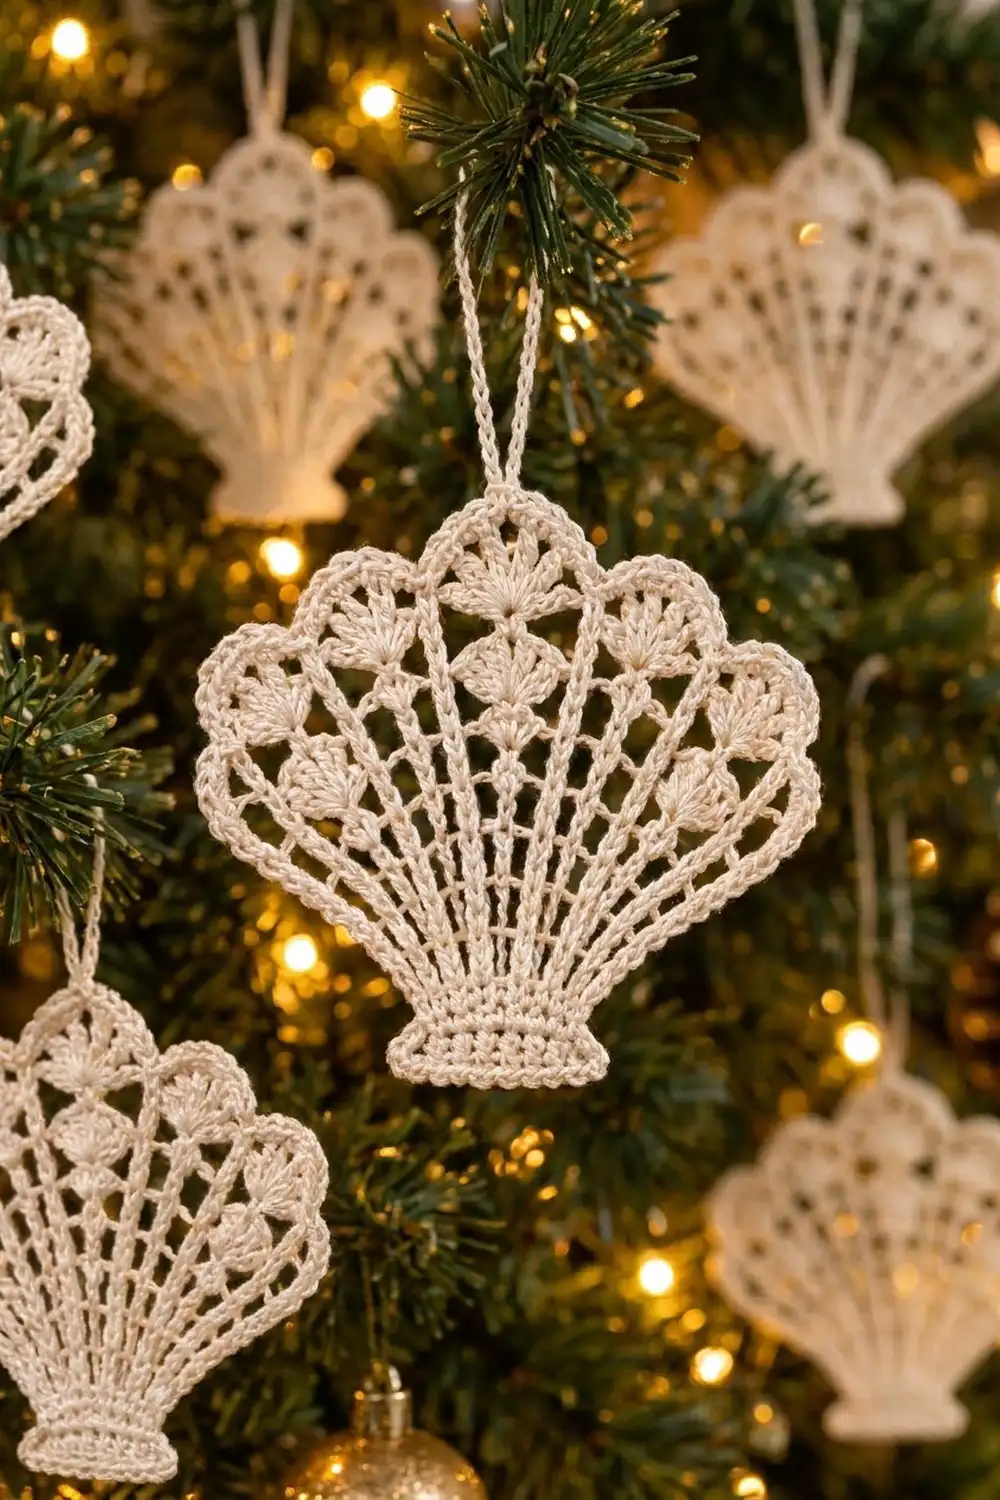
This lace scallop shell ornament is made in fine ivory cotton thread. Twelve slim ribs fan out from a small solid foot, and tiny five-stitch fans sit between them in staggered rows, like the ridges of a real seashell. Five rounded scallops form the top edge, and a chain loop at the top center lets it hang from a tree branch.
The design uses one color, a warm ivory or cream. That keeps it calm and classic, so it looks just as good with gold baubles and fairy lights as it does in a coastal-themed room. Stiffened and blocked flat, the open lacework catches the light very nicely.
The pattern uses US crochet terms. The finished ornament measures 4 in (10.2 cm) wide and 3.5 in (8.9 cm) tall, not counting the hanging loop. The loop adds about 1.25 in (3.2 cm).
You work it as one flat piece in rows, from the bottom up. First comes a three-row solid foot. Then six rows of treble ribs with chain spaces that get wider each row, which is what makes the fan open out. Two of those rows add the little fans. An arc row and a scallop row shape the top. Finally, one round of single crochet edges the whole piece and makes the hanging loop as you go.
Finished Size and Construction
- Finished size: 4 in (10.2 cm) wide x 3.5 in (8.9 cm) tall, plus a 1.25 in (3.2 cm) loop
- Skill level: Intermediate (thread work, chain-space counting)
- Terminology: US crochet terms
- Yarn weight: Size 10 crochet cotton thread (Lace, weight 0)
- Hook: 1.5 mm (US steel size 8)
- Number of pieces: 1 (a single flat piece, no joining)
- Layout: Fan shape, with the foot at the bottom and scallops at the top
- Piece size before border: 3.75 in (9.5 cm) wide x 3.25 in (8.3 cm) tall
- Border depth: 1/8 in (0.3 cm) on each edge, one round of sc
Materials
Use a mercerized cotton thread in size 10. Mercerized cotton has a slight sheen, keeps the stitches crisp, and holds starch well. Avoid fuzzy or blended threads, because the open ribs need clean, well-defined stitches.
- Ivory / cream, size 10 cotton thread: 5 g, about 30 m (33 yd) per ornament
That amount includes a safety margin of roughly 20 percent for tails and any frogging. One standard ball of size 10 thread makes a whole set of ornaments.
Tools:
- 1.5 mm (US steel size 8) crochet hook
- Fine tapestry needle for thread
- Small sharp scissors
- Fabric stiffener, or a mix of equal parts white glue and water, or spray starch
- Blocking board or foam, plastic wrap, and rustproof pins
- Ruler or tape measure
Abbreviations (US Terms)
- ch – chain
- sl st – slip stitch
- sc – single crochet
- dc – double crochet
- tr – treble crochet
- sk – skip
- sp(s) – space(s)
- st(s) – stitch(es)
- RS – right side
Special stitch:
- Fan: Work 5 dc in the same chain space. This gives a small fan that opens upward, like a tiny shell.
Note: At the start of the treble rows, ch 4 counts as the first tr. At the start of Row 2, ch 3 counts as the first dc. At the start of sc rows, ch 1 does not count as a stitch.
Gauge and Checkpoints
Gauge: 10 sc = 1 in (2.5 cm) in size 10 thread on a 1.5 mm hook. One tr row is about 0.35 in (0.9 cm) tall.
Since this is a single small piece, the ornament itself is your gauge test. Work Rows 1 to 3 and measure before going on.
Checkpoints:
- After Row 3 (foot): 2.3 in (5.8 cm) wide, 0.4 in (1.0 cm) tall
- After Row 7: top edge about 3 in (7.6 cm) across, height about 1.8 in (4.6 cm)
- After Row 9: top edge about 3.4 in (8.6 cm) across, height about 2.6 in (6.6 cm)
- After Row 11: 3.75 in (9.5 cm) wide, 3.25 in (8.3 cm) tall at the center scallop
- After the border: 4 in (10.2 cm) wide, 3.5 in (8.9 cm) tall
The foot is the most reliable measurement. If it is wider than 2.4 in (6.1 cm), your stitches are too large, so switch to a 1.25 mm hook. If it is narrower than 2.2 in (5.6 cm), switch to a 1.75 mm hook. Small differences are fine for an ornament, but large ones will change how the ribs fan out and how the scallops sit.
Pattern
Foot
Foundation: Ch 24.
Row 1 (RS): Sc in 2nd ch from hook and in each ch across, turn. (23 sc)
Row 2: Ch 3 (counts as dc), dc in each st across, turn. (23 dc)
The upright dc posts make the vertical ribbed look on the foot.
Row 3: Ch 1, sc in each st across, turn. (23 sc)
Check the foot measurement now.
Ribs
From here on, each tr is one rib. You will always have 12 ribs and 11 spaces between them. The chain spaces get one chain longer each row, which spreads the ribs into a fan. In every tr row, work the last tr in the top of the turning chain.
Row 4: Ch 4 (counts as tr), ch 1, sk next st, tr in next st; repeat from * 10 more times, turn. (12 tr, 11 ch-1 sps)*
Check: the first st plus 11 pairs of (skip 1, tr 1) uses 1 + 22 = 23 sts.
Row 5: Ch 4 (counts as tr), ch 2, tr in next tr; repeat from * 10 more times, turn. (12 tr, 11 ch-2 sps)*
Row 6: Ch 4 (counts as tr), ch 3, tr in next tr; repeat from * 10 more times, turn. (12 tr, 11 ch-3 sps)*
Row 7: Ch 4 (counts as tr), ch 4, tr in next tr; repeat from * 10 more times, turn. (12 tr, 11 ch-4 sps)*
Number the 11 spaces from 1 to 11 across. Space 6 is the center.
Fan Rows
Row 8: Ch 4 (counts as tr), *Fan in next ch-4 sp, tr in next tr, ch 5, tr in next tr; repeat from * 4 more times, Fan in last ch-4 sp, tr in top of turning ch, turn.
Row 8 count: 12 tr, 6 Fans (30 dc), 5 ch-5 sps. The Fans sit in spaces 1, 3, 5, 7, 9, and 11, and the ch-5 sps sit over spaces 2, 4, 6, 8, and 10. That is 6 + 5 = 11 spaces, so the pattern is symmetrical around the center.
Row 9: Ch 4 (counts as tr), *ch 6, sk Fan, tr in next tr, Fan in next ch-5 sp, tr in next tr; repeat from * 4 more times, ch 6, sk last Fan, tr in top of turning ch, turn.
Row 9 count: 12 tr, 5 Fans (25 dc), 6 ch-6 sps. Now the Fans sit in spaces 2, 4, 6, 8, and 10, so they are staggered with the Row 8 Fans. The center column (space 6) ends with a Fan just under the top.
Top Shaping
Row 10: Ch 1, sc in first tr, ch 4, sc in next tr; repeat from * 10 more times, turn. (12 sc, 11 ch-4 arcs)*
Each rib now ends in one sc, and an arc of chain sits over each space. Label the sc as rib-tops 1 to 12.
Row 11 (scallops, RS): Ch 1, sc in rib-top 1.
- Scallop 1: 6 dc in each of next 2 arcs (skip the sc between them), sc in rib-top 3. (12 dc)
- Scallop 2: 6 dc in each of next 2 arcs, sc in rib-top 5. (12 dc)
- Scallop 3 (center): 6 dc in each of next 3 arcs, sc in rib-top 8. (18 dc)
- Scallop 4: 6 dc in each of next 2 arcs, sc in rib-top 10. (12 dc)
- Scallop 5: 6 dc in each of next 2 arcs, sc in rib-top 12. (12 dc)
Row 11 count: 6 sc + 66 dc = 72 sts. Do not turn and do not fasten off.
The sc at rib-tops 3, 5, 8, and 10 form the 4 dips between the scallops. The center scallop covers arcs 5, 6, and 7, so it sits exactly over the middle. The middle of the row falls between sts 36 and 37, which are the 9th and 10th dc of the center scallop.
Border
Border gauge: Use the same 10 sc per 1 in (2.5 cm). Along the row ends, work 1 sc per sc row end, 2 sc per dc row end, and 3 sc per tr row end. These amounts match how tall each stitch is at this gauge.
Border Round (RS): Keep the RS facing. Your hook is at the last st of Row 11 (st 72). Ch 1 and turn the piece to work down the side.
- First side: Work down the row ends of Rows 10 to 1: 1 sc in Row 10, 3 sc in each of Rows 9 to 4 (18 sc), 1 sc in Row 3, 2 sc in Row 2, 1 sc in Row 1. (23 sc)
- Bottom edge: 3 sc in first foundation ch, sc in each of next 21 ch, 3 sc in last ch. (27 sc)
- Second side: Work up the row ends of Rows 1 to 10 with the same counts, in reverse order. (23 sc)
- Top edge: 3 sc in st 1 of Row 11, sc in each of next 35 sts (sts 2 to 36), ch 36, sl st in last sc made to form the hanging loop, sc in each of next 35 sts (sts 37 to 71), 3 sc in st 72. (76 sc)
Join with a sl st to the first sc. Fasten off.
Round total: 23 + 27 + 23 + 76 = 149 sc, plus the ch-36 loop, which is not counted.
Why the math works: The top has 72 sts and you work one sc into each, then 2 extra sc at each of the 2 corners: 72 + 4 = 76. The bottom has 23 foundation chains, plus 2 extra at each corner: 23 + 4 = 27. Each side has 1 + 18 + 1 + 2 + 1 = 23 sc, and no corner stitches are counted there, because the corners already belong to the top and bottom counts. The 3 sc at the bottom corners round the ends of the foot. The loop sits right after st 36, at the exact center of the 72 top sts, so the ornament hangs straight. The 23 side sc are a little firm on purpose. That keeps the outer ribs from rippling.
Final Blocking
- Weave in all ends along the solid parts (the foot or the scallop dc), never through the open ribs, where they would show.
- Soak the ornament in fabric stiffener, or in equal parts white glue and water. Gently press out the extra liquid in a towel.
- Cover your blocking board with plastic wrap and lay the shell RS up.
- Pin the foot first. It should be straight, 2.3 in (5.8 cm) wide plus the border.
- Pin each of the 12 ribs so they fan out evenly from the foot. Keep the outer ribs curved outward.
- Pin the top of each scallop, then pin into each of the 4 dips so they look sharp.
- Open each Fan with the tip of a pin so the dc spread out.
- Measure: 4 in (10.2 cm) wide and 3.5 in (8.9 cm) tall. Adjust the pins until it matches.
- Pin the loop straight up and let everything dry completely, usually 12 to 24 hours.
Final Quality-Control Checklist
- Foot rows: 23 sts each
- Rows 4 to 9: 12 tr in every row
- Row 8 has 6 Fans and Row 9 has 5 Fans, staggered
- Row 11: 72 sts in 5 scallops (12, 12, 18, 12, 12 dc)
- Border: 149 sc, with the loop at the exact top center
- Blocked size 4 in (10.2 cm) x 3.5 in (8.9 cm)
- Ends hidden and trimmed, ornament stiff and flat
Troubleshooting
The ribs lean to one side. You probably missed the turning chain at the end of a row. Count to 12 tr every row.
The fan stays narrow and cupped. Your chains are too tight. Chain a little more loosely, or make the chains with a hook one size up and work the tr with the main hook.
The edges ripple. Your chains are too loose, or you worked more than 3 sc per tr row end in the border. Go back to the stated counts.
The Fans curl forward. That is normal before blocking. Stiffening and pinning will flatten them.
The scallops are uneven. Check that you worked exactly 6 dc in each arc and skipped the sc between arcs within each scallop.
The ornament hangs crooked. The loop is off center. It must start after the 36th top st.
Care
Dust the ornament with a soft, dry brush. If it goes limp, mist it lightly with spray starch, reshape it, and pin it until dry. Store it flat in tissue paper.
Final Notes
The measurement chain is simple. The foot sets the width at 2.3 in (5.8 cm). The ribs and Fans open the shell to about 3.4 in (8.6 cm). The scallops bring it to 3.75 in (9.5 cm) x 3.25 in (8.3 cm). The border adds 1/8 in (0.3 cm) on each edge, for a finished size of 4 in (10.2 cm) x 3.5 in (8.9 cm). If you check each stage, the finished shell will come out right. Make one, then make a whole set for the tree.
Happy crocheting!